# Ammo Box 6384 Winch Build
**URL:** https://foil.zone/t/ammo-box-6384-winch-build/20002
**Category:** Builds
**Created:** [January 15, 2024, 3:23pm UTC](https://foil.zone/t/ammo-box-6384-winch-build/20002 "2024-01-15T15:23:42Z")
**Posts on this page:** 20
**Page:** 1
### Author:  [@foilinghopeful](https://foil.zone/u/foilinghopeful)
#### Post date: [January 15, 2024, 3:23pm UTC](https://foil.zone/t/ammo-box-6384-winch-build/20002/1 "2024-01-15T15:23:42Z")
I’ve learned a ton on this forum, so I decided to contribute back with this post. This is my first build of this sort so any advice is much appreciated.
**Why a winch:**
I initially was thinking of making a tow boogie or foil assist, but the winch won out for a few reasons.
1. My primary purpose is to get better at foiling then transition to prone and wing.
2. I had a good time doing a couple of sessions at a wake tow park on a foil board, but the travel time and cost doesn’t justify going back .
3. I figured I could also use the winch with surf/skim boards with friends on flat days.
4. I assumed the tow boogie and foil assist would be more difficult builds - lack of 3d printer, and not in a major market where getting the right props seemed difficult.
In retrospect, I think I should have tried to build a tow boogie, but I’m happy so far with what I have with the winch.
**The inspiration:**
Rewinch - [https://rewinch.com/](https://rewinch.com/)
Motowinch - [https://motowinch.com/](https://motowinch.com/)
Commercial options, and quite pricey.
DIY build 1 - [Power winch for wake-boarding | Endless Sphere DIY EV Forum](https://endless-sphere.com/sphere/threads/power-winch-for-wake-boarding.83869/)
Amazing, but not cheap. He manages to get 30mph max, and can pull 200lb men from a deep water start. He runs a 12s battery, and the motor he mentions is a ‘custom’ Astro Flight 3220. The link I found online shows the specs of the motor only roughly 50% beefier than the 6384. ([3220 ASTRO BRUSHLESS MOTOR](https://www.astroflight.com/3220-astro-brushless-motor-details.html)).
DIY build 2 - [https://www.youtube.com/watch?v=kr2-DdBsqFw](https://www.youtube.com/watch?v=kr2-DdBsqFw)
They say 72v at 60a which is just above 4000watts using an e-bike hub motor.
DIY build 3 - [https://www.youtube.com/watch?v=9XLXMNq9u4Q](https://www.youtube.com/watch?v=9XLXMNq9u4Q)
These guys are using a 1000watt motor to tow foils, so you don’t need very much power if you just want to foil.
**The key components:**
6384 140KV Flipsky motor.
- After doing a bunch of research and some basic math, I figured this motor should be plenty for a foiling and surfing.
Flipsky 75100 vesc.
- I’m not sure how much these things matter as long as they can push the amps you need.
Flipsky VX3 remote.
- I got a waterproof remote for future use in other builds, and to possibly remotely operate the winch from the water.
A 12s 5000mah Lipo battery (2x 6s in series).
- Rewinch comes with 4x 6s 4000mah, so I’m not too far off from their capacity, and my use case should be much less energy intensive.
Some questions people may have about the parts:
Why a chain vs belt? - There was no choice. I could only find a chain sprocket sized for my motor shaft here.
Why LiPo? - I don’t want to build my own battery which seemed involved and dangerous, and for 100usd for both it was an easy buy. With proper maintenance people seem to have no problem with LiPos.
Why not a hub motor? - I wish. It would simplify things greatly. I could not find a reasonably priced one with anything like the amount of power the 6384 was promising.
**The build:**
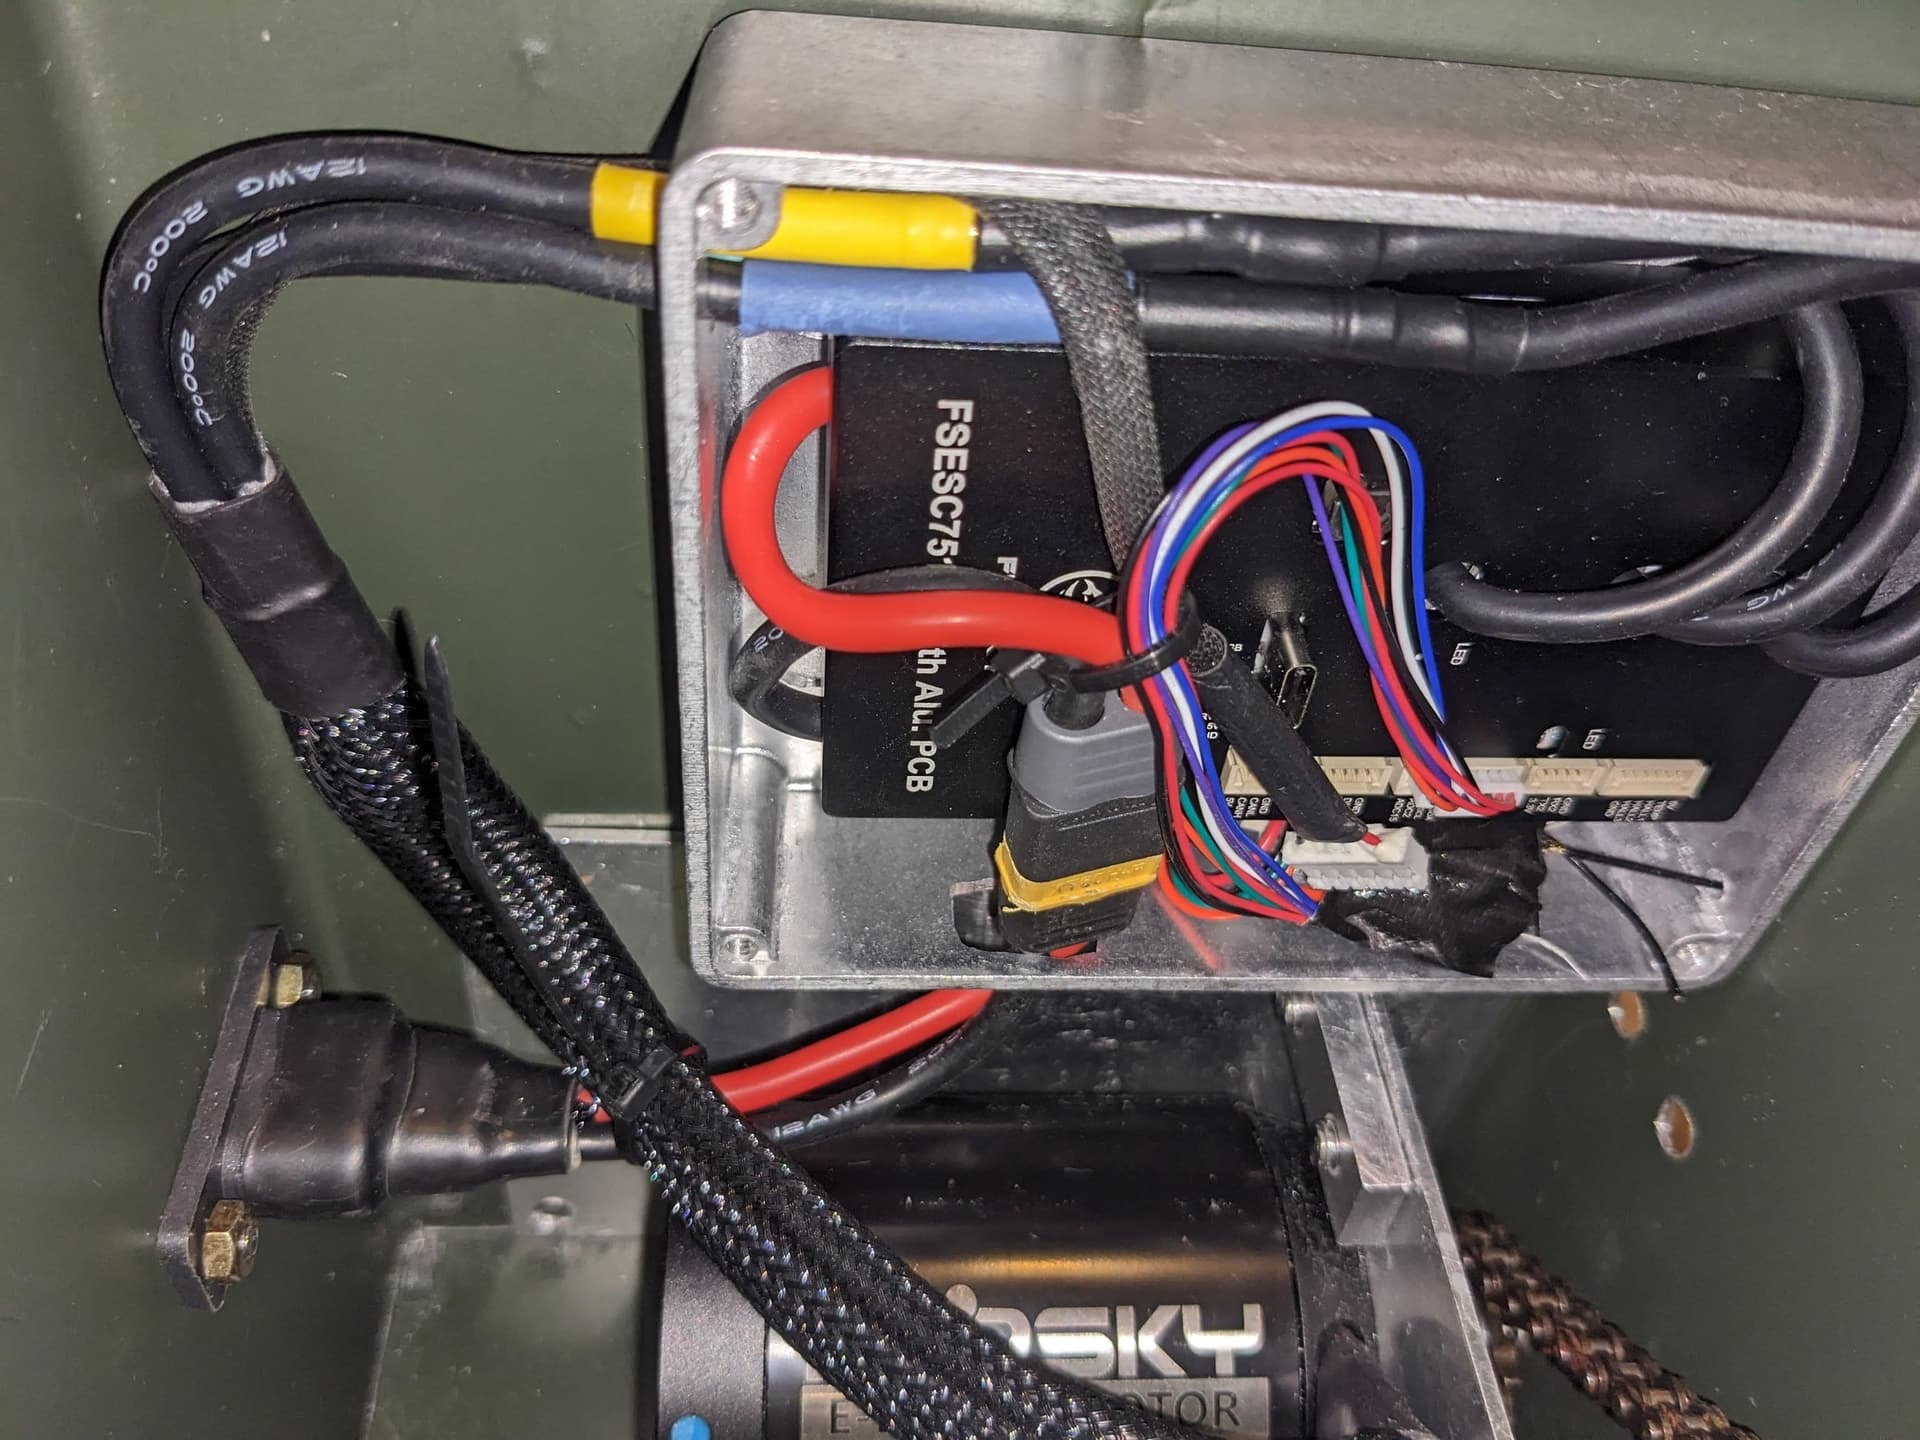
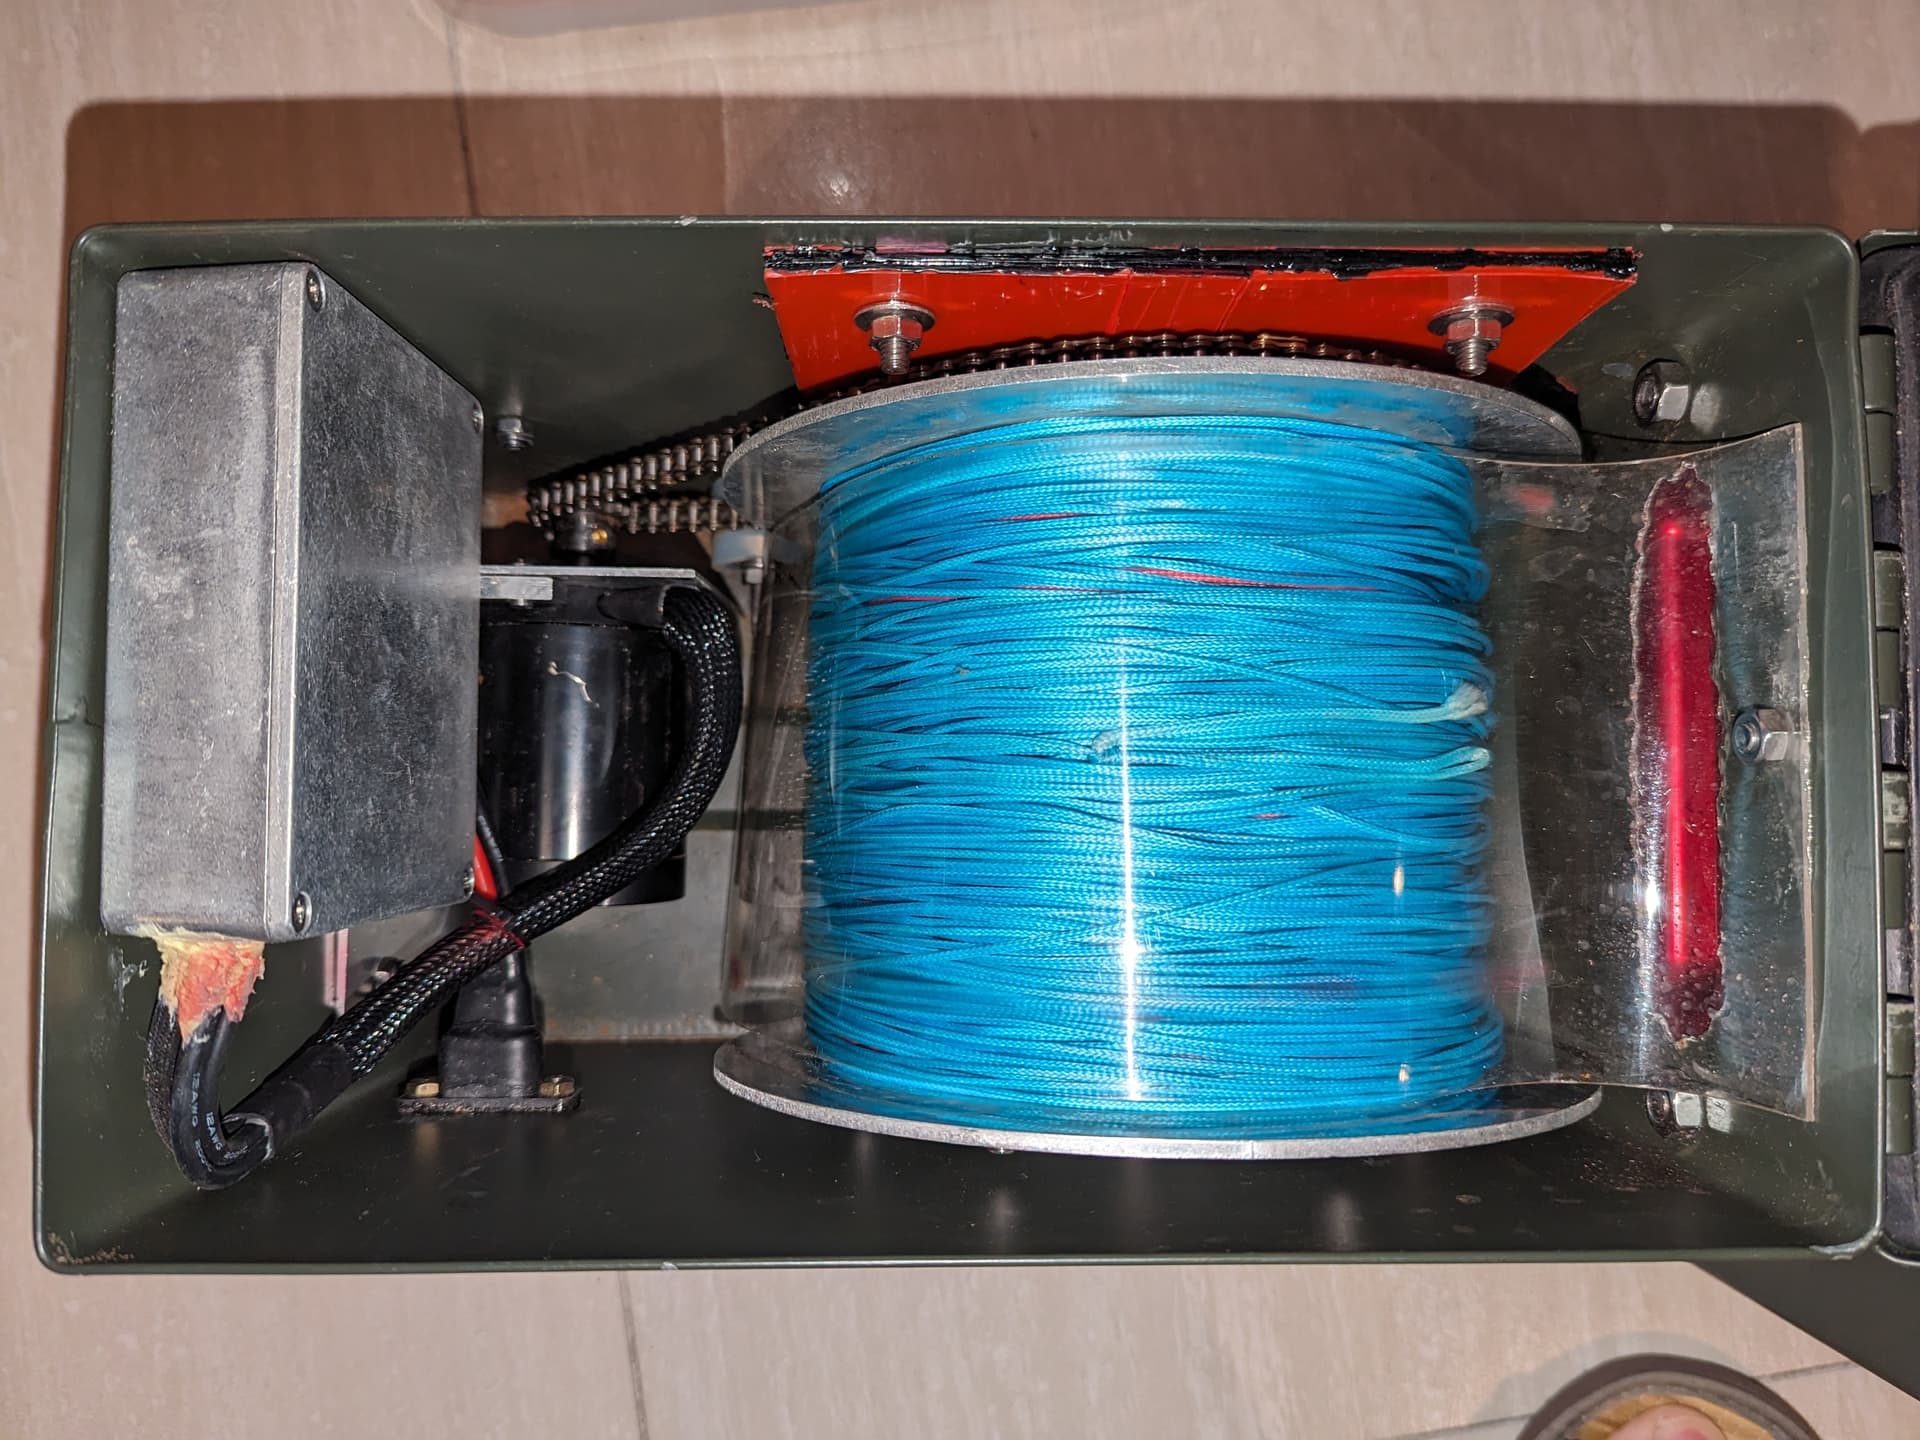
I tried to go as simple as possible avoiding welding, and went with an ammo box which was roughly the size I needed. It felt a bit flimsy so I added some aluminum plates to the back where I mounted the motor, and may add more as required. The box didn’t fit the batteries, but that worked out as even Rewinch has a separate battery bag. Also, I’m not sure I want powerful moving parts and batteries too close together. The assembly was pretty straight forward as you can see in the pictures. The chain is 25H and the line is a 2mm 16 strand fishing line with a stated strength of 500lbs. The spool is a 14cm diameter hexagon and gear ratio is 6:1 (13:78 sprocket teeth). Everything was done with a hand drill (I wish I had a drill press) and basic tools. Now for some math:
Max Speed:
48v (~12s) \* 140KV =\> 6720 motor rpm / 6 gear ratio =\> 1120 spool rpm \* 42cm spool circumference =\> 4740 cm / m =\> 28.2 km/h
Max Torque:
9NM =\> .918kgf m \* 6 gear ratio =\> 5.508 kgf m \* ( 1m / 7cm spool radius ) =\> 78.7kgf at the point on the spool. I’ll be honest, this feels high, so correct me if I’m wrong.
I’ve never built anything from metal before and had a hard time imagining the forces the build could withstand
**Testing (unscientific and in progress):**
Test 1 - lifting water bottles vertically.
I had 16L (16KG) of large water bottles laying around, and decided to see how it handled those in a vertical lift test. They _flew_ right up with little effort. Seemed like it could do a ton more. The inline amp meter briefly spiked to somewhere between 30-40 amps during the upward acceleration. After bouncing bottles up and down for a bit, the chain fell and I had my first weakest link. The tip of a set screw to the gear on the motor sheared half off. The reason was that the motor shaft has a keyway in it, but I could not find a gear that also had one. As a hack I screwed the tip of the 5mm set screw into the keyway (3mm wide) for better hold. I tried filing a keyway into the gear with a diamond file, but that metal is really damn hard. I decided to try a dog set screw with a 3mm bottom peg that slid right into the keyway as a fix. Anyway, the result of the first test seemed to suggest that the calculated torque rating may not be too far off. Also, an unloaded spool with a partly drained battery had RPMs suggesting around 25km/h.
Test 2 - with a foil
We decided to skip to the fun, and took a 112L board with a 1500sqcm foil out onto the water. It basically worked. At about half throttle, we were taking off (and wiping out soon after). I don’t have good speed or amp measurements to report for this as its hard to concentrate on the rider, the remote display, and the winch at the same time. Toward the end of the session, the winch had a few bolts loose. The yanking and vibration is serious enough that I will need to Loctite everything.
Test 3 - coming soon.
**Planned improvements:**
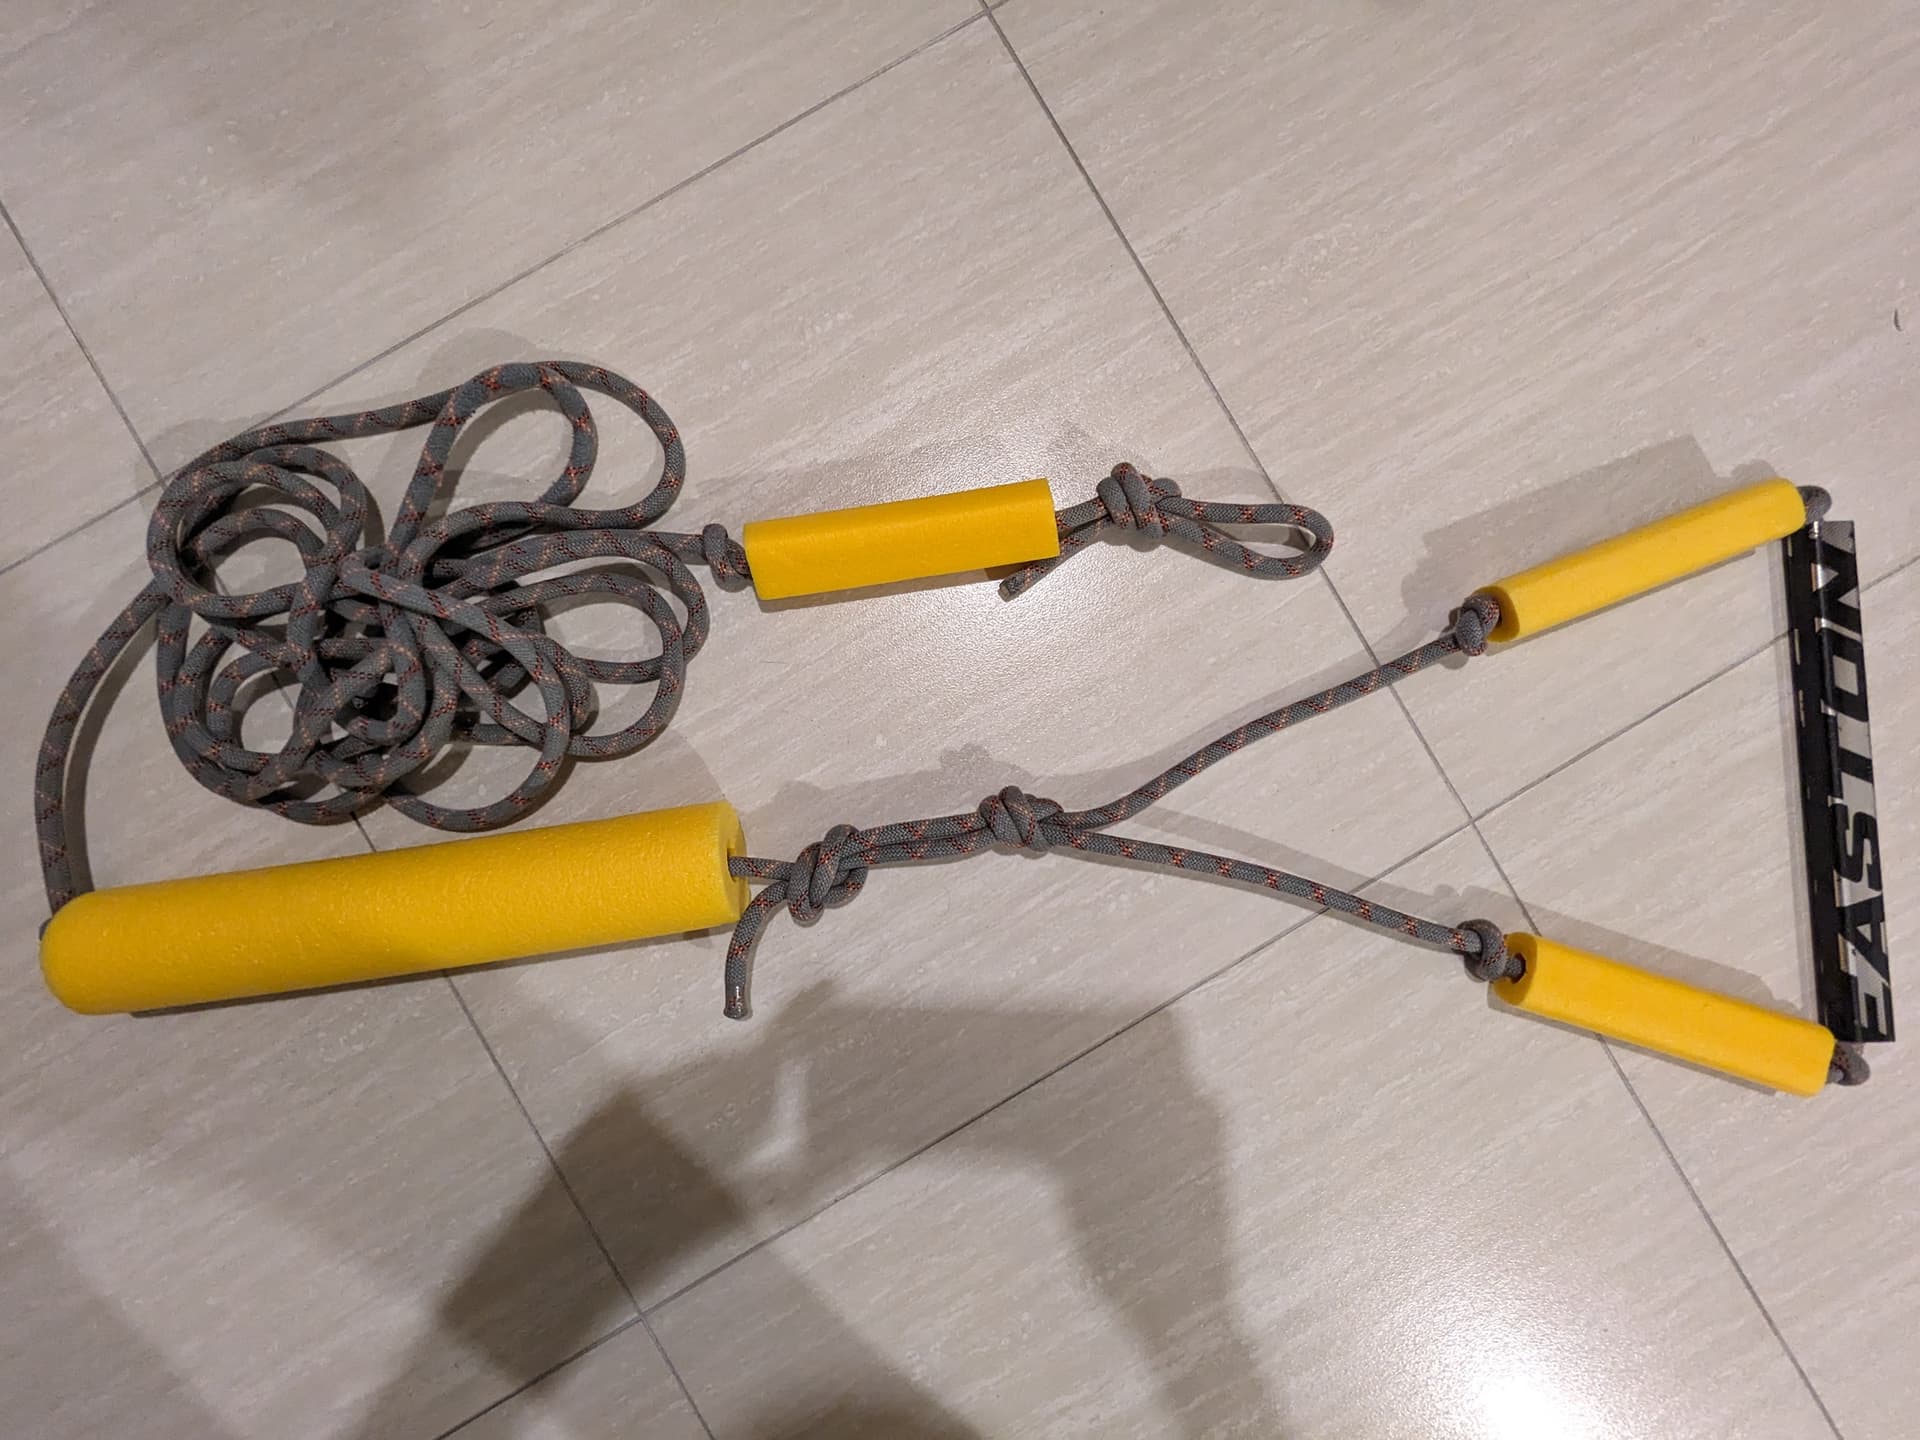
Limit torque - This thing can really yank. I’m afraid of pulling someones arm off, or breaking some other mechanical part on the winch itself. I’ll be exploring settings on the remote and vesc to maybe smooth the power delivery. Not sure if there are small slipper clutches or torque limiters that I could add between the motor and the sprocket. I’ve had 10m of retired dynamic climbing rope on the handle side which allows for some stretch and safety (you don’t want to be tangled in that fishing line), but it is nowhere near enough.
Controller sensitivity - Related to the previous item, the distance between 0 and 100 on the controller is relatively small so its hard to make minor adjustments for someone else on a board. Ultimately the plan is to use the controller while on the board, but perhaps a nice big dial of sorts would have been a better option for the land-based operator.
Sand/Water protection - Initially I though a ton of sand and water would be coming in with the line, but that has not been the case so far. I think my waterproofing precautions were overkill.
Bi-directional support (once everything else is dialed in) - The pulley part is obvious. I suspect the internally winch modification is relatively simple with the spool split into two (winding and unwinding) sections. Does anyone know how Rewinch does this?


---
### Author:  [@Foilguy](https://foil.zone/u/Foilguy)
#### Post date: [January 15, 2024, 4:35pm UTC](https://foil.zone/t/ammo-box-6384-winch-build/20002/2 "2024-01-15T16:35:42Z")
The VX3 has three “power” settings. The setting is done by pressing the function button quickly and it will cycle through H M and L and the top right corner of the display shows which one it’s in. The default at power on is H so you have to adjust for each on-off cycle.
This might help with the smoothing out the initial pull.
---
### Author:  [@vincent](https://foil.zone/u/vincent)
#### Post date: [January 15, 2024, 9:19pm UTC](https://foil.zone/t/ammo-box-6384-winch-build/20002/3 "2024-01-15T21:19:32Z")
Or set a ramping time in the VESC APP Settings and adjust the curve
---
### Author:  [@foilinghopeful](https://foil.zone/u/foilinghopeful)
#### Post date: [January 16, 2024, 2:10am UTC](https://foil.zone/t/ammo-box-6384-winch-build/20002/4 "2024-01-16T02:10:09Z")
Thanks! This might help a bunch with the trigger range. I didn’t consider just capping the max power. Hopefully, for foiling, full power on M or L is roughly what we need which would make it easier for the operator to deliver a consistent pull each time.
There also seems to be a ‘Throttle Sensitivity’ option on the remote, but the documentation is pretty thin on that. I’ll need to play with it to get a feel for what kind of delay and smoothing is applied.
---
### Author:  [@foilinghopeful](https://foil.zone/u/foilinghopeful)
#### Post date: [January 16, 2024, 2:28am UTC](https://foil.zone/t/ammo-box-6384-winch-build/20002/5 "2024-01-16T02:28:08Z")
Awesome. Thanks! I think this is exactly what I’m looking for:
VESC tool → App Settings → VESC remote → Positive Ramping Time (currently set to 0.4s)
I’ll be playing around in this settings area to try to get some more reasonable behavior from the remote.
---
### Author:  [@foilinghopeful](https://foil.zone/u/foilinghopeful)
#### Post date: [February 14, 2024, 4:29am UTC](https://foil.zone/t/ammo-box-6384-winch-build/20002/6 "2024-02-14T04:29:41Z")
**Progress Update**
I updated the Positive Ramping Time to 2s, and I think it helped a bit in that nobody’s arms were ripped off during the tests.
Test 3 - 70L soft top surfboard.
We decided to pull ourselves parallel to shore on a 70L soft top board. There is not much to say here other than it worked, and we were cruising at around 15km/h pulling about 30 amps. After several runs, a cheap shaft collar became loose allowing the spool to shift sideways which resulted in the chain falling and getting a bit bent around some bolts.
Upgrade - A second layer of shaft collars was added for extra durability. An adjustable chain tensioner was added and the chain channel was narrowed as it did seem like the chain was a bit loose in general. There were chain falls before under different scenarios with less catastrophic consequences, so I figured this was also an area for improvement. Finally, the rope was extended to 200m as 100m felt a bit short.
Test 4 - Skimboarding a 40L soft top surfboard without fins
This was a lot of fun, and nothing broke! We got 13 runs, each about 100m, on a half full battery (~2100mAh used). The runs were about 15km/h and were using 30 amps at full power.
Newest Problem -
I’m not sure why my ‘Flipsky 75100 With Aluminum PCB’ is only pushing 30 amps max resulting in 15km/h when all the amp settings in the vesc tool are set much higher. The theoretical max speed at 3.8v per cell is about 27km/h (3.8v \* 12 cells \* 140kv / 6 gear ratio \* 42cm circumference \* 100000 cm/m \* 60 minutes/hr). I’ll be looking into this, but if anyone has any insight it would be much appreciated.
A few more facts:
– The 30 amps was measured both on the remote and inline amp meter.
– The 15km/h and 30 amps both make sense when you do the math in terms of how much rope there was, the number of runs, and total battery usage at the end of the day, so it doesn’t seem to be a measurement problem. That is, 100m \* 13 runs / 15km/h \* 30 amps = 2600mAh. Not exactly 2100mAh, but close enough given the estimates involved.
– On the last run, with no vesc throttling enabled, peak amp usage dropped to around 20 and speed was reduced to around 10km/h. Not sure why this would occur. The battery was still around 3.65v per cell.
Question -
Has anyone tried changing VESC tool → App Settings → General → General → UAVCAN Raw Throttle Mode from ‘current’ to ‘duty cycle’? I don’t see much documentation on the internet about it, but my guess is that the trigger of the remote would then control speed with amps adjusting automatically to get enough torque rather than amps. This would help with foiling as drag changes significantly from start to planing to flight. I tried changing it and testing with no load, but did not notice a difference.
Some other lessons or things I feel like I should have done differently -
– Align the height of rope intake and the winch restraining loops. This may not sound clear, but you need to account for the lateral force if your rope is being pulled in at an angle. Currently my restraining loops are a bit lower than the rope intake, and it looks like the winch wants to tip over (hasn’t yet) when it slides to the side.
– When building things, make sure bolts and screws are easy to access. Some parts of this winch are a pain to disassemble.
– I should have gotten a bluetooth module for the vesc. Would have made testing easier out in the wild.
– I didn’t need the waterproof remote. The range of the VX3 is pretty limited, so controlling the winch while being pulled is not an option with it.
The chain tensioner is just a couple of bearings on a bolt and silicone tubing.
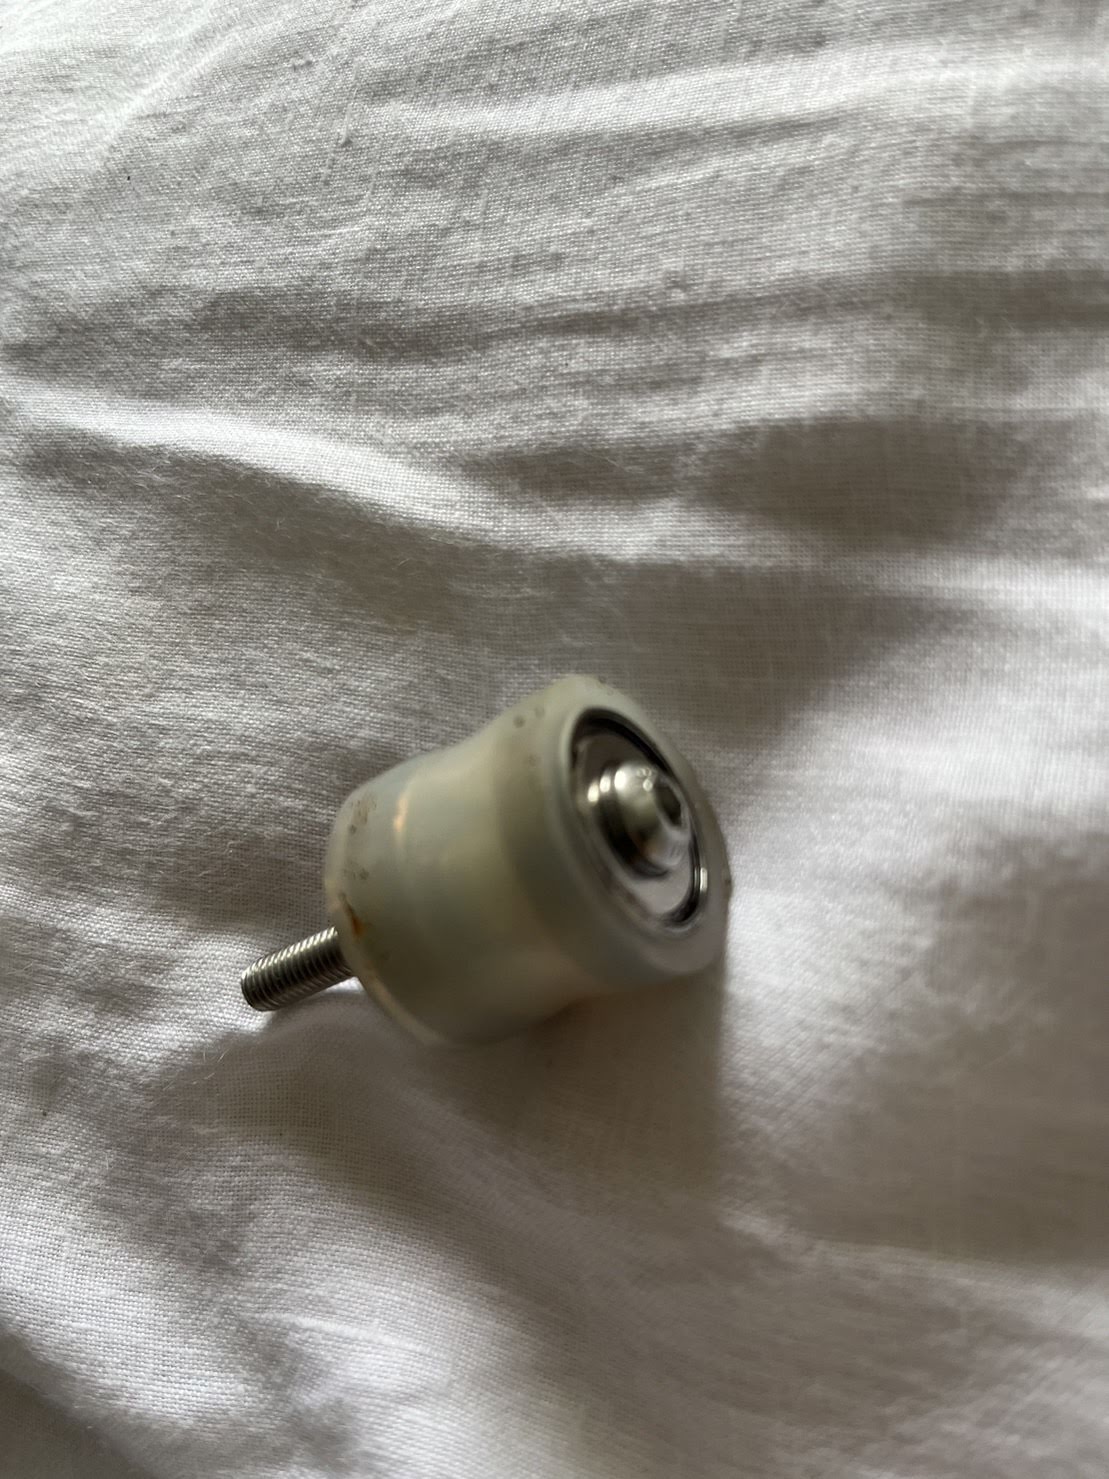
Red plastic added to narrow the chain channel and chain tensioner on the return (bottom) side of the chain.
For completeness, the handle. I’m using a thicker rope here for safety. You don’t want that 2mm fishing line near you.
---
### Author:  [@Larsb](https://foil.zone/u/Larsb)
#### Post date: [February 14, 2024, 8:27am UTC](https://foil.zone/t/ammo-box-6384-winch-build/20002/7 "2024-02-14T08:27:12Z")
Regarding the speed you get there are some possible issues, one is that loaded speed is not same as unloaded. Depending on how hard the motor is loaded you need a reduction factor for it. Still the difference between 15kph and 28kph is a bit too large, motor would be really hot if loading was the cause to the difference.
What is the unloaded motor rpm? Could be an rpm restriction in vesc settings, rpm restriction in remote settings, wrong kV motor and all those would affect the unloaded rpm.
---
### Author:  [@Jezza](https://foil.zone/u/Jezza)
#### Post date: [February 14, 2024, 9:23am UTC](https://foil.zone/t/ammo-box-6384-winch-build/20002/8 "2024-02-14T09:23:50Z")
Check:
- max current settings
- max power settings
- max eRPM settings
> [@foilinghopeful](#):
>
> I didn’t need the waterproof remote. The range of the VX3 is pretty limited, so controlling the winch while being pulled is not an option with it.
Water causes havoc with the signal over distance. You need to raise the receiver around 2m above the winch and then it should work much better. I had the same issues with a Maytech remote, but went 3m up and all of a sudden I had great signal.
---
### Author:  [@Foilguy](https://foil.zone/u/Foilguy)
#### Post date: [February 14, 2024, 2:43pm UTC](https://foil.zone/t/ammo-box-6384-winch-build/20002/9 "2024-02-14T14:43:23Z")
> [@foilinghopeful](#):
>
> I didn’t need the waterproof remote. The range of the VX3 is pretty limited, so controlling the winch while being pulled is not an option with it.
Flipsky sells both a 1.5m and 3m antennae extension for the VX3 receiver. Take the original off and replace with one of these might help range issues.
---
### Author:  [@Jezza](https://foil.zone/u/Jezza)
#### Post date: [February 14, 2024, 3:55pm UTC](https://foil.zone/t/ammo-box-6384-winch-build/20002/10 "2024-02-14T15:55:01Z")
> [@Foilguy](#):
>
> 3m antennae extension
Exactly what I did on a broomstick 🤣
---
### Author:  [@foilinghopeful](https://foil.zone/u/foilinghopeful)
#### Post date: [February 17, 2024, 3:02am UTC](https://foil.zone/t/ammo-box-6384-winch-build/20002/11 "2024-02-17T03:02:18Z")
@Jezza @Foilguy What kind of range are you guys getting?
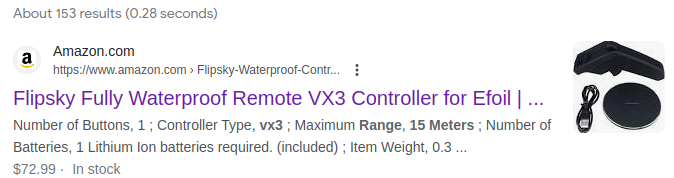
I noticed, even with line of sight, my signal (ping time) degrades about 20 meters away from the winch. That said, the antenna is taped to the side of a metal box which may affect things. I tried to find the official range spec, but all I got was the a listing on Amazon (by Flipsky) stating that the max range is 15 meters. That made me give up, but that is probably without an antenna extension. That text has since been removed on Amazon, but Google still has the cached version.
It seems like drones also use 2.4g for their remotes, so assuming the vx3 is putting out enough juice, the range should be substantial. I’ll try the Flipsky antenna extension or maybe a compatible retractable one. Adding a 2 meter broom stick to the crap I have to lug to the beach isn’t ideal.
Thanks guys!
EDIT:
I decided to do some basic range tests today. When I placed the winch 1.5 meters above the ground, the range situation improved greatly. More specifically, at 100m I still had great signal (full bars, \<50ms ping) regardless of the orientation of the antenna. It was worst (by a small margin), when the signal would have to penetrate through the winch, but still fine. It was best with the antenna’s flat part facing me (winch sideways). When the winch was at ground level, I was intermittently losing signal around the 50m mark with much higher ping times in general. I guess I need to add a tall antenna.
---
### Author:  [@foilinghopeful](https://foil.zone/u/foilinghopeful)
#### Post date: [February 17, 2024, 3:37am UTC](https://foil.zone/t/ammo-box-6384-winch-build/20002/12 "2024-02-17T03:37:35Z")
Unloaded RPM yields 25.5 km/h using almost no power.
RPM with spool yields 25.5 km/h using about 1.5 amps.
So, these numbers are roughly inline with the theoretical value of 28 km/h, and probably lower due to 95 max duty and other possible stress limiting settings.
And I understand that under heavy loads, RPMs would in theory go down. But, maybe my understanding is off here - wouldn’t the current increase first to give more torque? Or said another way, if the motor got 60 amps (double) in this scenario, it would be able to spin faster, correct?
Regarding the heat issue, I did try and feel the motor while at the beach and it wasn’t particularly hot. Additionally, the runs are only ~20s long so I can’t imagine it overheating that quickly. This issue was also present from the first run. I’ll look into this more carefully next time as well as the speed control temperature as it does seem like the most plausible explanation at the moment. Perhaps a heat sensor is busted.
Also, I am running the motor in sensored mode in case it matters.
@Jezza To answer your questions
Max Current: 80 amps
Max Power: 1500000 watts
Max eRPM: 100000 (I’m guessing this is fine given that the motor can reach higher speeds under less load)
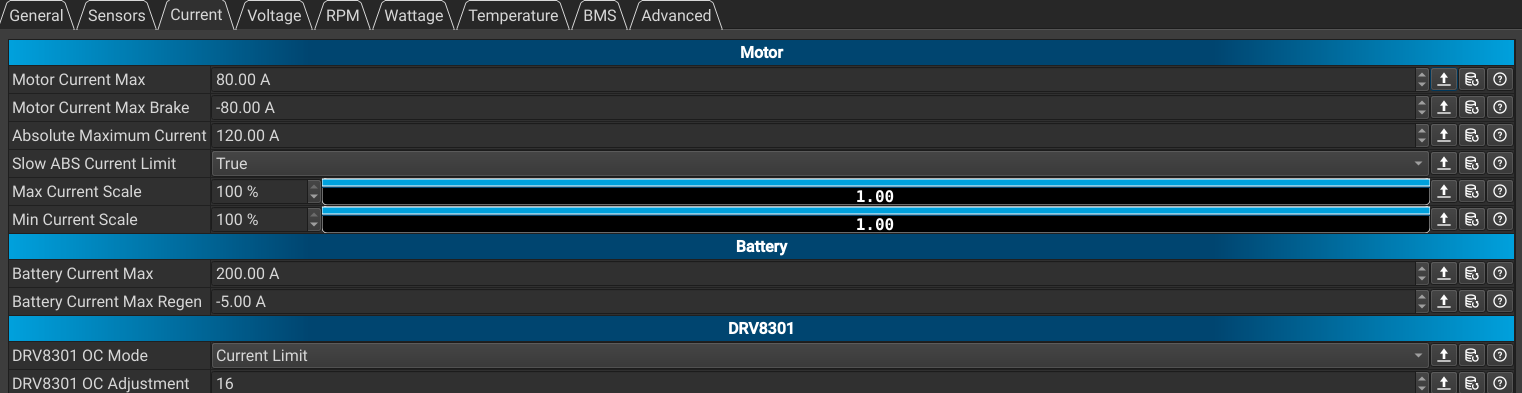
I think my next step will be to figure out a way to pull various loads across the beach and try to figure out what the speed vs load curve looks like while taking note of the motor and speed control temperatures. It’s really the only thing I can think of. Also, I will look into figuring out how to monitoring live VESC info with my laptop at the beach to see if anything jumps out at me.
I’m also including an export of all the settings as C header files for reference. This seemed much more readable than XML.
> **motor configuration header**
>
> // This file is autogenerated by VESC Tool
>
> #ifndef MCCONF\_DEFAULT\_H\_
> #define MCCONF\_DEFAULT\_H\_
>
> // PWM Mode
> #define MCCONF\_PWM\_MODE 1
>
> // Commutation Mode
> #define MCCONF\_COMM\_MODE 0
>
> // Motor Type
> #define MCCONF\_DEFAULT\_MOTOR\_TYPE 2
>
> // Sensor Mode
> #define MCCONF\_SENSOR\_MODE 0
>
> // Motor Current Max
> #define MCCONF\_L\_CURRENT\_MAX 80
>
> // Motor Current Max Brake
> #define MCCONF\_L\_CURRENT\_MIN -80
>
> // Battery Current Max
> #define MCCONF\_L\_IN\_CURRENT\_MAX 200
>
> // Battery Current Max Regen
> #define MCCONF\_L\_IN\_CURRENT\_MIN -5
>
> // Absolute Maximum Current
> #define MCCONF\_L\_MAX\_ABS\_CURRENT 120
>
> // Max ERPM Reverse
> #define MCCONF\_L\_RPM\_MIN -100000
>
> // Max ERPM
> #define MCCONF\_L\_RPM\_MAX 100000
>
> // ERPM Limit Start
> #define MCCONF\_L\_RPM\_START 0.8
>
> // Max ERPM Full Brake
> #define MCCONF\_L\_CURR\_MAX\_RPM\_FBRAKE 300
>
> // Max ERPM Full Brake Current Control
> #define MCCONF\_L\_CURR\_MAX\_RPM\_FBRAKE\_CC 1500
>
> // Minimum Input Voltage
> #define MCCONF\_L\_MIN\_VOLTAGE 12
>
> // Maximum Input Voltage
> #define MCCONF\_L\_MAX\_VOLTAGE 72
>
> // Battery Voltage Cutoff Start
> #define MCCONF\_L\_BATTERY\_CUT\_START 43.2
>
> // Battery Voltage Cutoff End
> #define MCCONF\_L\_BATTERY\_CUT\_END 42
>
> // Slow ABS Current Limit
> #define MCCONF\_L\_SLOW\_ABS\_OVERCURRENT 1
>
> // MOSFET Temp Cutoff Start
> #define MCCONF\_L\_LIM\_TEMP\_FET\_START 85
>
> // MOSFET Temp Cutoff End
> #define MCCONF\_L\_LIM\_TEMP\_FET\_END 100
>
> // Motor Temp Cutoff Start
> #define MCCONF\_L\_LIM\_TEMP\_MOTOR\_START 85
>
> // Motor Temp Cutoff End
> #define MCCONF\_L\_LIM\_TEMP\_MOTOR\_END 100
>
> // Acceleration Temperature Decrease
> #define MCCONF\_L\_LIM\_TEMP\_ACCEL\_DEC 0.15
>
> // Minimum Duty Cycle
> #define MCCONF\_L\_MIN\_DUTY 0.005
>
> // Maximum Duty Cycle
> #define MCCONF\_L\_MAX\_DUTY 0.95
>
> // Maximum Wattage
> #define MCCONF\_L\_WATT\_MAX 1.5e+06
>
> // Maximum Braking Wattage
> #define MCCONF\_L\_WATT\_MIN -1.5e+06
>
> // Max Current Scale
> #define MCCONF\_L\_CURRENT\_MAX\_SCALE 1
>
> // Min Current Scale
> #define MCCONF\_L\_CURRENT\_MIN\_SCALE 1
>
> // Duty Cycle Current Limit Start
> #define MCCONF\_L\_DUTY\_START 0.85
>
> // Minimum ERPM
> #define MCCONF\_SL\_MIN\_RPM 150
>
> // Minimum ERPM Integrator
> #define MCCONF\_SL\_MIN\_ERPM\_CYCLE\_INT\_LIMIT 1100
>
> // Max Brake Current at Direction Change
> #define MCCONF\_SL\_MAX\_FB\_CURR\_DIR\_CHANGE 10
>
> // Cycle Integrator Limit
> #define MCCONF\_SL\_CYCLE\_INT\_LIMIT 62
>
> // Phase Advance at BR ERPM
> #define MCCONF\_SL\_PHASE\_ADVANCE\_AT\_BR 0.8
>
> // BR ERPM
> #define MCCONF\_SL\_CYCLE\_INT\_BR 80000
>
> // BEMF Coupling
> #define MCCONF\_SL\_BEMF\_COUPLING\_K 600
>
> // Hall Table [0]
> #define MCCONF\_HALL\_TAB\_0 -1
>
> // Hall Table [1]
> #define MCCONF\_HALL\_TAB\_1 1
>
> // Hall Table [2]
> #define MCCONF\_HALL\_TAB\_2 3
>
> // Hall Table [3]
> #define MCCONF\_HALL\_TAB\_3 2
>
> // Hall Table [4]
> #define MCCONF\_HALL\_TAB\_4 5
>
> // Hall Table [5]
> #define MCCONF\_HALL\_TAB\_5 6
>
> // Hall Table [6]
> #define MCCONF\_HALL\_TAB\_6 4
>
> // Hall Table [7]
> #define MCCONF\_HALL\_TAB\_7 -1
>
> // Sensorless ERPM Hybrid
> #define MCCONF\_HALL\_ERPM 2000
>
> // Current KP
> #define MCCONF\_FOC\_CURRENT\_KP 0.00807825
>
> // Current KI
> #define MCCONF\_FOC\_CURRENT\_KI 13.9811
>
> // Switching Frequency
> #define MCCONF\_FOC\_F\_SW 30000
>
> // Dead Time Compensation
> #define MCCONF\_FOC\_DT\_US 0.12
>
> // Encoder Inverted
> #define MCCONF\_FOC\_ENCODER\_INVERTED 0
>
> // Encoder Offset
> #define MCCONF\_FOC\_ENCODER\_OFFSET 180
>
> // Encoder Ratio
> #define MCCONF\_FOC\_ENCODER\_RATIO 7
>
> // Sin/Cos Sine Gain Compensation
> #define MCCONF\_FOC\_ENCODER\_SIN\_GAIN 1
>
> // Sin/Cos Cosine Gain Compensation
> #define MCCONF\_FOC\_ENCODER\_COS\_GAIN 1
>
> // Sin/Cos Sine Offset
> #define MCCONF\_FOC\_ENCODER\_SIN\_OFFSET 1.65
>
> // Sin/Cos Cosine Offset
> #define MCCONF\_FOC\_ENCODER\_COS\_OFFSET 1.65
>
> // Sin/Cos Filter Constant
> #define MCCONF\_FOC\_ENCODER\_SINCOS\_FILTER 0.5
>
> // Sensor Mode
> #define MCCONF\_FOC\_SENSOR\_MODE 2
>
> // Speed Tracker Kp
> #define MCCONF\_FOC\_PLL\_KP 2000
>
> // Speed Tracker Ki
> #define MCCONF\_FOC\_PLL\_KI 30000
>
> // Motor Inductance (L)
> #define MCCONF\_FOC\_MOTOR\_L 8.07825e-06
>
> // Motor Inductance Difference (Ld - Lq)
> #define MCCONF\_FOC\_MOTOR\_LD\_LQ\_DIFF 0
>
> // Motor Resistance (R)
> #define MCCONF\_FOC\_MOTOR\_R 0.0139811
>
> // Motor Flux Linkage (λ)
> #define MCCONF\_FOC\_MOTOR\_FLUX\_LINKAGE 0.00507544
>
> // Observer Gain (x1M)
> #define MCCONF\_FOC\_OBSERVER\_GAIN 3.88197e+07
>
> // Observer Gain At Minimum Duty
> #define MCCONF\_FOC\_OBSERVER\_GAIN\_SLOW 0.05
>
> // Duty Downramp Kp
> #define MCCONF\_FOC\_DUTY\_DOWNRAMP\_KP 10
>
> // Duty Downramp Ki
> #define MCCONF\_FOC\_DUTY\_DOWNRAMP\_KI 200
>
> // Openloop ERPM
> #define MCCONF\_FOC\_OPENLOOP\_RPM 700
>
> // Openloop ERPM at Min Current
> #define MCCONF\_FOC\_OPENLOOP\_RPM\_LOW 0
>
> // D Axis Gain Scaling Start
> #define MCCONF\_FOC\_D\_GAIN\_SCALE\_START 0.9
>
> // D Axis Gain Scaling at Max Mod
> #define MCCONF\_FOC\_D\_GAIN\_SCALE\_MAX\_MOD 0.2
>
> // Openloop Hysteresis
> #define MCCONF\_FOC\_SL\_OPENLOOP\_HYST 0.1
>
> // Openloop Lock Time
> #define MCCONF\_FOC\_SL\_OPENLOOP\_T\_LOCK 0
>
> // Openloop Ramp Time
> #define MCCONF\_FOC\_SL\_OPENLOOP\_T\_RAMP 0.1
>
> // Openloop Time
> #define MCCONF\_FOC\_SL\_OPENLOOP\_TIME 0.05
>
> // Hall Table [0]
> #define MCCONF\_FOC\_HALL\_TAB\_0 255
>
> // Hall Table [1]
> #define MCCONF\_FOC\_HALL\_TAB\_1 24
>
> // Hall Table [2]
> #define MCCONF\_FOC\_HALL\_TAB\_2 159
>
> // Hall Table [3]
> #define MCCONF\_FOC\_HALL\_TAB\_3 189
>
> // Hall Table [4]
> #define MCCONF\_FOC\_HALL\_TAB\_4 88
>
> // Hall Table [5]
> #define MCCONF\_FOC\_HALL\_TAB\_5 58
>
> // Hall Table [6]
> #define MCCONF\_FOC\_HALL\_TAB\_6 124
>
> // Hall Table [7]
> #define MCCONF\_FOC\_HALL\_TAB\_7 255
>
> // Hall Interpolation ERPM
> #define MCCONF\_FOC\_HALL\_INTERP\_ERPM 500
>
> // Sensorless ERPM
> #define MCCONF\_FOC\_SL\_ERPM 4000
>
> // Sample in V0 and V7
> #define MCCONF\_FOC\_SAMPLE\_V0\_V7 0
>
> // High Current Sampling Mode
> #define MCCONF\_FOC\_SAMPLE\_HIGH\_CURRENT 0
>
> // Stator Saturation Compensation
> #define MCCONF\_FOC\_SAT\_COMP 0
>
> // Temp Comp
> #define MCCONF\_FOC\_TEMP\_COMP 0
>
> // Temp Comp Base Temp
> #define MCCONF\_FOC\_TEMP\_COMP\_BASE\_TEMP 25
>
> // Current Filter Constant
> #define MCCONF\_FOC\_CURRENT\_FILTER\_CONST 0.1
>
> // Current Controller Decoupling
> #define MCCONF\_FOC\_CC\_DECOUPLING 2
>
> // Observer Type
> #define MCCONF\_FOC\_OBSERVER\_TYPE 0
>
> // HFI Start Voltage
> #define MCCONF\_FOC\_HFI\_VOLTAGE\_START 20
>
> // HFI Run Voltage
> #define MCCONF\_FOC\_HFI\_VOLTAGE\_RUN 4
>
> // HFI Max Voltage
> #define MCCONF\_FOC\_HFI\_VOLTAGE\_MAX 10
>
> // Sensorless ERPM HFI
> #define MCCONF\_FOC\_SL\_ERPM\_HFI 2000
>
> // HFI Start Samples
> #define MCCONF\_FOC\_HFI\_START\_SAMPLES 65
>
> // HFI Observer Override Time
> #define MCCONF\_FOC\_HFI\_OBS\_OVR\_SEC 0.001
>
> // HFI Samples
> #define MCCONF\_FOC\_HFI\_SAMPLES 1
>
> // Buffer Notification Length
> #define MCCONF\_GPD\_BUFFER\_NOTIFY\_LEFT 200
>
> // Buffer Sampling Interpolation
> #define MCCONF\_GPD\_BUFFER\_INTERPOL 0
>
> // Current Filter Constant
> #define MCCONF\_GPD\_CURRENT\_FILTER\_CONST 0.1
>
> // Current KP
> #define MCCONF\_GPD\_CURRENT\_KP 0.03
>
> // Current KI
> #define MCCONF\_GPD\_CURRENT\_KI 50
>
> // Speed PID Kp
> #define MCCONF\_S\_PID\_KP 0.004
>
> // Speed PID Ki
> #define MCCONF\_S\_PID\_KI 0.004
>
> // Speed PID Kd
> #define MCCONF\_S\_PID\_KD 0.0001
>
> // Speed PID Kd Filer
> #define MCCONF\_S\_PID\_KD\_FILTER 0.2
>
> // Minimum ERPM
> #define MCCONF\_S\_PID\_MIN\_RPM 900
>
> // Allow Braking
> #define MCCONF\_S\_PID\_ALLOW\_BRAKING 1
>
> // Ramp eRPMs per second
> #define MCCONF\_S\_PID\_RAMP\_ERPMS\_S -1
>
> // Position PID Kp
> #define MCCONF\_P\_PID\_KP 0.03
>
> // Position PID Ki
> #define MCCONF\_P\_PID\_KI 0
>
> // Position PID Kd
> #define MCCONF\_P\_PID\_KD 0.0004
>
> // Position PID Kd Filer
> #define MCCONF\_P\_PID\_KD\_FILTER 0.2
>
> // Position Angle Division
> #define MCCONF\_P\_PID\_ANG\_DIV 1
>
> // Startup boost
> #define MCCONF\_CC\_STARTUP\_BOOST\_DUTY 0.01
>
> // Minimum Current
> #define MCCONF\_CC\_MIN\_CURRENT 0.05
>
> // Current Controller Gain
> #define MCCONF\_CC\_GAIN 0.0046
>
> // Current Control Ramp Step Max
> #define MCCONF\_CC\_RAMP\_STEP 0.04
>
> // Fault Stop Time
> #define MCCONF\_M\_FAULT\_STOP\_TIME 500
>
> // Duty Ramp Step Max
> #define MCCONF\_M\_RAMP\_STEP 0.02
>
> // Current Backoff Gain
> #define MCCONF\_M\_CURRENT\_BACKOFF\_GAIN 0.5
>
> // ABI Encoder Counts
> #define MCCONF\_M\_ENCODER\_COUNTS 8192
>
> // Sensor Port Mode
> #define MCCONF\_M\_SENSOR\_PORT\_MODE 0
>
> // Invert Motor Direction
> #define MCCONF\_M\_INVERT\_DIRECTION 0
>
> // DRV8301 OC Mode
> #define MCCONF\_M\_DRV8301\_OC\_MODE 0
>
> // DRV8301 OC Adjustment
> #define MCCONF\_M\_DRV8301\_OC\_ADJ 16
>
> // Minimum Switching Frequency
> #define MCCONF\_M\_BLDC\_F\_SW\_MIN 3000
>
> // Maximum Switching Frequency
> #define MCCONF\_M\_BLDC\_F\_SW\_MAX 35000
>
> // Switching Frequency
> #define MCCONF\_M\_DC\_F\_SW 25000
>
> // Beta Value for Motor Thermistor
> #define MCCONF\_M\_NTC\_MOTOR\_BETA 3380
>
> // Auxiliary Output Mode
> #define MCCONF\_M\_OUT\_AUX\_MODE 0
>
> // Motor Temperature Sensor Type
> #define MCCONF\_M\_MOTOR\_TEMP\_SENS\_TYPE 0
>
> // Coefficient for PTC Motor Thermistor
> #define MCCONF\_M\_PTC\_MOTOR\_COEFF 0.61
>
> // Hall Sensor Extra Samples
> #define MCCONF\_M\_HALL\_EXTRA\_SAMPLES 1
>
> // Motor Poles
> #define MCCONF\_SI\_MOTOR\_POLES 14
>
> // Gear Ratio
> #define MCCONF\_SI\_GEAR\_RATIO 6
>
> // Wheel Diameter
> #define MCCONF\_SI\_WHEEL\_DIAMETER 0.14
>
> // Battery Type
> #define MCCONF\_SI\_BATTERY\_TYPE 0
>
> // Battery Cells Series
> #define MCCONF\_SI\_BATTERY\_CELLS 12
>
> // Battery Capacity
> #define MCCONF\_SI\_BATTERY\_AH 5
>
> // BMS Type
> #define MCCONF\_BMS\_TYPE 1
>
> // Temperature Limit Start
> #define MCCONF\_BMS\_T\_LIMIT\_START 45
>
> // Temperature Limit End
> #define MCCONF\_BMS\_T\_LIMIT\_END 65
>
> // SOC Limit Start
> #define MCCONF\_BMS\_SOC\_LIMIT\_START 0.05
>
> // SOC Limit End
> #define MCCONF\_BMS\_SOC\_LIMIT\_END 0
>
> // MCCONF\_DEFAULT\_H\_
> #endif
> **app configuration header**
>
> // This file is autogenerated by VESC Tool
>
> #ifndef APPCONF\_DEFAULT\_H\_
> #define APPCONF\_DEFAULT\_H\_
>
> // VESC ID
> #define APPCONF\_CONTROLLER\_ID 58
>
> // Timeout
> #define APPCONF\_TIMEOUT\_MSEC 1000
>
> // Timeout Brake Current
> #define APPCONF\_TIMEOUT\_BRAKE\_CURRENT 0
>
> // Can Status Message Mode
> #define APPCONF\_SEND\_CAN\_STATUS 4
>
> // Can Status Rate
> #define APPCONF\_SEND\_CAN\_STATUS\_RATE\_HZ 50
>
> // CAN Baud Rate
> #define APPCONF\_CAN\_BAUD\_RATE 2
>
> // Pairing Done
> #define APPCONF\_PAIRING\_DONE 0
>
> // Enable Permanent UART
> #define APPCONF\_PERMANENT\_UART\_ENABLED 1
>
> // Shutdown Mode
> #define APPCONF\_SHUTDOWN\_MODE 7
>
> // CAN Mode
> #define APPCONF\_CAN\_MODE 0
>
> // UAVCAN ESC Index
> #define APPCONF\_UAVCAN\_ESC\_INDEX 0
>
> // UAVCAN Raw Throttle Mode
> #define APPCONF\_UAVCAN\_RAW\_MODE 0
>
> // APP to Use
> #define APPCONF\_APP\_TO\_USE 3
>
> // Control Type
> #define APPCONF\_PPM\_CTRL\_TYPE 3
>
> // PID Max ERPM
> #define APPCONF\_PPM\_PID\_MAX\_ERPM 15000
>
> // Input Deadband
> #define APPCONF\_PPM\_HYST 0.15
>
> // Pulselength Start
> #define APPCONF\_PPM\_PULSE\_START 1.072
>
> // Pulselength End
> #define APPCONF\_PPM\_PULSE\_END 1.843
>
> // Pulselength Center
> #define APPCONF\_PPM\_PULSE\_CENTER 1.456
>
> // Median Filter
> #define APPCONF\_PPM\_MEDIAN\_FILTER 1
>
> // Safe Start
> #define APPCONF\_PPM\_SAFE\_START 1
>
> // Throttle Expo
> #define APPCONF\_PPM\_THROTTLE\_EXP 0
>
> // Throttle Expo Brake
> #define APPCONF\_PPM\_THROTTLE\_EXP\_BRAKE 0
>
> // Throttle Expo Mode
> #define APPCONF\_PPM\_THROTTLE\_EXP\_MODE 2
>
> // Positive Ramping Time
> #define APPCONF\_PPM\_RAMP\_TIME\_POS 0.4
>
> // Negative Ramping Time
> #define APPCONF\_PPM\_RAMP\_TIME\_NEG 0.2
>
> // Multiple VESCs Over CAN
> #define APPCONF\_PPM\_MULTI\_ESC 1
>
> // Traction Control
> #define APPCONF\_PPM\_TC 0
>
> // TC Max ERPM Difference
> #define APPCONF\_PPM\_TC\_MAX\_DIFF 3000
>
> // Max ERPM for direction switch
> #define APPCONF\_PPM\_MAX\_ERPM\_FOR\_DIR 4000
>
> // Smart Reverse Max Duty Cycle
> #define APPCONF\_PPM\_SMART\_REV\_MAX\_DUTY 0.07
>
> // Smart Reverse Ramp Time
> #define APPCONF\_PPM\_SMART\_REV\_RAMP\_TIME 3
>
> // Control Type
> #define APPCONF\_ADC\_CTRL\_TYPE 0
>
> // Input Deadband
> #define APPCONF\_ADC\_HYST 0.15
>
> // ADC1 Min Voltage
> #define APPCONF\_ADC\_VOLTAGE\_START 0.9
>
> // ADC1 Max Voltage
> #define APPCONF\_ADC\_VOLTAGE\_END 3
>
> // ADC1 Center Voltage
> #define APPCONF\_ADC\_VOLTAGE\_CENTER 2
>
> // ADC2 Min Voltage
> #define APPCONF\_ADC\_VOLTAGE2\_START 0.9
>
> // ADC2 Max Voltage
> #define APPCONF\_ADC\_VOLTAGE2\_END 3
>
> // Use Filter
> #define APPCONF\_ADC\_USE\_FILTER 1
>
> // Safe Start
> #define APPCONF\_ADC\_SAFE\_START 1
>
> // Invert Cruise Control Button
> #define APPCONF\_ADC\_CC\_BUTTON\_INVERTED 0
>
> // Invert Reverse Button
> #define APPCONF\_ADC\_REV\_BUTTON\_INVERTED 0
>
> // Invert ADC1 Voltage
> #define APPCONF\_ADC\_VOLTAGE\_INVERTED 0
>
> // Invert ADC2 Voltage
> #define APPCONF\_ADC\_VOLTAGE2\_INVERTED 0
>
> // Throttle Expo
> #define APPCONF\_ADC\_THROTTLE\_EXP 0
>
> // Throttle Expo Brake
> #define APPCONF\_ADC\_THROTTLE\_EXP\_BRAKE 0
>
> // Throttle Expo Mode
> #define APPCONF\_ADC\_THROTTLE\_EXP\_MODE 2
>
> // Positive Ramping Time
> #define APPCONF\_ADC\_RAMP\_TIME\_POS 0.3
>
> // Negative Ramping Time
> #define APPCONF\_ADC\_RAMP\_TIME\_NEG 0.1
>
> // Multiple VESCs Over CAN
> #define APPCONF\_ADC\_MULTI\_ESC 1
>
> // Traction Control
> #define APPCONF\_ADC\_TC 0
>
> // TC Max ERPM Difference
> #define APPCONF\_ADC\_TC\_MAX\_DIFF 3000
>
> // Update Rate
> #define APPCONF\_ADC\_UPDATE\_RATE\_HZ 500
>
> // Baudrate
> #define APPCONF\_UART\_BAUDRATE 115200
>
> // Control Type
> #define APPCONF\_CHUK\_CTRL\_TYPE 1
>
> // Input Deadband
> #define APPCONF\_CHUK\_HYST 0.05
>
> // Positive Ramping Time
> #define APPCONF\_CHUK\_RAMP\_TIME\_POS 2
>
> // Negative Ramping Time
> #define APPCONF\_CHUK\_RAMP\_TIME\_NEG 0.2
>
> // ERPM Per Second Cruise Control
> #define APPCONF\_STICK\_ERPM\_PER\_S\_IN\_CC 3000
>
> // Throttle Expo
> #define APPCONF\_CHUK\_THROTTLE\_EXP 0
>
> // Throttle Expo Brake
> #define APPCONF\_CHUK\_THROTTLE\_EXP\_BRAKE 0
>
> // Throttle Expo Mode
> #define APPCONF\_CHUK\_THROTTLE\_EXP\_MODE 2
>
> // Multiple VESCs Over CAN
> #define APPCONF\_CHUK\_MULTI\_ESC 1
>
> // Traction Control
> #define APPCONF\_CHUK\_TC 0
>
> // TC Max ERPM Difference
> #define APPCONF\_CHUK\_TC\_MAX\_DIFF 3000
>
> // Use Smart Reverse
> #define APPCONF\_CHUK\_USE\_SMART\_REV 1
>
> // Smart Reverse Max Duty Cycle
> #define APPCONF\_CHUK\_SMART\_REV\_MAX\_DUTY 0.15
>
> // Smart Reverse Ramp Time
> #define APPCONF\_CHUK\_SMART\_REV\_RAMP\_TIME 3
>
> // Speed
> #define APPCONF\_NRF\_SPEED 1
>
> // TX Power
> #define APPCONF\_NRF\_POWER 3
>
> // CRC
> #define APPCONF\_NRF\_CRC 1
>
> // Retry Delay
> #define APPCONF\_NRF\_RETR\_DELAY 0
>
> // Retries
> #define APPCONF\_NRF\_RETRIES 3
>
> // Radio Channel
> #define APPCONF\_NRF\_CHANNEL 76
>
> // Address 0
> #define APPCONF\_NRF\_ADDR\_B0 198
>
> // Address 1
> #define APPCONF\_NRF\_ADDR\_B1 199
>
> // Address 2
> #define APPCONF\_NRF\_ADDR\_B2 0
>
> // Send ACK
> #define APPCONF\_NRF\_SEND\_CRC\_ACK 1
>
> // P
> #define APPCONF\_BALANCE\_KP 0
>
> // I
> #define APPCONF\_BALANCE\_KI 0
>
> // D
> #define APPCONF\_BALANCE\_KD 0
>
> // Loop Hertz
> #define APPCONF\_BALANCE\_HERTZ 1000
>
> // Pitch Axis Fault Cutoff
> #define APPCONF\_BALANCE\_FAULT\_PITCH 20
>
> // Roll Axis Fault Cutoff
> #define APPCONF\_BALANCE\_FAULT\_ROLL 45
>
> // Duty Cycle Fault Cutoff
> #define APPCONF\_BALANCE\_FAULT\_DUTY 0.9
>
> // ADC1 Switch Voltage
> #define APPCONF\_BALANCE\_FAULT\_ADC1 0
>
> // ADC2 Switch Voltage
> #define APPCONF\_BALANCE\_FAULT\_ADC2 0
>
> // Pitch Fault Delay
> #define APPCONF\_BALANCE\_FAULT\_DELAY\_PITCH 0
>
> // Roll Fault Delay
> #define APPCONF\_BALANCE\_FAULT\_DELAY\_ROLL 0
>
> // Duty Fault Delay
> #define APPCONF\_BALANCE\_FAULT\_DELAY\_DUTY 0
>
> // Half Switch Fault Delay
> #define APPCONF\_BALANCE\_FAULT\_DELAY\_SWITCH\_HALF 0
>
> // Full Switch Fault Delay
> #define APPCONF\_BALANCE\_FAULT\_DELAY\_SWITCH\_FULL 0
>
> // ADC Half State Fault ERPM
> #define APPCONF\_BALANCE\_FAULT\_ADC\_HALF\_ERPM 1000
>
> // Tiltback Angle
> #define APPCONF\_BALANCE\_TILTBACK\_ANGLE 15
>
> // Tiltback Speed
> #define APPCONF\_BALANCE\_TILTBACK\_SPEED 5
>
> // Duty Cycle Tiltback
> #define APPCONF\_BALANCE\_TILTBACK\_DUTY 0.75
>
> // High Voltage Tiltback
> #define APPCONF\_BALANCE\_TILTBACK\_HIGH\_V 200
>
> // Low Voltage Tiltback
> #define APPCONF\_BALANCE\_TILTBACK\_LOW\_V 0
>
> // Constant Tiltback
> #define APPCONF\_BALANCE\_TILTBACK\_CONSTANT 0
>
> // Constant Tiltback ERPM
> #define APPCONF\_BALANCE\_TILTBACK\_CONSTANT\_ERPM 500
>
> // Startup Pitch Axis Angle Tolerance
> #define APPCONF\_BALANCE\_STARTUP\_PITCH\_TOLERANCE 20
>
> // Startup Roll Axis Angle Tolerance
> #define APPCONF\_BALANCE\_STARTUP\_ROLL\_TOLERANCE 8
>
> // Startup Centering Speed
> #define APPCONF\_BALANCE\_STARTUP\_SPEED 30
>
> // Deadzone
> #define APPCONF\_BALANCE\_DEADZONE 0
>
> // Current Boost
> #define APPCONF\_BALANCE\_CURRENT\_BOOST 0
>
> // Multiple VESCs Over CAN
> #define APPCONF\_BALANCE\_MULTI\_ESC 0
>
> // Yaw P
> #define APPCONF\_BALANCE\_YAW\_KP 0
>
> // Yaw I
> #define APPCONF\_BALANCE\_YAW\_KI 0
>
> // Yaw D
> #define APPCONF\_BALANCE\_YAW\_KD 0
>
> // Roll Steer KP
> #define APPCONF\_BALANCE\_ROLL\_STEER\_KP 0
>
> // Roll Steer ERPM KP
> #define APPCONF\_BALANCE\_ROLL\_STEER\_ERPM\_KP 0
>
> // Brake Current
> #define APPCONF\_BALANCE\_BRAKE\_CURRENT 0
>
> // Yaw Current Clamp
> #define APPCONF\_BALANCE\_YAW\_CURRENT\_CLAMP 0
>
> // Setpoint Pitch Low Pass Filter
> #define APPCONF\_BALANCE\_SETPOINT\_PITCH\_FILTER 0
>
> // Setpoint Target Low Pass Filter
> #define APPCONF\_BALANCE\_SETPOINT\_TARGET\_FILTER 1
>
> // Setpoint Filter Clamp
> #define APPCONF\_BALANCE\_SETPOINT\_FILTER\_CLAMP 8
>
> // D term PT1 Filter
> #define APPCONF\_BALANCE\_KD\_PT1\_FREQUENCY 0
>
> // Control Type
> #define APPCONF\_PAS\_CTRL\_TYPE 0
>
> // Sensor Type
> #define APPCONF\_PAS\_SENSOR\_TYPE 0
>
> // PAS Max Current
> #define APPCONF\_PAS\_CURRENT\_SCALING 0.1
>
> // Pedal RPM Start
> #define APPCONF\_PAS\_PEDAL\_RPM\_START 10
>
> // Pedal RPM End
> #define APPCONF\_PAS\_PEDAL\_RPM\_END 180
>
> // Invert Pedal Direction
> #define APPCONF\_PAS\_INVERT\_PEDAL\_DIRECTION 0
>
> // Sensor Magnets
> #define APPCONF\_PAS\_MAGNETS 24
>
> // Use Filter
> #define APPCONF\_PAS\_USE\_FILTER 1
>
> // Positive Ramping Time
> #define APPCONF\_PAS\_RAMP\_TIME\_POS 0.6
>
> // Negative Ramping Time
> #define APPCONF\_PAS\_RAMP\_TIME\_NEG 0.3
>
> // Update Rate
> #define APPCONF\_PAS\_UPDATE\_RATE\_HZ 500
>
> // IMU Type
> #define APPCONF\_IMU\_TYPE 1
>
> // IMU AHRS Mode
> #define APPCONF\_IMU\_AHRS\_MODE 0
>
> // Sample Rate
> #define APPCONF\_IMU\_SAMPLE\_RATE\_HZ 200
>
> // Accelerometer Confidence Decay
> #define APPCONF\_IMU\_ACCEL\_CONFIDENCE\_DECAY 1
>
> // Mahony KP
> #define APPCONF\_IMU\_MAHONY\_KP 0.3
>
> // Mahony KI
> #define APPCONF\_IMU\_MAHONY\_KI 0
>
> // Madgwick Beta
> #define APPCONF\_IMU\_MADGWICK\_BETA 0.1
>
> // Imu Rotation Roll
> #define APPCONF\_IMU\_ROT\_ROLL 0
>
> // Imu Rotation Pitch
> #define APPCONF\_IMU\_ROT\_PITCH 0
>
> // Imu Rotation Yaw
> #define APPCONF\_IMU\_ROT\_YAW 0
>
> // Accel Offset X
> #define APPCONF\_IMU\_A\_OFFSET\_0 0
>
> // Accel Offset Y
> #define APPCONF\_IMU\_A\_OFFSET\_1 0
>
> // Accel Offset Z
> #define APPCONF\_IMU\_A\_OFFSET\_2 0
>
> // Gyro Offset X
> #define APPCONF\_IMU\_G\_OFFSET\_0 0
>
> // Gyro Offset Y
> #define APPCONF\_IMU\_G\_OFFSET\_1 0
>
> // Gyro Offset Z
> #define APPCONF\_IMU\_G\_OFFSET\_2 0
>
> // Gyro Offset Comp X
> #define APPCONF\_IMU\_G\_OFFSET\_COMP\_FACT\_0 0
>
> // Gyro Offset Comp Y
> #define APPCONF\_IMU\_G\_OFFSET\_COMP\_FACT\_1 0
>
> // Gyro Offset Comp Z
> #define APPCONF\_IMU\_G\_OFFSET\_COMP\_FACT\_2 0
>
> // Gyro Offset Comp Clamp
> #define APPCONF\_IMU\_G\_OFFSET\_COMP\_CLAMP 5
>
> // APPCONF\_DEFAULT\_H\_
> #endif
---
### Author:  [@Larsb](https://foil.zone/u/Larsb)
#### Post date: [February 17, 2024, 9:52am UTC](https://foil.zone/t/ammo-box-6384-winch-build/20002/13 "2024-02-17T09:52:30Z")
> [@foilinghopeful](#):
>
> Wheel Diameter
> #define MCCONF\_SI\_WHEEL\_DIAMETER 0.14
Guess this one isn‘t correct (if you use the vesc to check speed)? Your drum diameter is larger, right?
Seems there isn’t enough torque and with the low battery current output it could be low motor current that is the issue. You could test increasing the motor current to the max the controller can take, does it make a difference in the speed and battery current? If it does make a difference then could be that motor torque wasn’t enough or remote isn’t requesting full throttle.
If it doesn’t make a difference then motor torque might be maxed out, motor is too small.
Do you see 100% throttle command in vesc tool when throttled to the max?
What is the motor current in vesc tool during a pull, is it the expected value?
Apart from that i don’t see any obvious things.
---
### Author:  [@Jezza](https://foil.zone/u/Jezza)
#### Post date: [February 17, 2024, 10:05am UTC](https://foil.zone/t/ammo-box-6384-winch-build/20002/14 "2024-02-17T10:05:51Z")
> [@Larsb](#):
>
> Seems there isn’t enough torque and with the low battery current output it could be low motor current that is the issue. You could test increasing the motor current to the max the controller can take, does it make a difference in the speed and battery current?
This is it. Up the motor current to 160a and then you should see 80a at the battery…
---
### Author:  [@Foilguy](https://foil.zone/u/Foilguy)
#### Post date: [February 17, 2024, 2:47pm UTC](https://foil.zone/t/ammo-box-6384-winch-build/20002/15 "2024-02-17T14:47:15Z")
> [@foilinghopeful](#):
>
> When I placed the winch 1.5 meters above the ground,
You could mount the antennae on a small telescopic rod to make transport easier.
---
### Author:  [@foilinghopeful](https://foil.zone/u/foilinghopeful)
#### Post date: [February 21, 2024, 1:34pm UTC](https://foil.zone/t/ammo-box-6384-winch-build/20002/16 "2024-02-21T13:34:04Z")
**Progress Update**
Test 5: Skimboarding again.
The test was mostly a fail as the chain fell off again after jerky initial pull. Then, I tightened the chain tensioner a bit too tight, and the next run broke the a quick link holding the chain together fell apart. But, I did get some data on my laptop and did get to do an antenna test.
@Jezza @Foilguy Antenna problem solved.
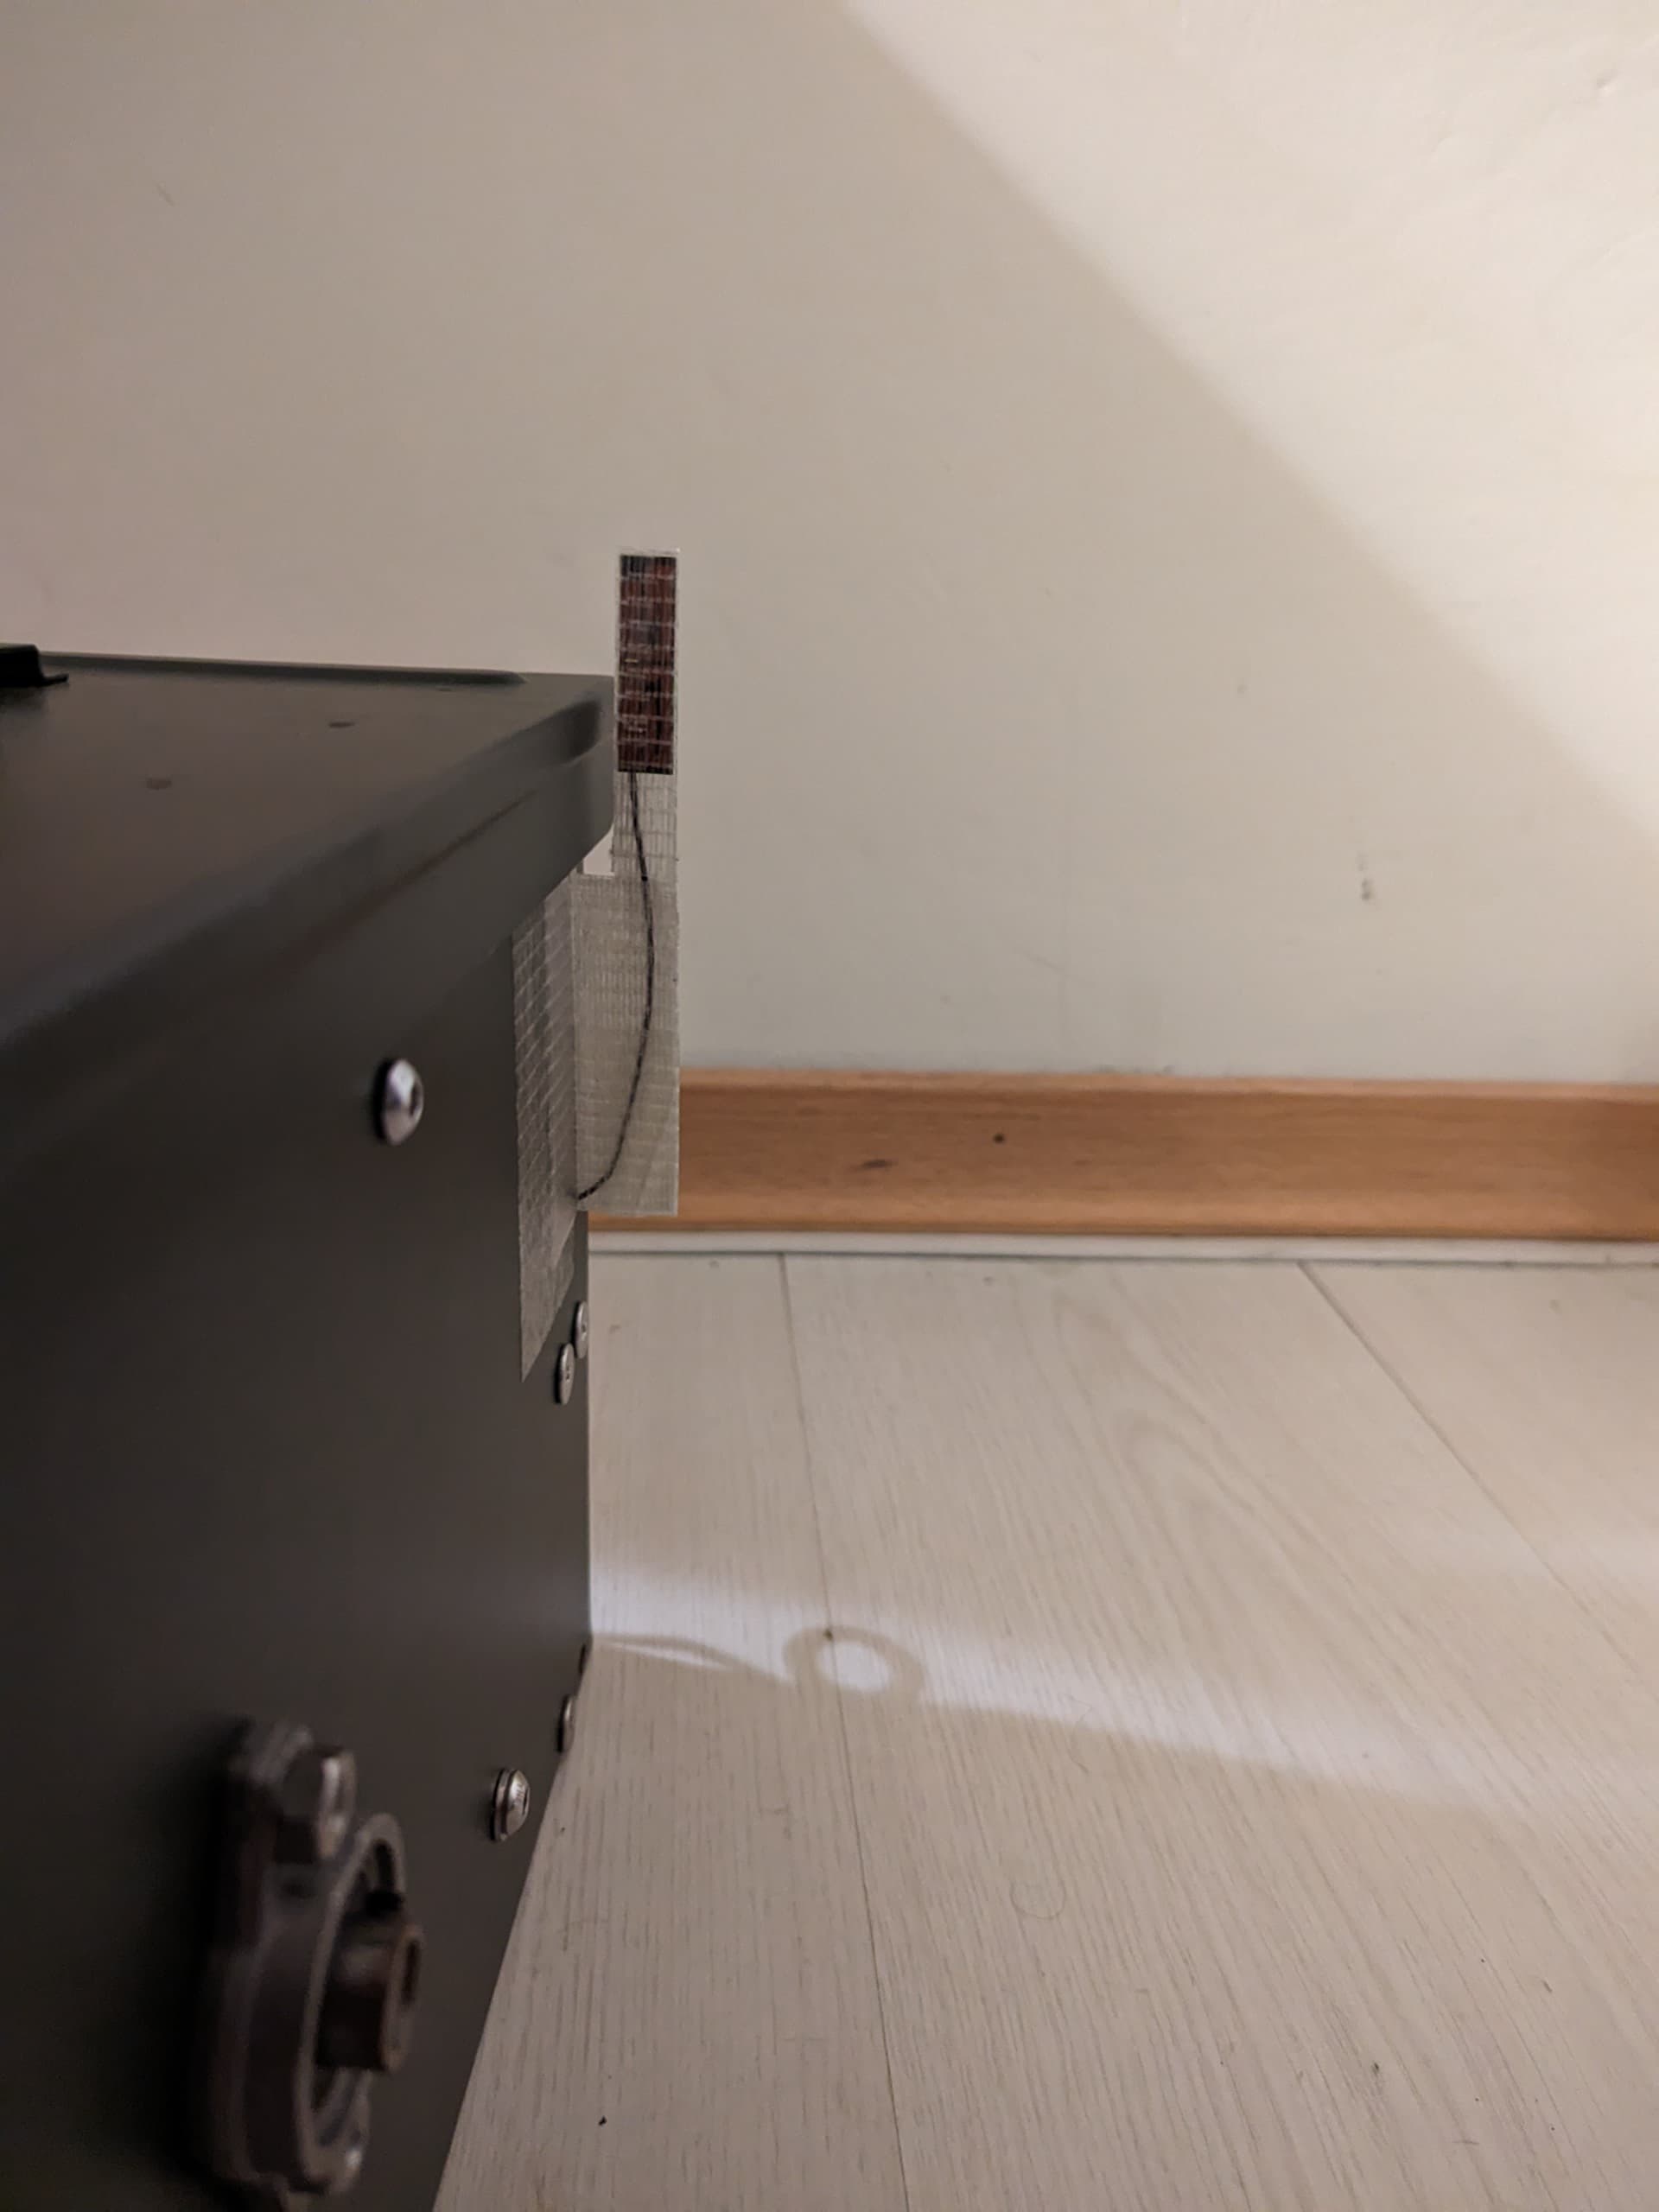
After reading a bunch about these types of antennas and antennas in general, it turns out that the antenna that comes with the VX3 also uses the cable as part of it which should be oriented perpendicular to the direction of the transmitter. Additionally, even though the antenna is likely omni-directional the radiation pattern is shaped like a fat donut leaving weak spots at the poles. I had the antenna positioned in the worst way possible on the winch. Changing it a bit (see picture), gave even more range than just elevating it. It works fine with low ping times and full bars at 150m, but at that range signal breaks if anything (one human body is enough) is in the way. I wrote Flipsky asking about the specs of the antennas they offer with the VX3, but no reply yet. If additional range is required, it seems like a high gain wifi antenna should yield a substantial improvement.
Motor current -
This is still under investigation. Some comments and questions.
> [@Larsb](#):
>
> Do you see 100% throttle command in vesc tool when throttled to the max?
I’m not sure where to check that, but I changed the throttle curve to the most extreme exponent possible, and tested inching up on the remote. It seemed fine as the motor didn’t even budge until 40% was reached on the remote. So, if the max throttle is off, it probably isn’t off by a lot. I also re-ran the VX3 calibration setting, and got basically the same results for a full trigger pull. If nothing else works, I’ll set the vesc power curve to max throttle on a hair trigger to make sure.
Also, the wheel diameter is fine. I’m guessing it is shown there in meters, so 14cm is accurate. I confirmed in the app.
> [@Larsb](#):
>
> You could test increasing the motor current to the max the controller can take
> [@Jezza](#):
>
> This is it. Up the motor current to 160a and then you should see 80a at the battery…
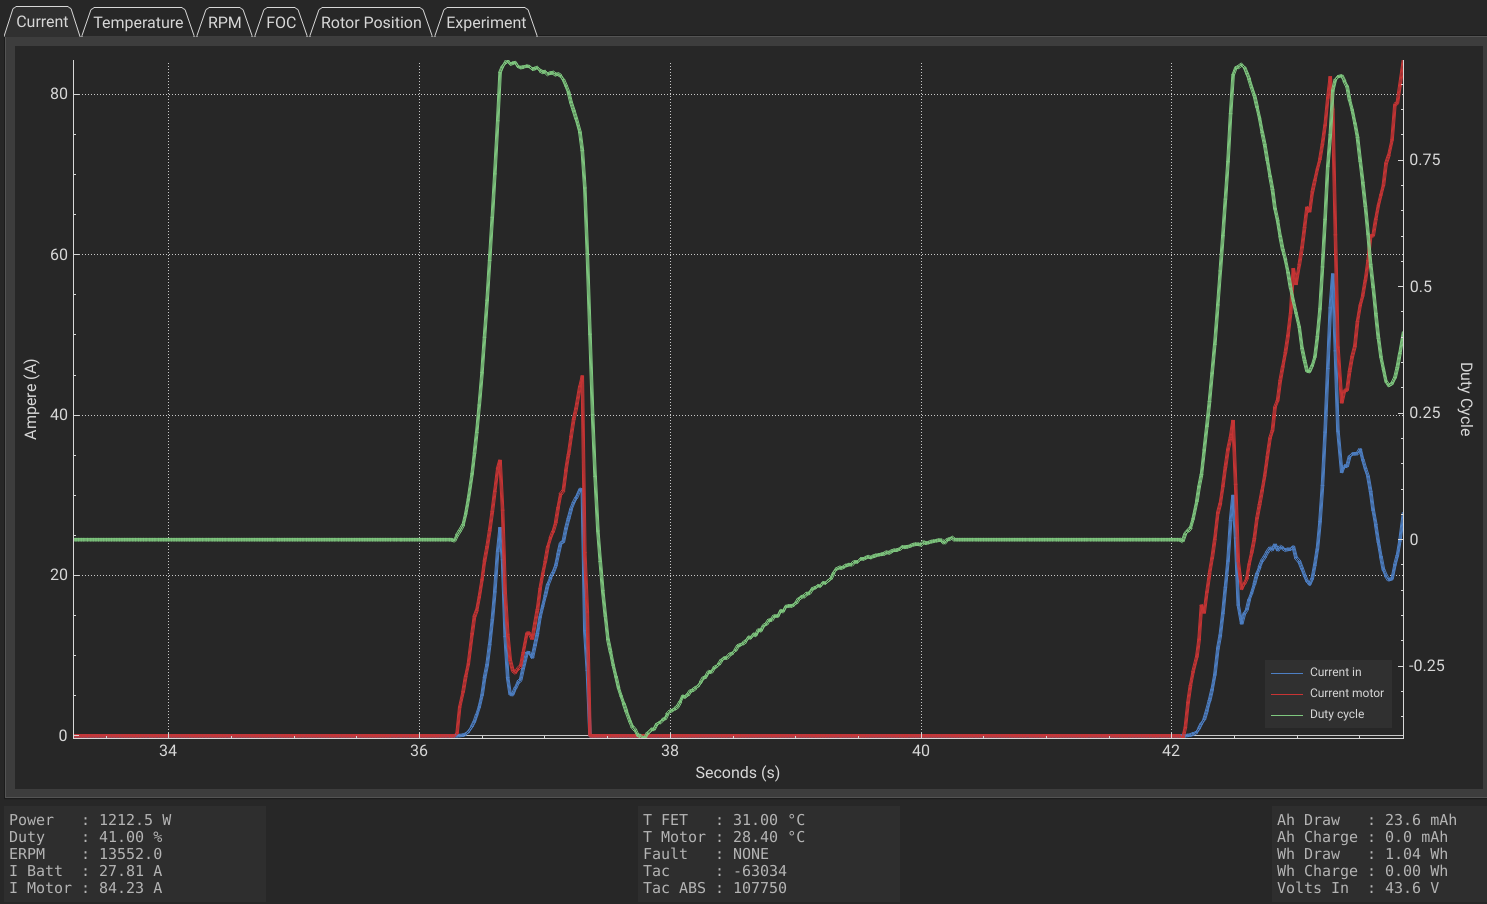
The vesc can only handle 120 amps burst, and 100 amps continuous. As a result, I set motor amps to 120 fearing that 160 could fry something if it works. Is there any reason why we would need to set this value higher than what is wanted? Or, is it some bug? Regardless, the minimal data I got was promising. The graph below shows the line being tensioned, and then the second set of spikes is the start of the pull (the chain falls off right after). The motor current does increase past 80 amps, and the battery current seems to rise to almost 60 amps. The winch was jolted rather violently causing the chain to fall which, unfortunately, didn’t get me a reading of speed or current draw for the run. It is possible that this behavior also existed under the old settings. I’ll be trying this again next time. I wish I got a bluetooth module instead of having to take my laptop to the beach.
One other thing to note is that I had the VX3 set to VESC mode instead of FSESC (Flipsky ESC) which sounds like a trivial change, but I thought it should be mentioned.
Anyway, next steps:
1. Get current graphs of full runs with new and old settings to compare.
2. Possibly upgrade VESC firmware in case that is the issue.
3. Add some sort of stabilizing mechanism to the winch so it doesn’t get whipped around so easily due to the forces involved.
---
### Author:  [@Larsb](https://foil.zone/u/Larsb)
#### Post date: [February 21, 2024, 5:11pm UTC](https://foil.zone/t/ammo-box-6384-winch-build/20002/17 "2024-02-21T17:11:11Z")
> [@foilinghopeful](#):
>
> I’m not sure where to check that, but I changed the throttle curve to the most extreme exponent possible,
When you setup the remote in vesc tool you can see if you reach 100% command on the screen. You can probably see it in the live readout view also but i never tried this.
Another trial with some more succesful pulls will be interesting.
---
### Author:  [@Jesserosco](https://foil.zone/u/Jesserosco)
#### Post date: [February 21, 2024, 7:32pm UTC](https://foil.zone/t/ammo-box-6384-winch-build/20002/18 "2024-02-21T19:32:57Z")
For range on the remote I would get the BREmote Long Range… its really good.
---
### Author:  [@foilinghopeful](https://foil.zone/u/foilinghopeful)
#### Post date: [April 24, 2024, 8:55am UTC](https://foil.zone/t/ammo-box-6384-winch-build/20002/19 "2024-04-24T08:55:35Z")
Hey guys,
Thanks for all the guidance on here. I’ve done a bunch of testing on and off the water, and here are the results.
1. The low current issue is resolved. I was reading the battery current and not motor current. I learned a bit about ESCs during this process. The constant battery voltage and variable battery current, is converted to lower voltage and higher current when being sent to the motor (keeping wattage constant). So, if the motor can’t spin quickly due to resistance, the voltage to the motor is lower which increases the current. This higher motor current hits the VESC motor current limit, and as a result it pulls less than the motor current limit from the battery. Example: Battery 48V_40A = Motor 24V_80A (motor spinning at 50%). Those numbers are rounded for clarity, but roughly what I was seeing.
2. There is something strange with ramping time. When using the break/reverse trigger, ramping time works like a charm with duty cycle rising linearly. On the forward trigger, it appears to be a function of motor current and is about twice as aggressive as in the settings. That is, for a max motor current of 80A, the ramp increases as if the max it was reaching after Xs is ~150A. A couple of graphs included.
3. The VX3’s high/medium/low settings are also just a max motor current setting with low being 50% and medium 75%. These numbers could be a bit off. I only ran the test once.
4. Again, remote range is fine after the super basic antenna re-orientation.
So, I guess, mission accomplished… kinda. For foiling it works fine. Actually, the power for foiling is overkill. The bonus scenario of cross shore surfboard drag doesn’t work terribly well for us guys here at around 80kg (15km/h is fun for a bit, but gets old). For women and children, it could be a hoot though.
Next steps:
1. See if I can perpetually foil doing figure 8s in front of the winch. Basically, you pull yourself at a sharp angle to the winch, then release the power and turn directly away from the winch for as far as you can go, then repeat in the opposite direction. A bit like a long tack. I have successfully tested it on a skateboard gaining ground against the winch. But first, I need to suck a lot less at foiling.
2. See if I can perpetually foil using the winch to pull me out toward a sea wall away from the beach, then use waves to ride back in and away from the winch. Repeat.
I think those two options are better than trying to make this bidirectional.
Wish list:
I wish I could reprogram the VESC such that the remote’s break/reverse button also goes forward. It would be a nice addition to have a separate nice and chill ‘tighten rope’ trigger vs gently using the ‘go go go’ option after tweaking the throttle curve. The lack of resistance on the rope really whips it around with even a tiny dose of current.
I’ll post a video once someone here does something not totally embarrassing on the foil. Haha.
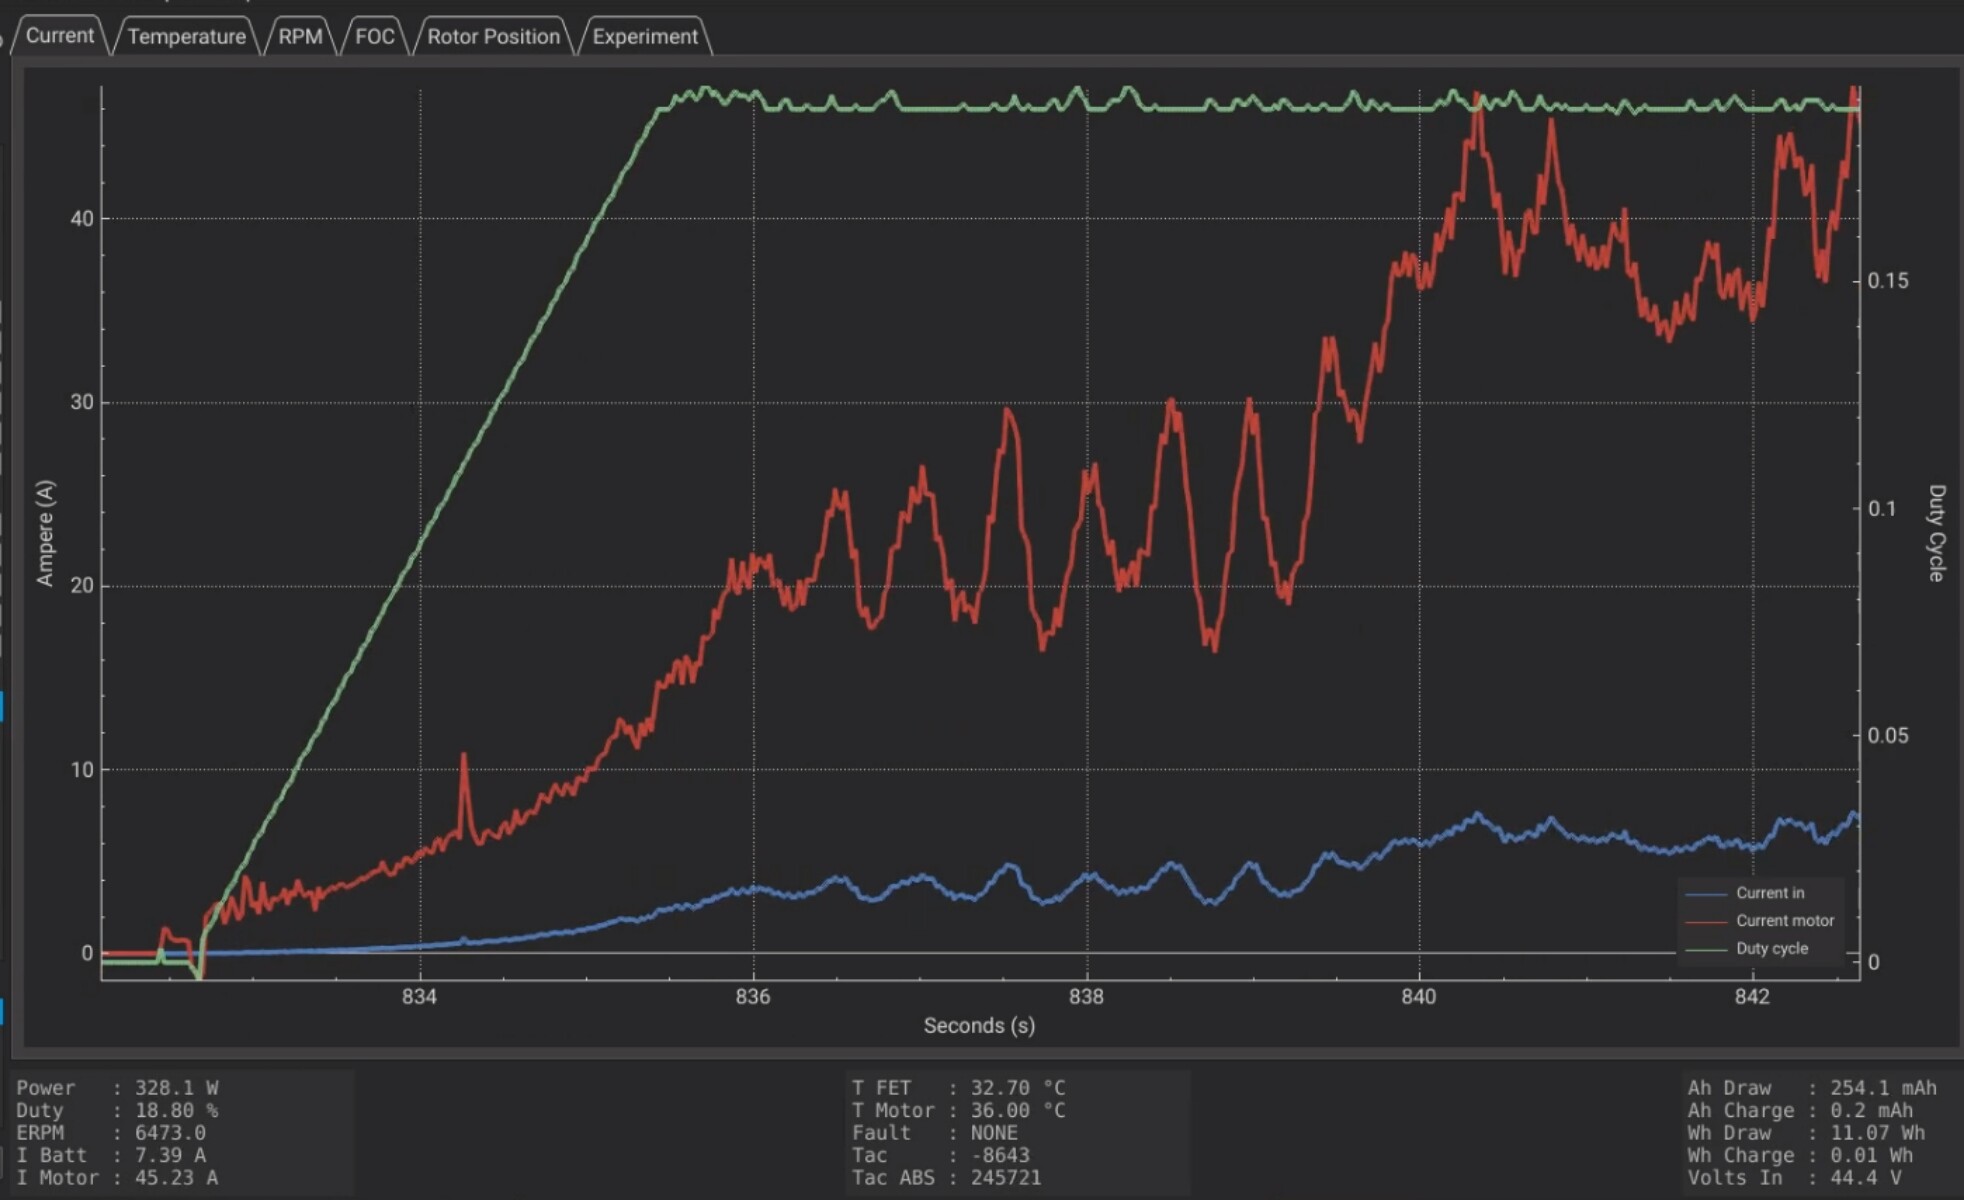
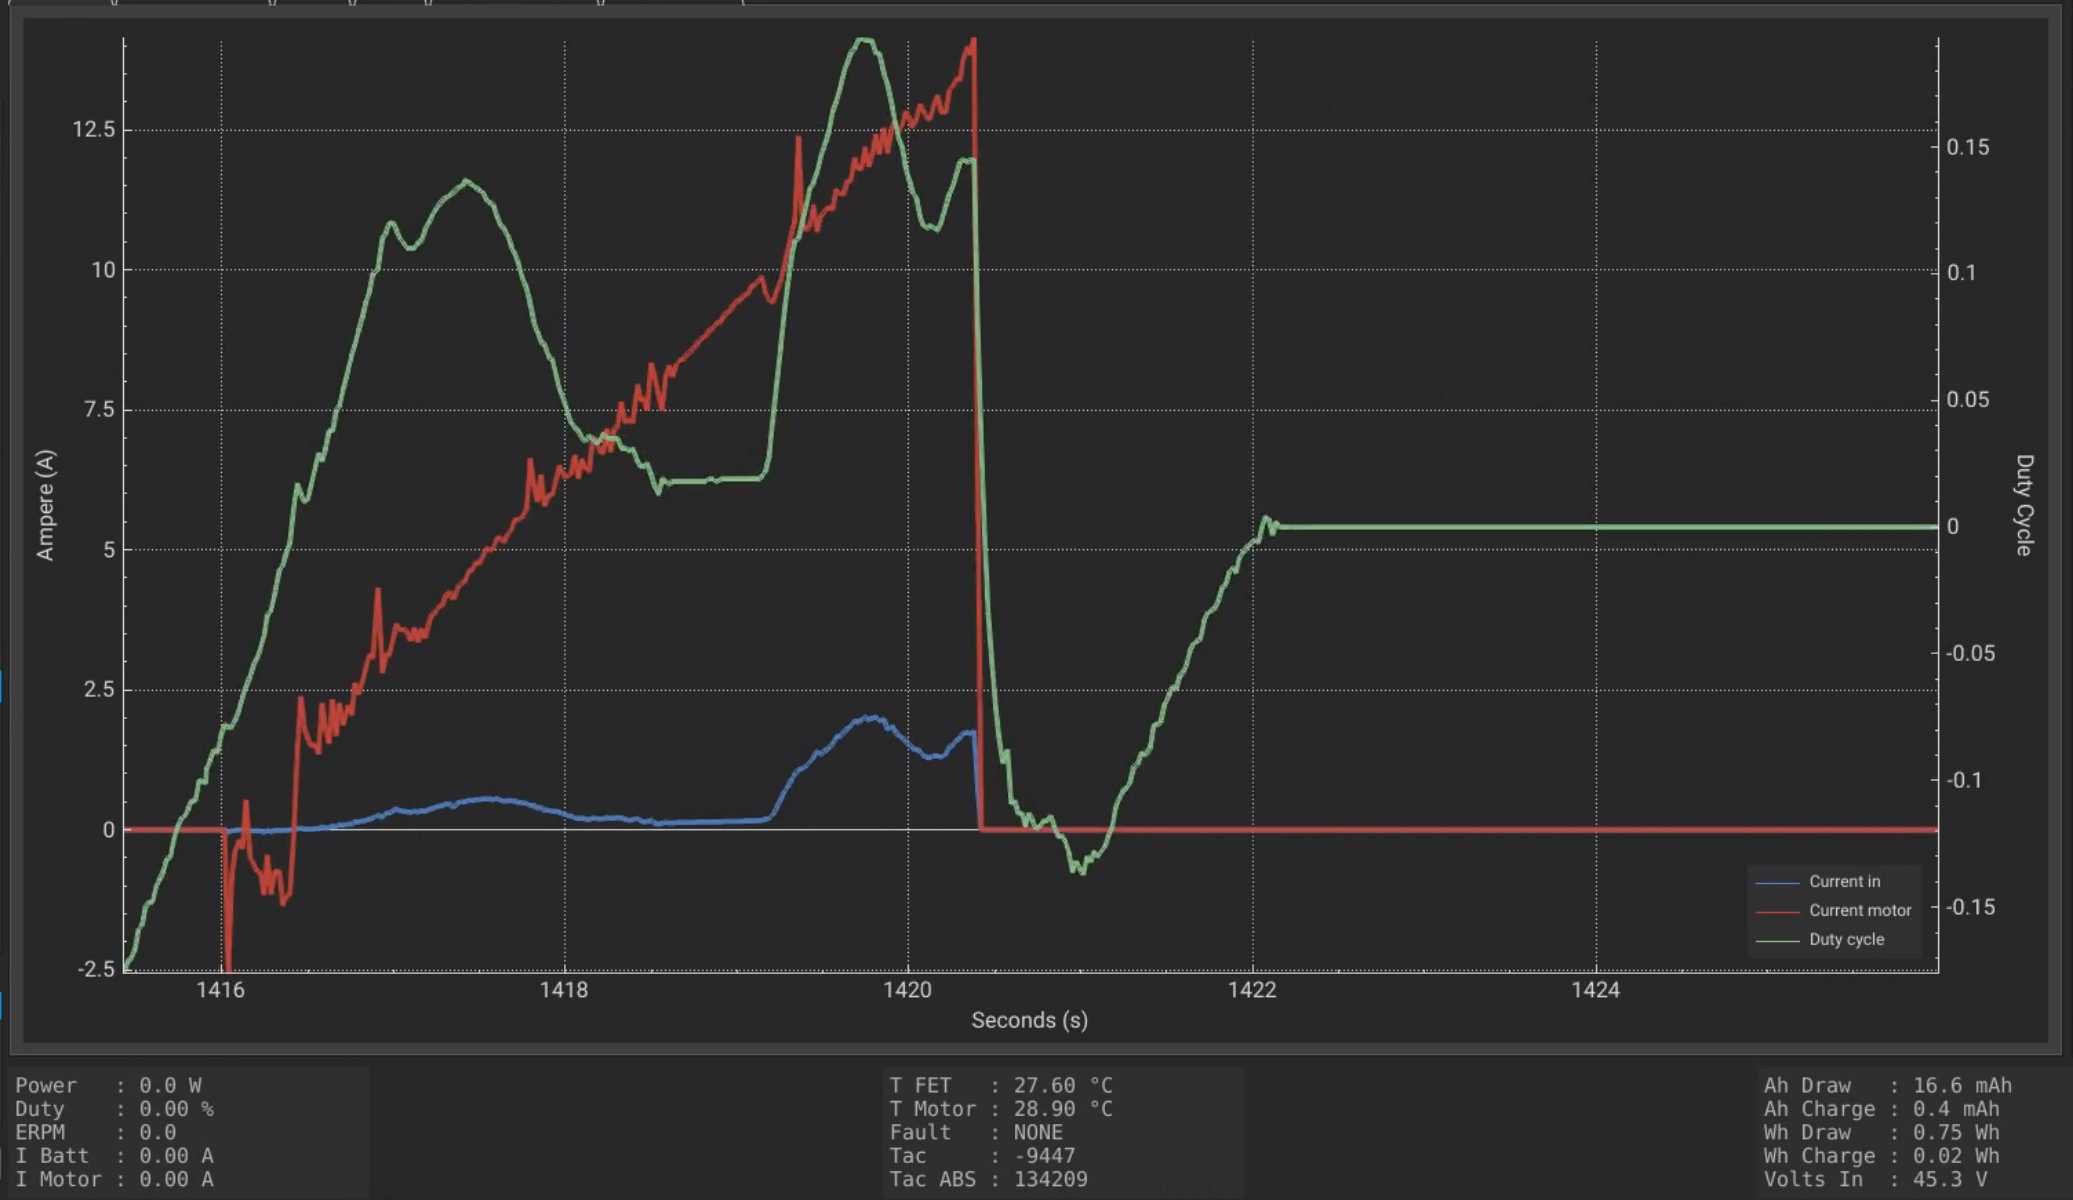
---
### Author:  [@Strongarm](https://foil.zone/u/Strongarm)
#### Post date: [April 24, 2024, 9:23am UTC](https://foil.zone/t/ammo-box-6384-winch-build/20002/20 "2024-04-24T09:23:59Z")
Great write up. If you can replicate this bug you might have one of your wishes.
[https://vesc-project.com/node/1112](https://vesc-project.com/node/1112)
And if incorrectly calibrate the brake trigger so that full press is only few % power then it should work quite well.
Another option could be putting a negative in front of a value (brake current maybe) in VESC tool to see if you can make reverse/ brake run forward??
[Next page](https://foil.zone/t/ammo-box-6384-winch-build/20002.md?page=2)