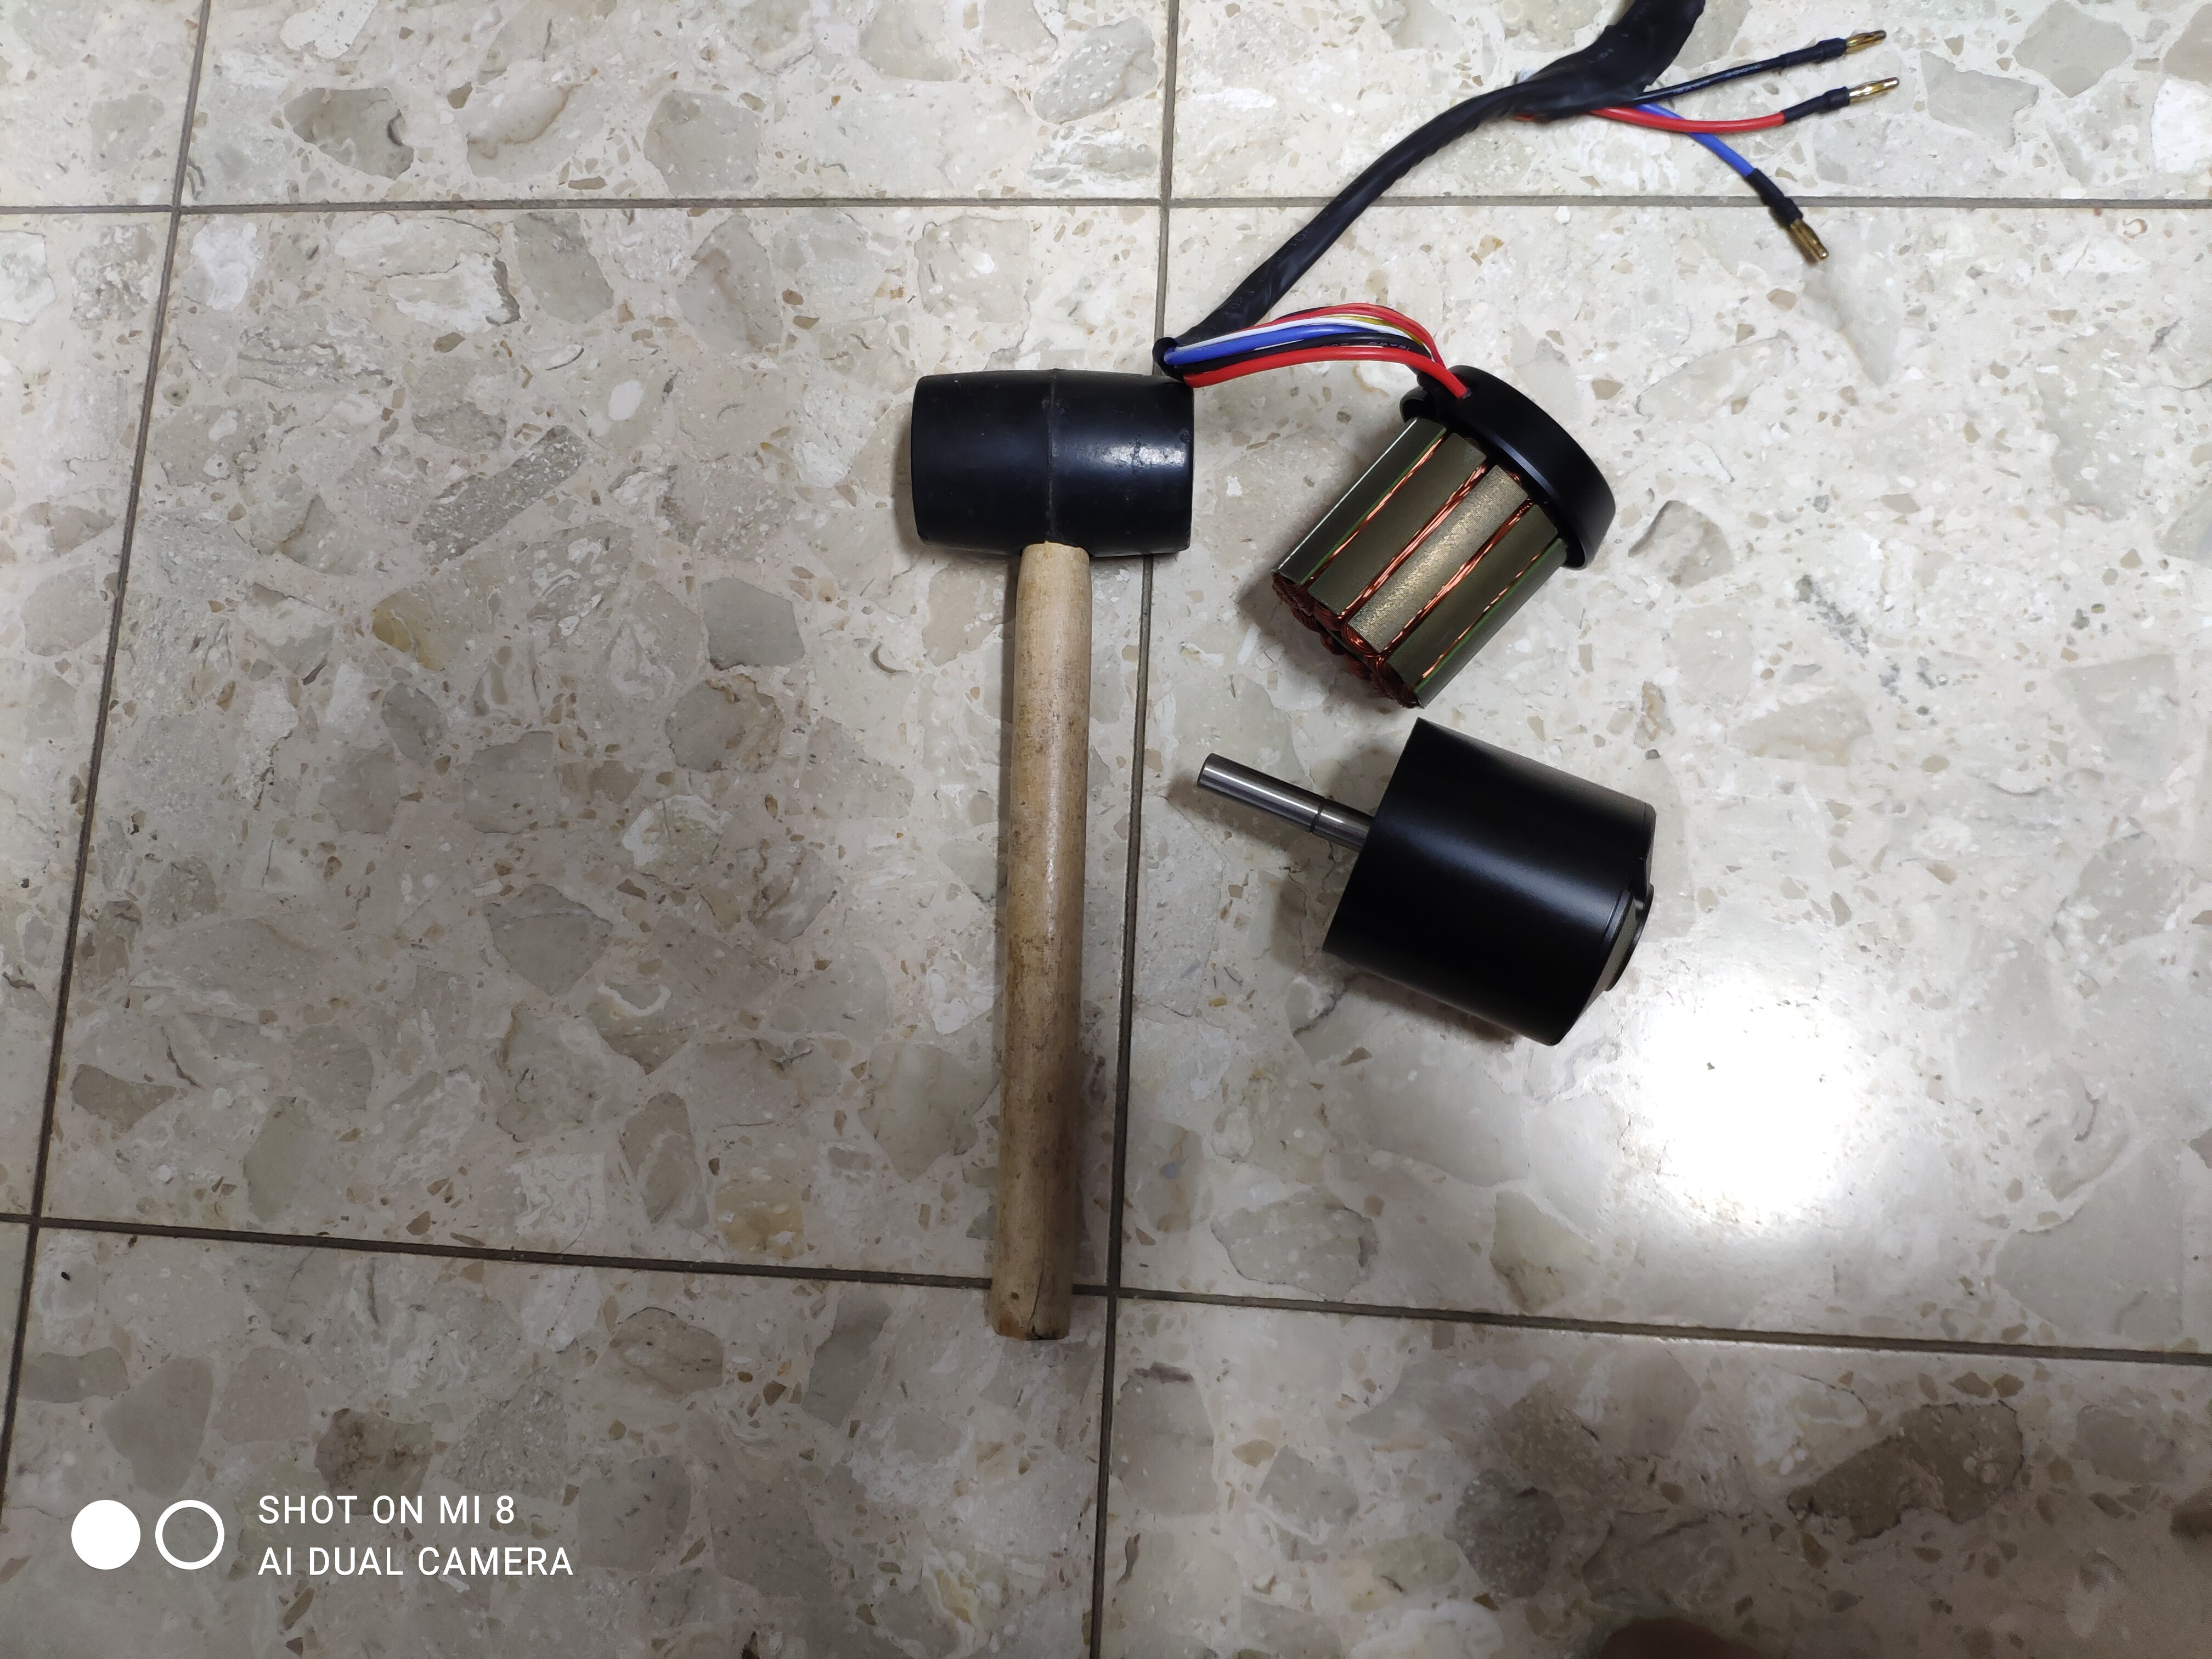
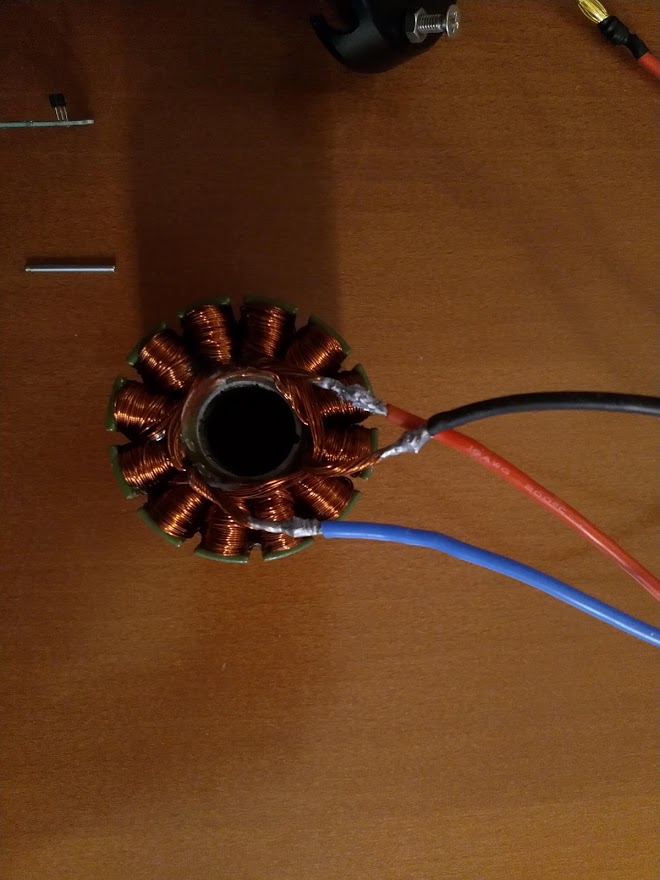
Hey guys, I got my generic 6384 outrunner and wanted to start prepping it, soldering thicker phase wires, epoxying, etc. However, trying to remove the upper bearing gave me a hard time, any advice? Thanks
Sometimes these have bearing glue on, should be visible in this case. If so, put the stator in the oven 100degC for half an hour, this can soften the glue.
I don’t have a 6384 motor to check but normally you can push out the bearings with a mandrel pushed into the hole from the opposite side. If you’re anyway replacing with stainless bearings then you can smack them out from the opposite side with a hammer and screwdriver.
1 Like
Thanks buddy, you’re always there to help.
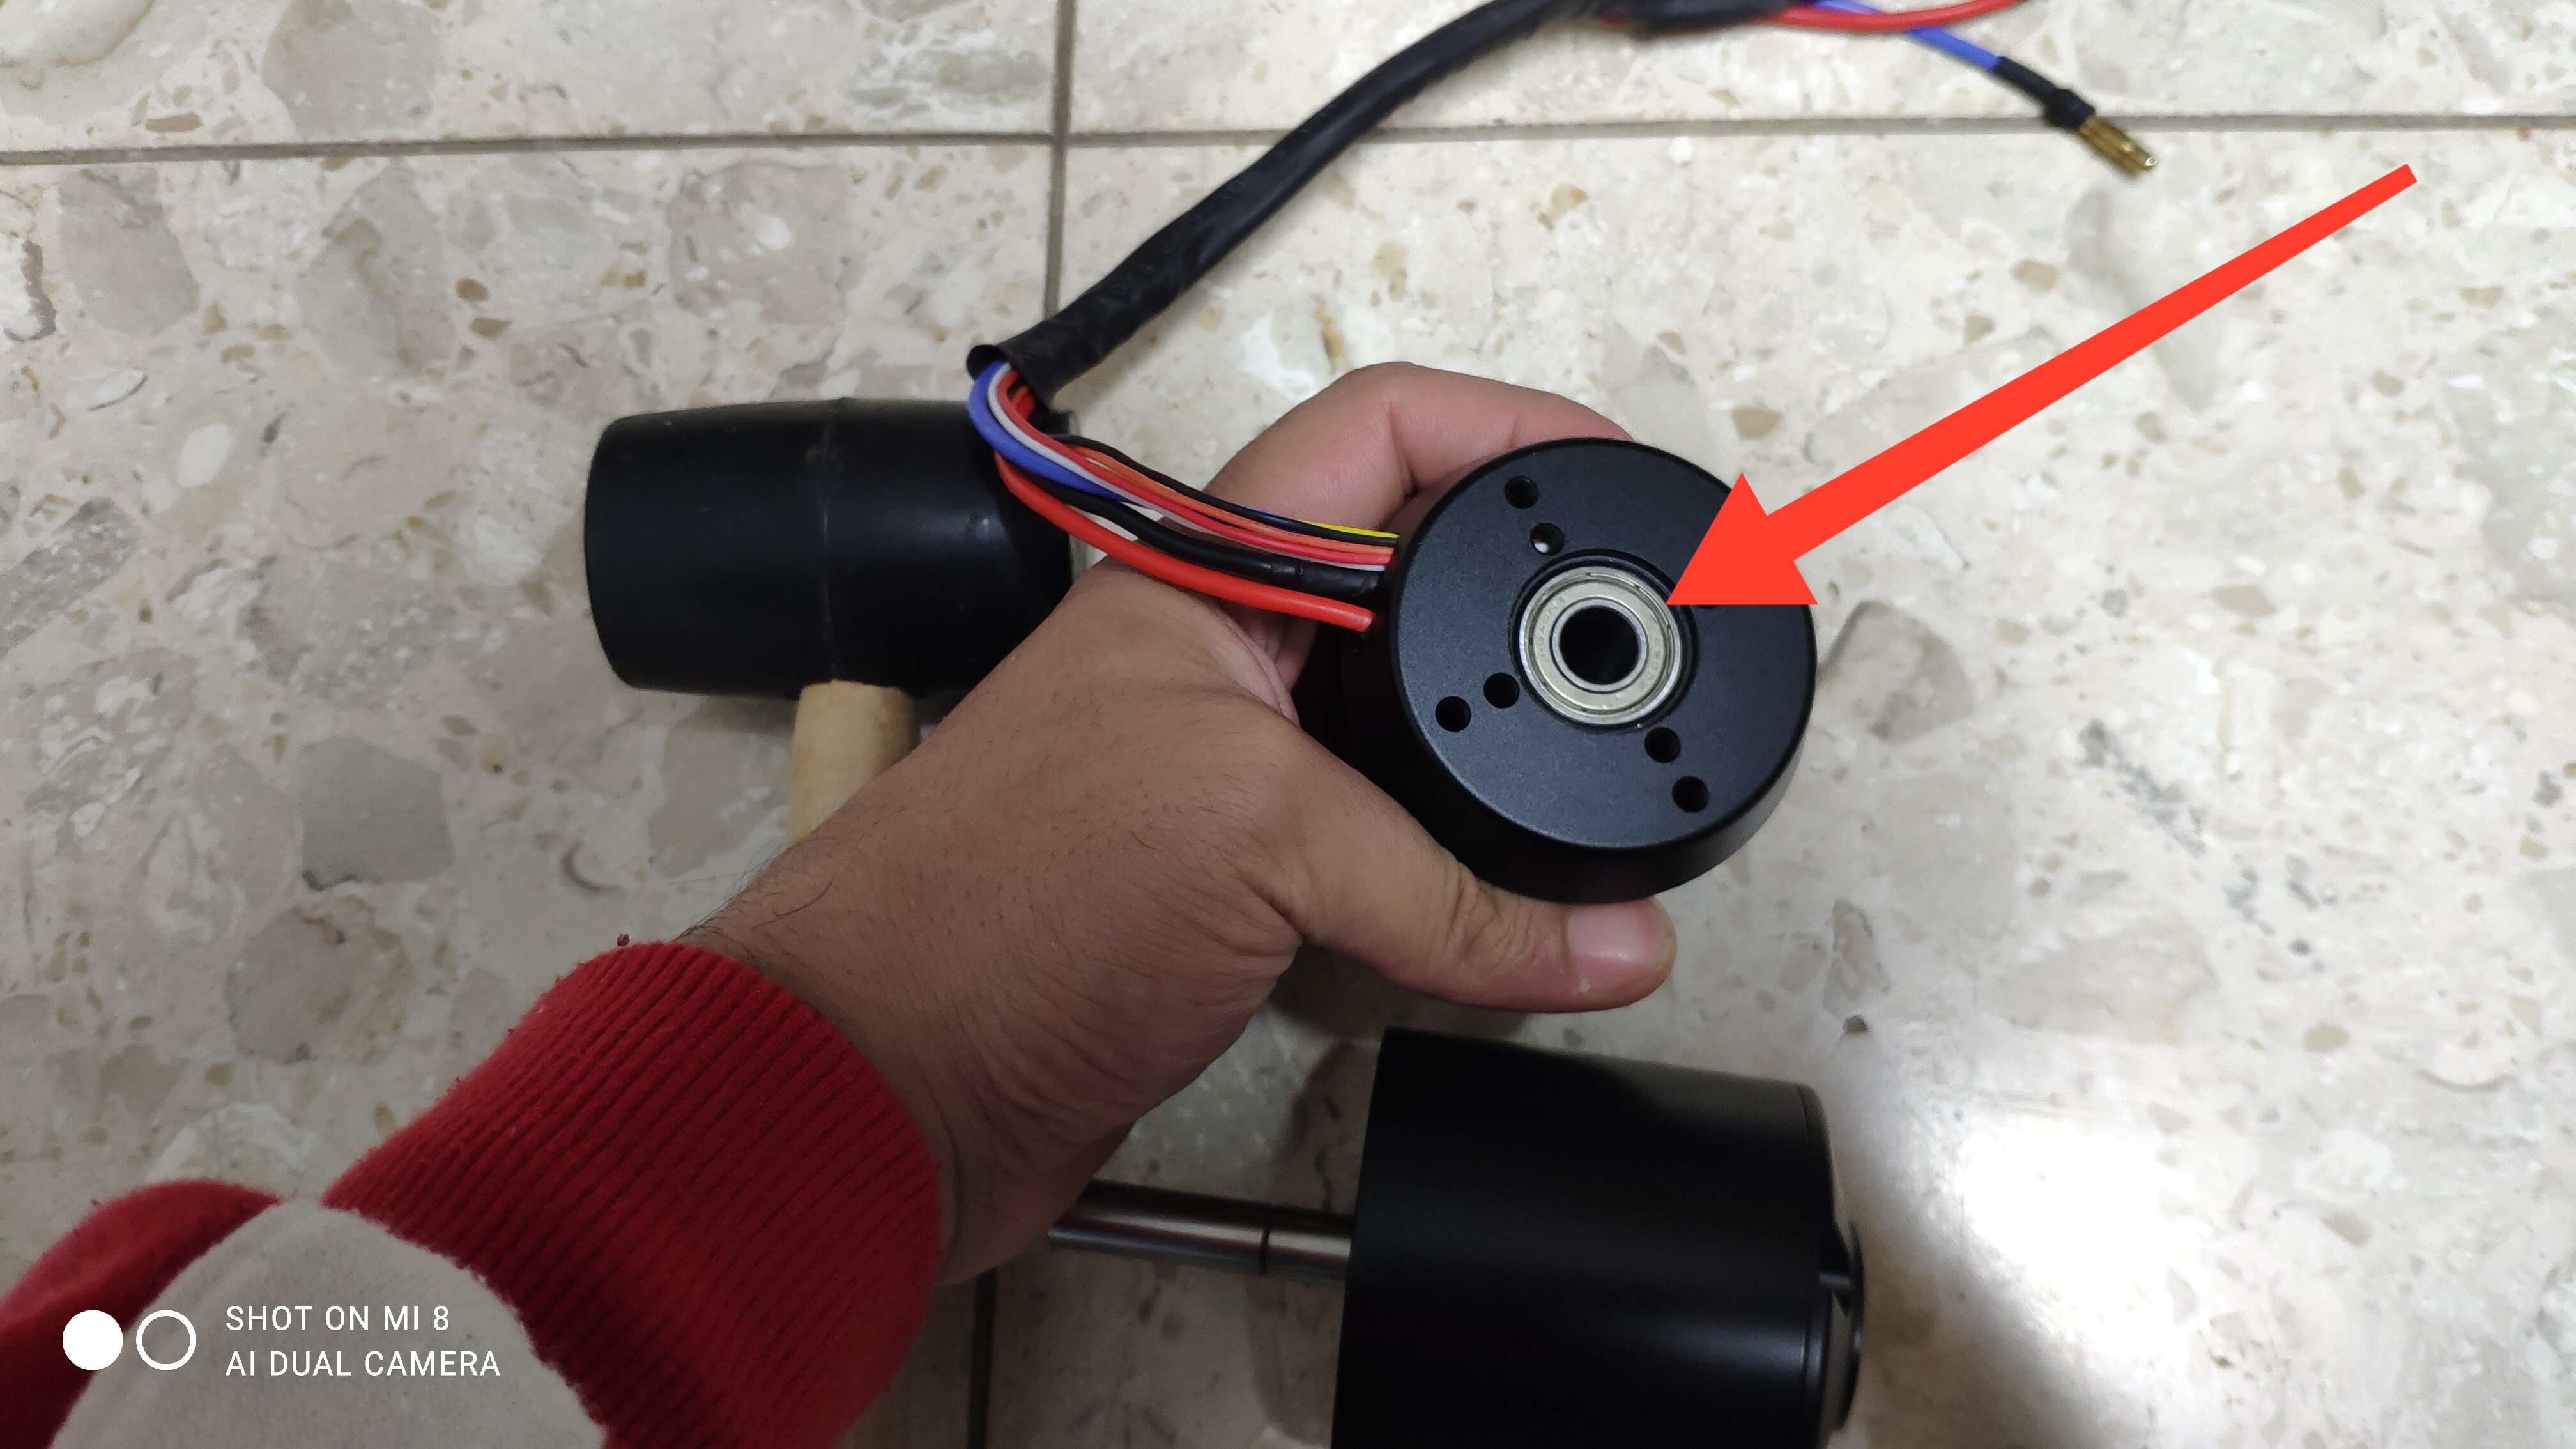
My most important challenge now is to remove the top mount plate so I can separate the stator completely, I want to get rid of the sensor wires and from there proceed to solder new phase wires, and dunk it in epoxy, etc. any idea how to do that without destroying that motor?
Tried to check some pictures, no screw fixations for the back plate? If so then likely a grip fit between the plate to the stator core. I’d remove the bearings first and check what can be seen.
Probably you need to use a puller to get it off. Just be careful, the thin copper wires are easily damaged - could be better to cut the wires just outside of the motor and solder on some new ones.
Good luck removing the top mount plate. I tried EVERYTHING on a 6364 motor and finally gave up. If you’re not worried about damaging your windings (because you plan on replacing them) you might have luck using a torch and a press. I tried a press alone, and couldn’t get it to budge.
It’s actually easier than it seems, no need a press, I made a video explaining just that, send me a private message and I’ll send you the link.
You have a way to remove the armature/windings from the front mount plate? I’d love to see your video. Thanks.
Please share link here for all. It might help someone to avoid destroying their motor 
The video indeed would be very helpful for me
I have the same question for two units, would need remove the top mount plate so I can remove sensor wires/board? Otherwise build quality on these seams rather ok what i can tell. 3 small bearings on each motor.
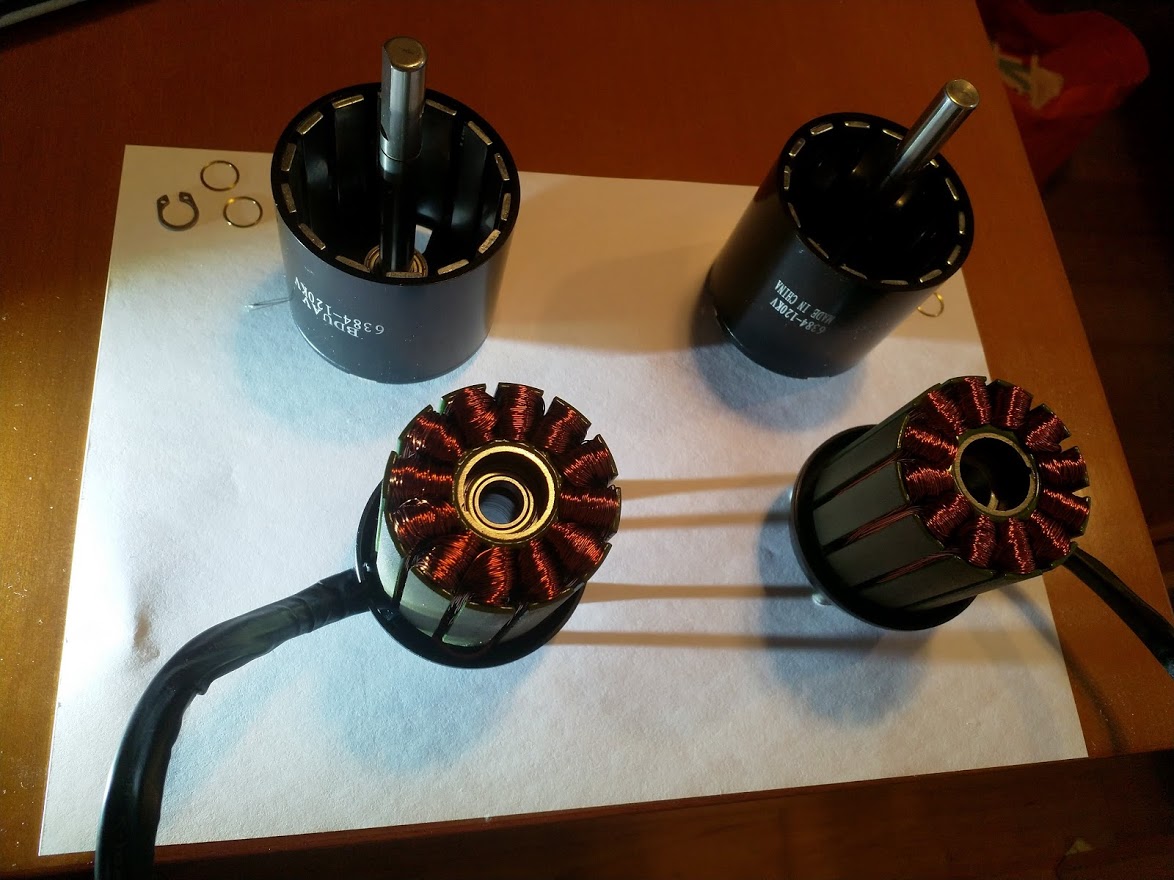
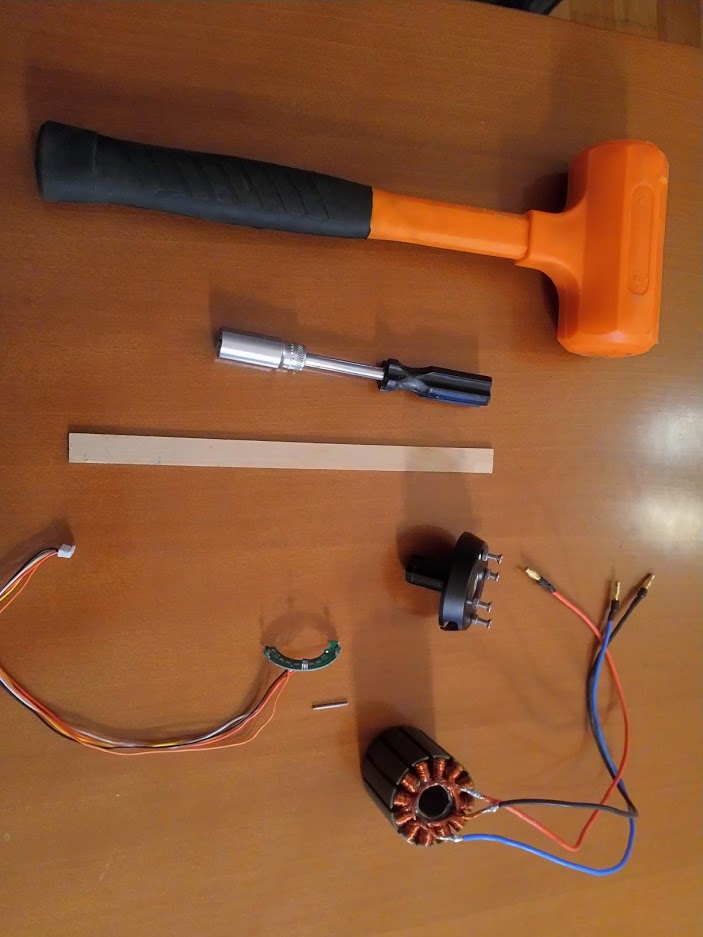
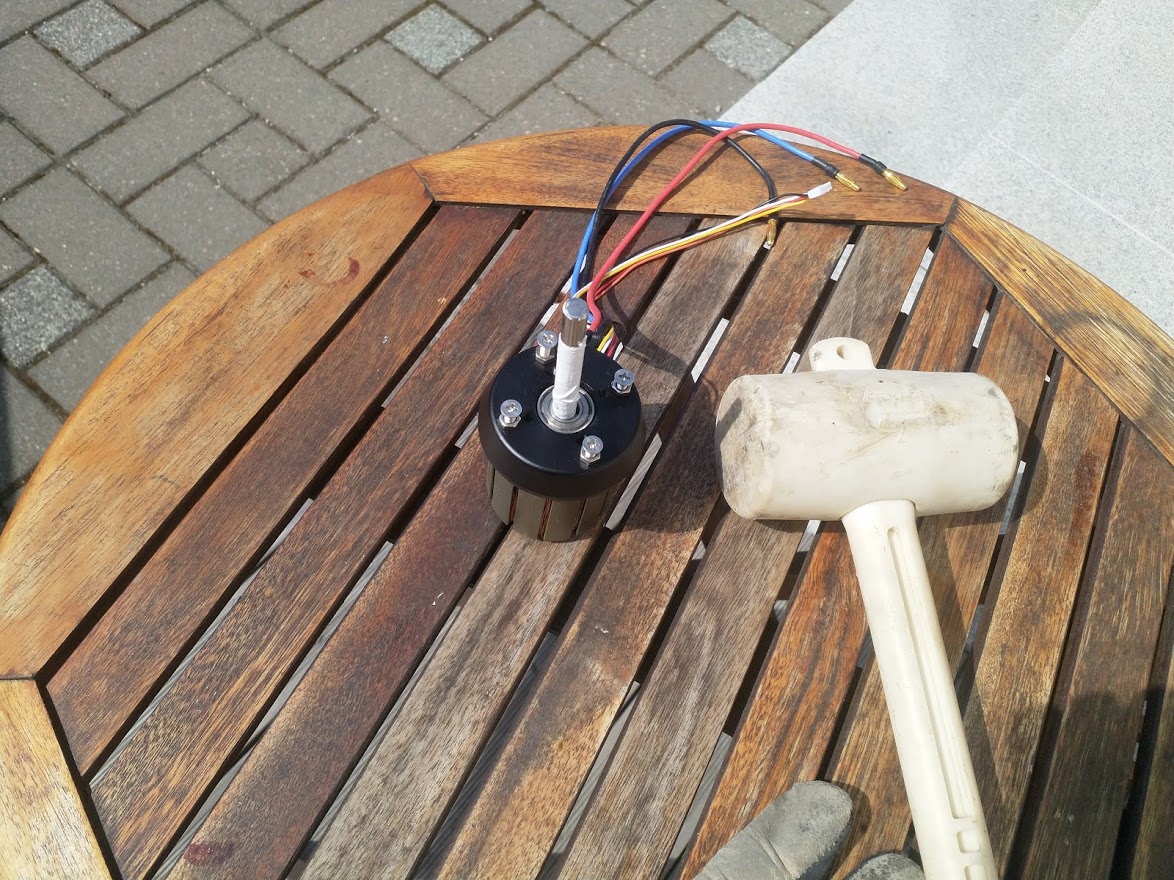
Thanks e- Jetter for Your help! In the pictures You can see the tools I used. I left the bearing in the topmount plate as it is (for now). First everything was like solid…but then kept the stator in the Owen at 55C, and cooled the top mount quickly, then it started to move after some hammering. The wires are partly glued to the top mount plate, so watch out. Think I got everything loose without damaging anything. The phase wires are extremely thin, will change to minimum 6mm2. I am really bad a soldering, need to practice…worried will damage/melt the winding protection.
Even though this will be inside the hull( but fluid cooled), still feel should epoxy the stator. Or should i use 2pack PU varnish? Another thing to consider is should i do the stator totally smooth( less friction) or should try to leave space between the poles( better cooling)?

1 Like
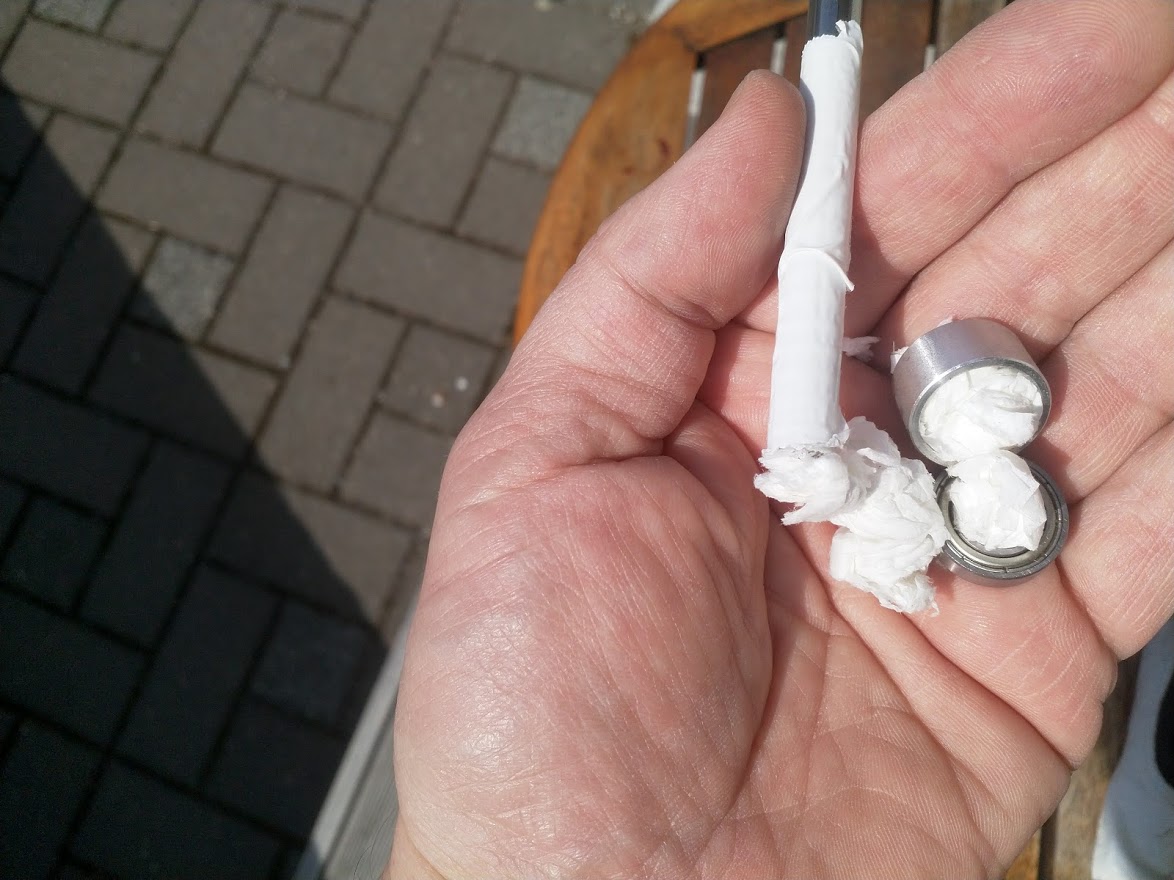
To remove the other bearing so the topmount can be removed, filled the cavity with tissue paper and gently banged on the compressed tissue with a shaft and rubber hammar. This one moved very easily.
2 Likes
Yay! You made it, I feel better about my video now lol, be sure to use the tissue paper method to avoid messing up your bearings, any missing info please comment on the video itself so I get notified, I don’t get notifications on the forum. video is here: https://youtu.be/x4brZwlp2A8
2 Likes
@XSailor get some liquid tape man.
https://a.aliexpress.com/_vrVSMf
I bought two colours - black and white so it’s much easier visually tell if you covered your first layer.
this stuff is amazing, apply 2~3 coats with a thin paint brush over the solder joints, start with white - leave it for 15 minutes then apply the black and so on, no need to use heat shrink, maybe 2~3cm just over the joints, I didn’t - tested in water with no current leakage.
it creates a durable silicon-like waterproof barrier. even if you apply a sloppy layer this material works in such a way that will still spread itself evenly as soon as you stop scattering it with the brush, it should then coalesce and stick to itself, it also sticks to our silicon wires like a magnet, which is perfect.
Now, DON’T make the same mistake I did, you don’t have to desolder the existing wires, it will only mess up the varnish coating, You can leave the wires in their original condition.
Yes these are thin, but they get a good cooling since they will be submerged in water anyways, just apply liquid tape on any exposed visual solder joint.
you can shorten them to about 10cm and then solder the appropriate connectors, I’m using 6mm bullet connectors:
https://a.aliexpress.com/_v0sRsx
use glue-lined heat shrink tubing over your connectors, 8mm ID should shrink to 2mm, buy many sizes, trust me, you will need them in the future.
https://a.aliexpress.com/_vDXJiB
Show us how you epoxied your stator, will be interesting.
1 Like
I got my stainless bearings now. Should I remove the bearing covers?
So that the bearings are open and no water can stay in the bearings?
You could remove them and it shouldn’t cause too much issues, but I would leave them as they are and flush with fresh water + Corrosion-X regularly.
@PowerGlider added a shaft seal down in the bearing slot which is a cool idea.
I would love to see your parts, bearings, motor, epoxy job, everything you can share please do, let’s revive this low budget type of builds again, I know I’ll post and update soon.
Haven’t done much jet.
But I will post when im finished
Tanks for the link to the liquid tape, its on its way now:) . In the past have used similar stuff by Star Brite but the pricing is ridiculous here… By the way, I did this to two motors( same brand) the other was much harder, had to warm it in the oven a couple of times before finally get i loose. Yes will leave the old soldering as is (but protected) but still add thicker wire shortly after as will have a high amp draw rig due to running on only 24v.
Sure will post pictures after coating the stator and possible the rotor also, not yet 100% decided what material to use( epoxy, 2K PU varnish or other) and will I make the stator flush or leave some groves for better cooling. The laminating epoxy i have right now is rather thick, but will receive another brand in a week.
Do you think it’s necessary to do an epoxy job and protect the windings?
I thought about just using a simple clearcoat out of a spray can to protect the motor against corrosion
I think it‘s more about protecting the stator from getting rusty, not the windings. I dipped my 63100 stator in a cup of epoxy. I run it in fresh water for some months now without problems. Haven‘t taken it apart to check though.