Holland board build

Last couple of weeks I tried to finalize the Propellor pod design. Really afraid that seals will leak because of the mismatch between propshaft and coupler.
Tried a few designs and printed a few new sealmounts to test. Below proposal is based upon a Hiorth setup using jaw type coupler. But I had some issues to make the custom shaft or having it made turned out very expensive.


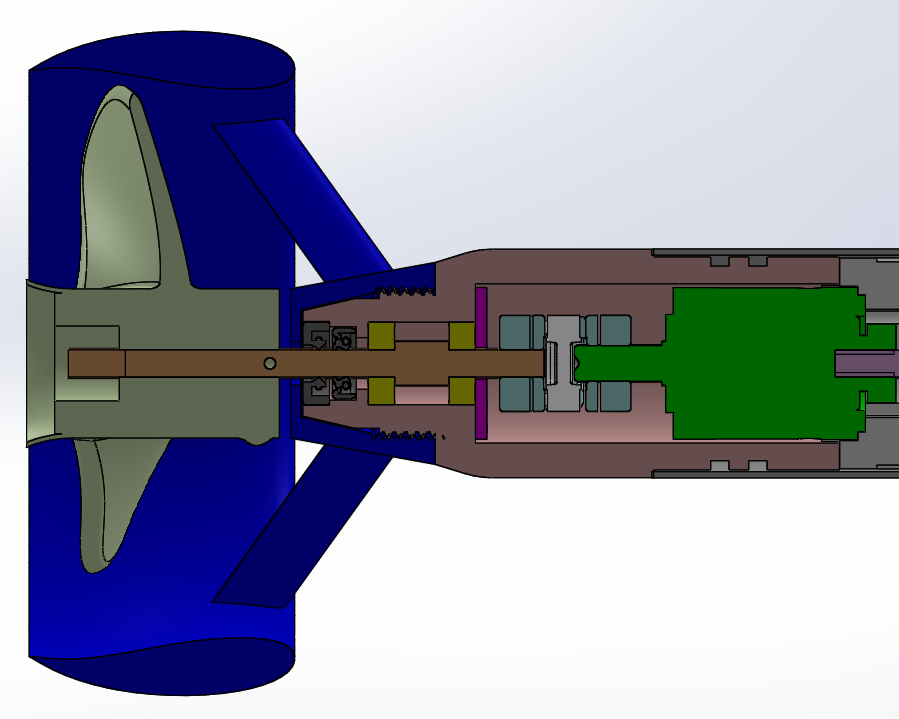
Next option was with a much larger clamp coupler and redesigning the PM sealmount so it would fit this coupler. Thought it would be good to add a second (dry) bearing and have quite a big gap between seals which I will fill with grease. I also increased the length a bit so a grub screw can be placed before the O-rings. My solidworks skills improve because of all this quite a bit :slight_smile:

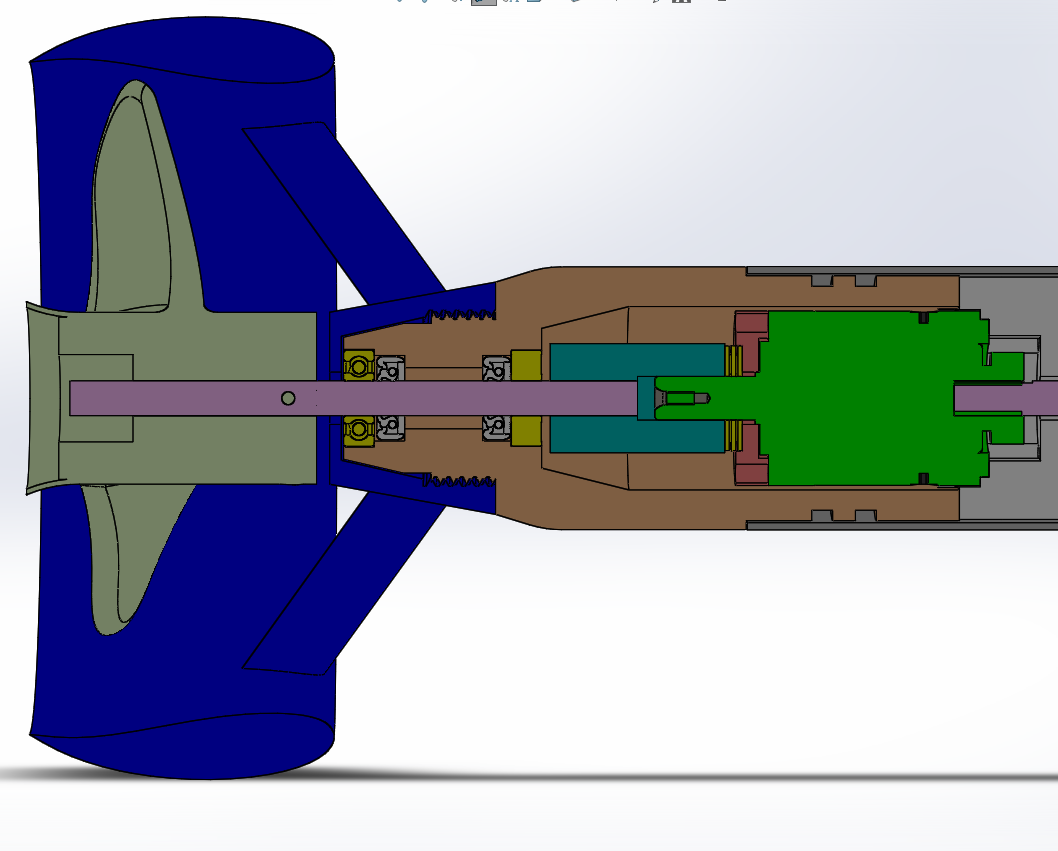
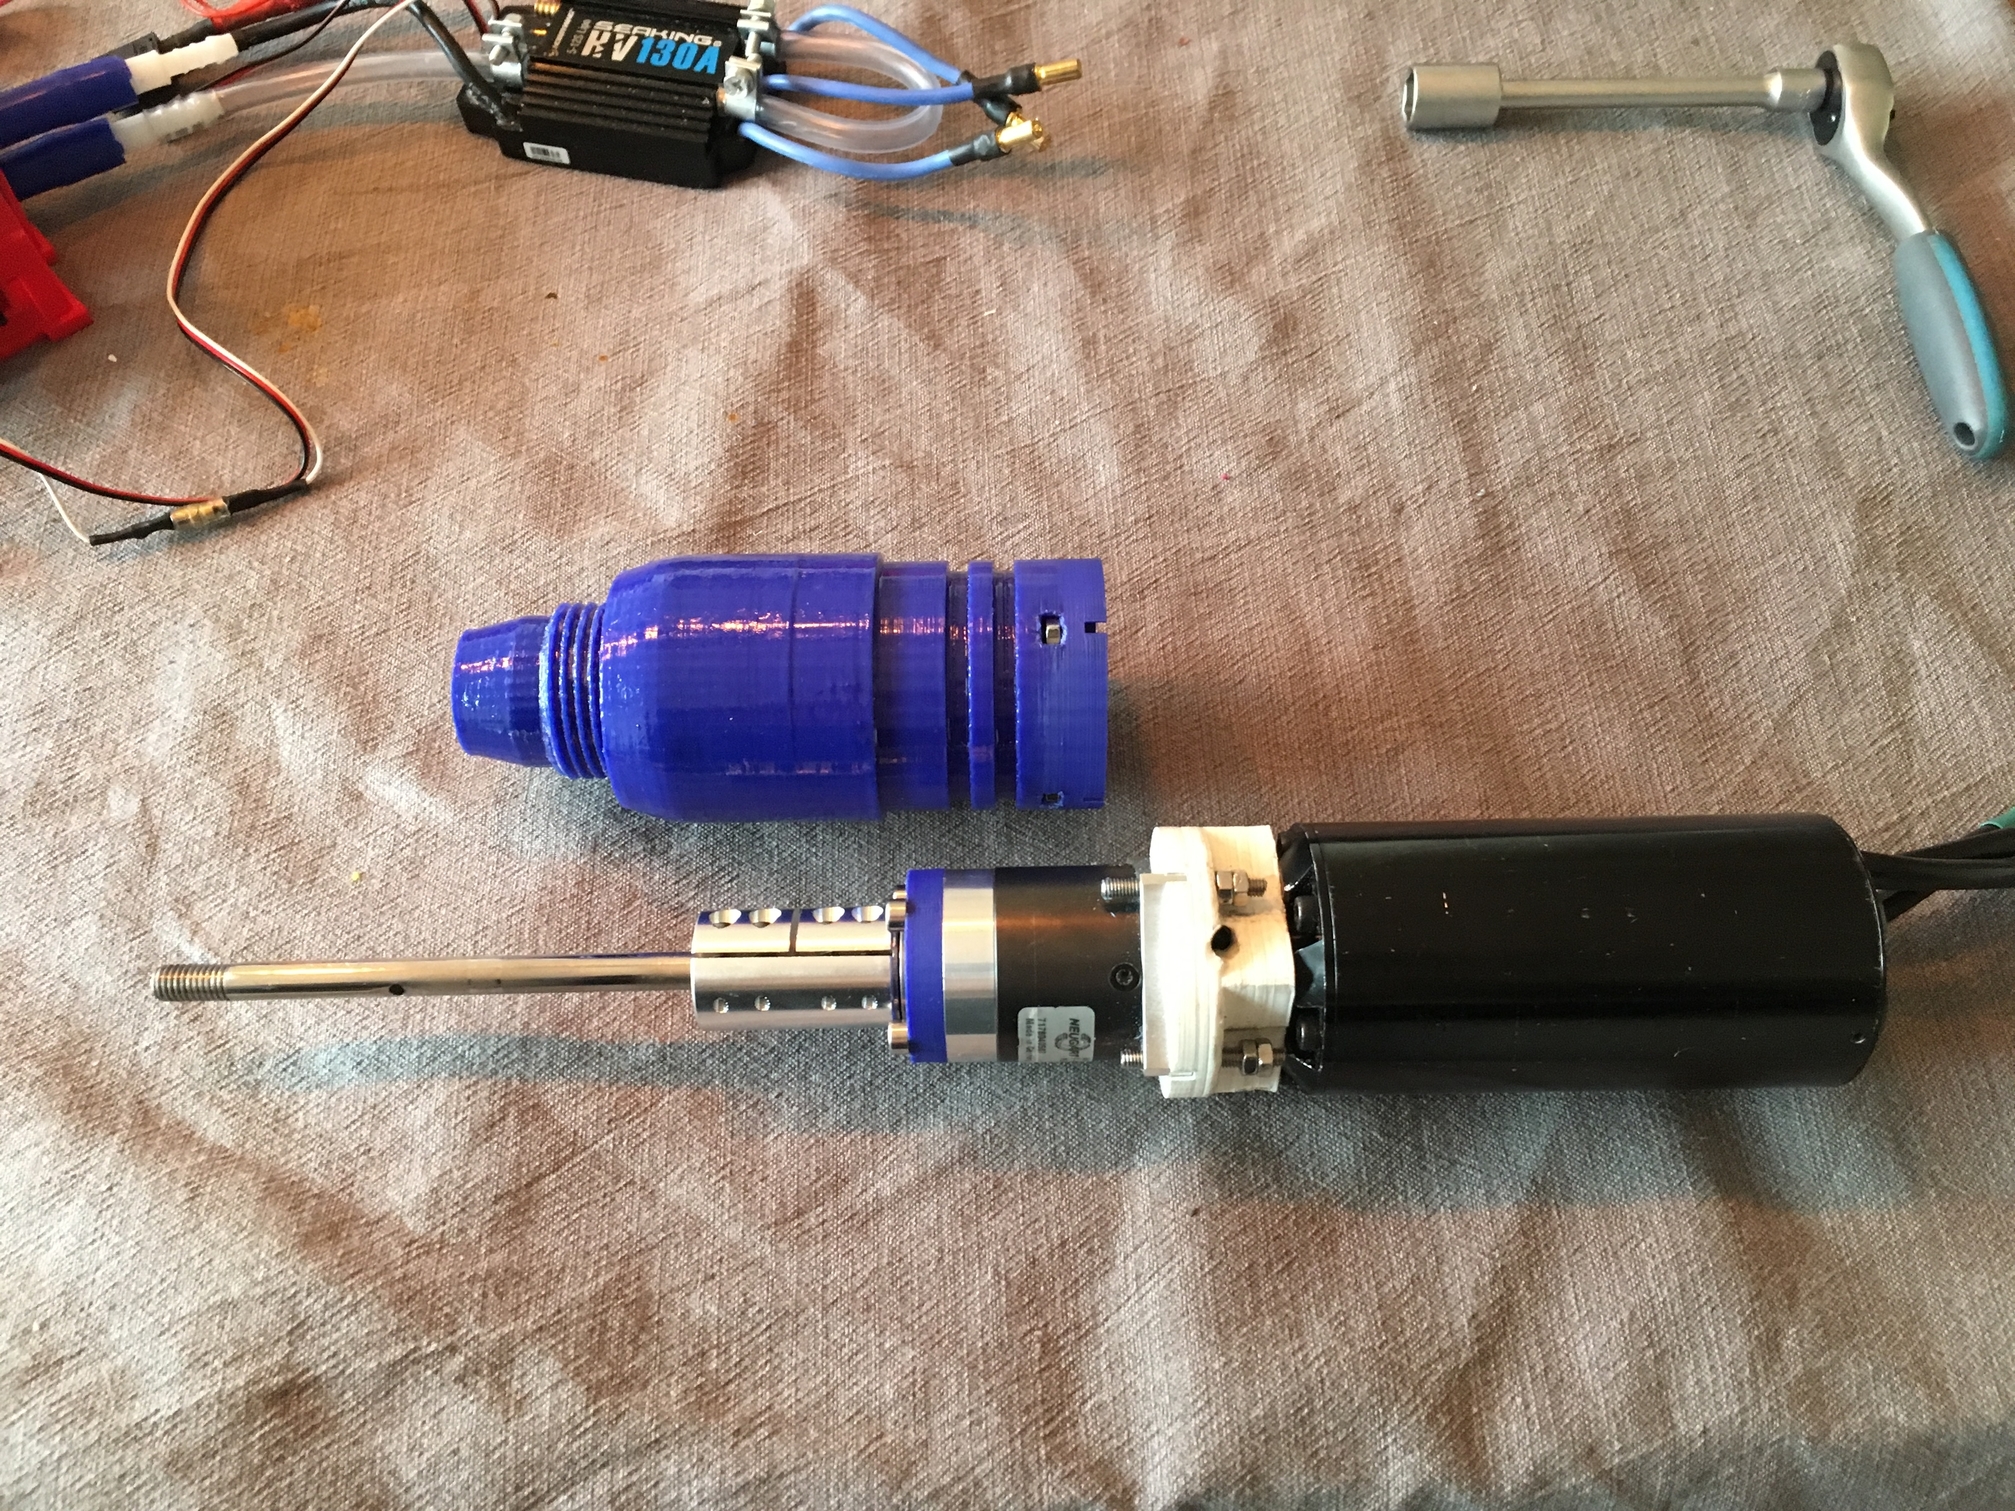
Today the coupler finally came, and it is quite a unit, 40mm long with two clamping screws per shaft.
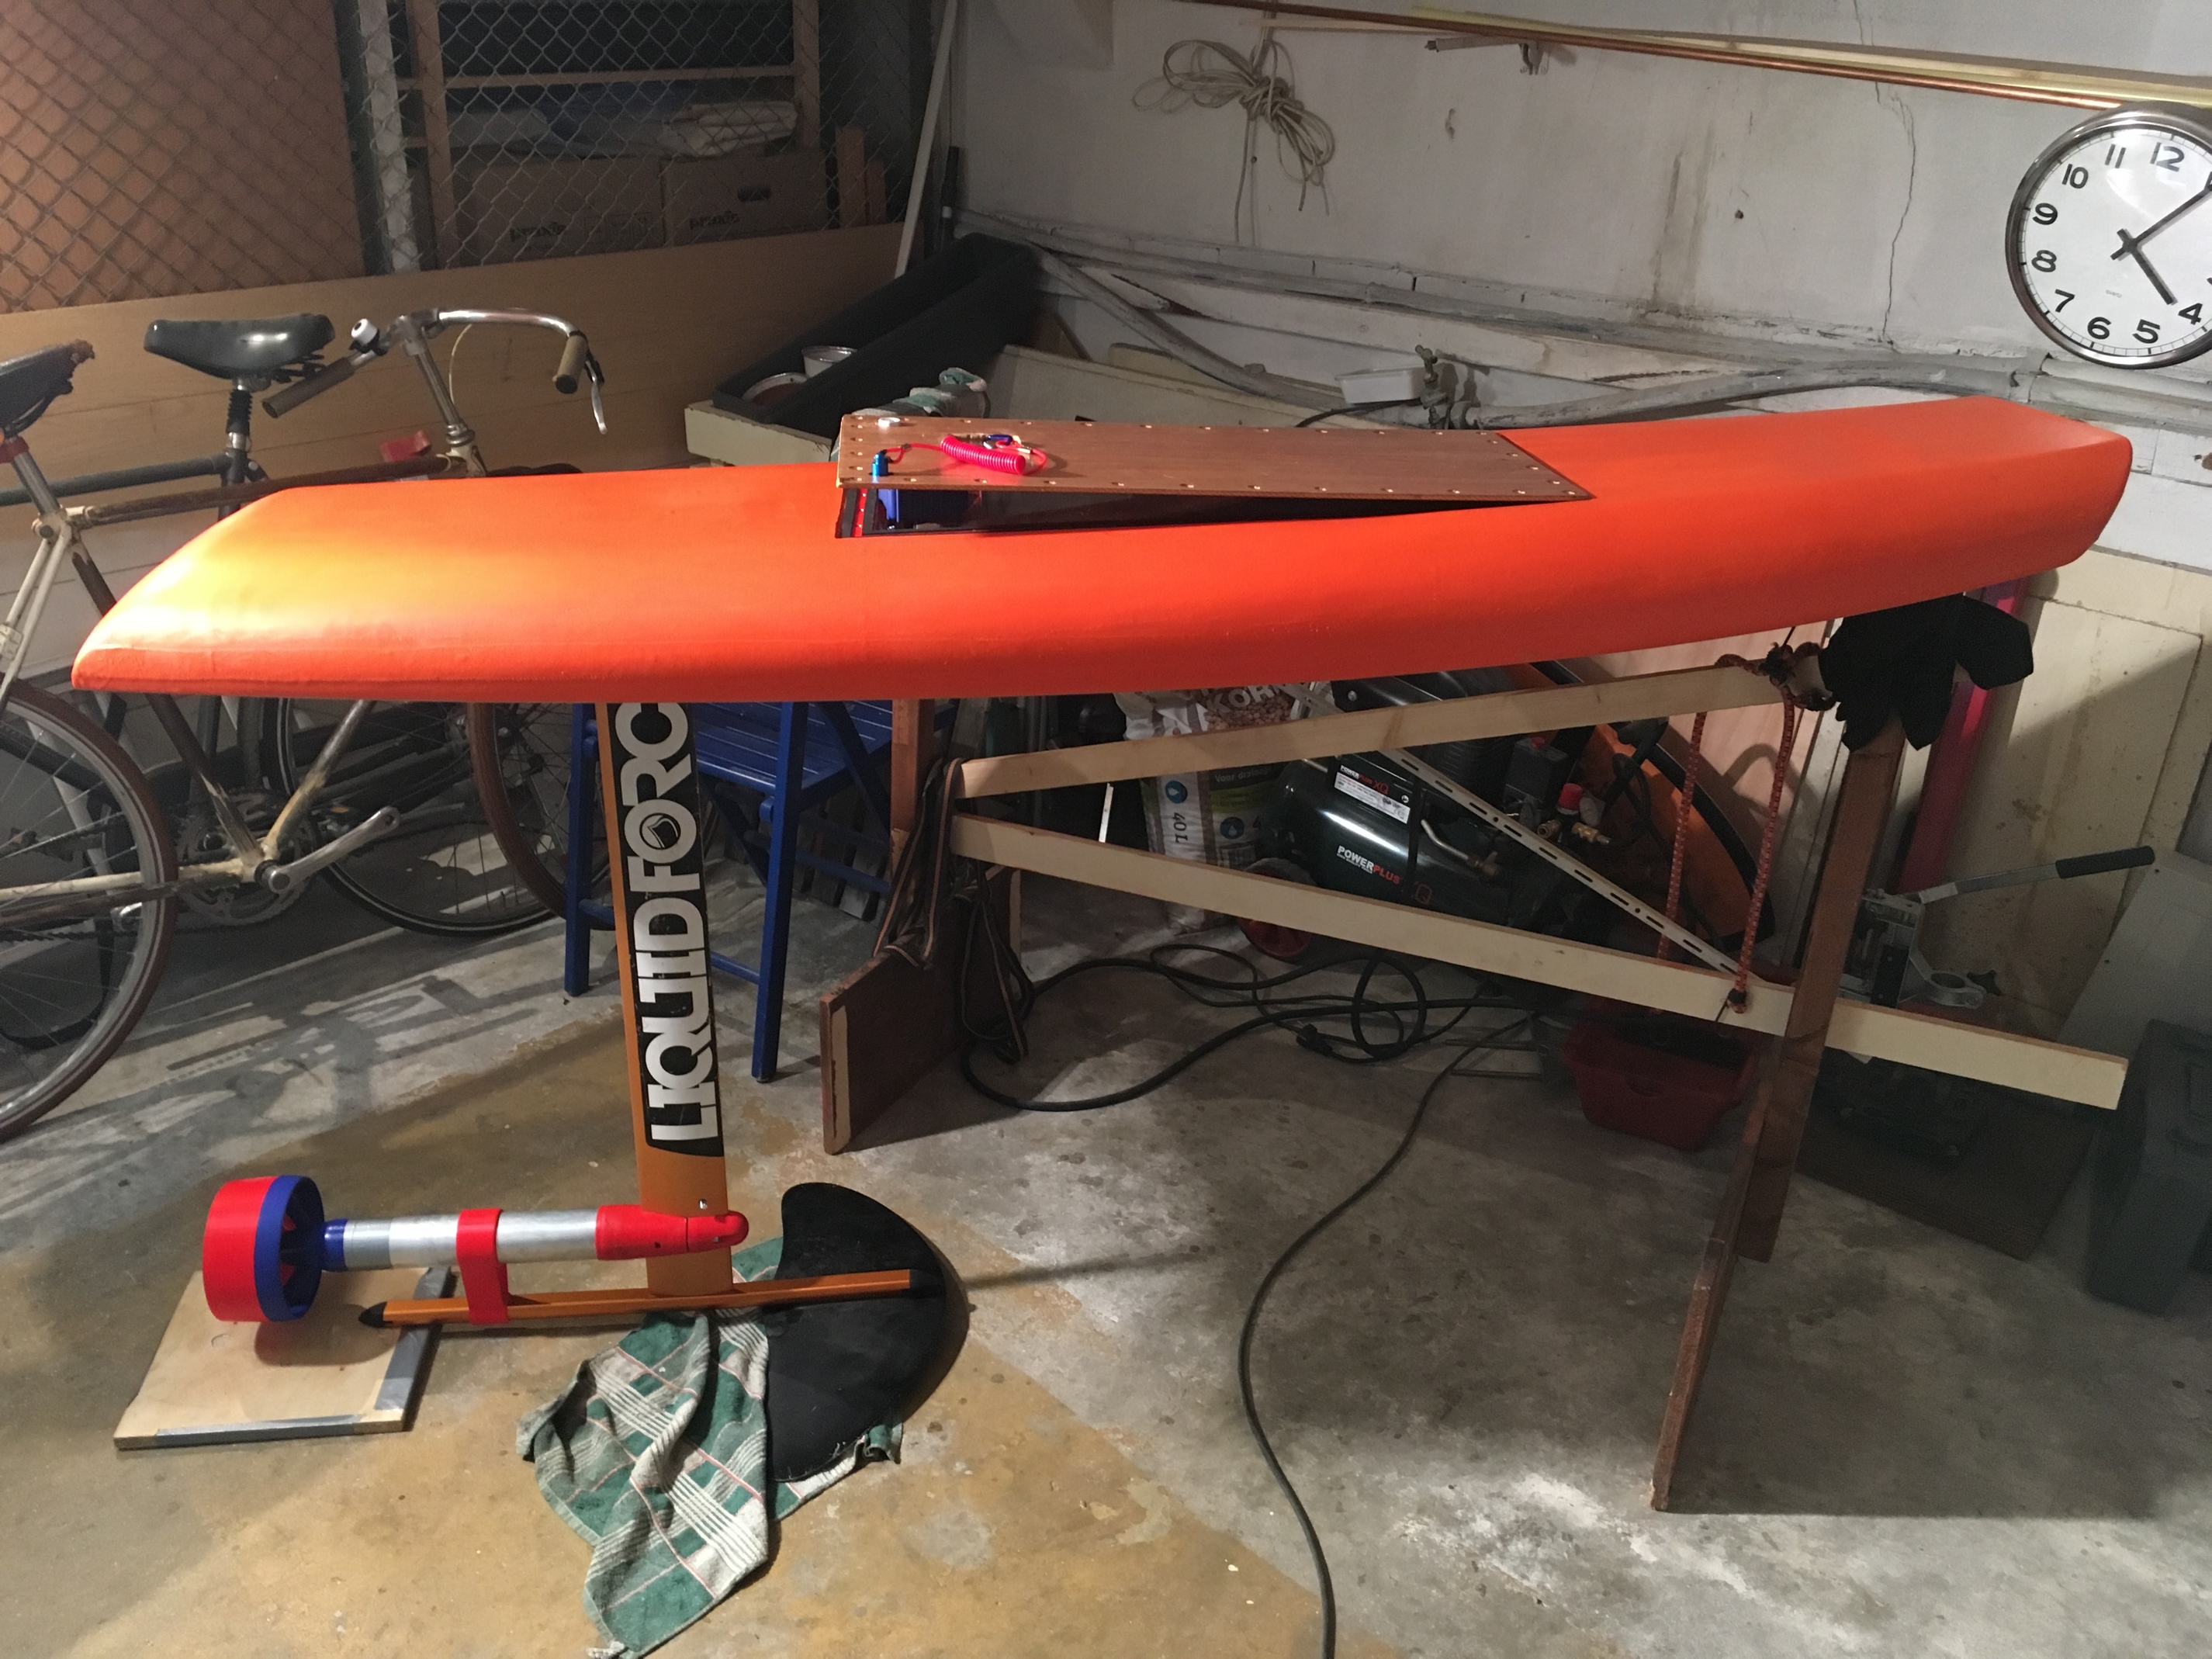
So an important moment, would the shaft (by now 130mm) fit properly and will er be less to no wobble during operation. I did not add the second dry bearing yet but what a difference! Below current setup in a nutshell.


I probably will tried the jaw coupler eventually as well, but I’m building for 9months now and want to get onto the water :smiley:

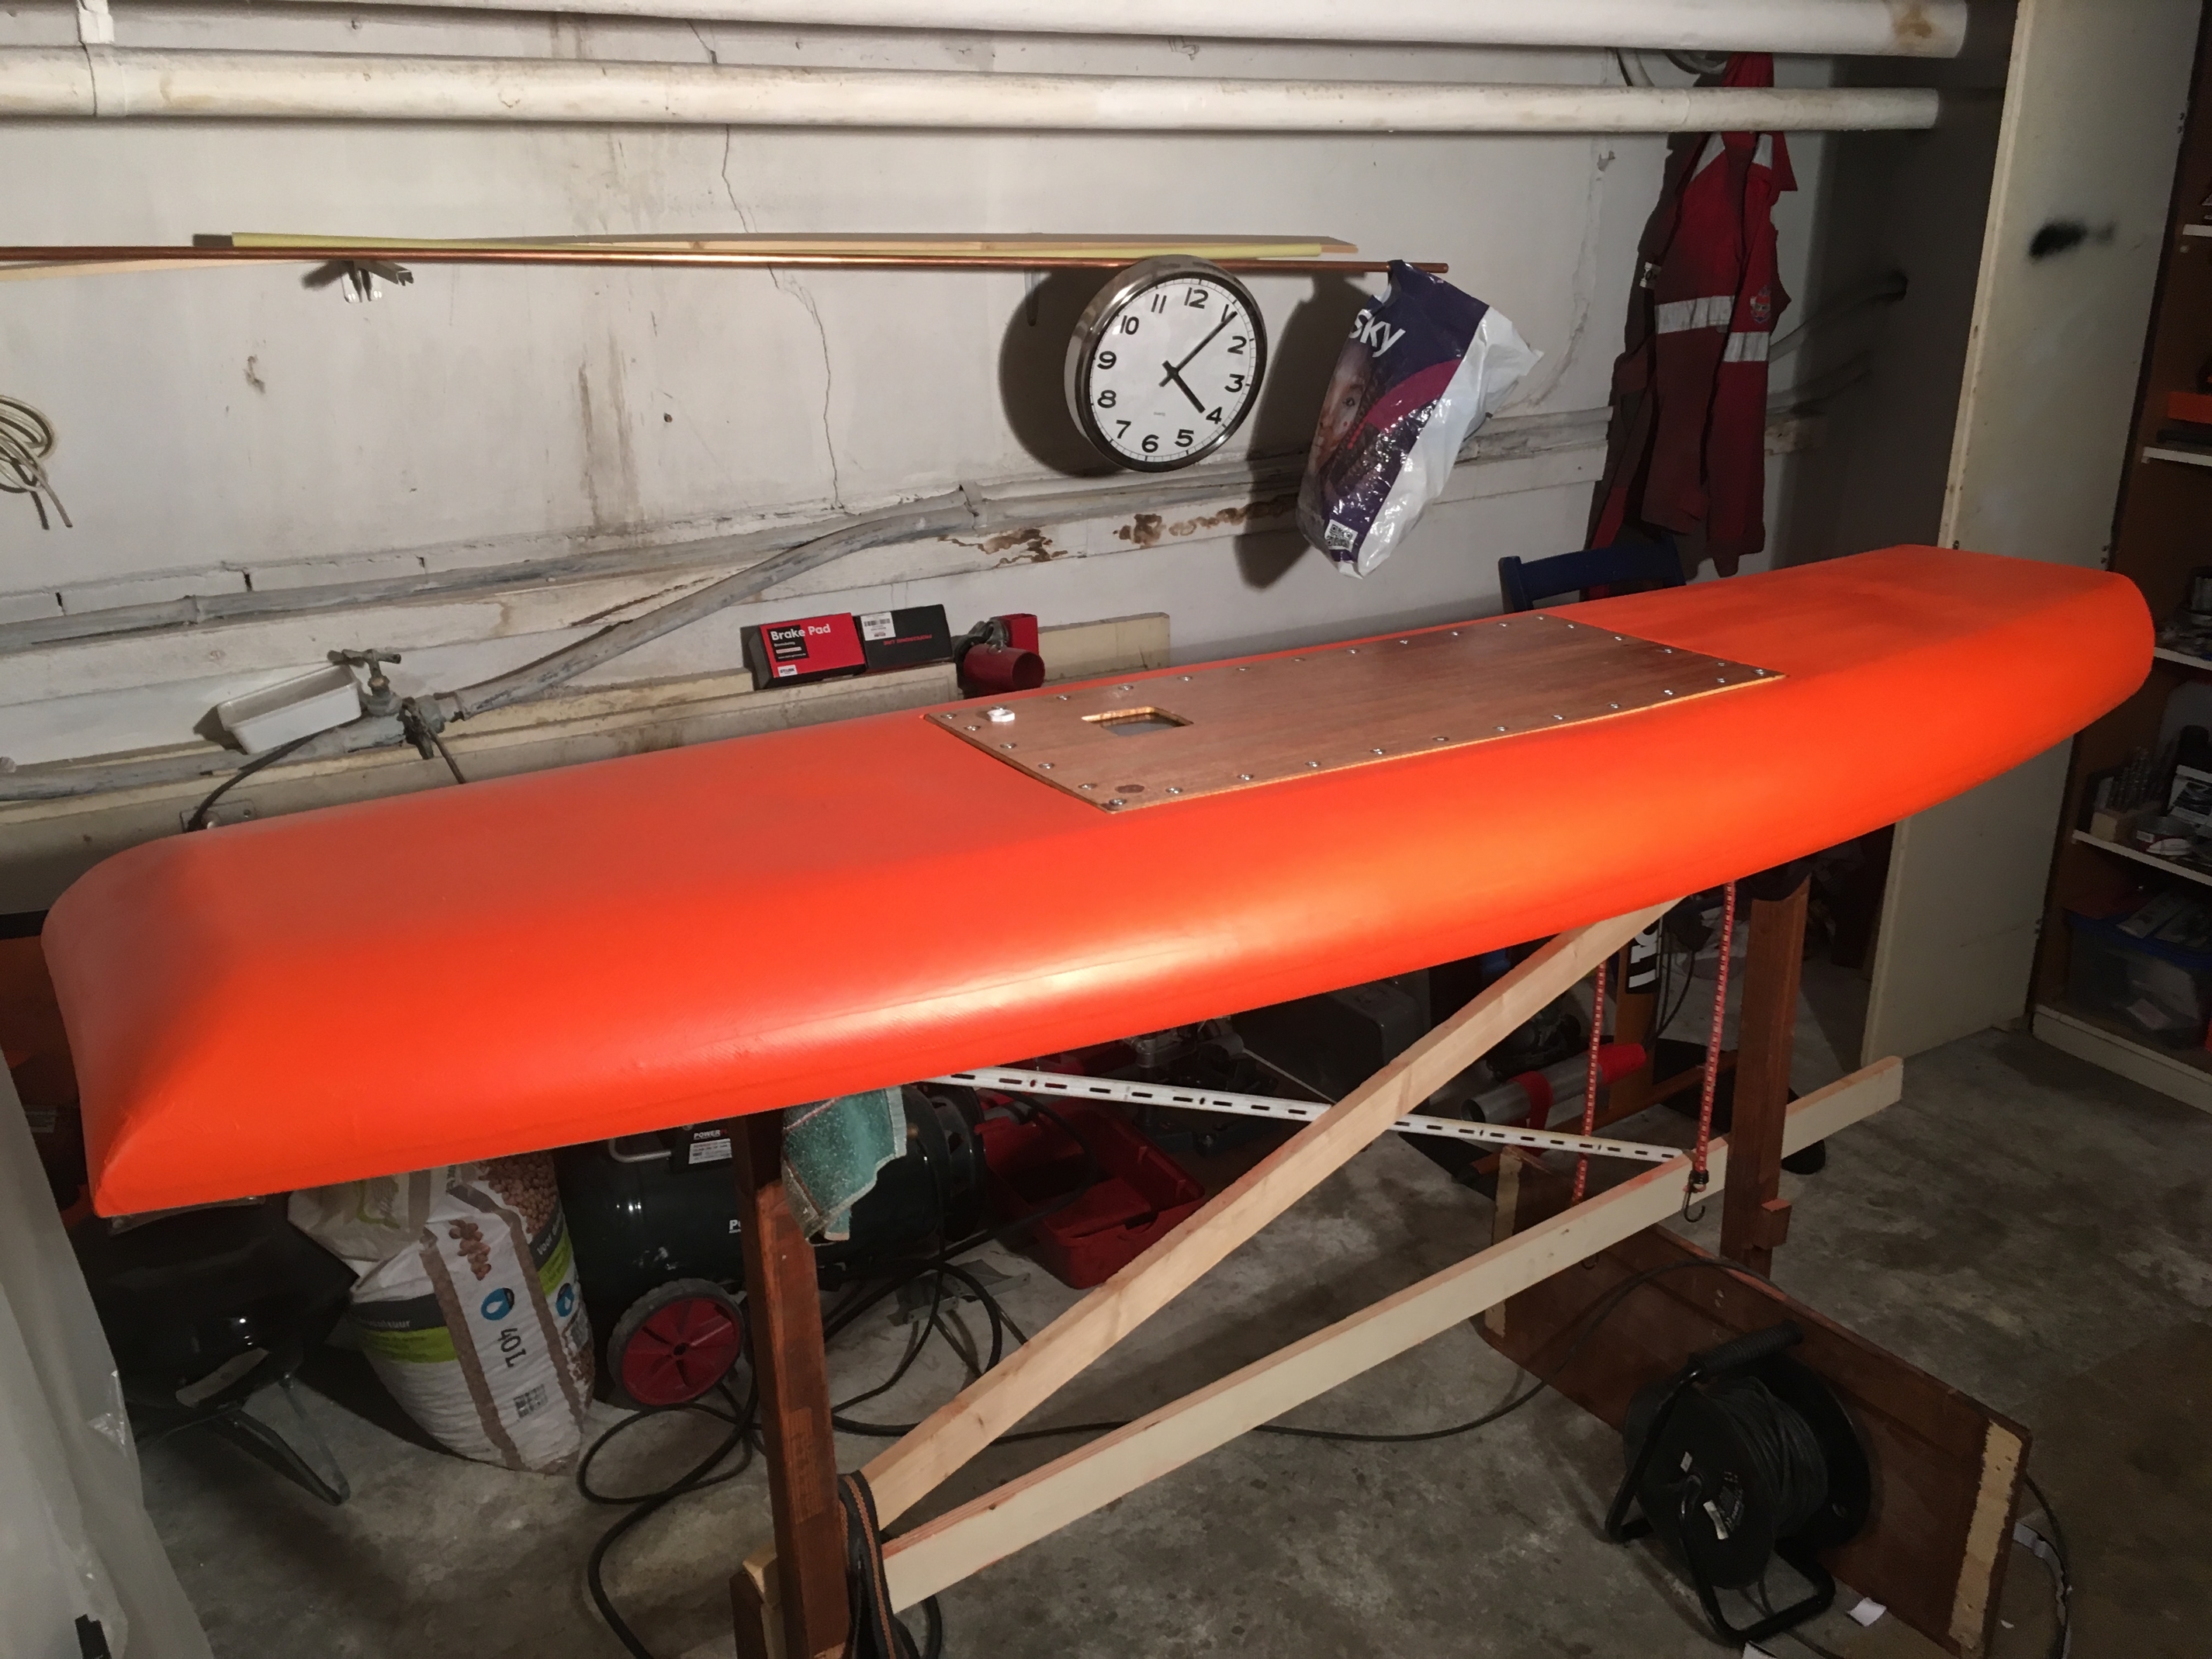
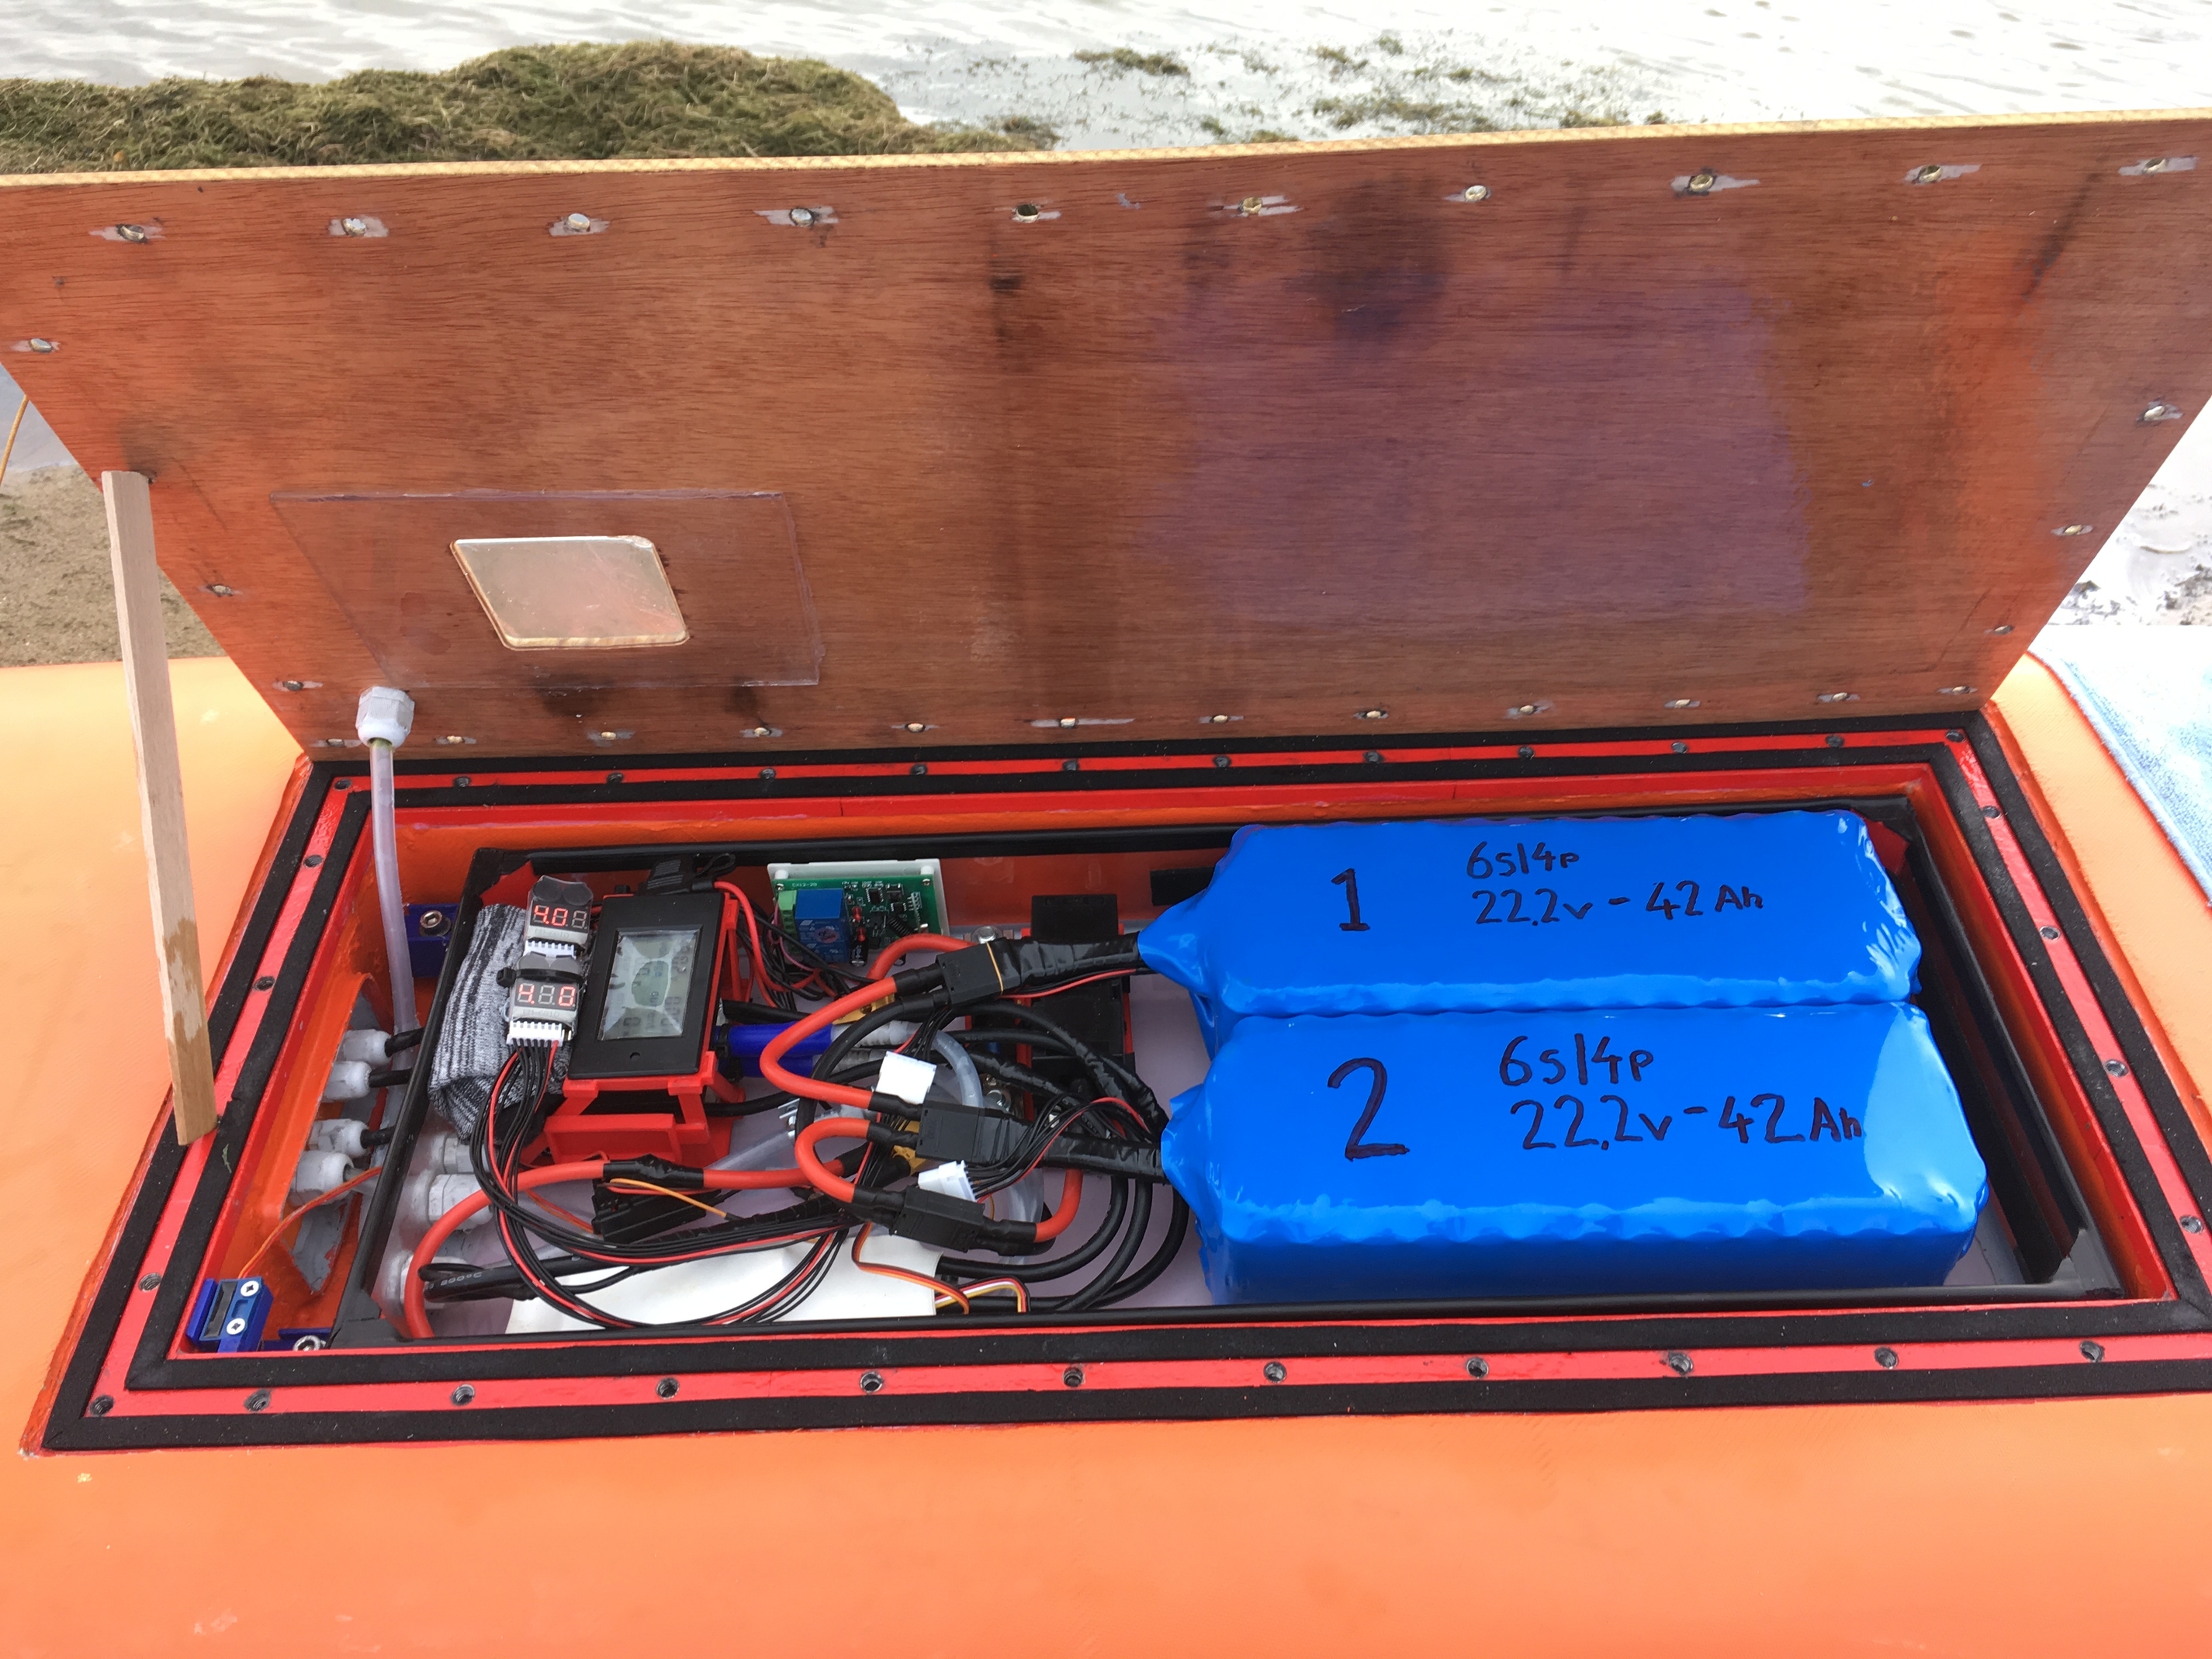
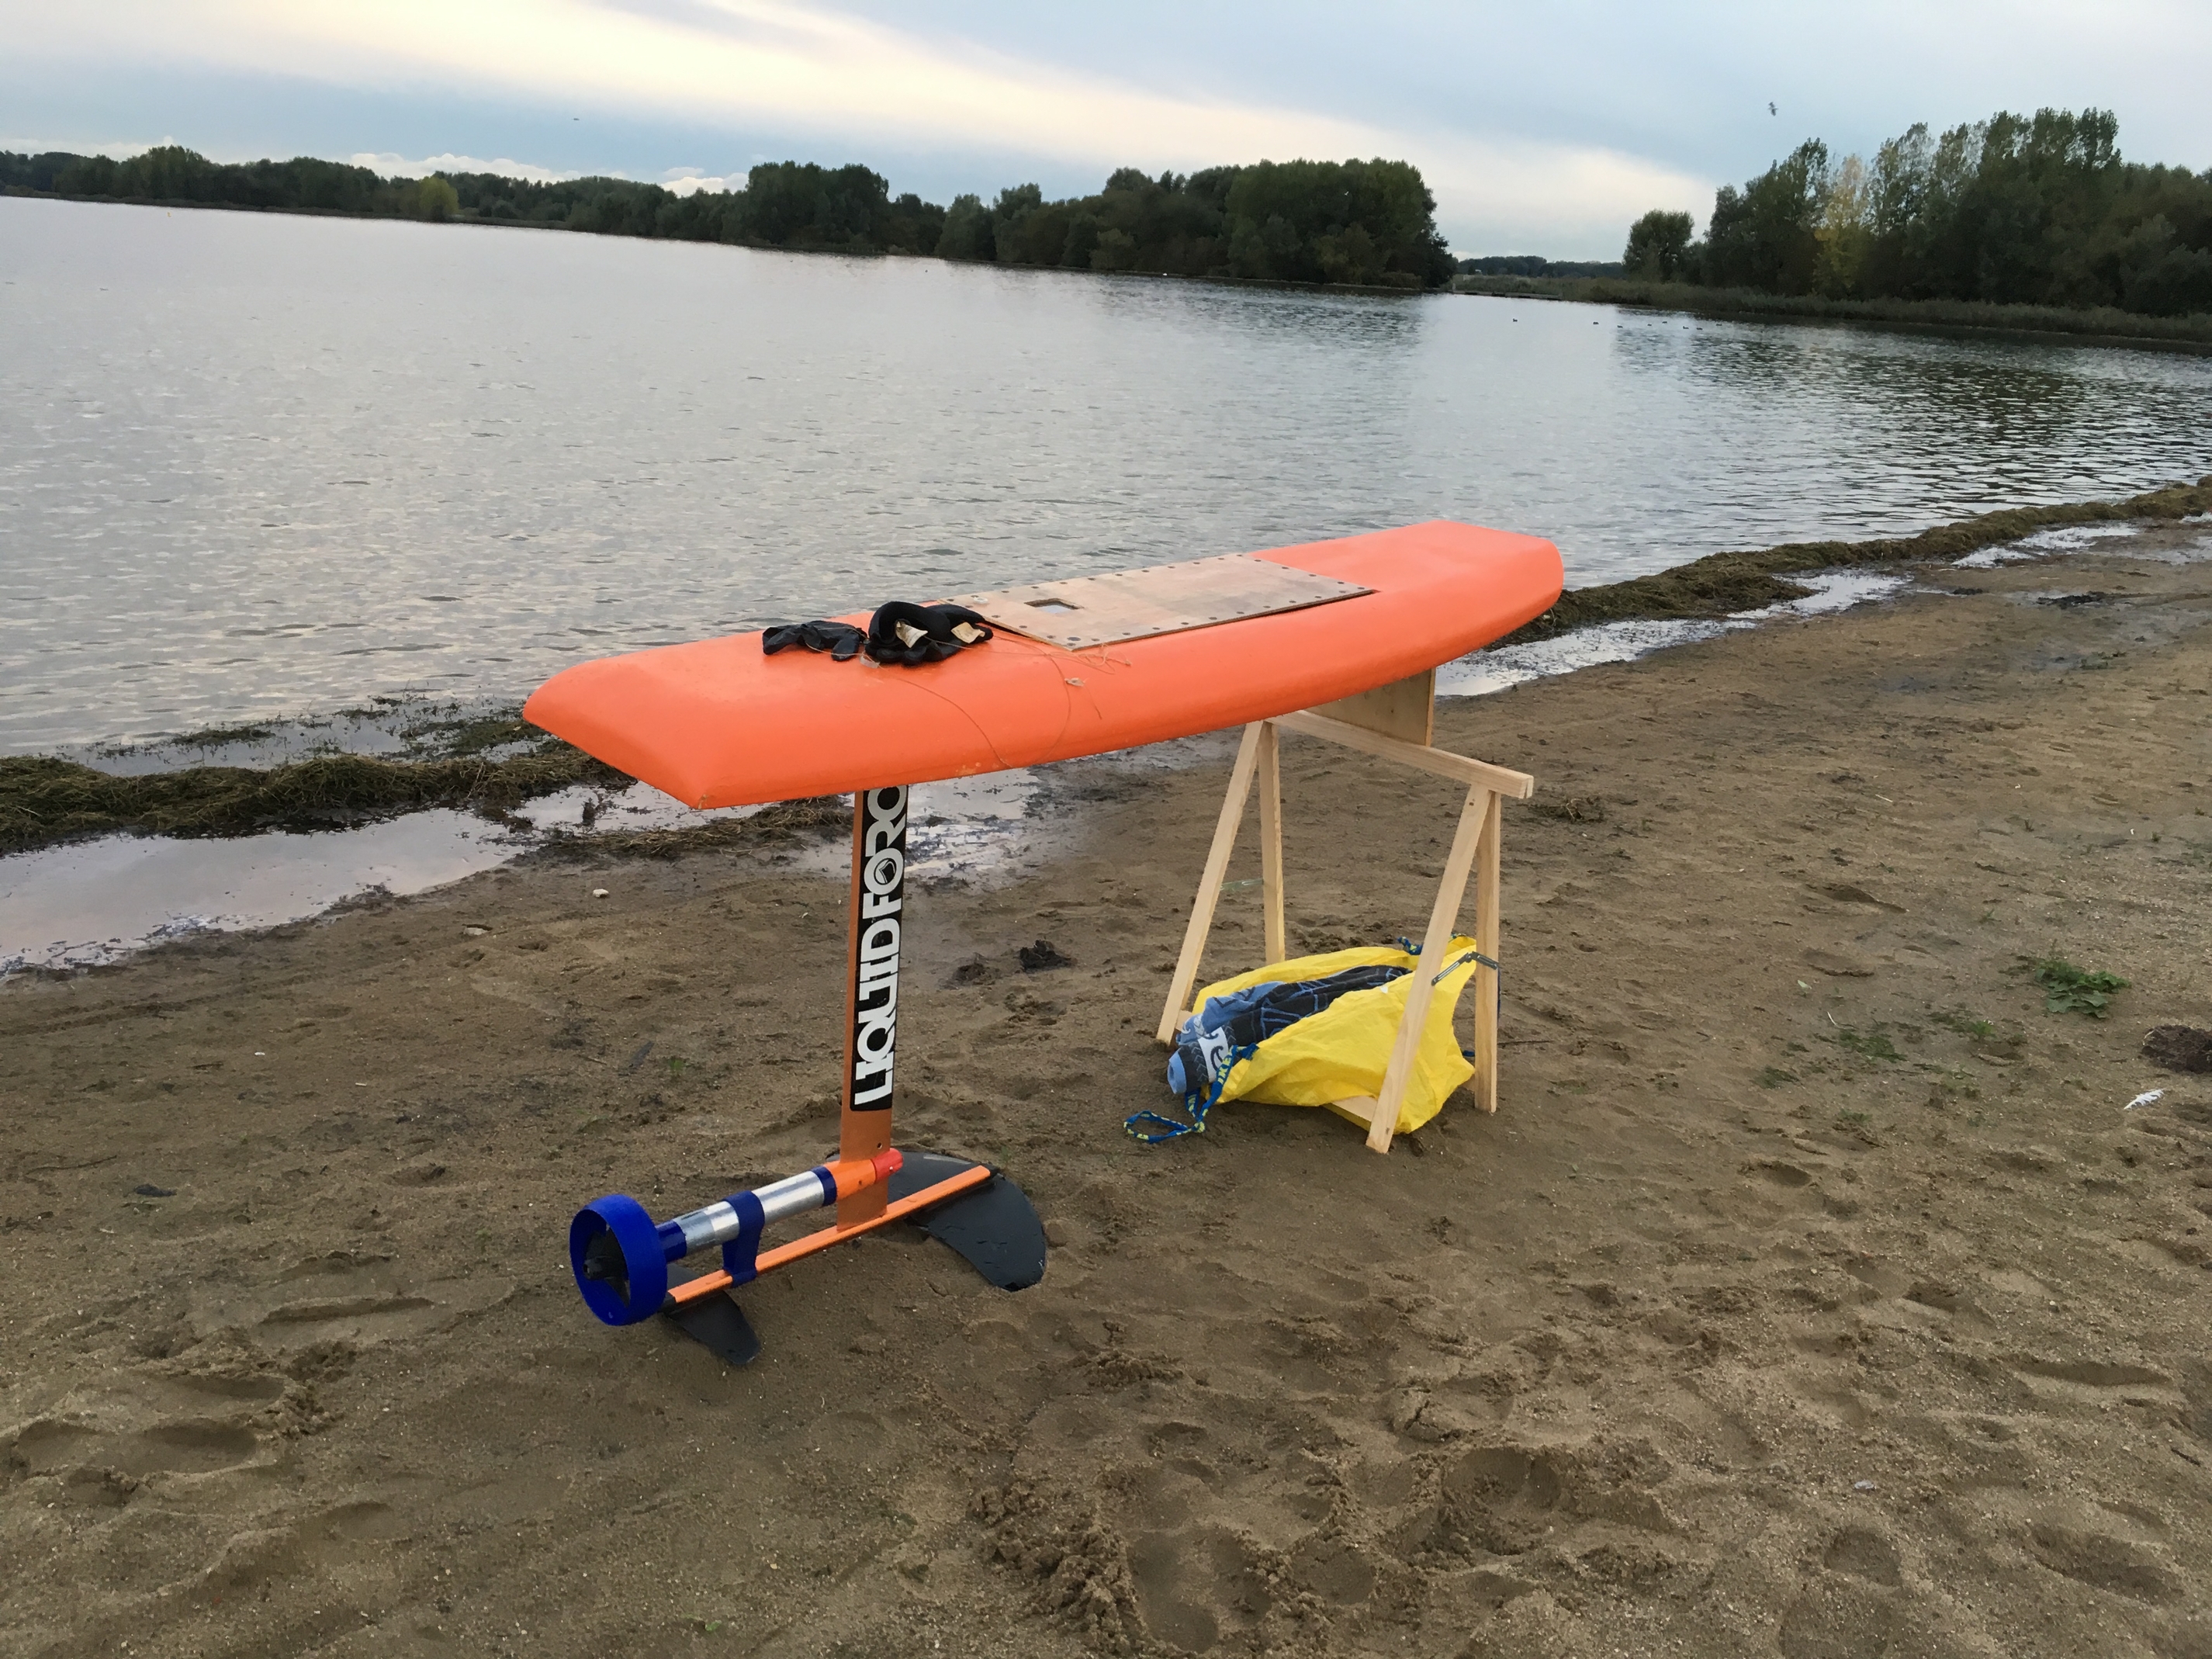
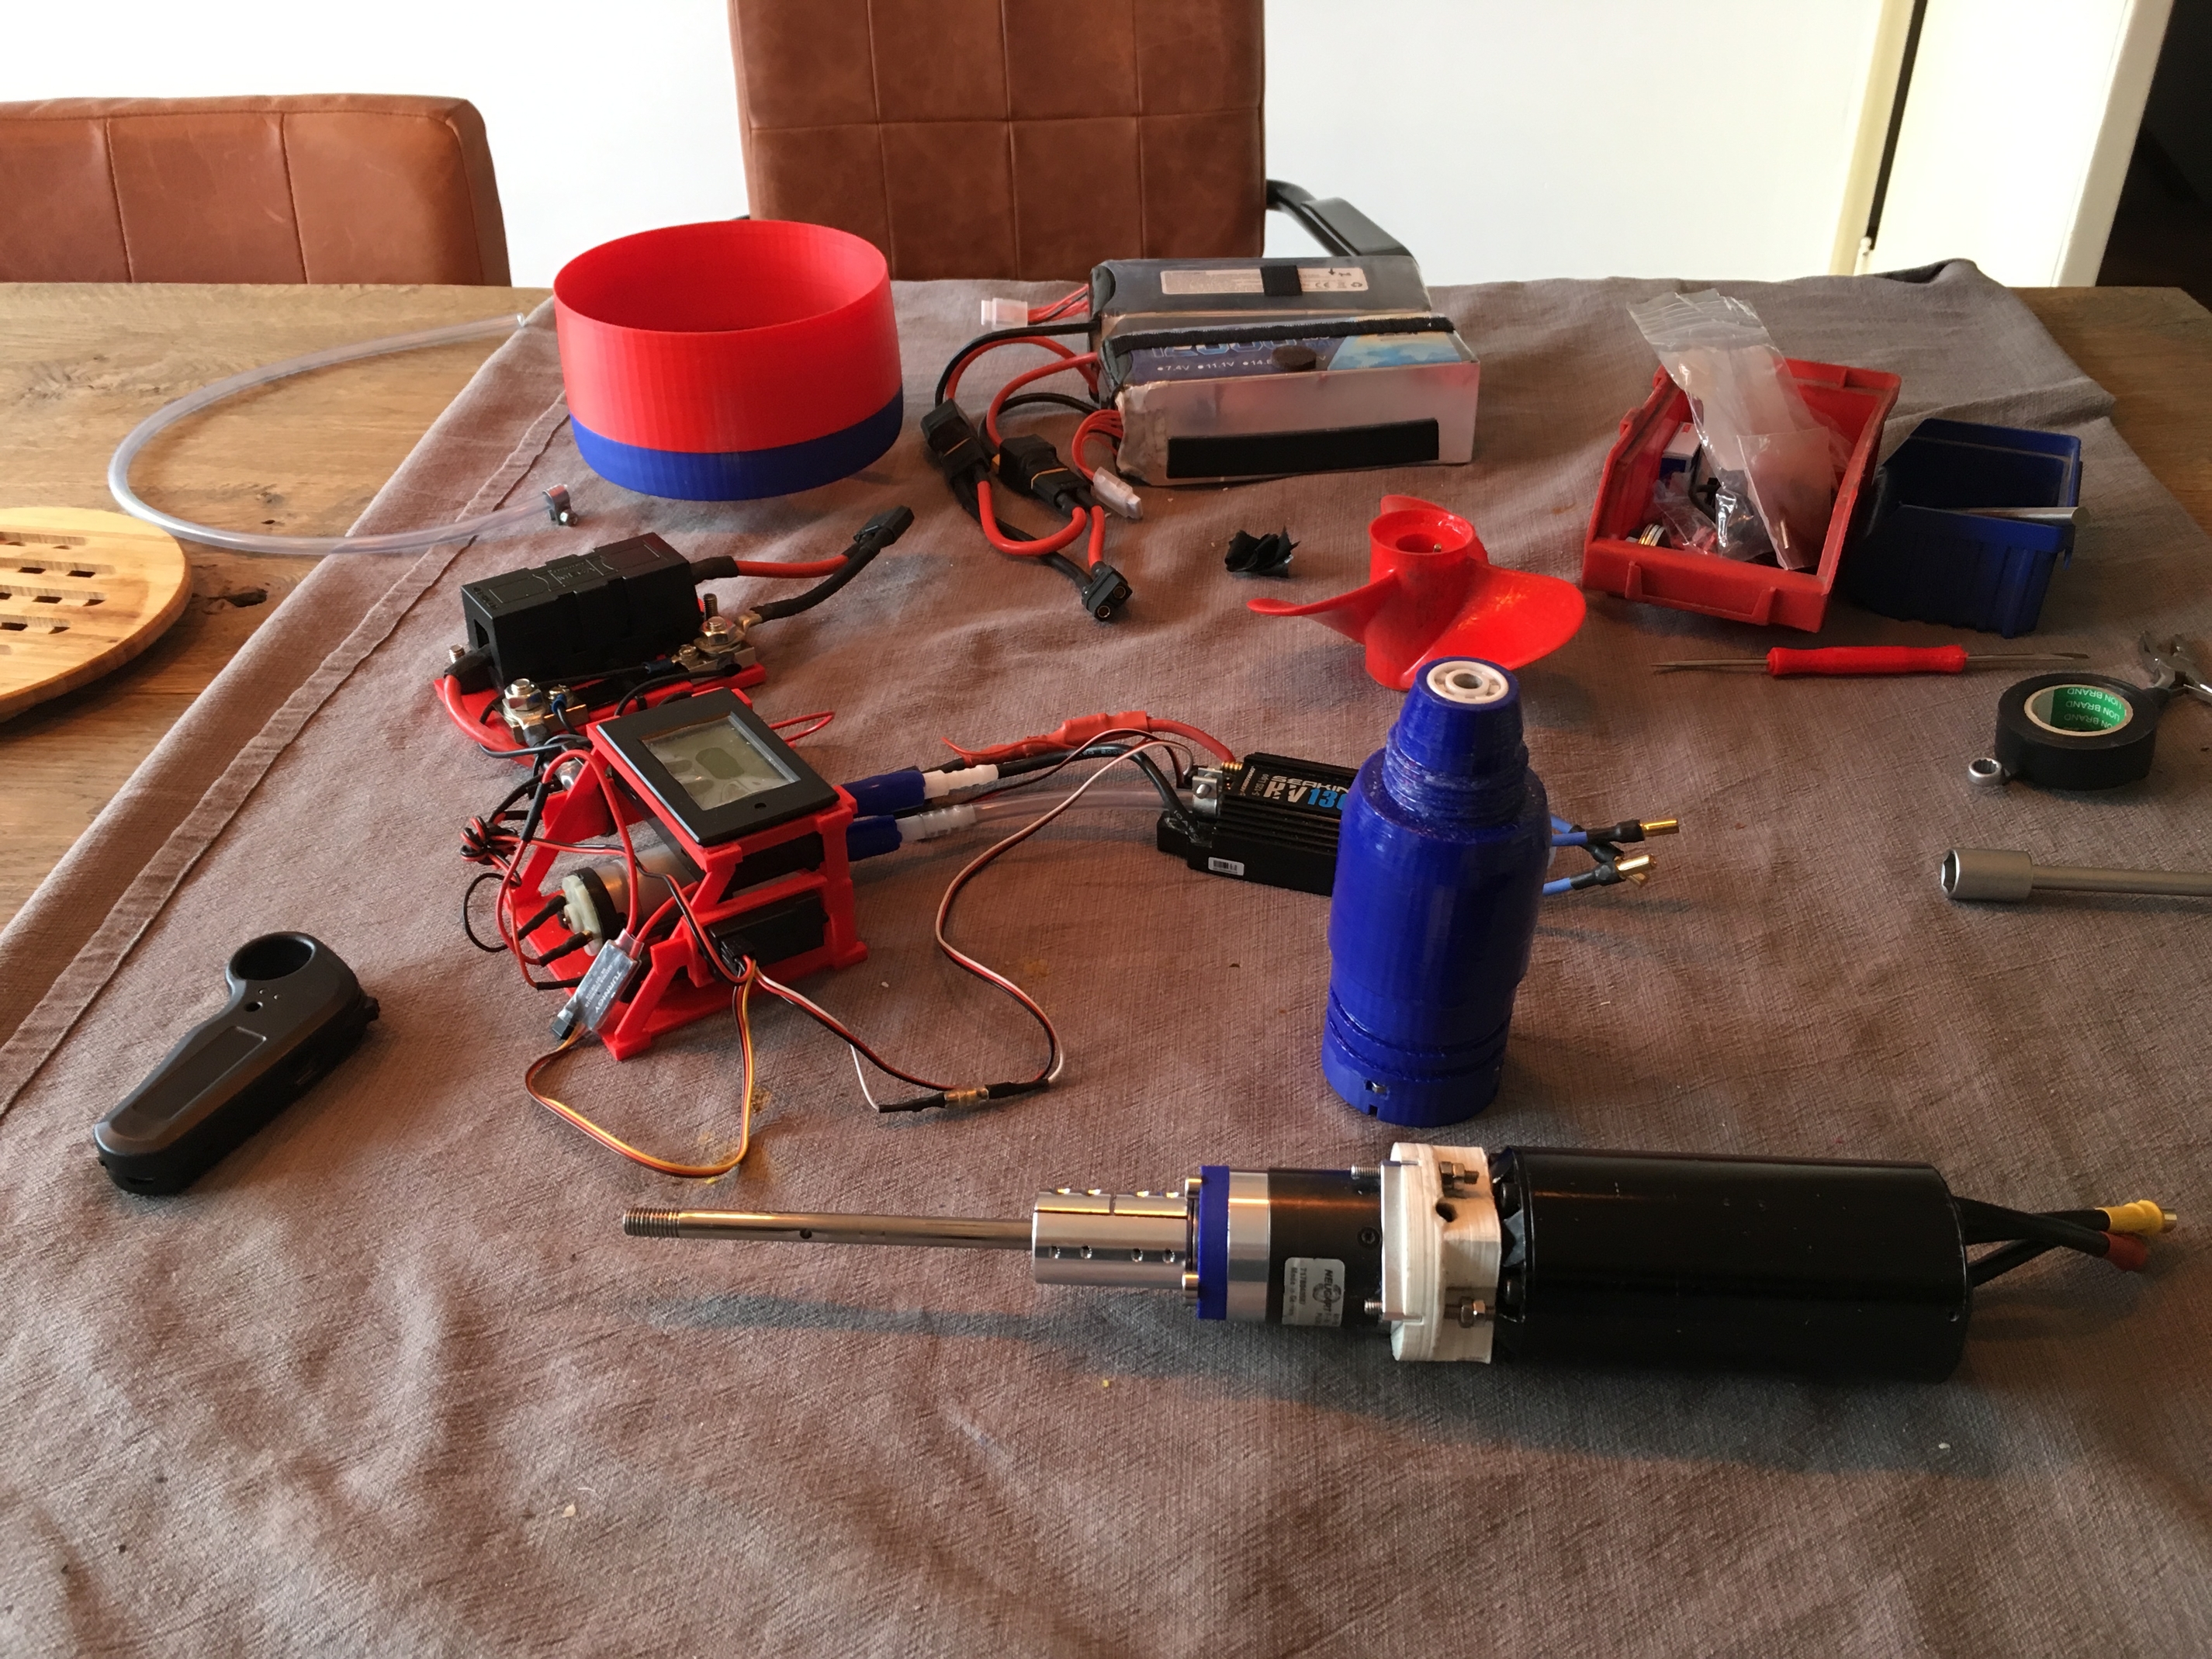
Board and Electric box are pretty much finished. Just need final positioning of the ESC and pump/display mount.
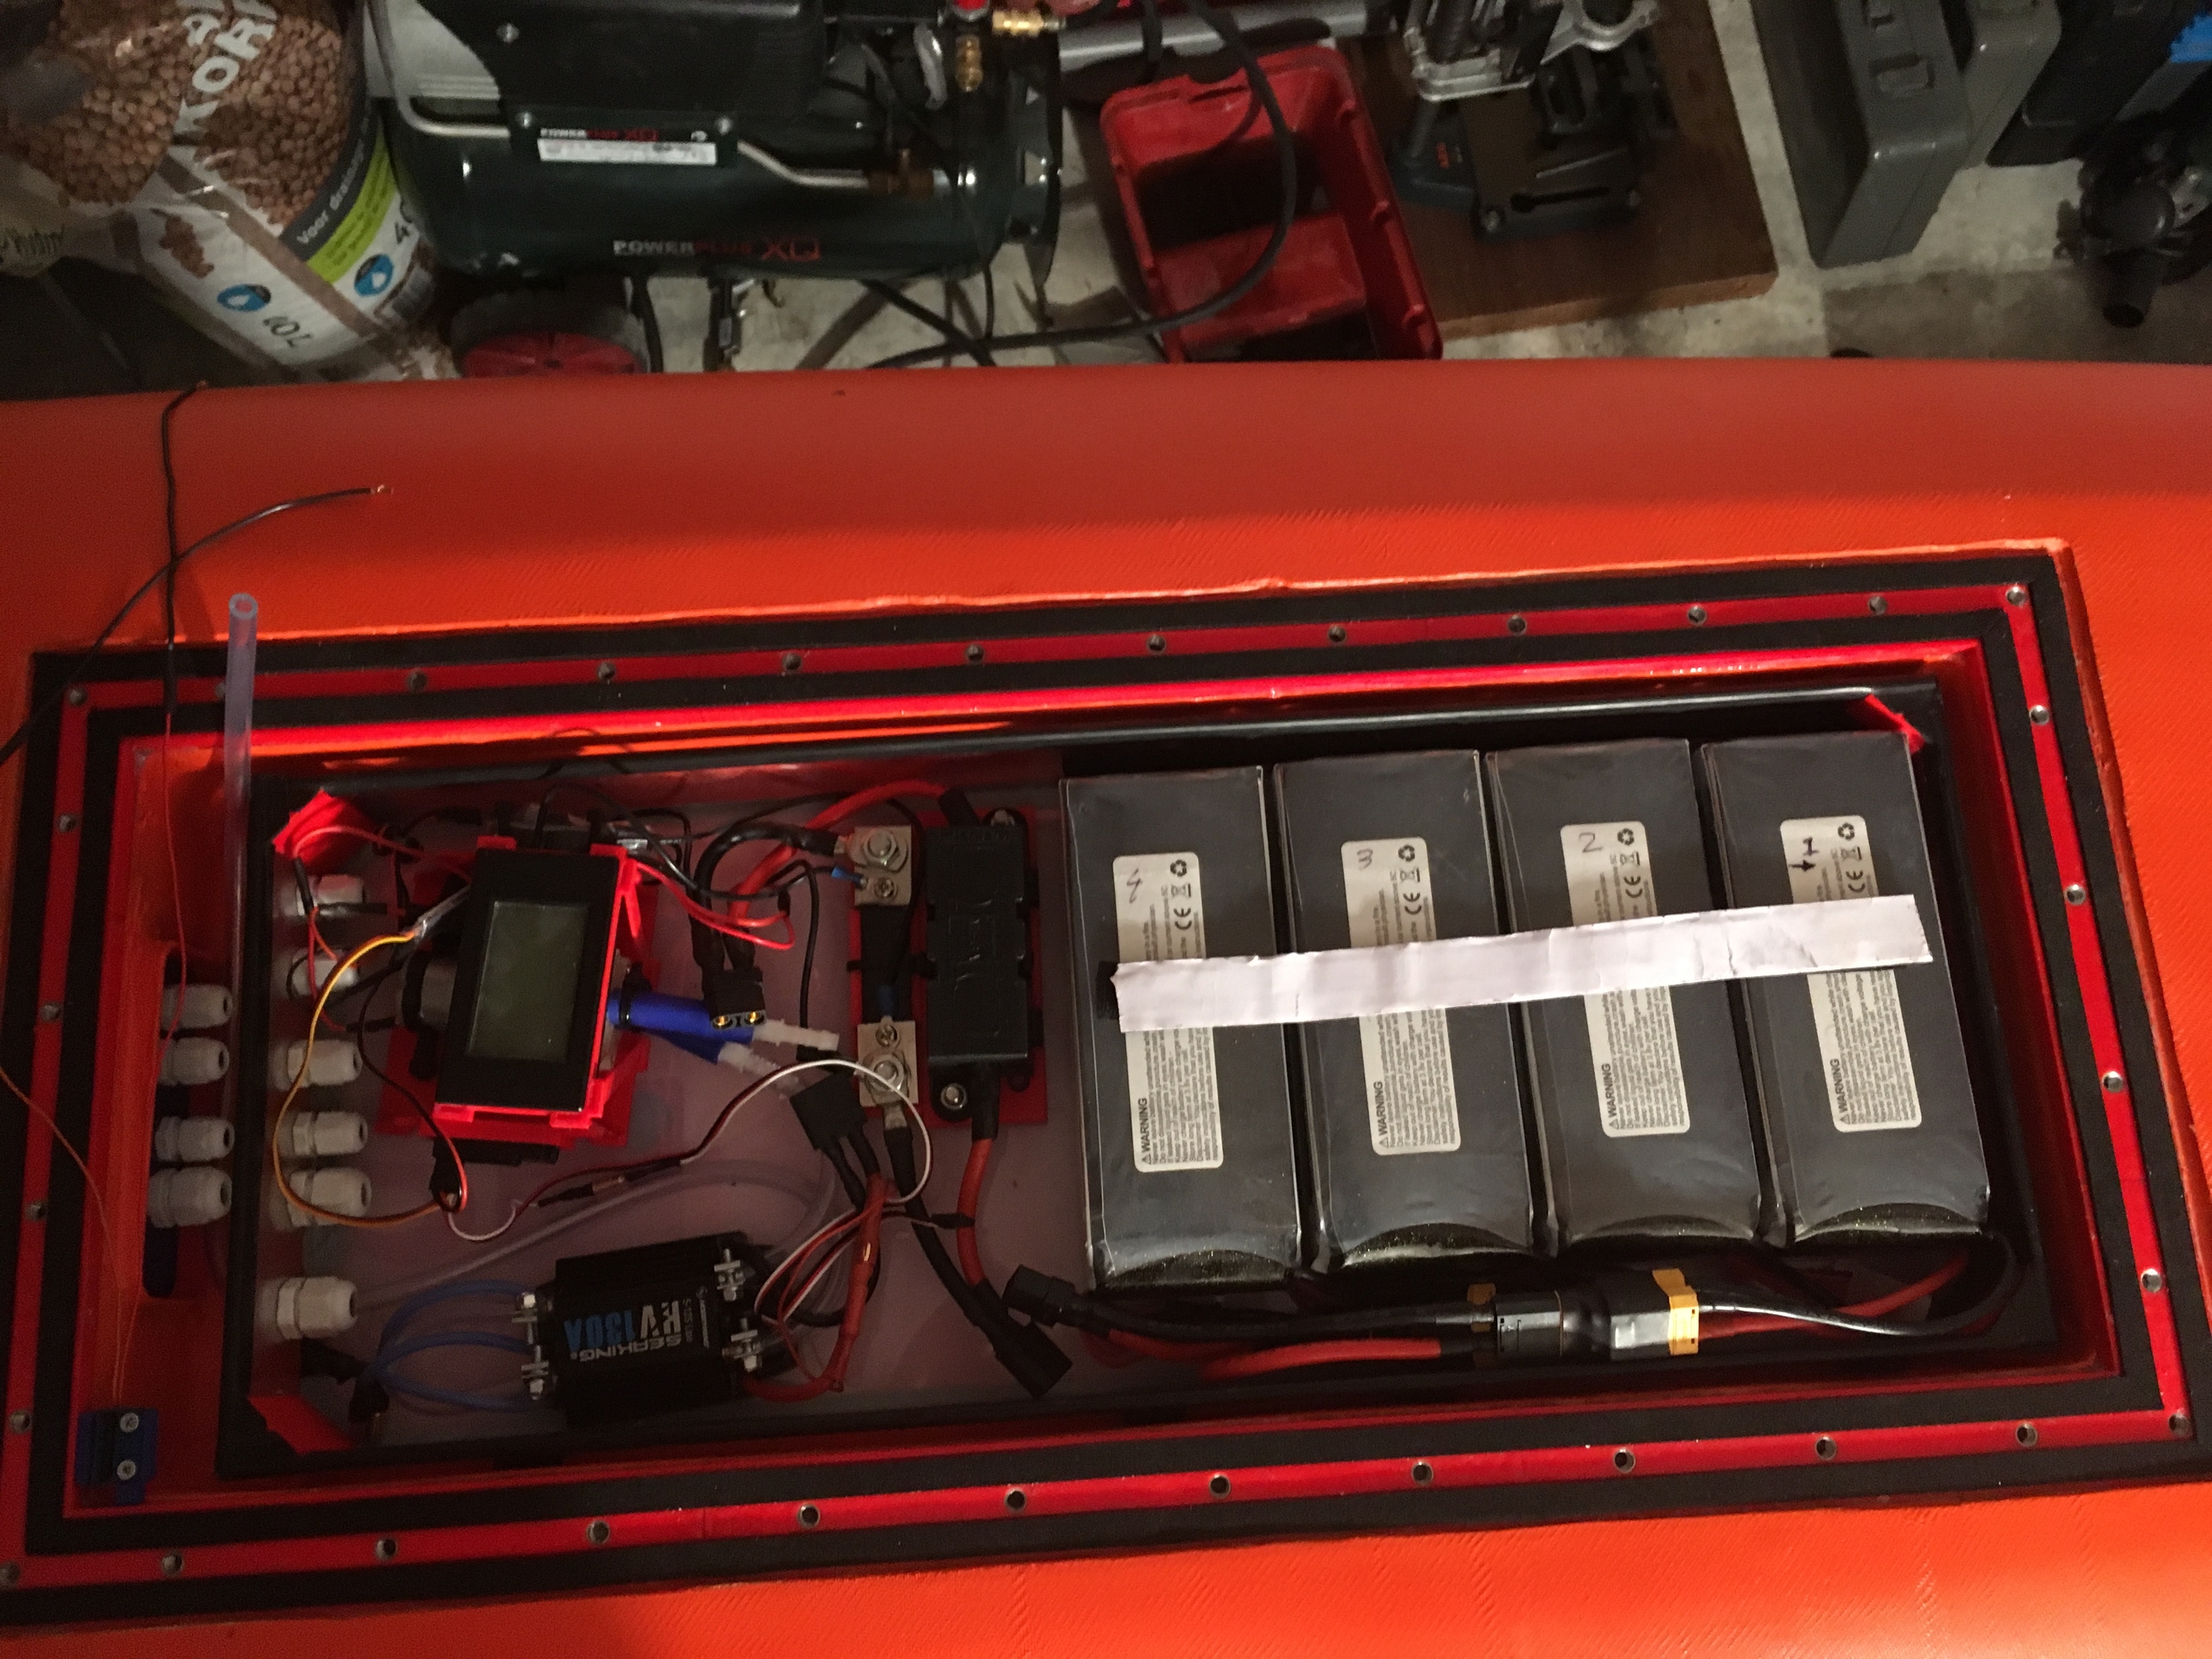
The E-box is a box in a box. So a bit weird, but have 2 lines of glands to get cables into the board. Water tightness test 1 was positive and increased it a bit further with the rubber seals ontop of the box (visible below).
The batteries a secured with Velcro and this seems to work very nicely. A rubber strip is mounted to the inner polycarbonate box side walls. So hope the lid seals even better now.
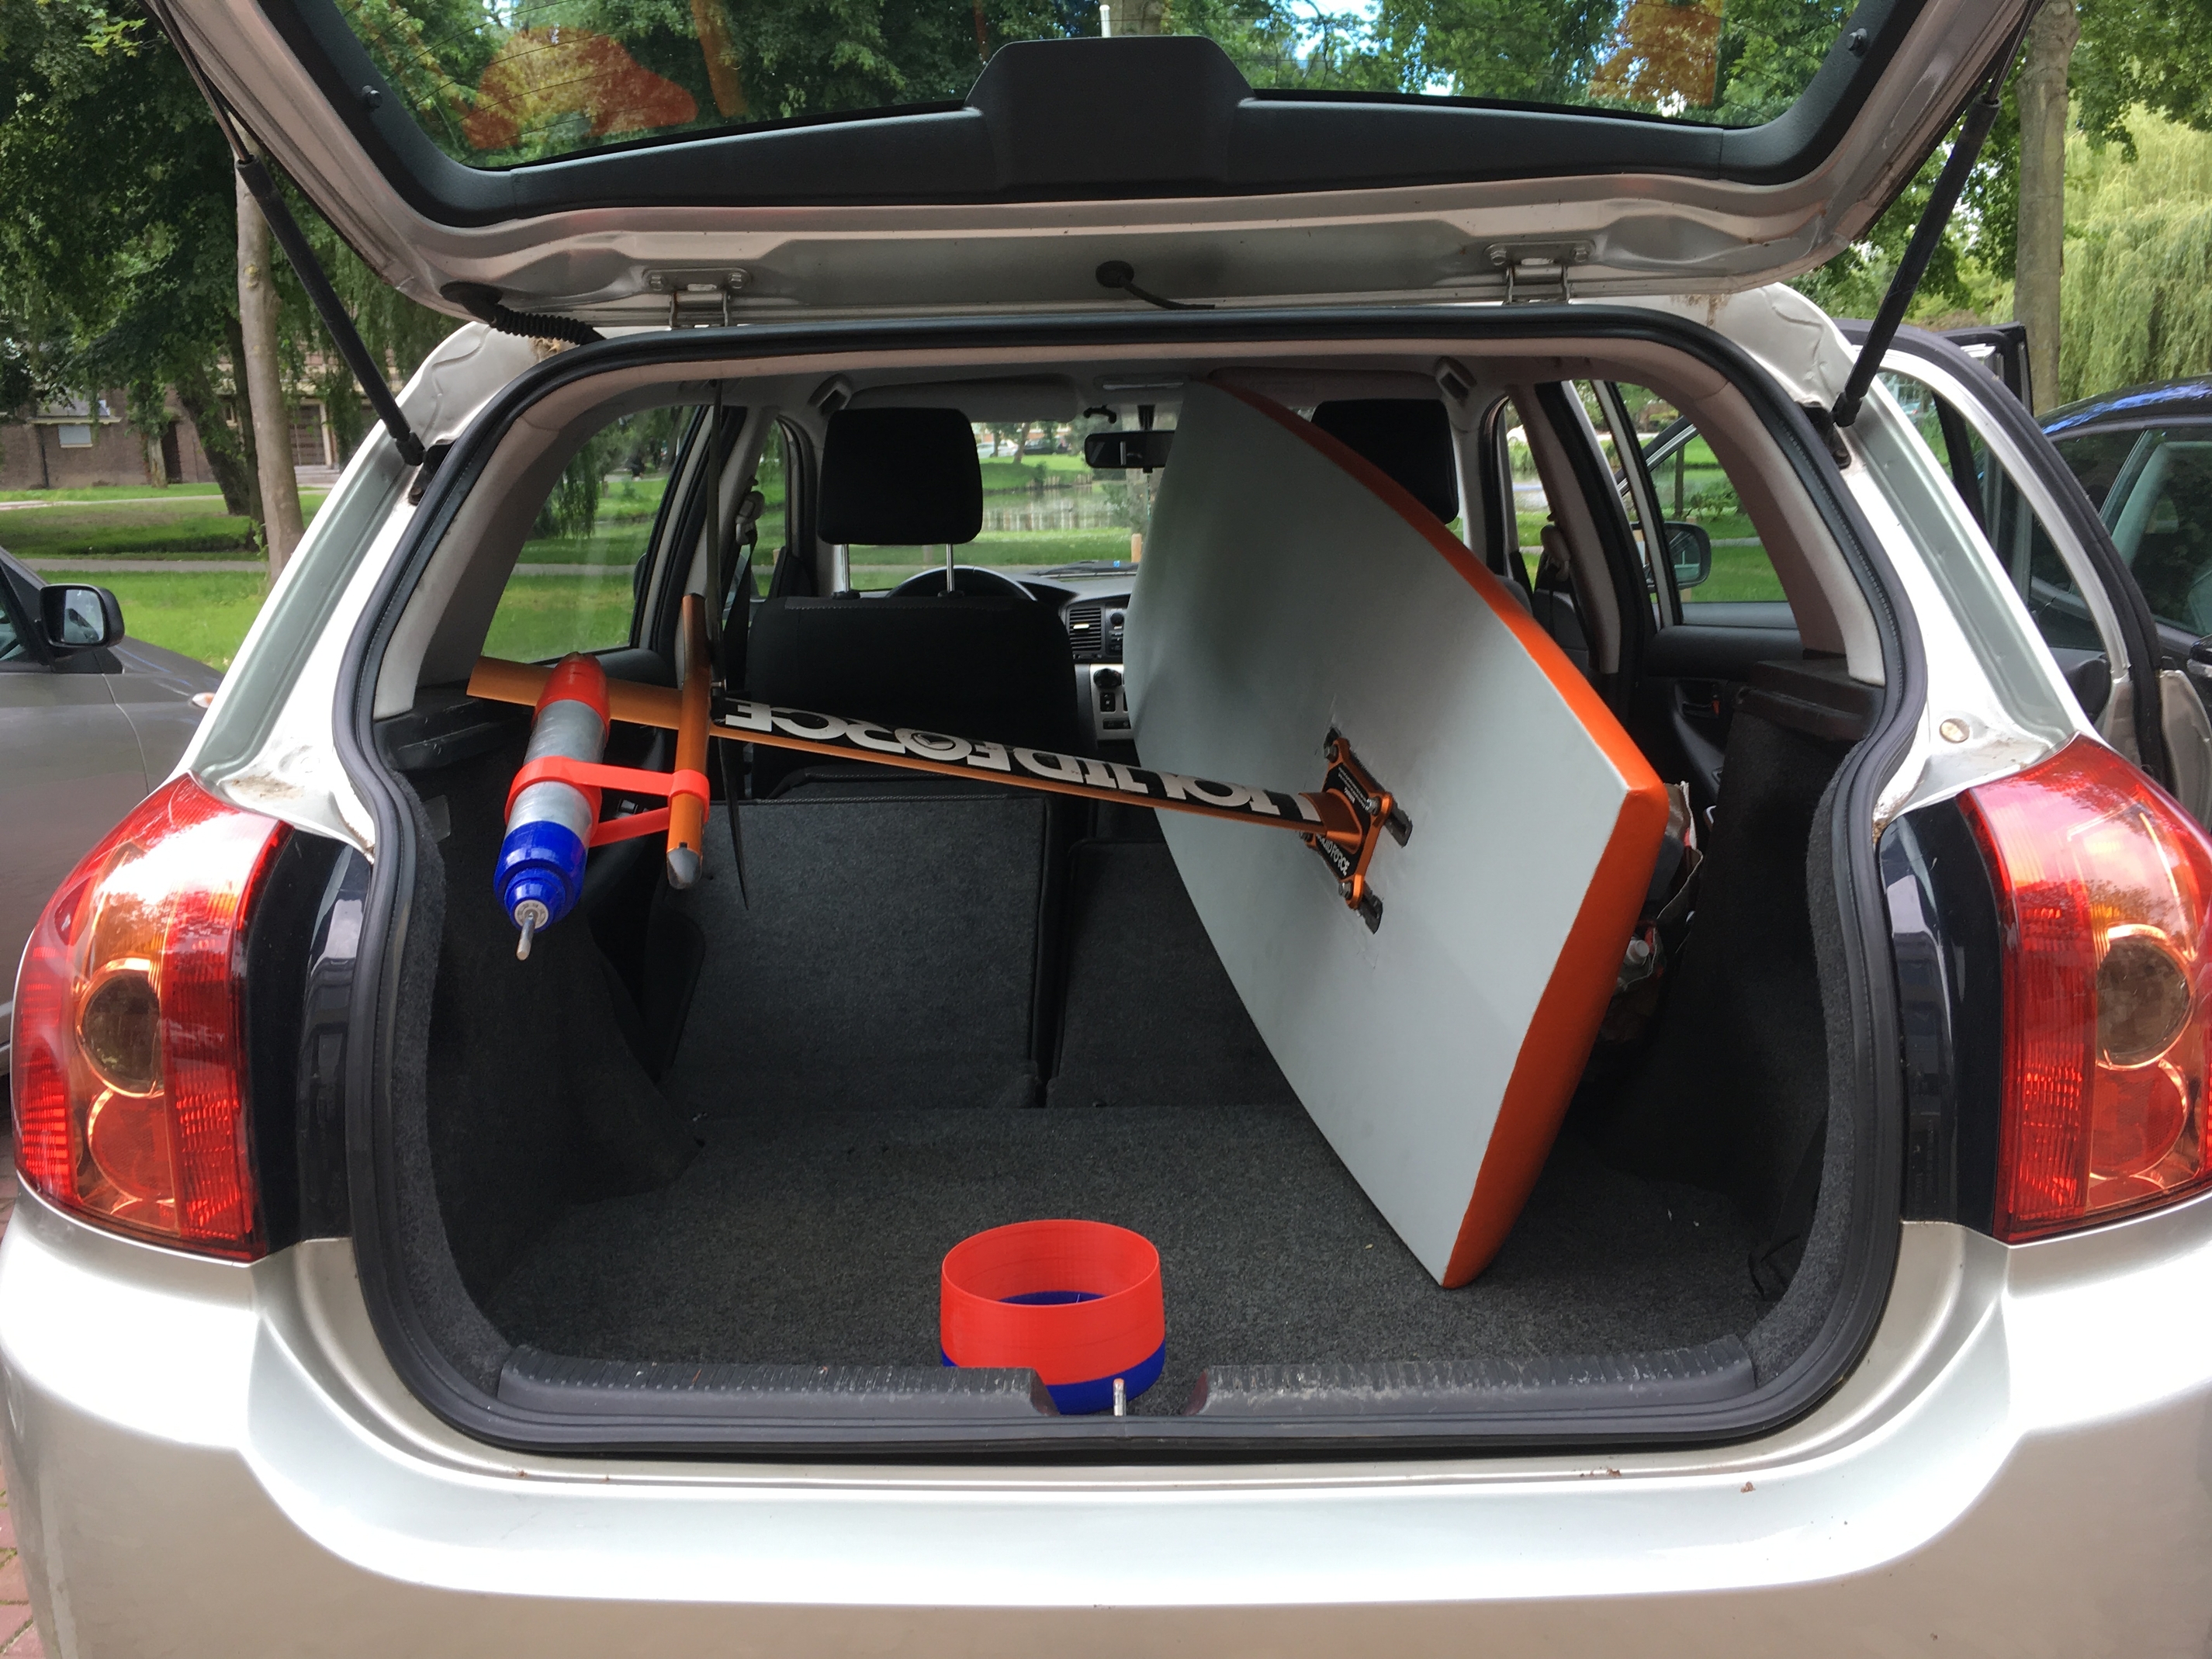
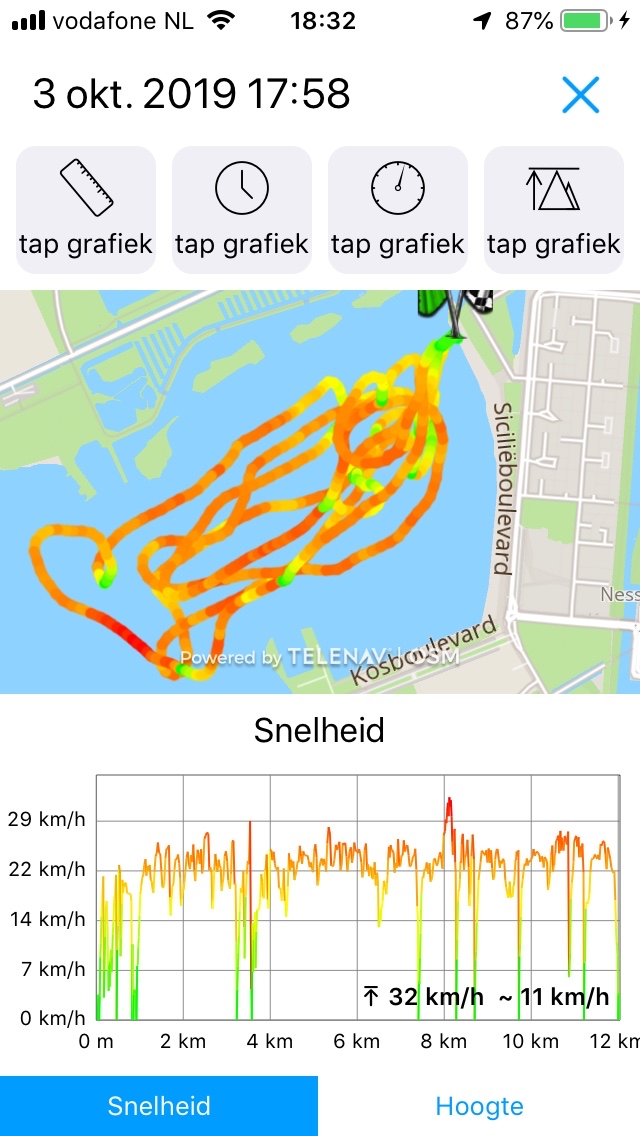
I plan to assemble the Prop pod this weekend and pull the wires in. Lets see how it goes.

3 Likes

Congrats on the build, looks good. Your big coupler looks similir to mine, Ruland stainless, quite big. Mine has a slot for a key which prevents slip (a common problem when using a coupler). Due to the lenght of the coupler, the shaft alligns quite well, 5/100 untrue at the pod exit of the shaft in my case. I don‘t know how much wobble other builders have, would be interresting to see if you have a dial gauge.The coupler should be balanced to reduce vibration. I removed matrrial with an angle grinder until it was balanced.

Thanks @sat_be Daniel. I have a non branded one, but think will work same as yours. I haven’t measured the untrue value for my setup, as I don’t have a dial gauge. Might ask around if somebody has this laying around. Eye balling it so far and looks promising. Leaks at the seals are one of my big worries.
Good point regarding the balancing, will check it out. How did you test this?

Put a shaft through it and put it on 2 parallel bars (shaft on the bars, coupler in the air). It will turn to the position with the heavyest point to the down side. (The side opposite of the screws). Mark it and remove some material with an angle grinder. Repeat until it keeps the position. You can also see it in the way it mooves when you create a (very flat) slope with the parallel bars and let it roll down. Only remove small portions, don‘t remove too much.

Thanks Daniel, very clear. I actually read about it for RC props, logical to use it for this purpose as well. Going to try it out.

Worked the whole weekend to finalise the board. I think i am sort of there :slight_smile:

I pulled the motor wires + water cooling line into the board and secured the mast to the board.
It actually fits in the car, only requires to disconnect the fuselage + prop&duct.

Up next was to hook up all the wires in the E-box. Quite a bit of work and I hope my soldering holds up. Working half standing with clamp and soldering iron over the box was a bit tricky.
Tested the motor a lot and it works great so far. The dead-mans switch also works good in dry condition and “loosing connection” with the remote also switched of the motor. I hope its ready

What’s left is grease the seals of the wooden lid, securing the rear foil and getting a wet suit. The batteries are all charged up. And so am I. I feel very excited and a little anxious as well. Hope it doesn’t go up in smoke!

Next: actually going into the water, hope I can bring some positive news :smiley:

1 Like

Water “shoes” and suit , help for the knees the first time ( getting on and on the board a few time 
)

Yes, the water shoes also. I have those from wind surfing. Did you also added the “grip” on the board itself (don’t know what it is called)?
Good tip, will try it out like that :slight_smile:

“Pad” i think
https://gongsupshop.com/epages/box1707.mobile/fr_FR/?ViewAction=View&ObjectID=669266&PageSize=5&Page=3

https://www.hydroturf.com/hydro-requestsup

1 Like

Haha go for it Marc. I know the feeling so well. It can go wrong, or it is party time with a big smile at the water :smile:

€ 8,47 6%OFF | Srfda 18003205mm Surfboard deck pad daimond line FR EVA Dek grip heeft lijm sup dek pad in surfen SkiĂ«n sport
https://s.click.aliexpress.com/e/1NzRcqi8x

I use this

Thanks Louis. It is exciting!

I tested the board in the water for the first time.
It is really water proof so far, I am mostly happy about that. I made a few test runs laying on the board, so cool!! But I kicked of the deadmans switch which fell in the water and disappeared haha. So 5 minutes and that was it for now. But it is working :smiley: I will be back soon

1 Like

Well these were some expensive weeks and hard learned lessons.

Burned my Seaking ESC because one of the phase wires got detached in the motor pod. I thought to be smart and use the existing connectors. But no, bad idea! Ordered a Flier 320 and got that 1,5 week ago. Build up the pod, soldered the phase wires this time, and pulled the wires into the E-box last week and was ready for a new try last Friday.

Got into the water and did literally 1 run before I lost power. Motor still worked, it seemed. Back on land I touched the pod and it was very very hot.
Once in the garage I had no reaction of the engine at all so decided, without further ado, to cut the alu pipe. I found my whole phase cabling in a big spagetti. What the heck. Well, I forgot to use the grubscrews in the sealmount/alu pipe to avoid rotation of the engine in the pod!!! That’s what you get when you are too enthusiastic to go into the water I guess
 I checked my checklist and noticed it wasn’t there. I guess last time I added it in the moment but forgot it this time :frowning:

So ordered a now motor as well and expanded my checklist. 3d printer is making over hours again, to the delight of my girlfriend.

Good thing is that everything else, also the engine pod, was still dry.

Also the prop seems crazy powerful, Its lifting me with the slightest movement of the trigger. Will try with a different prop next time.

Hope to be back in the water in 2 weeks.

Hi Mark, thanks for sharing your experiences
 the good and the bad :slight_smile:
Where do you ride in Holland? I’ve started my build this month, planning to fly end of this summer near Leiden/Alphen.

I read a lot about a forklift relay to cut the power to the esc if you fall. But I’m not sure if this is a good idea? In my swordfish manual they say you can’t cut the power when the motor is running. I think it is better to only cut the receivers power? Also you don’t need a big relay for this. What do you guys think?

Here also from Holland, Drenthe. With my build I also planned a full cut off power. To be sure everything is off. I think it is more safe. And you wont cut off under load. The remote control goes to 0 % throttle. But just in case something goes wrong I want to be sure I will loose all battery power. With a magnet switch to a board leash and a 200a relay inside.

Ha it happens he :wink:
I foil in Rotterdam, as far as you can call it foiling yet
Would be great if you can make it still this summer. With all the dutch foilers around we should be able to make a camp out of it :wink:

I actually have one laying at home, however it requires quite a bit more than just this relay as you have to design an anti spark system as well. In my case it I don not think it would have helped as hte short came from the engine side. I believe adding a fuse is futile because if you blow one you have only 2 of the 3 phase wires in operation thus shorting the ESC

I think that running the deadmans switch between the signal wire should be fine. So far (with limited running time onlY) this worked fine for me.

But if you like to try a forklft relay let me know, you could take over my unit

HI Louis, what kind of system did you design? And did you use a anti-spark system?

TIme for an updated. I have been flying for a while now. Board, electrics, motor pod, remote, all is working well and stays dry. Total of about 8 running hours.

THe lipo’s have been ditched. The first 2 actual rides, after some test sessions, went fine, getting a little warm perhaps. But the 3rd run with them it became dangerous, they became crazy hot and swelled so much it almost opened the hatch, so I got rid of them.

I purchased some Samsung Q30 cells, nickel (thanks @Buildshit_gijs for a last minute nickel deal) and a spotwelded from Malecrics. This machine is working great, got some nice welds.
I went for 2 6S14P units without BMS. I charge/balance them with my dual 7s charger, hence the dual pack setup. I kept the 100A fuse in the system between the ESC and the packs.

I have tested quite a few different props, modified units from this forum and a own design.
Unfortunately my amp meter is difficult to read during flying but the most optimal prop gets me flying at around 50Amps. Max speed so far is 32 Kph, but this is not yet full throttle. I get about 12 km out of a charge, and I stop at 3.3v.

,

Its truly fantastic :smiley: :smiley: I try to go once per week.
I am starting to get the hang of it and able to make longer stretches without landing, turning a bit too. Loving it :smiley:

Only remotely useful video

Would like to share some experiences or moments which I learned a lot from:

-Don’t try to keep your ebox as small as possible in your first design/build. I switched to bigger components suchbatteries or ESC. These still fit since I build a bigger compartment, allowing for things to grow. Of course you could say that they should have been bigger in the first place, but hey what did I know :wink:
-THe 3d printed hatch frame works totally fine in combination with plywood hatch. Just keep the seal greased up and don’t save to much on screws. Takes some time but it is simple and with the cordless drill it works well.
-Don’t forget to lock your motor in the pod against rotation (for those of us still going strong with inrunners), expensive lesson for me to forget this.
-I redesigned the original PM sealmount to accommodate a larger clamp coupler, together with lots of grease and 2 bearings I have zero issues with a leaking pod. The collar is also lengthened to allow for grub screws into the alu pipe.

Below some of my designs or existing designs modified by me (PM sealmount), in solidworks

Hatch frame (see above for details)

Fuselage holder (without drilling, for liquid force fuselage, but can be adjust in the file)

3blade prop (dia: 160mm / Pitch: 220mm) I run max 3400 RPM. flying at about 50amp (about 95kg all in weight) Its a bit rough but works fine so far. 4blade prop is also available not not tested so much.

Revised sealmount (see above for details)

2 Likes

Nice, What is the total weight off Your board ?