Holland board build

Hey All,

I am Marc, from Rotterdam in the Netherlands, first build :slight_smile:

Before I start a big thumbs up for this forum and the people who are sharing so much info and building boards, brilliant! The thought of flying over the water is bringing a big smile already, now I have to start.
Just browsing through the posts and slowly getting to understand how matters work and writing down what I need. @pacificmeister, @Hiorth, and many others as well, thanks!

One of the first things I would like to work out is the general lay-out of the electrics and what is exactly needed for a board. The choice of battery, ESC, kill switches, etc comes later (I have still quite a few threads to read about these topics). What i was able to find/understand I put in a small diagram (sorry for the quality hope its clear). But, I think I still might have things wrong or missing. Would be great if I can have some feedback on this diagram.

Also looking around to source parts. I checked with a Neugart gearbox importer here in Holland, delivery time: 19 weeks because the economy is doing well. Guess its gonna take a while haha. Anyway, lots to do!

WIll keep you guys posted on my progress. Possibly needing more help, too!

Cheers, Marc
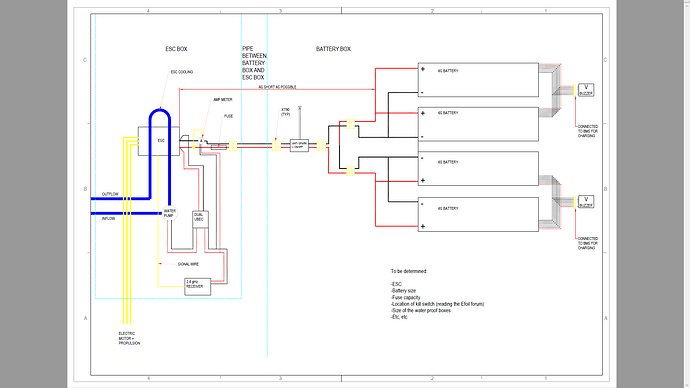
4 Likes

Hey Marc, wellcome. Looks like you have the basics. You may want to add a kill switch, like a reed switch or hall switch, triggered by a magnet on a leash around your foot. Best cut battery power with a big solenoid, at minimum cut the receiver power. For safety and to prevent equipment loss. I had my board once take off to the horizon and would have lost it if Don wouldn’t have been there on his Jetfoiler chasing after it :slight_smile:. Leash ever since. Good luck.

For the kill switch solenoid I can recommend forklift relays from albright.

Hello
Mark
Welcome to the forum ,
your schema is good, for my part I had to connect my amperemetre with a small battery 1S because I had a return of current with UBEC and now my amperemetre works!

1 Like

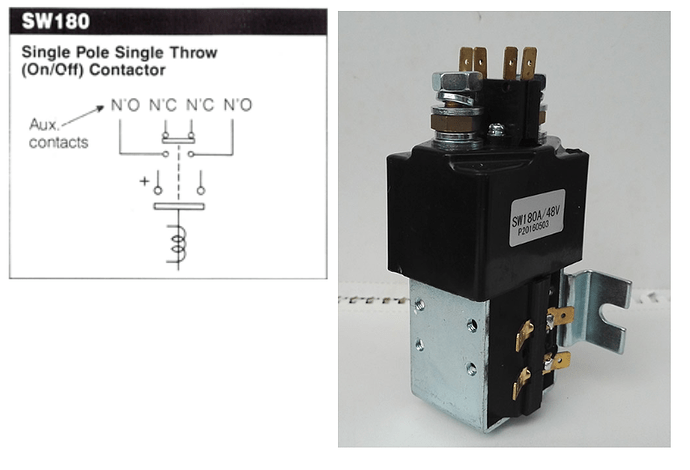
Thanks for the suggestion. Had a look and found this one.

Is this what you are referring to? With coils powered by the BEC/Battery and a kill switch to the Aux. contacts?

1 Like

Thanks Merten.
I am going to look into the kill switch options, Max came with some additional input as well, so will dive into this. Don’t want have the board take off without me or worse.

Yes, but make sure its a used albright. Not a new fake one.

Okay clear, going to look for one

This is 2nd case i read on the forum. I heard of this few times when 1st the esc is turned on then the TX. I heard and saw some weird crap when esc is turned on 1st and then transmitter. Was this the case when it happened?
They say ALWAYS turn tx 1st and shut it down last. I dont get what is the sorcery behind this?

Hi Marc, I’m from holland too. Leuk dat je er ook 1 gaat bouwen! I understand you consider building the pacific mister set-up.
I still have a spare 56114 motor(un-used, unboxed). Perhaps youre interested? I already have most of the files printed as well, they come for free:)
Please let me know when you’re about to order a suitable relais, as im not a electric guy.

Let me know if you’re interested!

Br Thijs

Hey Thijs,

Cool that you are building too! Just reading your post, you are already well underway, looking good.
I am indeed going for the Pacificmeister setup in general with some adjustments based on the parts I can find/like.
I am still in need of a motor, so definitely interested, also the other parts :slight_smile: thanks

You know that i ordered that part 2 hrs ago! A curtis/albright unit to be specific, think this works too. If you want i can still ask the guy to hold it and double the order.

Cheers, Marc

That would be great! What’s the price for this unit? Btw I have some other stuff too(Alu tube, axial bearing, cooling paste etc).
Lets keep in touch.

Hèhè Nederlanders! Ben zeer benieuwd of er straks ook efoils in de omgeving te koop komen. Bouwen wordt em voor mij niet helaas. Haha. Zet em op guys!

1 Like

Update 1 - Items are arriving

Packages are arriving from everywhere, the reception at my office is getting crazy haha.

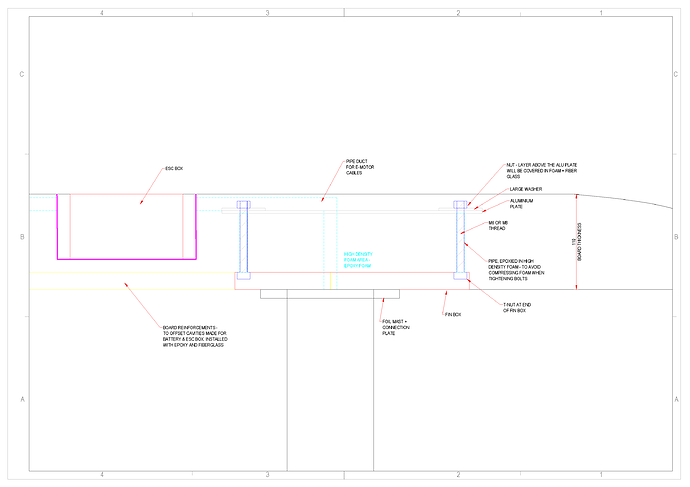
Bought a board. Its an old windsurf board. Now 2,95m long, 133L. Planning to cut off the front, keeping only a little rocker and not loosing to buoyancy. In addition, some trimming at the aft. In the end I hope to have about 100L left and a length of 1,90m a 1,95. THe bottom is not flat, but at the location of the mast I am planning to remove the foam and replacing it with high density epoxy foam + reinforcements as per below sketch. I don’t think the little v-shape it has over the rest of the length is an issue.

Got my relais as suggested by Max, quite a serious unit. Going to test this soon. Also bought this anti spark switch with on/off switch. Want to test if the switch can be replaced by a reed switch with proper magnet setup. This can then function as kill switch and on/off switch. Its is rated for about the same Amps as the ESC, so with the planned setup I believe this should work. Will keep you posted. If you have any thoughts let me know :slight_smile:

Was able to take over some excess parts from @Thijs (dutch build) and he was very kind to print Pacific meisters V3 setup as well, thanks!! Now removing the support structures, a nice job for the rainy evenings haha, and later putting epoxy on it.

Still waiting for the batteries and remote so I can start testing (got the E-motor, Ubec, ESC, cables, connectors, etc, etc), hope it arrives soon :smiley:

Cheers everyone

Looks like a solid mast mount, good job! Are you making a plug on the mast, or will you put the cables in at the bottom?

Nice drawing! Let me know of jou need some more prints;)

As hiorth mentions above, I’m also curious about your cable connection trough your board. I’m struggling with mine all the time when I’m attaching/detaching the mast. Already had to tape a naked cable:(

1 Like

I took your advise about a solid connection, want to have it strong :smile:
I am not quite sure if I follow you. my plan is to make a hole in the mast connection plate and guide the cables down and have an exit there to guide them into the torpedo. In the board I am planning a pipe for the cables. At the end, above the mast connection, I want a custom plastic pipe (3d print) which is same width as the pipe but longer in the longitudinal plane (sort of triangle shape) for me to adjust the mast position of necessary. This should also give some flexibility to unscrew the mast for transport. So far the thought. Have to figure out if this will work.

Sounds good, my thought is just that you need some additional cable length somewhere in case you want to detach your mast from the board when transporting.(Or you could detach the cables from the esc every time you transport it.)

Yess, the plan is to have some over-length somewhere. Have to find out a suitable place once building it up. I think I will try to avoid the disconnecting. Perhaps when you finish some connectors are still wet and you might have short-circuit?

1 Like

Update 2

It has been a while but making small steps forward.

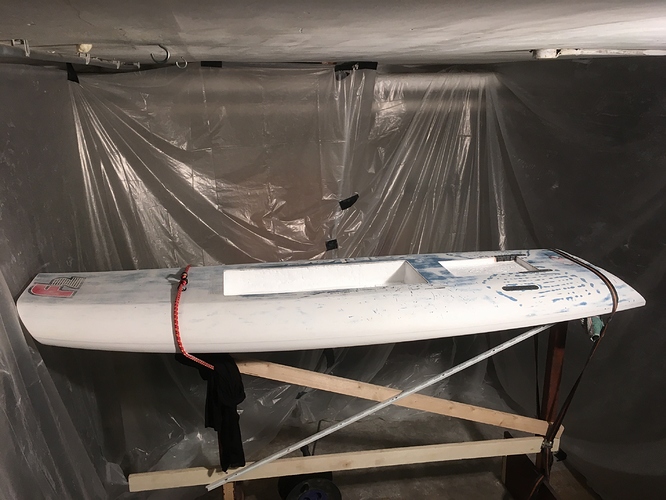
Cut up the old windsurf board i bought on the cheap. Thought this would make my life easier but it doesn’t. Lots and lots of work, starting from a foam block would have been half the work. Upshot is it already has a lot of strength by itself and I will add another two other layers of glass (test piece on a cut off part worked fine).
The bottom has several slots where I will add 6 90cm strips of wood to compensate for the large hole.

The large chamber is for the electrics. THe small recess is for my metal cover plate where the studs of the fin box securing will end. Will be covered with foam and glassed shut (see my sketch above of mast connection).


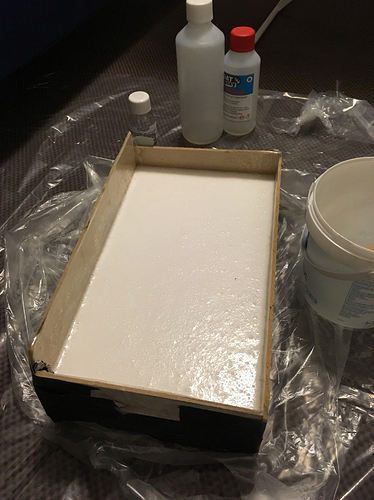
Pouring a high density foam section to which the mast will be secured. Will glass this into the cavity in bottom of board.


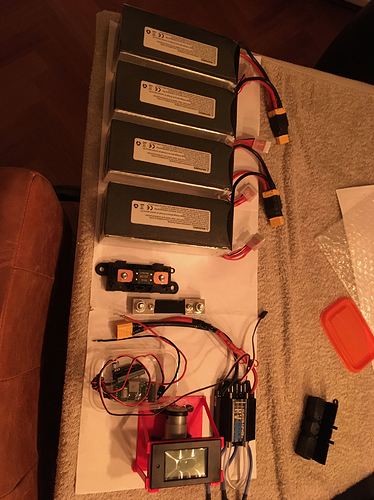
Setup of my electrics (4 12 Ah 6s batteries). The white paper is same size as the E-box in the board. Will make a divide between the batteries and the rest of the box. Got a Littel mega fuse, Seaking 130A ESC, dual SBEC and a small frame I printed to hold the water pump and raise the display so I can read it through a plexiglass section of the cover.

Do you guys have any thoughts or suggestions on the setup??

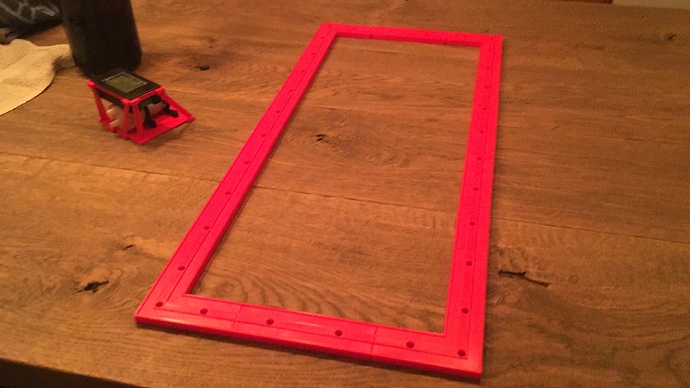
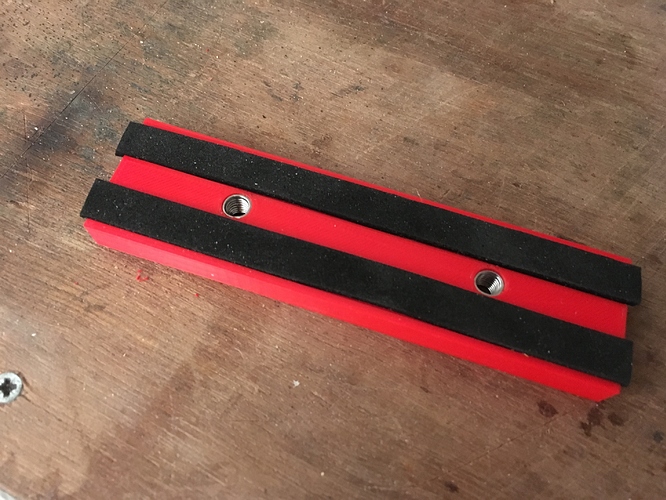
Below the frame which I came up with. Inspired by @rogjalon. I printed a profile which I will epoxy the hell out of to make it water tight. In the bottom picture you see the test piece with the rubber seals which, with some additional grease and a bolt every 6cm, should seal it from water, I hope.
Still need to use the router to remove the section in the board to fit this frame. Will also add a royal amount of bostik superfix for additional measure. The threads are stainless steel threads with the bend section made straight again and inserted in the recesses in the bottom of the profile.

Any thought on the workability perhaps? Have to test it still.


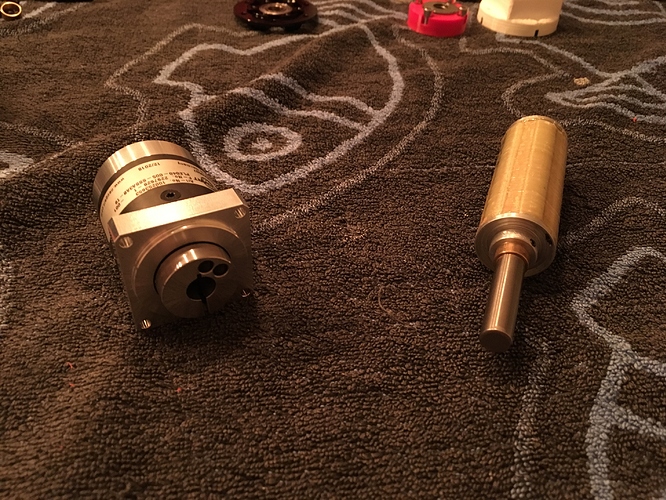
Today was also early christmas. After 18 weeks of waiting the Neugart gearbox arrived :smiley: :smiley:
But, but, but, the clamp which should fit on the 10mm shaft of the electric motor is only 9mm … :frowning:
Will call them tomorrow, but don’t want to wait another 18weeks for a redelivery.

What do you guys think is the way forward, to drill out the clamp to 10mm, or lathe the shaft of the motor (on the right below) to 9mm?

Hope to be ready for spring weather, but still lots and lots to do

1 Like