Hi All,
I built this project because I wanted to understand how an efoil works all the way through. This is an exploratory build intended to develop the working knowledge and riding skills to determine what I will want in future builds. Between a full efoil, a foil assist, and a tow-boogie, I selected the foil assist for low relative cost and simplicity.
So far, I’ve ridden 21miles on this setup and it’s been an absolute joy to my friends and I.
Thank you so much for all the information you all have collected here!
Build Summary
- Board, mast, and foil: Gong hype first rise 5’, 85cm mast, 1300cm^2
- Motor: 6384
- Battery: 10s3p Molicel P42A
- BMS: Flycolor 160A
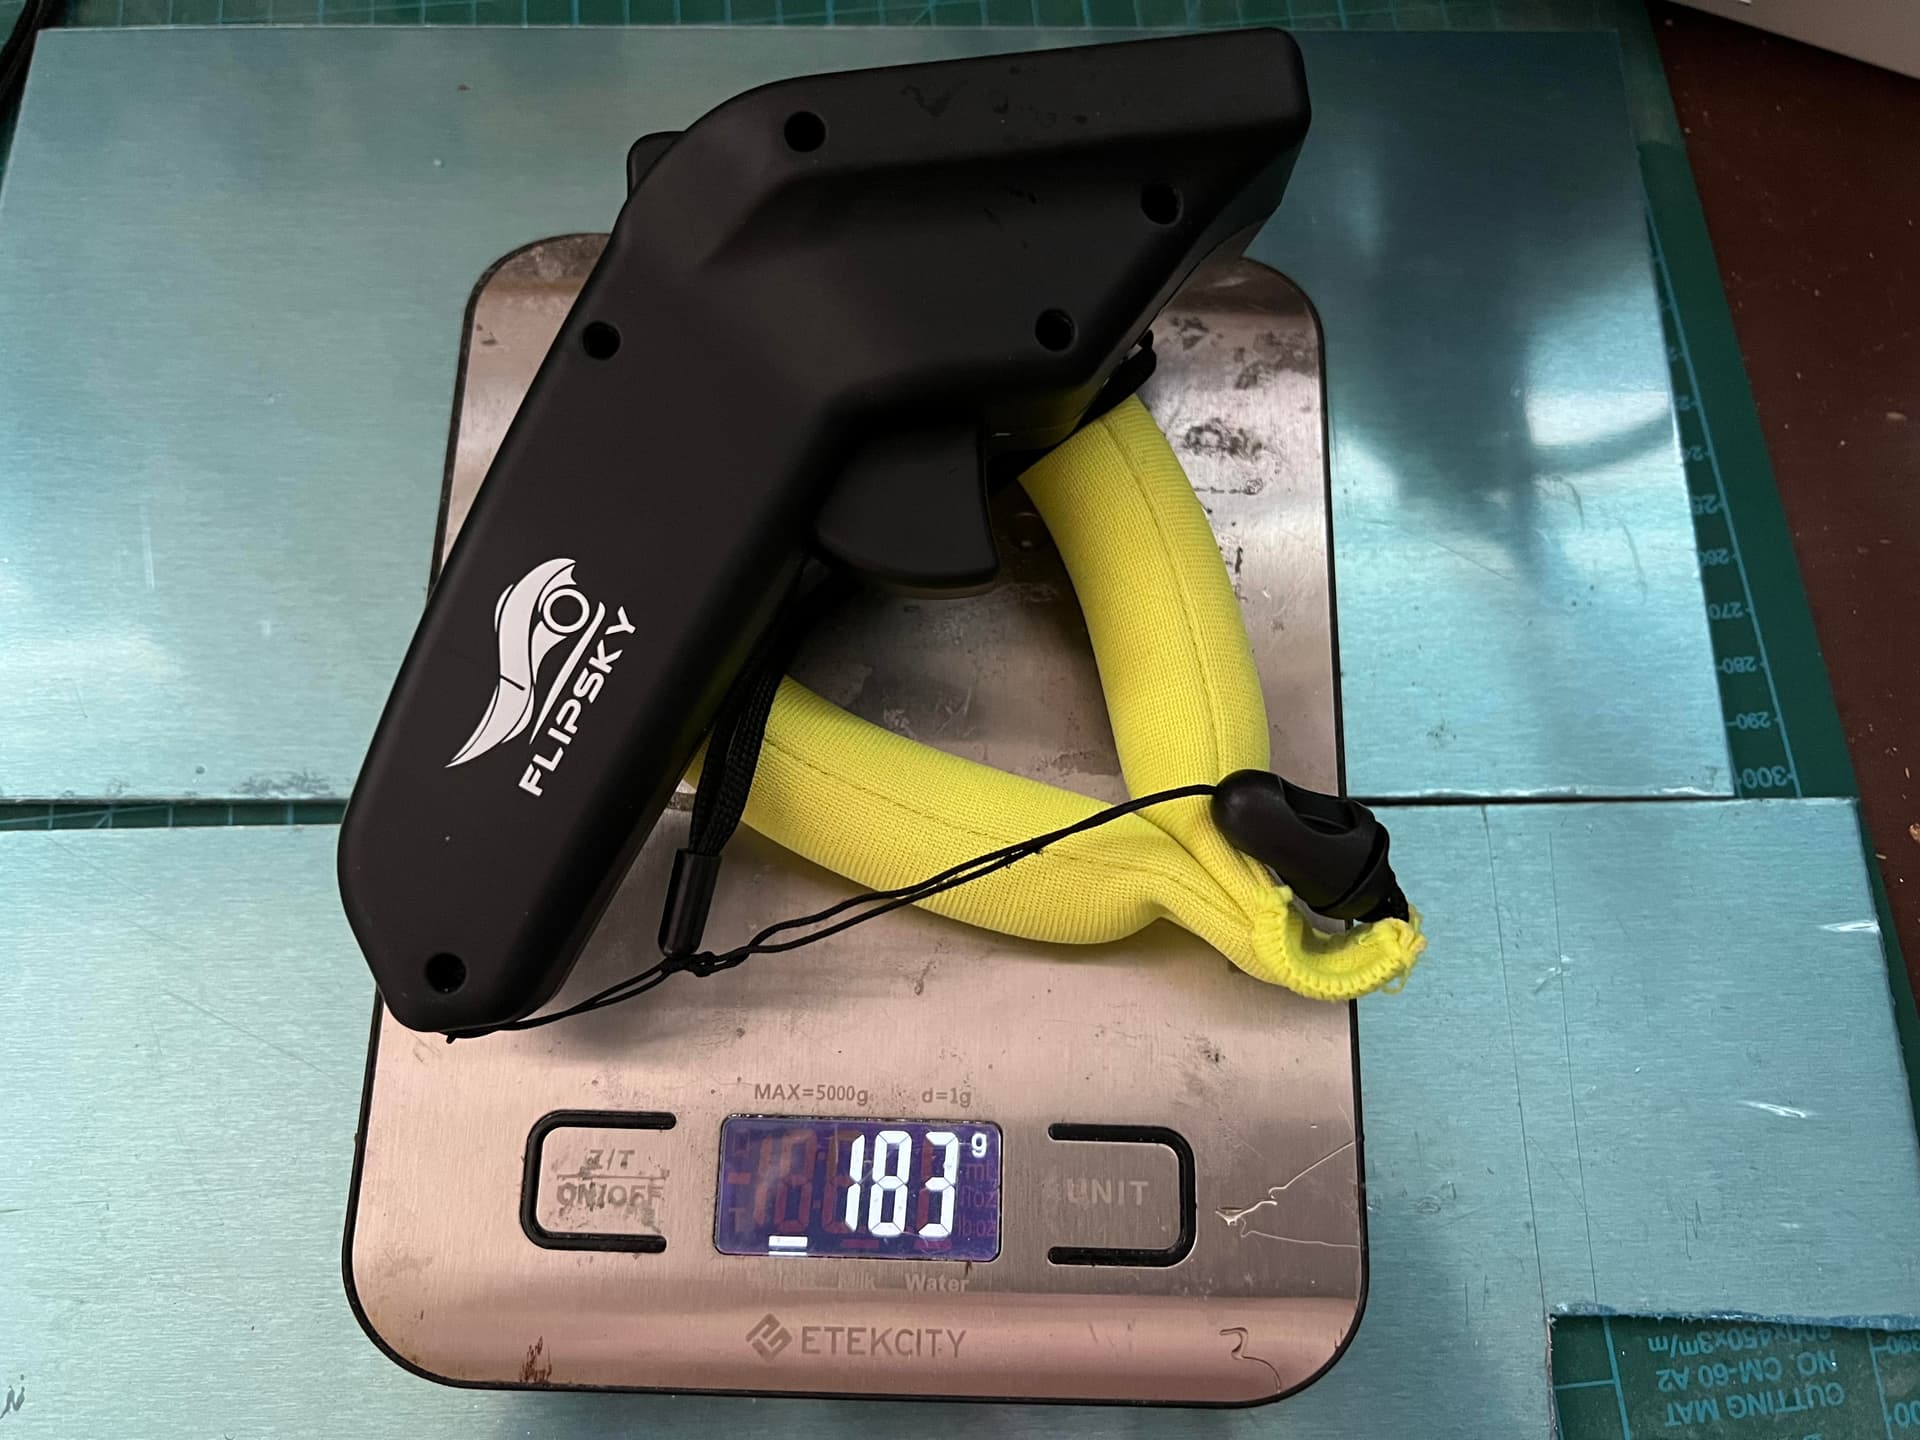
- Flipsky VX-3
Build Steps:
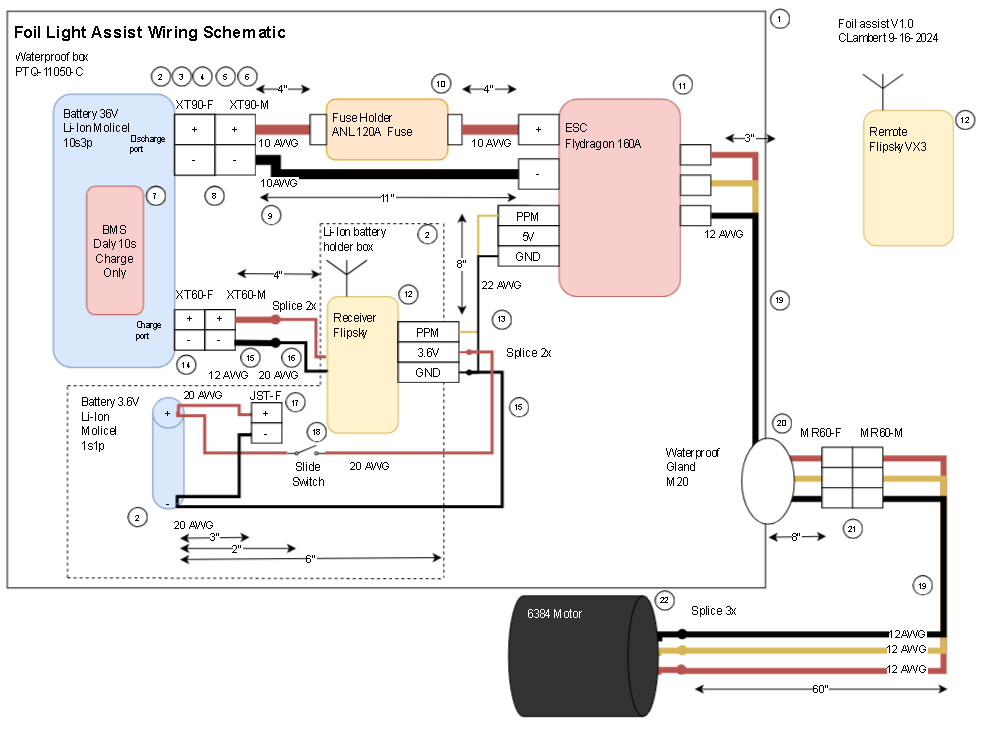
Schematic:
BOM:
Item	Name	Quantity	Price	Link	Total Price
1	Waterproof box	1	31.82	https://www.amazon.com/dp/B0131VGD1O?ref=ppx_yo2ov_dt_b_fed_asin_title	569.7
2	Battery Cells	31	150.35	https://www.imrbatteries.com/molicel-p42a-21700/
3	Heat Shrink	1	6.99	https://www.amazon.com/dp/B0CWDSP8YS?ref=ppx_yo2ov_dt_b_fed_asin_title
4	Fish Paper	1	11.8	https://www.amazon.com/dp/B00DJUHBIW?ref=ppx_yo2ov_dt_b_fed_asin_title
5	Kapton Tape	1	10.99	https://www.amazon.com/dp/B07S2219CK?ref=ppx_yo2ov_dt_b_fed_asin_title
6	BMS	1	13.6	https://www.aliexpress.us/item/3256806227374514.html?spm=a2g0o.detail.pcDetailTopMoreOtherSeller.1.23f43170aQ5r7t&gps-id=pcDetailTopMoreOtherSeller&scm=1007.40050.354490.0&scm_id=1007.40050.354490.0&scm-url=1007.40050.354490.0&pvid=99f8227e-2b1e-49b5-bedf-82c35970e9d1&_t=gps-id%3ApcDetailTopMoreOtherSeller%2Cscm-url%3A1007.40050.354490.0%2Cpvid%3A99f8227e-2b1e-49b5-bedf-82c35970e9d1%2Ctpp_buckets%3A668%232846%238108%231977&pdp_npi=4%40dis%21CAD%2119.92%2113.15%21%21%2114.39%219.50%21%4021032e4e17120108583173192eb5e7%2112000037095883027%21rec%21CA%21860052467%21&utparam-url=scene%3ApcDetailTopMoreOtherSeller%7Cquery_from%3A&gatewayAdapt=fra2usa4itemAdapt
7	XT90	1	9.99	https://www.amazon.com/gp/product/B07C8LJMFP/ref=ppx_yo_dt_b_asin_title_o00_s02?ie=UTF8&psc=1
8	10AWG WIRE	11”	16.98	https://www.amazon.com/gp/product/B0B9JBJ3LK/ref=ppx_yo_dt_b_asin_title_o00_s02?ie=UTF8&psc=1
9	ANL Fuse holder	1	9.99	https://www.amazon.com/dp/B0D1QQ1NSD?ref=ppx_yo2ov_dt_b_fed_asin_title
10	ESC Flydragon 160A	1	85.99	https://www.aliexpress.us/item/3256802066593278.html?spm=a2g0o.order_detail.order_detail_item.4.680ef19c9E8QiT&gatewayAdapt=glo2usa
11	Remote Flipsky	1	71.5	https://flipsky.net/products/flipsky-fully-waterproof-remote-vx3-controller-for-efoil-esurf-ejet-boards-esk8
12	Servo Wire	1	7.99	https://www.amazon.com/Connector-Splitters-Parallel-Extension-Airplanes/dp/B0CNDFCX6K/ref=sr_1_1?crid=BCJKYWI6GMWN&dib=eyJ2IjoiMSJ9.6Dq8DIb8i6vYF3WAT7os84FJGAnPFGJfoKGcUAV-xHlIvrFyW53t8ihumXfuHQa_3lMJX9ku_OoiUNlYmsdmWAt5aFD-OFZ6G2a8xic9-vYMoCpiqRXpapVDf79YALCxBPFvNx5qf1teQNDj61At-Ih-jTJYexEhrFjr7S_hOc1SXXNIs3m0-FNhlSkDwtW3_tyYS74KM0_GL6kfGJhXEblGWavQeH28wGR-2NJa2OhWglqvruzLa51-zvyCuEe9au1GudKkPRtKOZVGRrqVDUT52_n_DSOBpqwY4n1JZco.c6WK7MU08DlbvZDleC_CArTnIAoln21Nc7Bg3oWAJ6I&dib_tag=se&keywords=servo+3+way&qid=1726517851&sprefix=servo+3+way%2Caps%2C153&sr=8-1
13	XT60	1	8.99	https://www.amazon.com/Pairs-Female-Connector-Silicon-Battery/dp/B07QH249CR/ref=sr_1_5?crid=1JKD9MHBBTFPS&dib=eyJ2IjoiMSJ9.DaKl1hZzxQ8-Gjv6GV5NmxUp5VJHcKB7cXGPDwDZ2U12B-YtqSr4S6F7zdHD7akF8NJSPqLglYjwGz523zxKgdhNzdIPIjn1ULBfj6WK5a_-7aaThXK6e8TC7b-7hRskG-bZVRNQI5zaV1hVrPMFmF1hqDSAp1R7radp8uDYf_XCDr1IqCPJLM2fZALaXZHwtYc9PjFuDLFudNY5pn-rRKrVS0y2jIU97iWEkDZayoY_PP0yqBljVk_ORnFshJ6V_kAibShXJPn_OIigjIlCWYjc97UvshaxQg5tRc-0wh0.LgkwJsrwo8EQj_DqNvHX86e6U2_KEtfB739m1rt9ABI&dib_tag=se&keywords=xt-60&qid=1726517989&sprefix=xt-60%2Caps%2C140&sr=8-5
14	12AWG Wire	79”	15.99	https://www.amazon.com/gp/product/B0C6QXVHKL/ref=ppx_yo_dt_b_asin_title_o00_s00?ie=UTF8&psc=1
15	20 AWG Wire	11”	6.88	https://www.amazon.com/BNTECHGO-Silicone-Flexible-Strands-Stranded/dp/B01M12PSJM/ref=sr_1_11?crid=3P0QXVXR04E54&dib=eyJ2IjoiMSJ9.wIY7N3lR2j0ATiIhyjYyOua-hD0r6PnaGyGf837cHRPTgulgHuY6BEYlD1WmLUtVOtouWfwvb5007Sln73_FNV6pl_OwEaw2bWF4Eu_iefk0hYe2RBuqabRf929YnQNAbT9rpZxLOPqoGkNs0ElARMx9nnbP5dEWELV1SBQn0ghw_BOjww0kYrm92cEr3X0fDny5zkBDRkb_4gCN-udeT9HWYHFFTTOUQ68dzat4Dr7Ii3uWsjgD9nVjbEujeElLtjjR3cgFXk24BWQ0VUoEa6msyoPSR3YxtCRau5BSykc.AlKviZBbEA_I1iwBl6mh7HRbOhqqD0iNcV1dnORLTjc&dib_tag=se&keywords=20+awg&qid=1726518161&sprefix=20+awg%2Caps%2C141&sr=8-11
16	JST Connector Kit	1	6.59	https://www.amazon.com/eBoot-Connector-Female-Cable-Battery/dp/B01M5AHF0Z/ref=sr_1_5?crid=38I06M8LG93Q1&dib=eyJ2IjoiMSJ9.5cOA-WvPV6cbqxwGW00qOtSElvu1WTQytk5qH2sMxl9HreCDZbYqjzZmWojRkhBoWNiqa5GXHpXn1SSNfC_Uj6yMxbxKJ4FwHDAIqttNqTr0z4Ndh89PQtcK9ibAYXBZBQud-Bcsf1WUCbY21FyamMCKU6GEvjTSIIrs4aWJqIcaQukvqXcFpyOcKOgsN0u5d0ZhQLx69NH1GZc8RHj5YCX5KHzT3FpKya9o5iIPKvIMn7H-L8FAiAymSgfX-mAlRTU4ehbiv2tQ2IEIg7wtR-bJk2Ri-3VGcfpXkMqLOG8.ceXvqsDR_8xkFwSrm8zhBSA5ApnfLs5ecfAZVtOBCis&dib_tag=se&keywords=jst+connector&qid=1726514650&sprefix=jst+connecto%2Caps%2C128&sr=8-5
17	Slide Switch	1	6.79	https://www.amazon.com/cart/smart-wagon?newItems=814ef67c-18e7-4df1-b435-d0e8b802e1e9,1&ref_=sw_refresh
18	12AWG Wire	1	15.99	https://www.amazon.com/gp/product/B0C6QXVHKL/ref=ppx_yo_dt_b_asin_title_o00_s00?ie=UTF8&psc=1
19	Waterproof Gland	1	15.99	https://www.amazon.com/dp/B07Z9C9Q5X?ref=ppx_yo2ov_dt_b_fed_asin_title
20	MR60	1	14.99	https://www.amazon.com/gp/product/B07X223LK3/ref=ppx_yo_dt_b_asin_title_o00_s01?ie=UTF8&psc=1
21	6384 Motor	1	49.5	https://www.aliexpress.us/item/3256805603300813.html?spm=a2g0o.productlist.main.1.7a903af32yclxb&algo_pvid=6baf69dc-2132-41c0-bf1e-60e01593d54a&algo_exp_id=6baf69dc-2132-41c0-bf1e-60e01593d54a-0&pdp_npi=4%40dis%21USD%2150.00%2149.50%21%21%2150.00%2149.50%21%402101ec1a17222634778685954e5cf0%2112000034362123246%21sea%21US%210%21ABX&curPageLogUid=RbODZv4mJoYq&utparam-url=scene%3Asearch%7Cquery_from%3A#nav-review
Battery
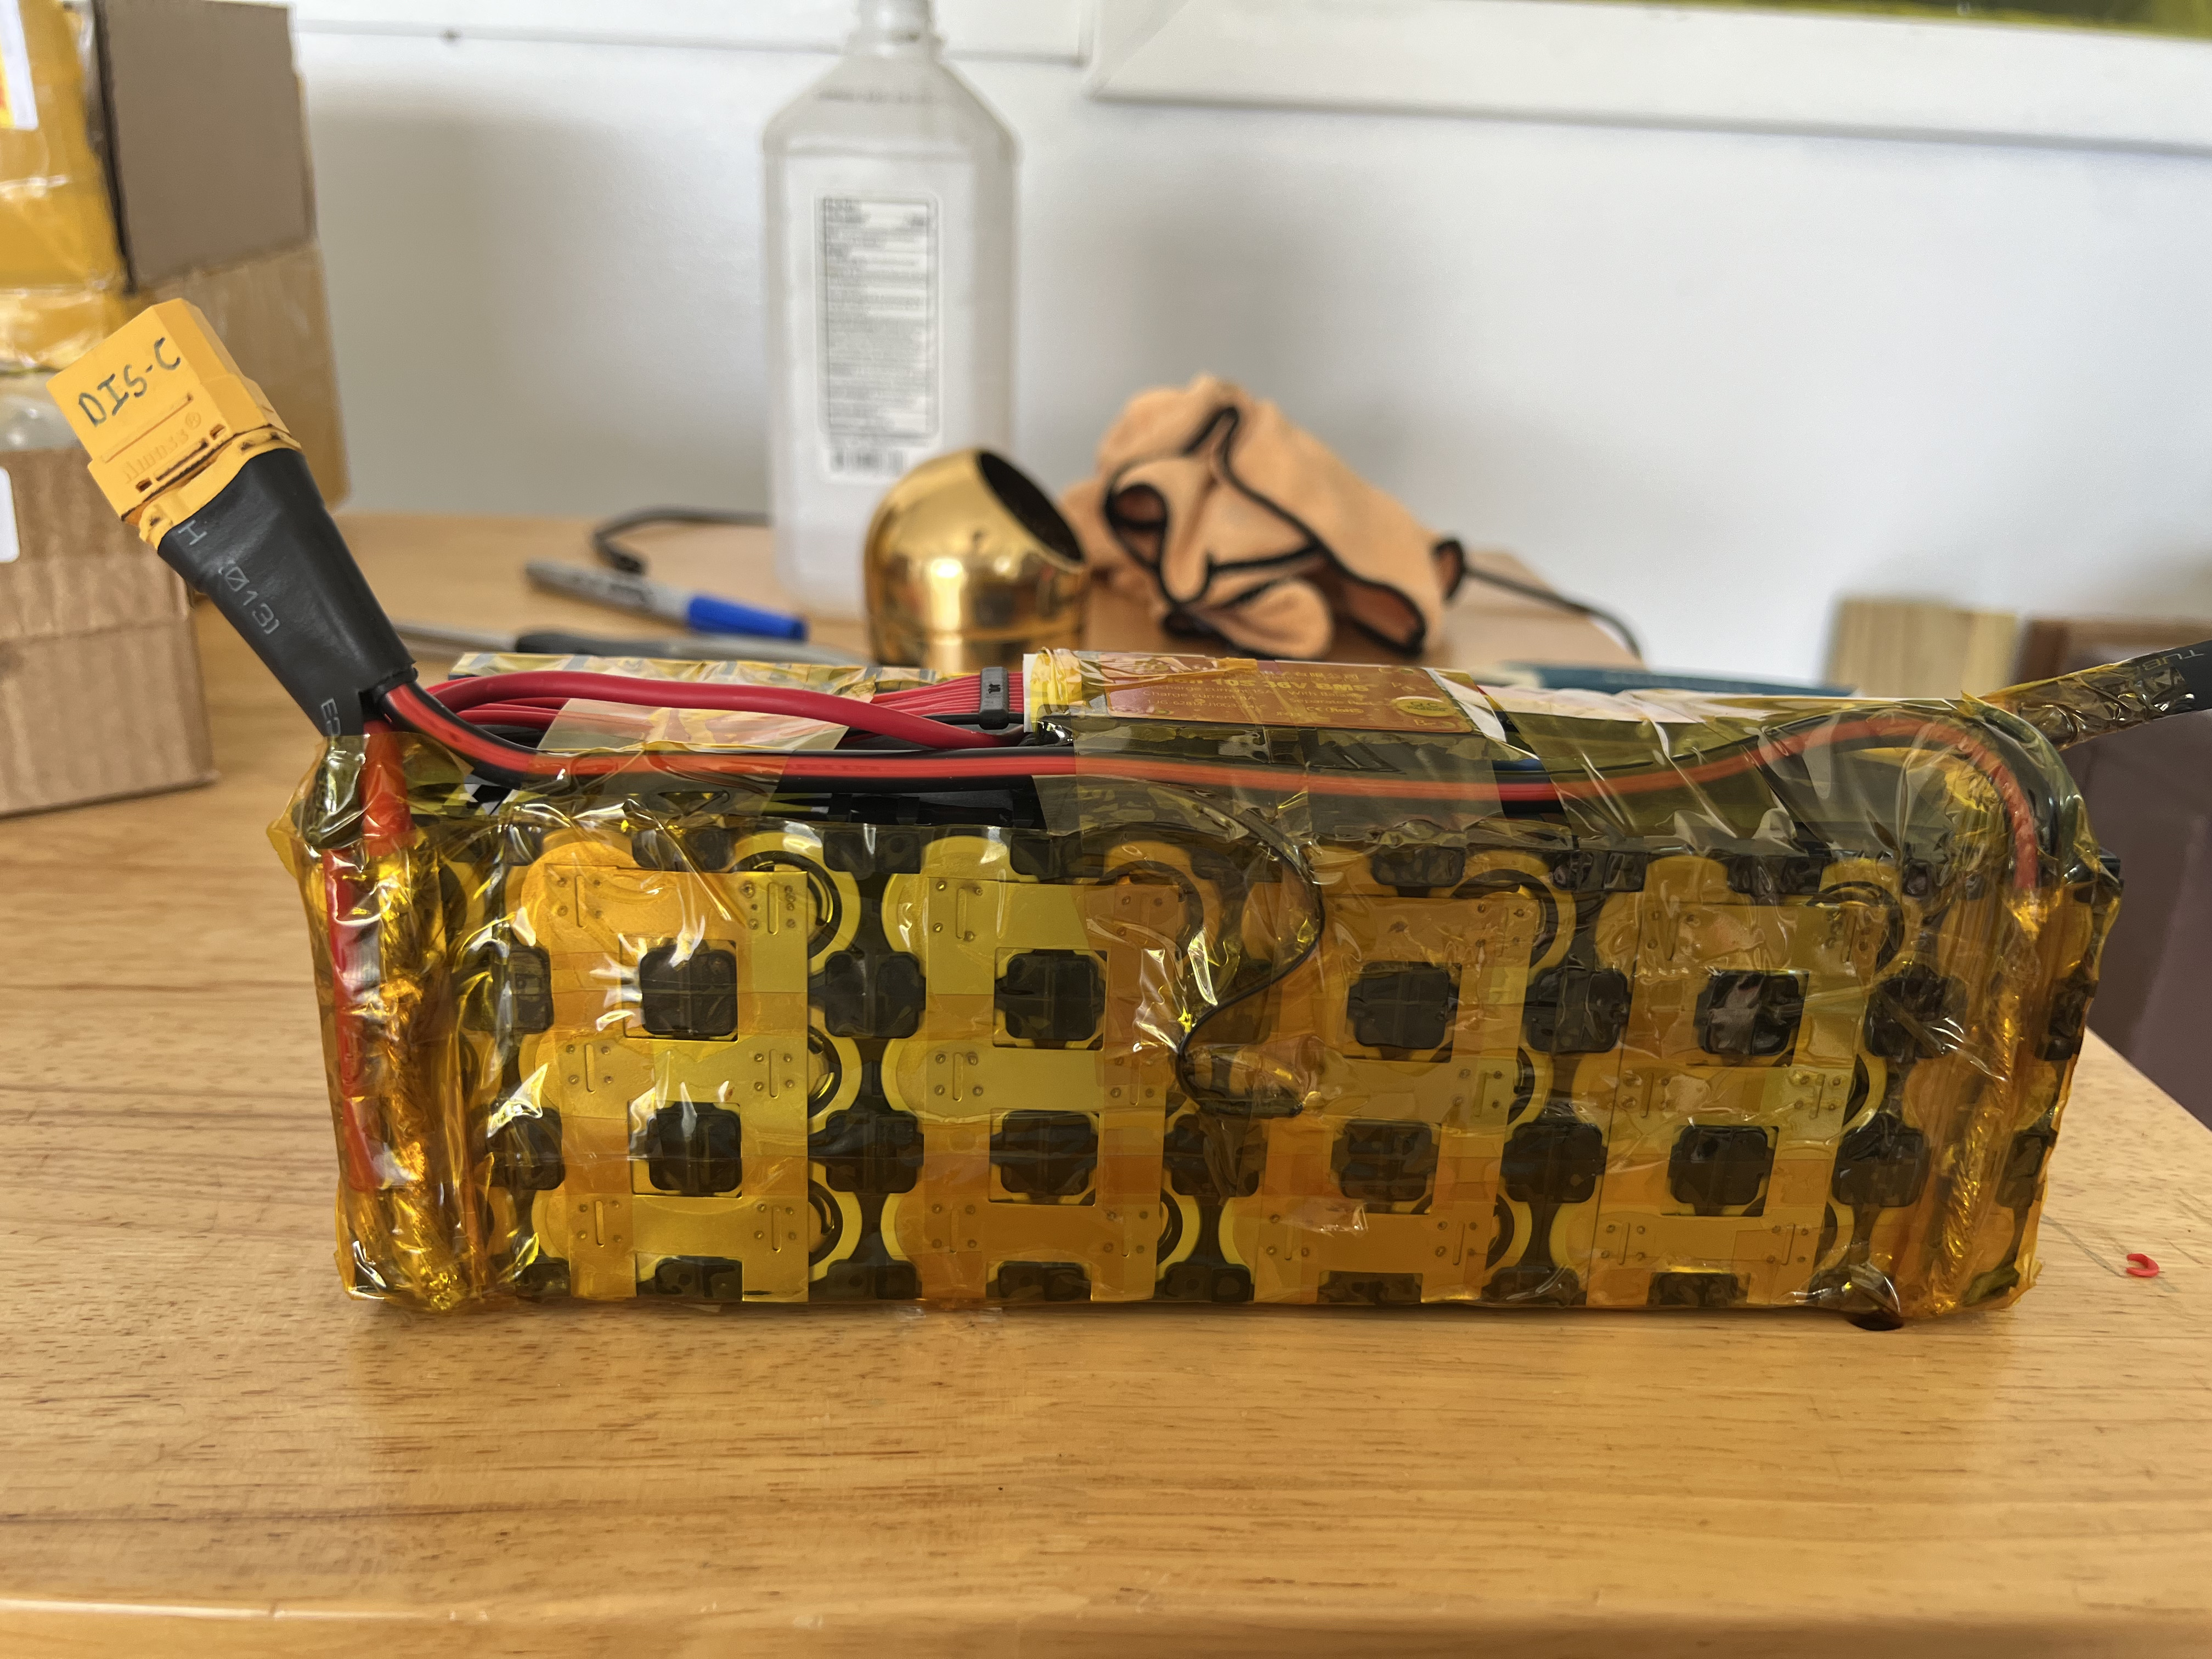
- 10s3p Molicel P42A welded using Maaletrics spot welded 18ms pulse
- 0.2x 9mm Nickel strip
- Daly BMS wired to charge batteries per manufacturers schematic (XT60)
- Main discharge (DIS-C) is connected with 10AWG to cells (XT90)
- Covered in Kapton Tape
- Surrounded by fish paper for insulation
- Covered with heatshrink, this was initially a very tight fit and required the next larger size to be used
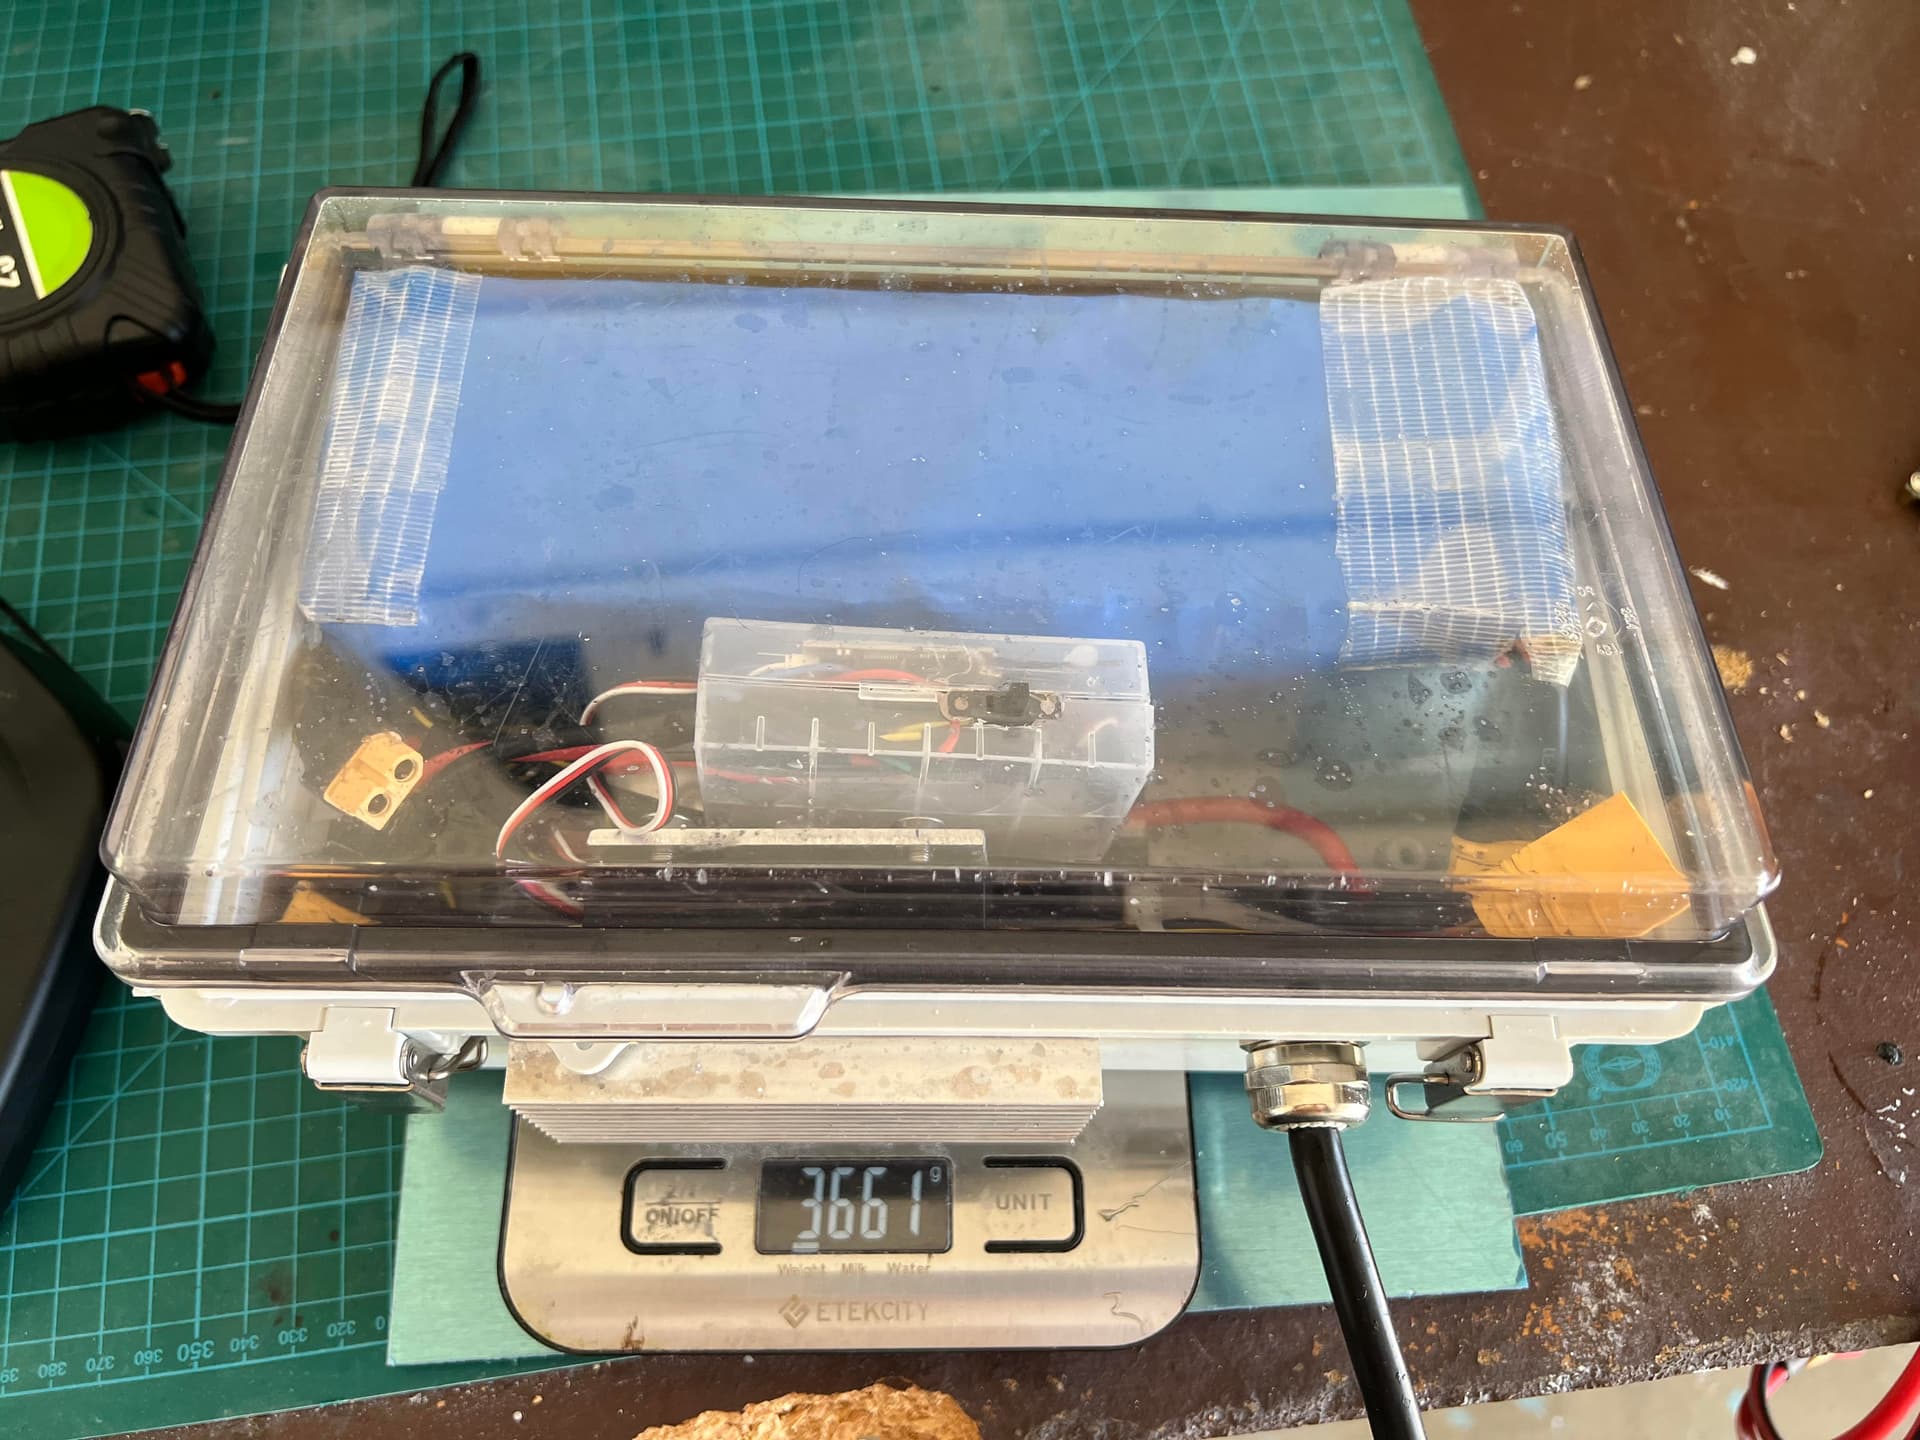
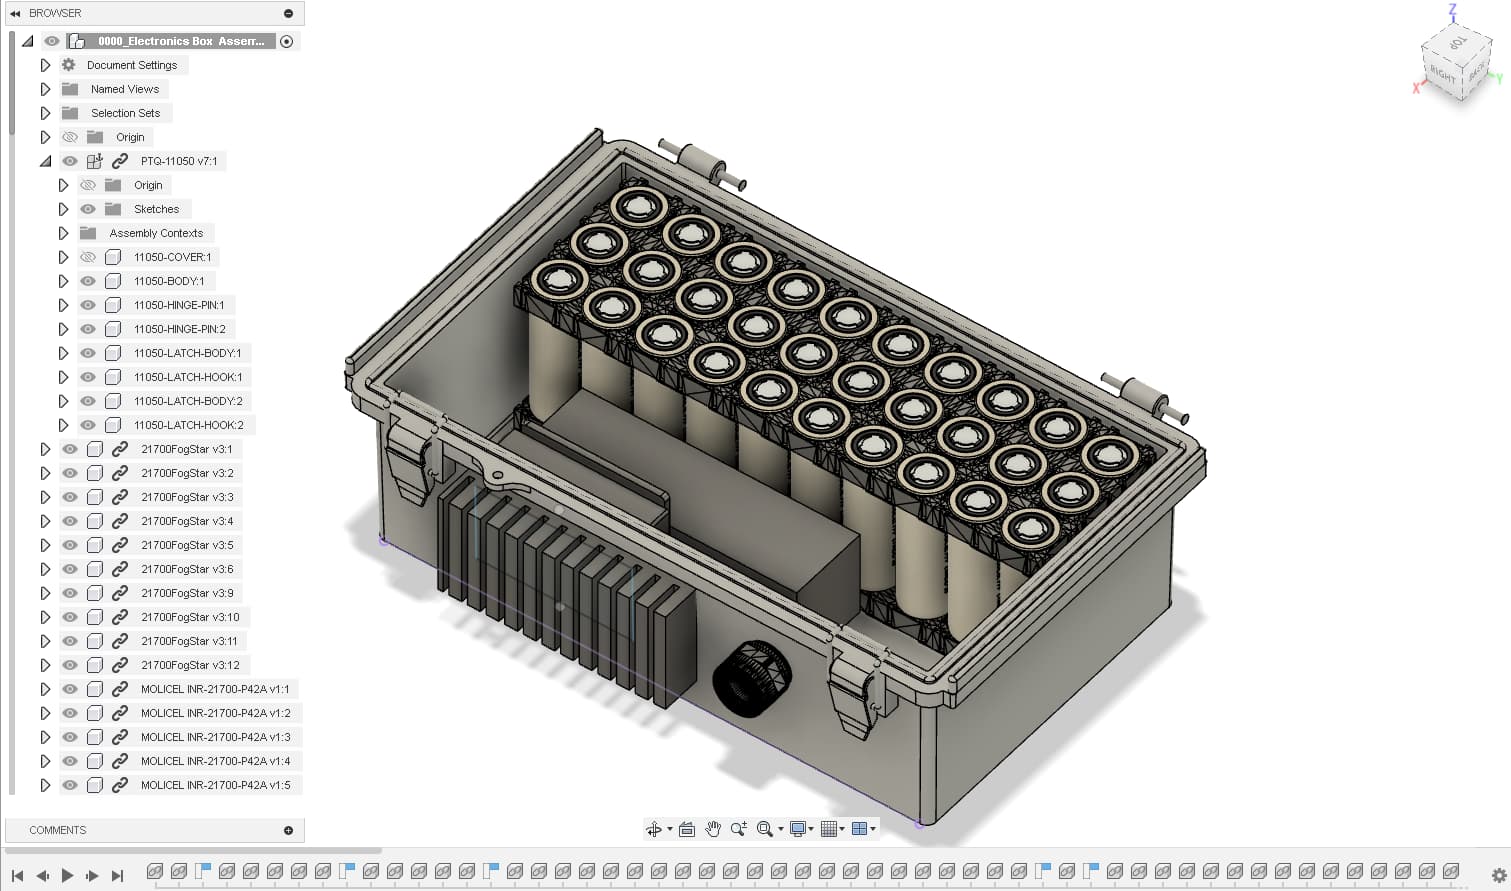
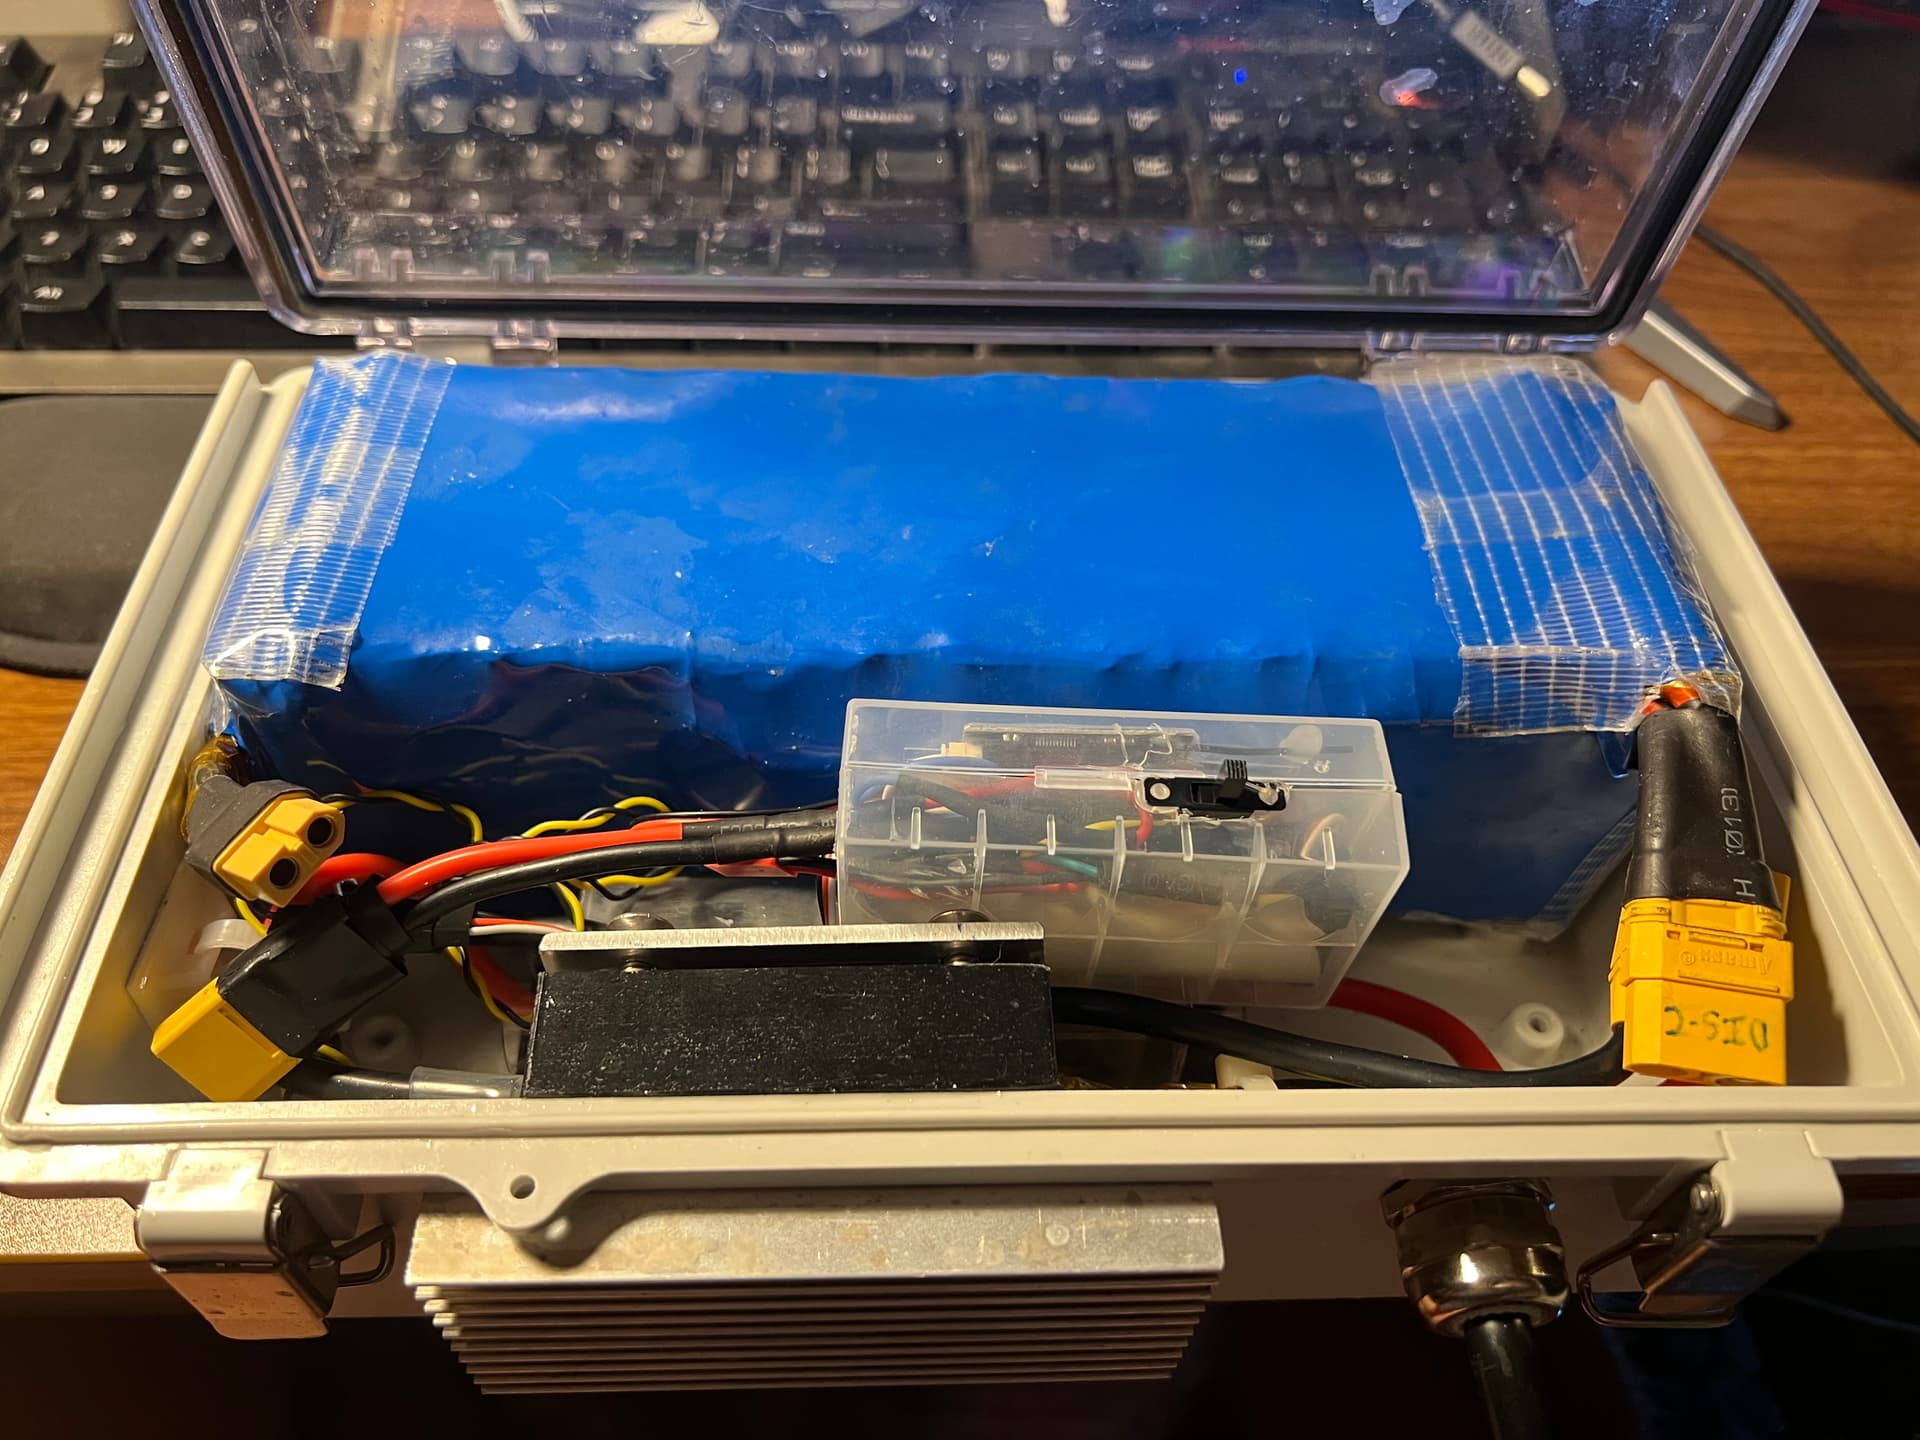
Electronics Box Assembly
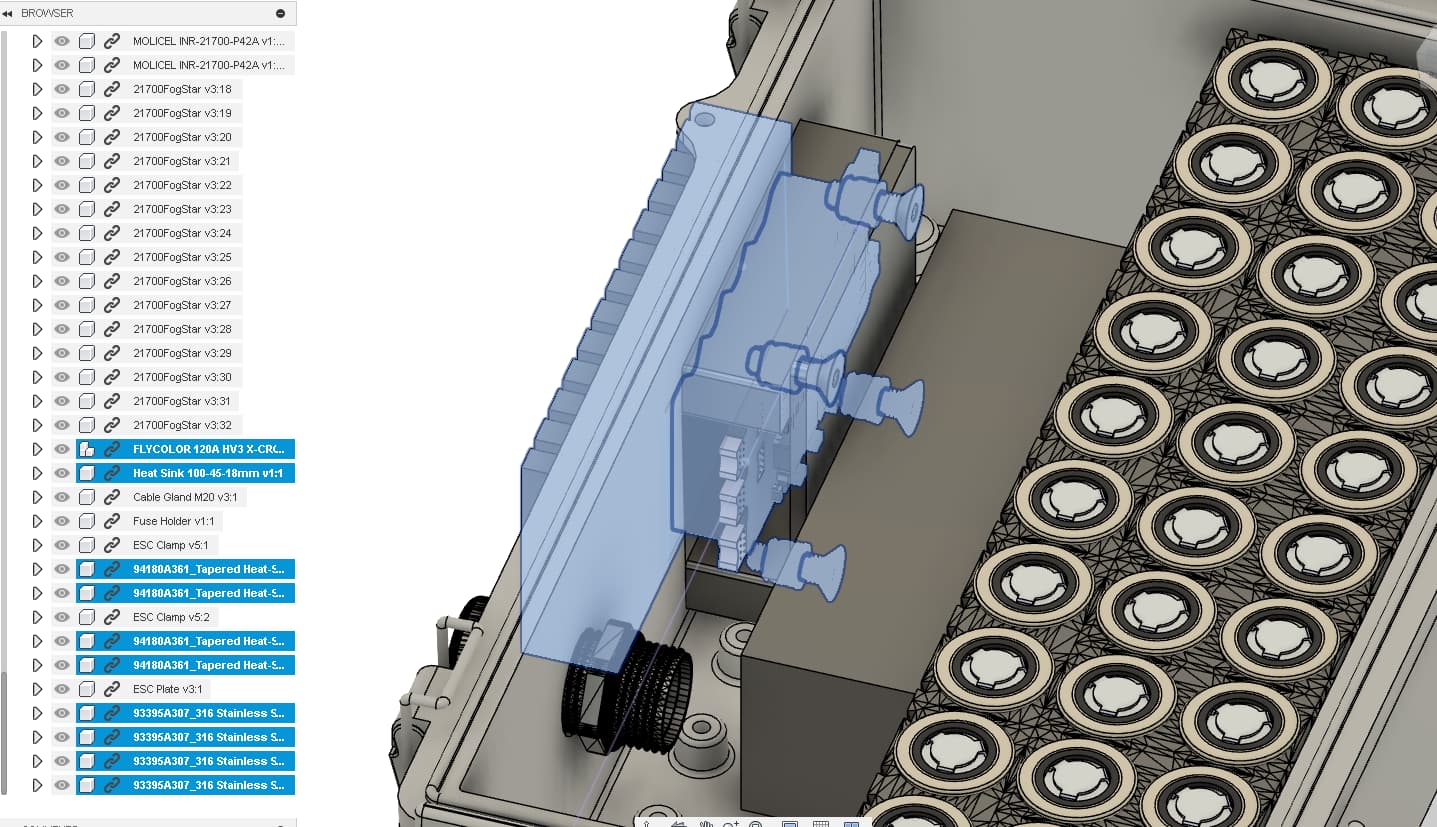
CAD:
Front View
Rear View
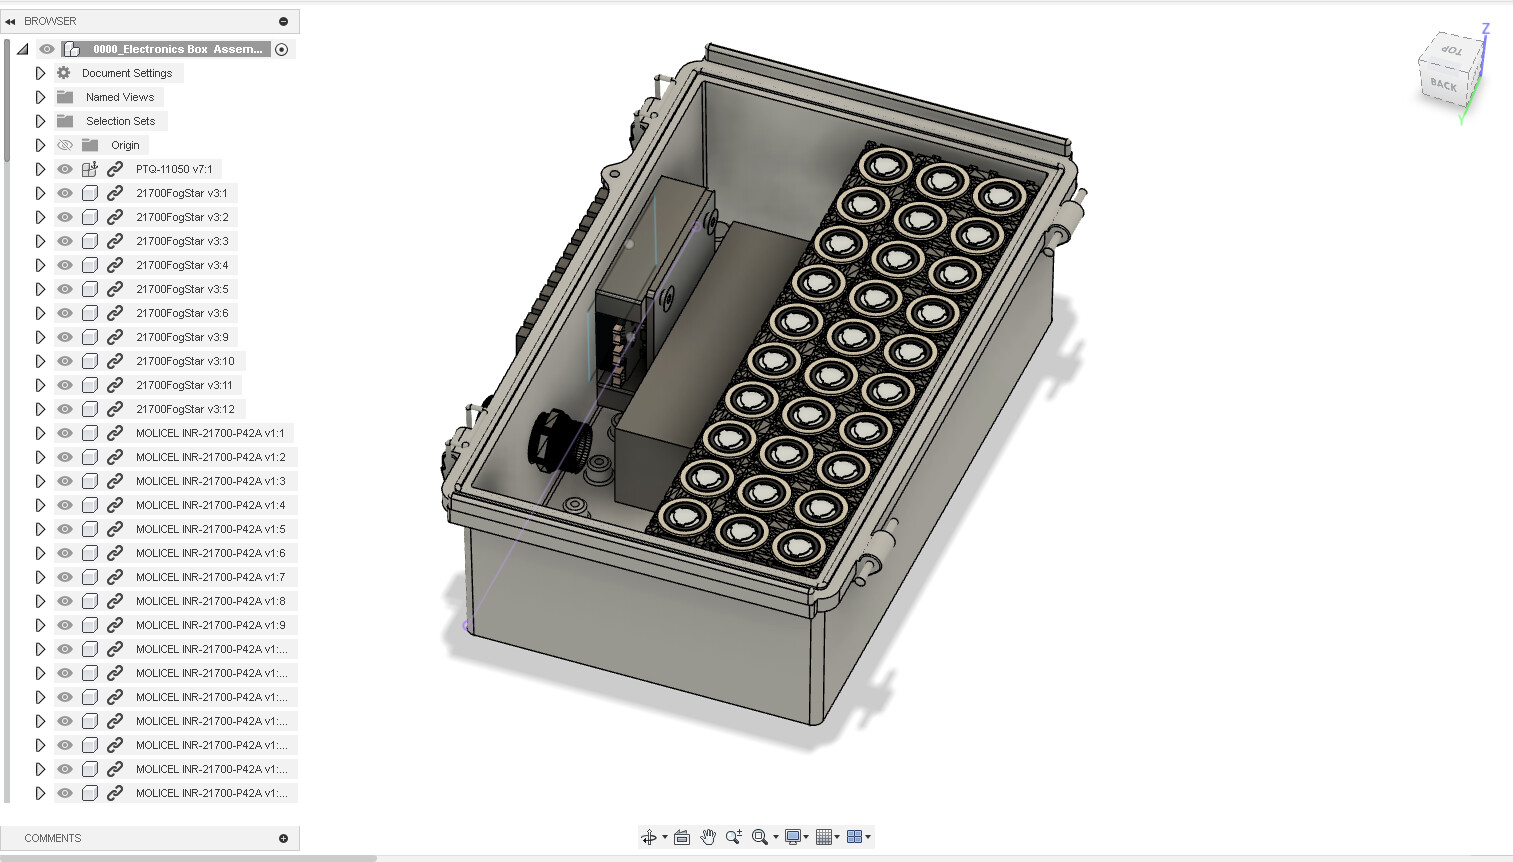
Blue highlights from left to right:
- Heat Sink (external to box, held in place with 5200)
- ESC Flycolor 160A**
- 3D printed bracket epoxied to wall of enclosure
- SS Threaded inserts
- SS Bolts
**Not shown is thermal pad between heat sink and ESC
Electronics box
- Clear case is spare 21700 battery holder with 1 3.6V cell powering the Flipsky receiver, a JST charge connector , Xt-60 for battery voltage measurement, and a power switch for convenience
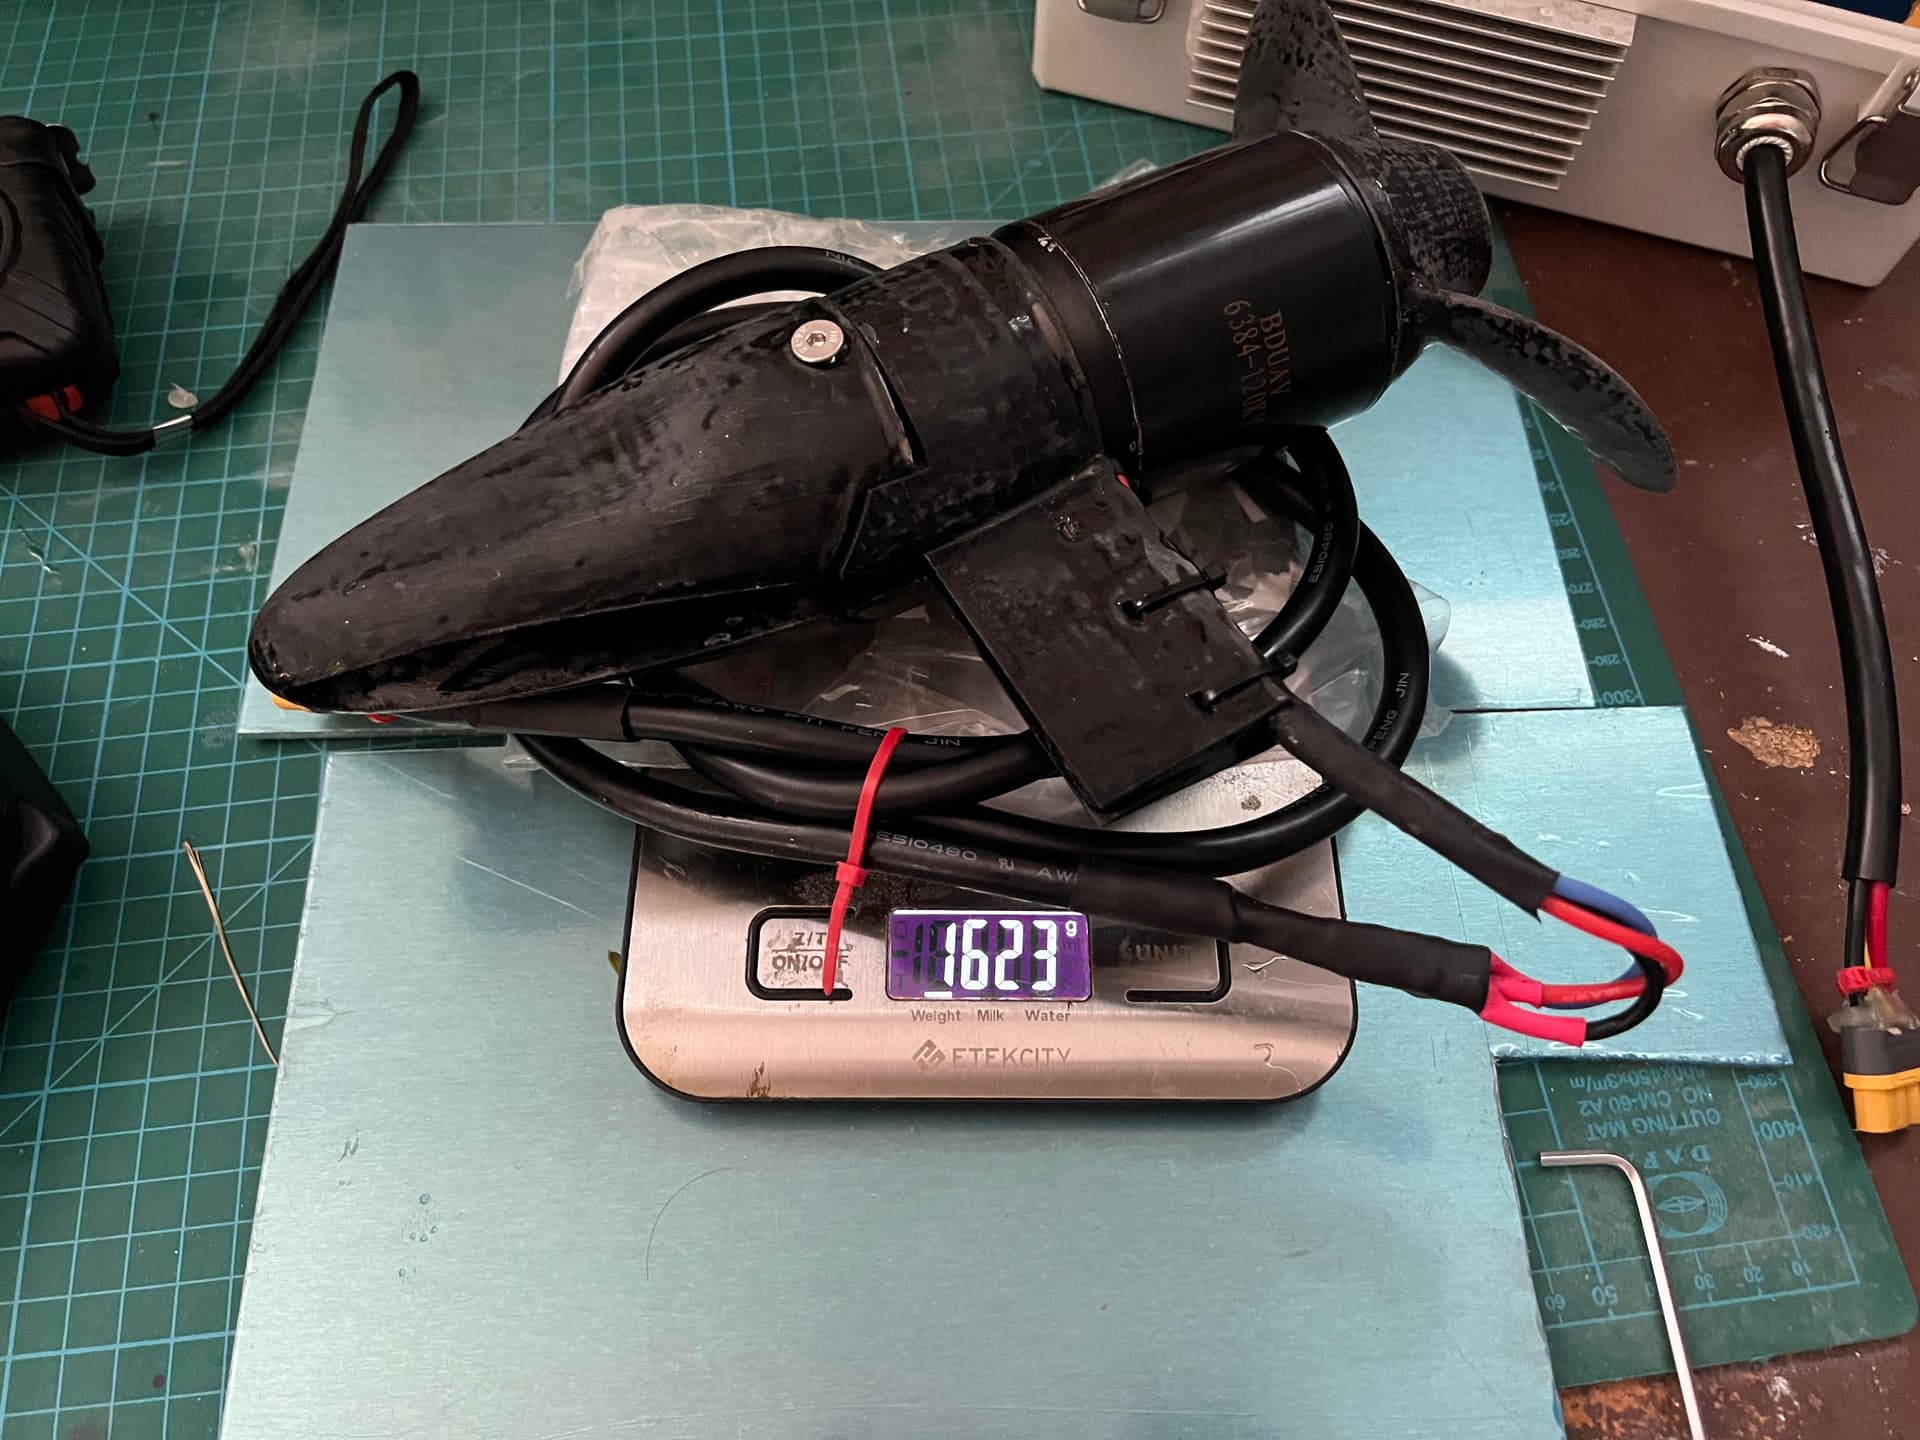
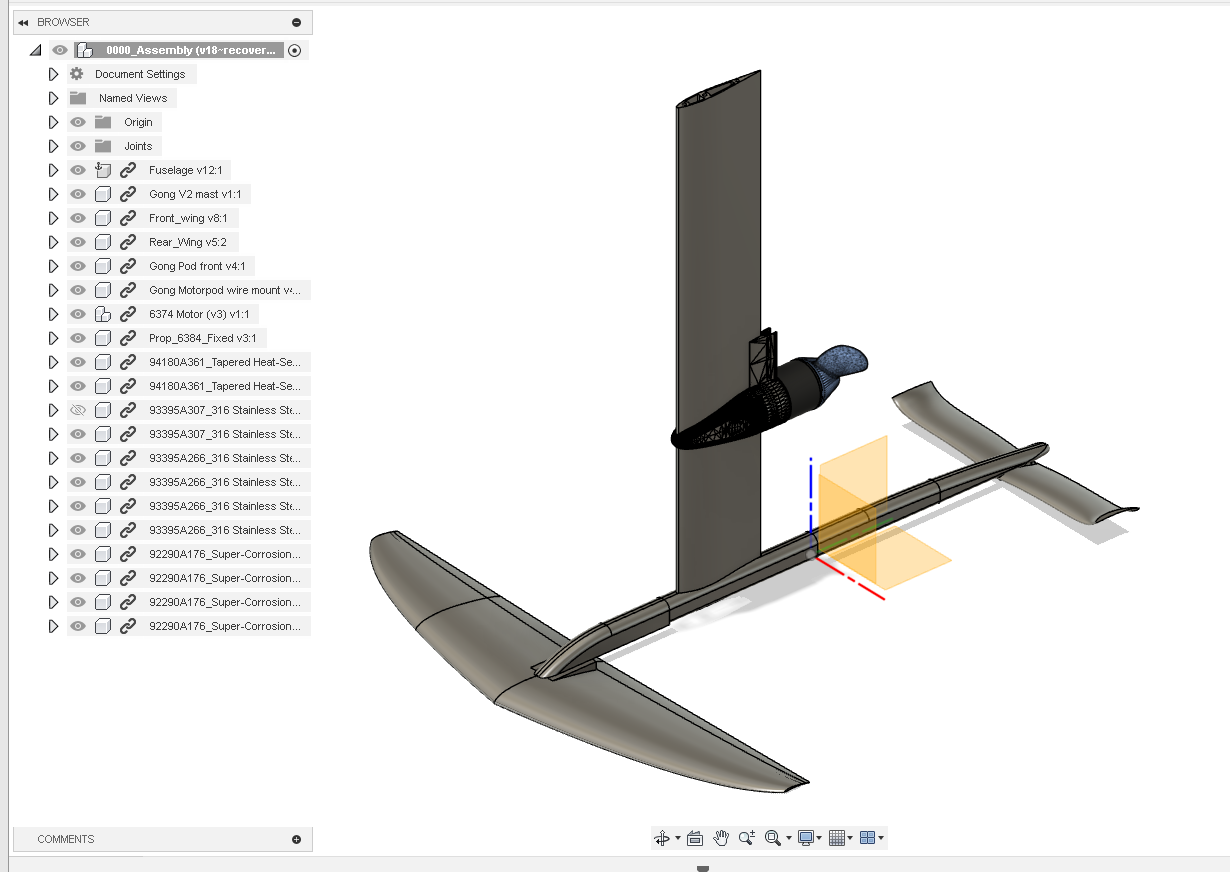
Fuse, motor mount, prop and foil:
-
For now I’m using the Gong 1300cm^2 foil, but I have a vacuum bagged / 3D printed one shown here
-
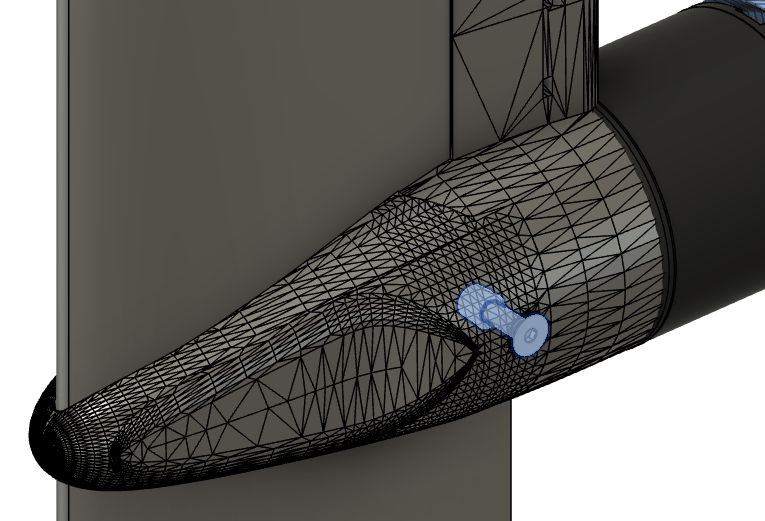
Huge shoutout to @Hangloose for the 6384 mount, it works great and saved me a ton of design time! One note to highlight in blue below was to replace the standard copper threaded inserts and replace them with stainless steel inserts to avoid dissimilar metal corrosion in water between the threaded inserts and the stainless steel bolts.
-
Many thanks to @V_S, I have used your propeller printed with Pet-G, covered in epoxy and lightly sanded, I’ve printed 3x but have only needed 1 for +20miles! Do you by chance have a 10s optimized design?
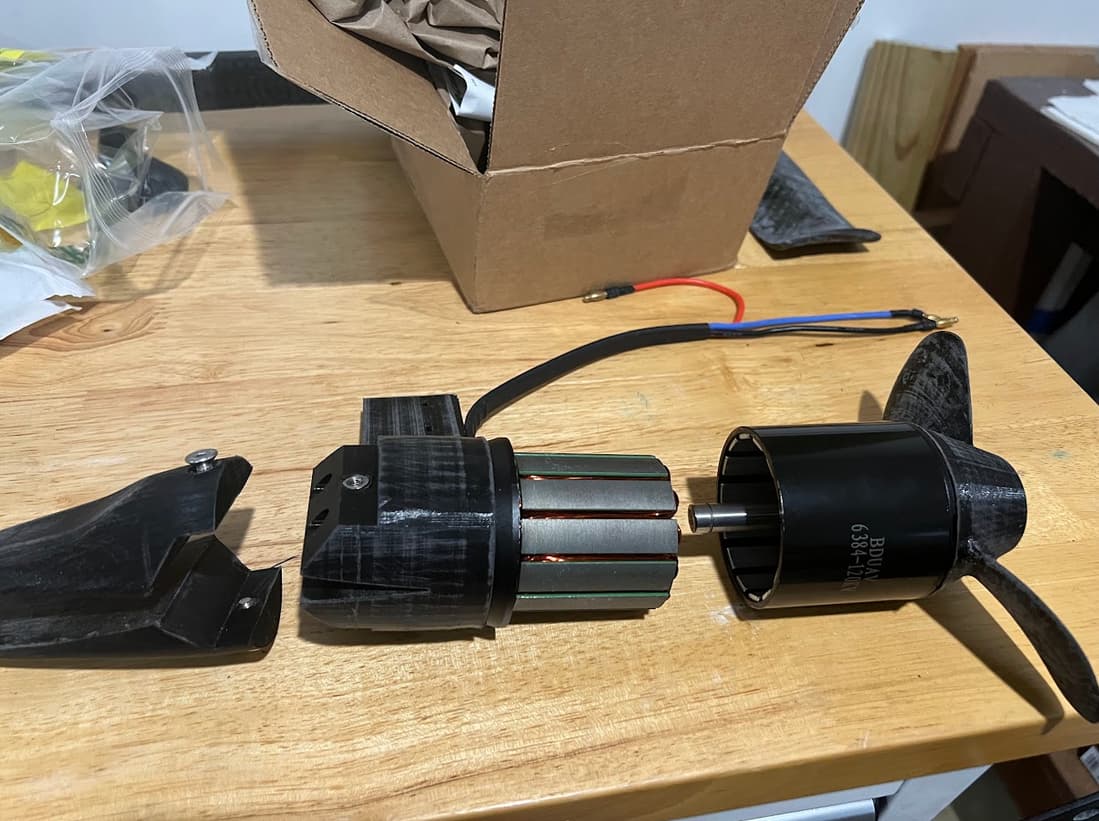
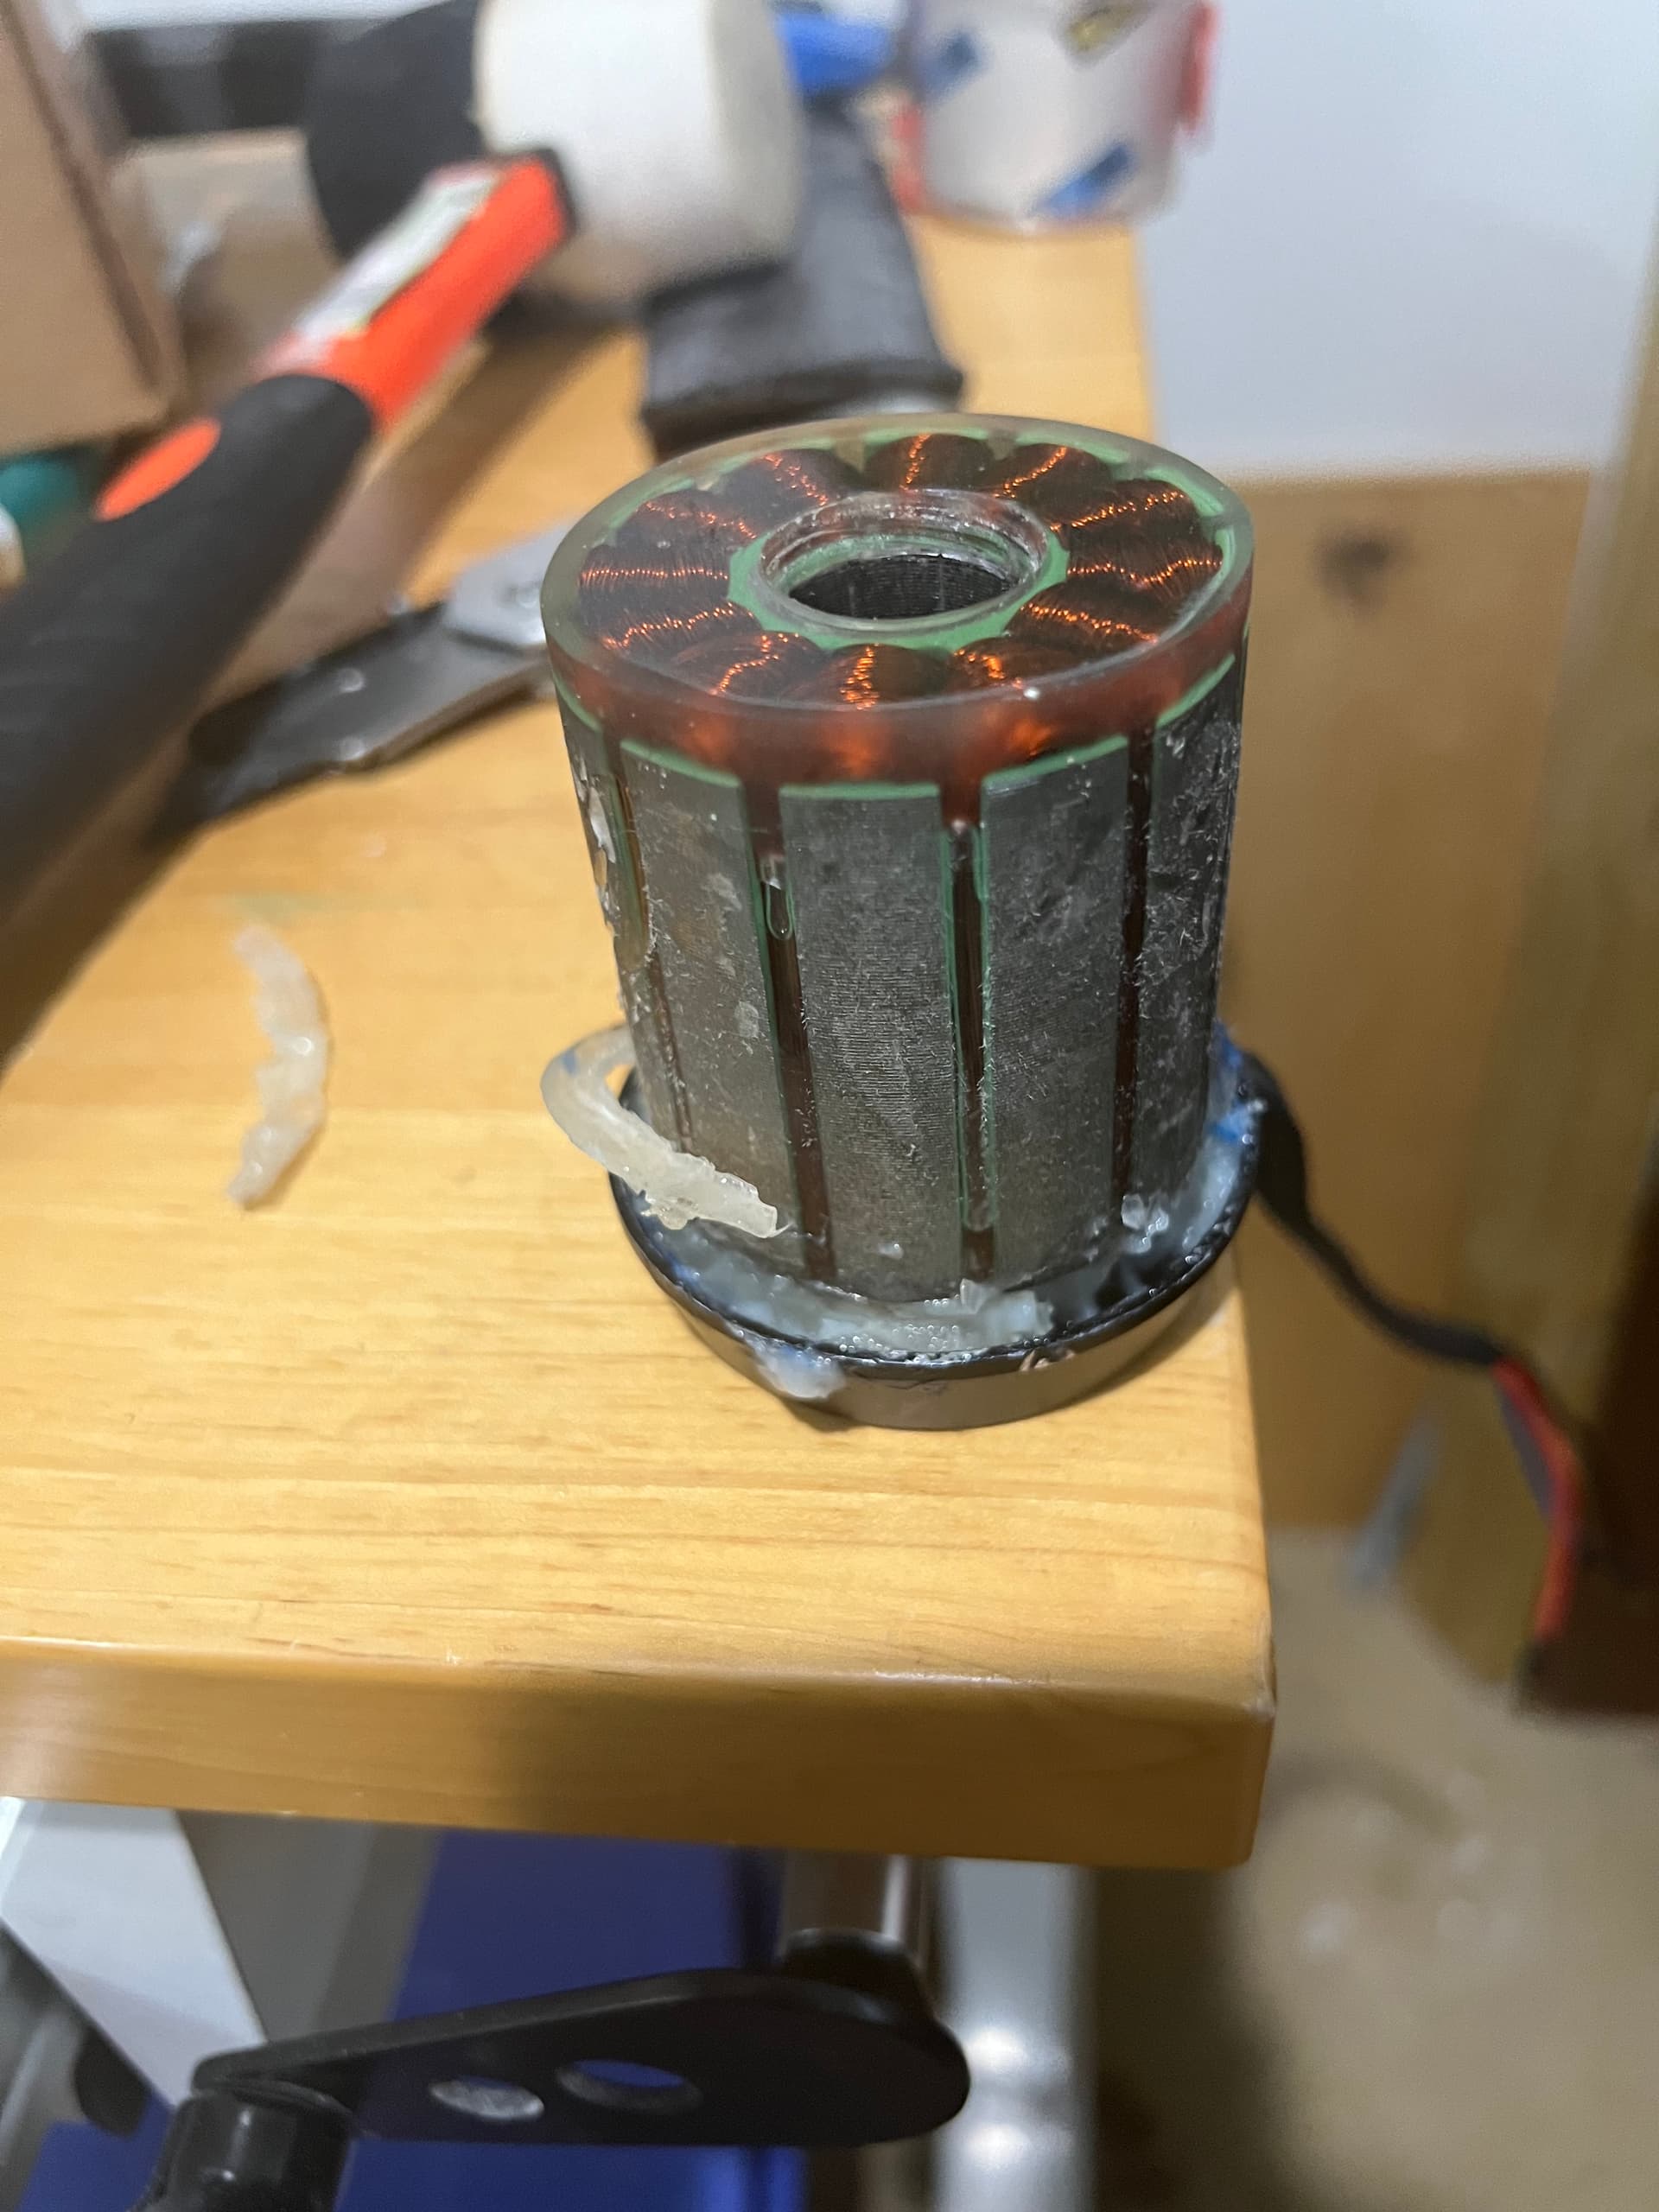
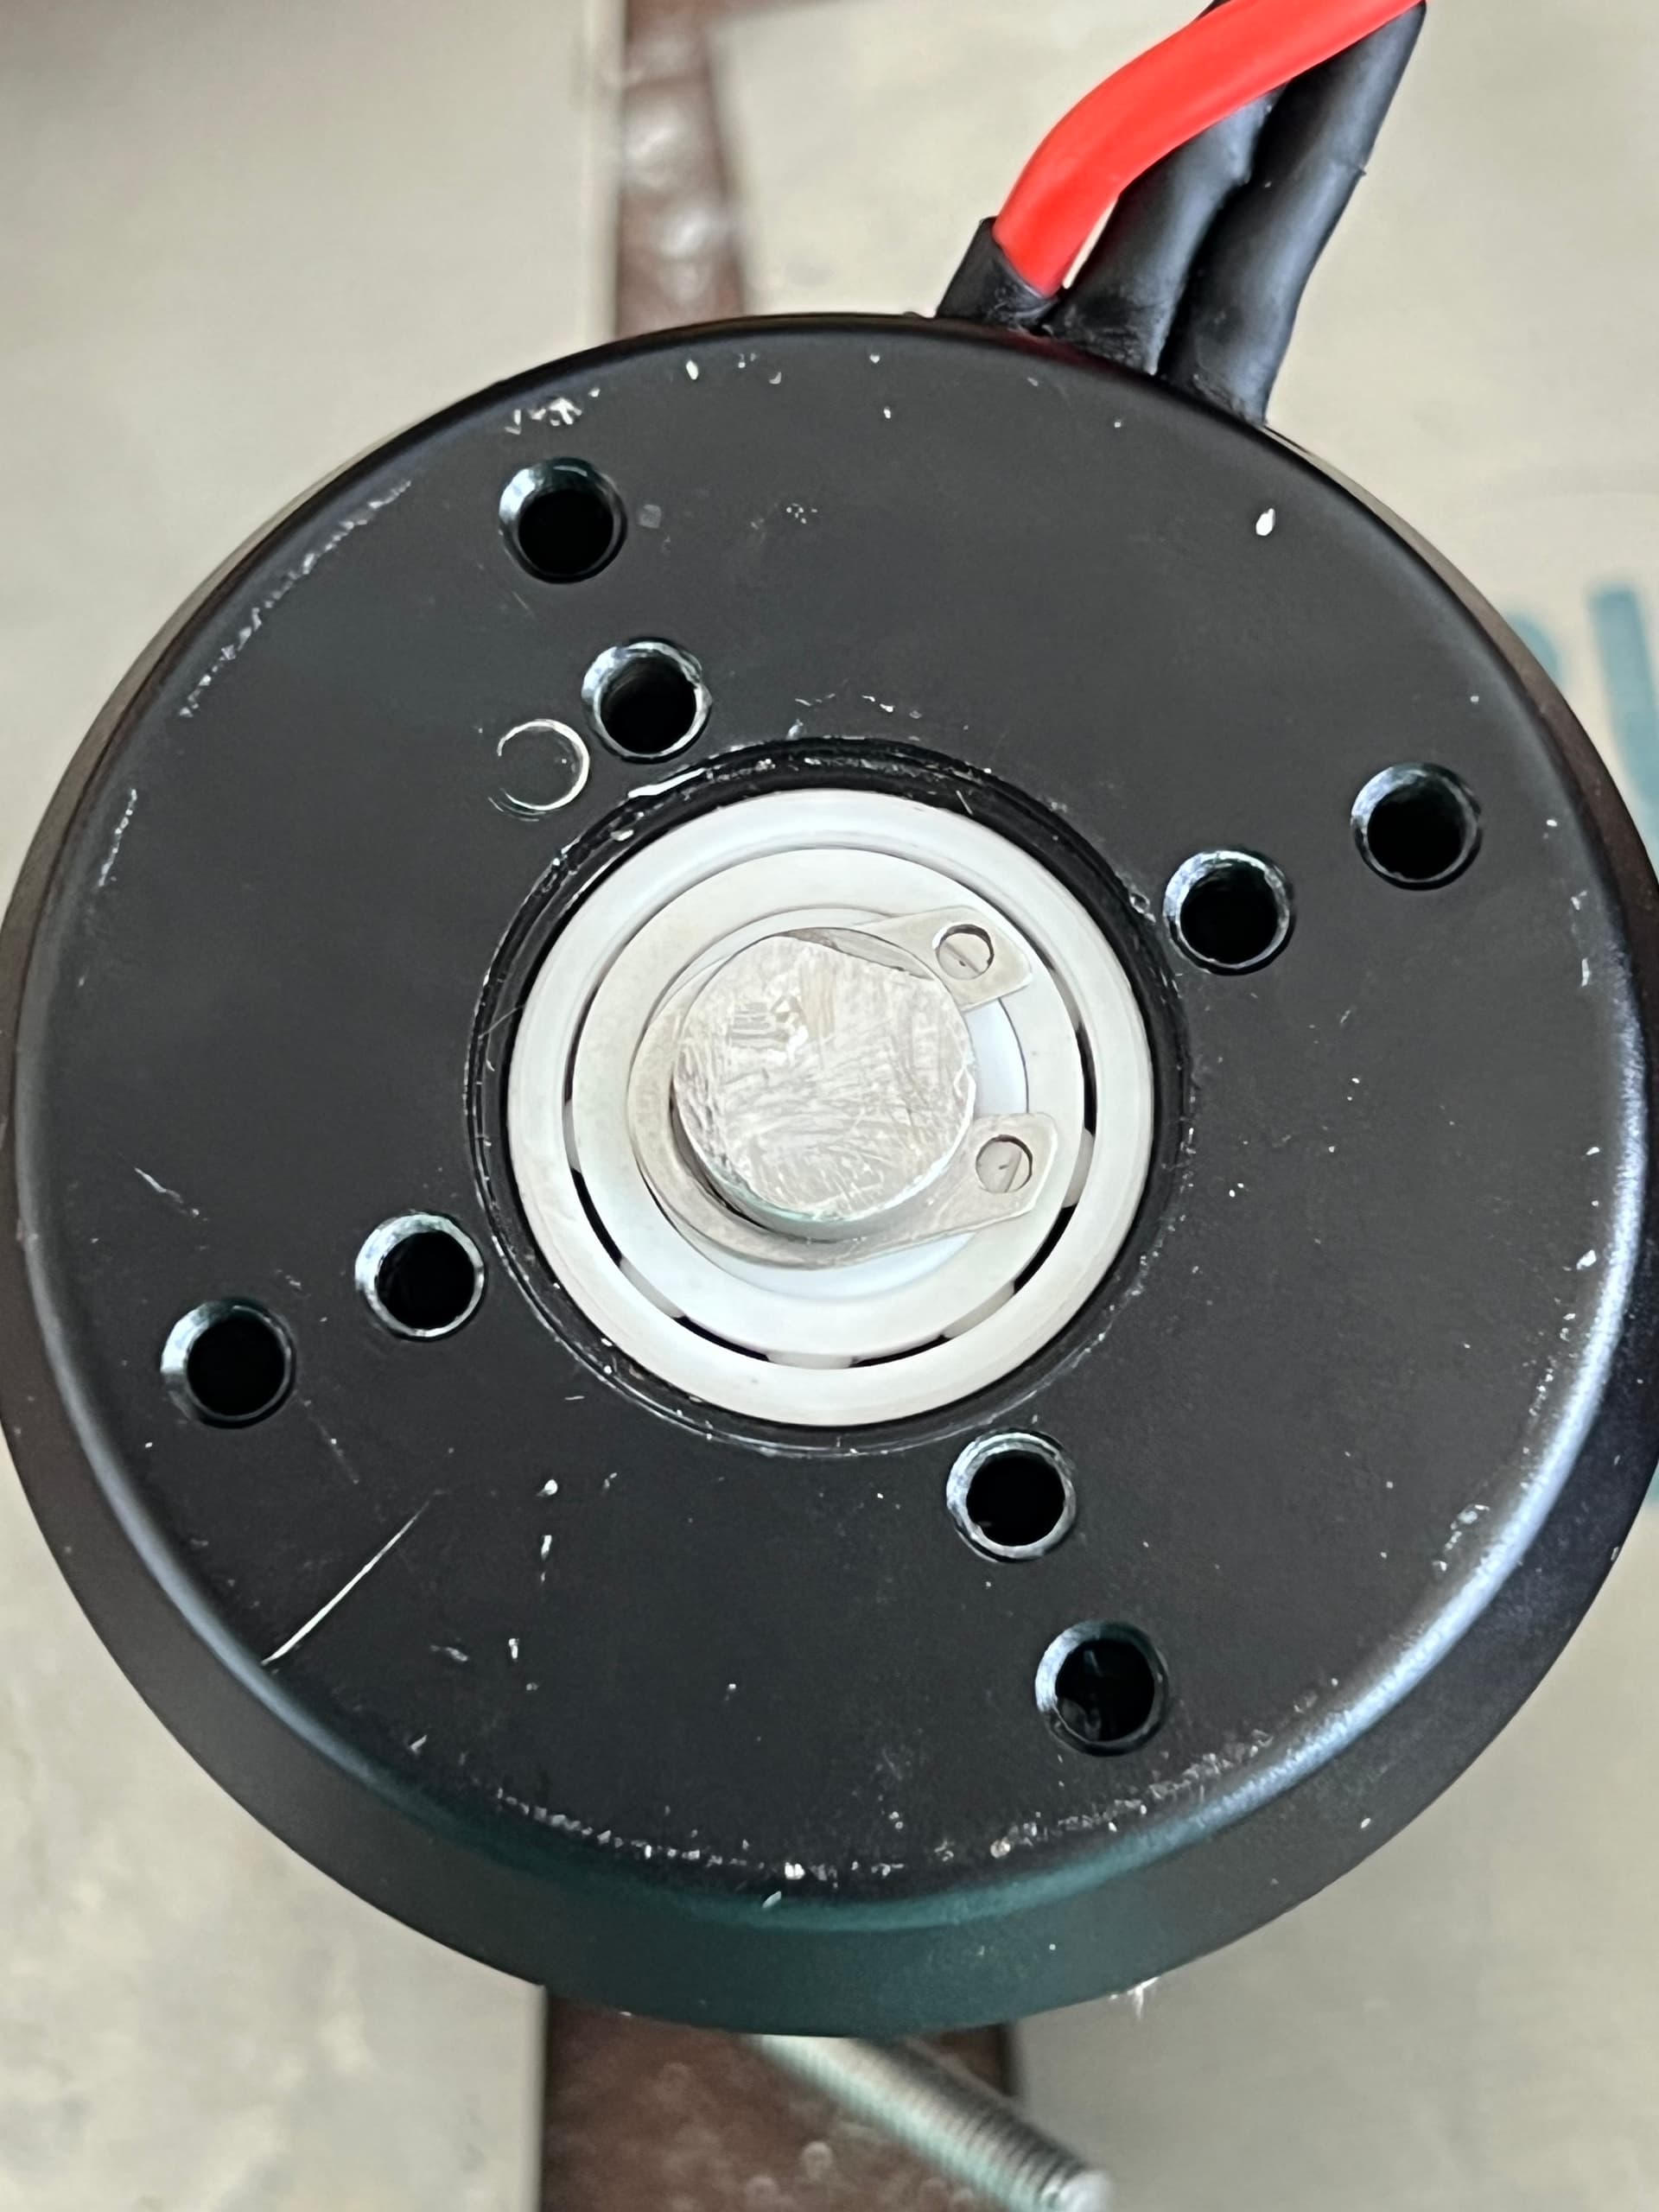
Waterproofing the motor:
-
Disassembly was easy if I inserted bolts into the motor stator partially and clamped the heads by the vice and pulled the rotor off by hand
-
I filled the bottom cup (black below) with melted wax, waiting for it to harden, wrapped the stater with tape, poured in the epoxy (not thermal epoxy, I was curious if it’s really needed since this whole assembly is in running water) then I melted it out with a decent result.
-
Replaced bearings with ceramic bearings (The original set was rusting when I took them out of a tank test in the garage)
Summary:
The project was a great success! It worked on the first trial in the water and I have been able to get 3 friends out riding so far with the hopes they will build their own! Since I already had a foil and board for wing foiling, the cost of ~$600 for the electronics has been well worth the upgrade. With a 65kg rider, the board rides for ~40minutes and has a range of 3 miles, it cruises at 11mph comfortably. 85kg rider was still able to use the board with a steady takeoff.
Improvements:
- Insert electronics box flush into the board, it’s such a hassle for people learning to get around a box being on the board
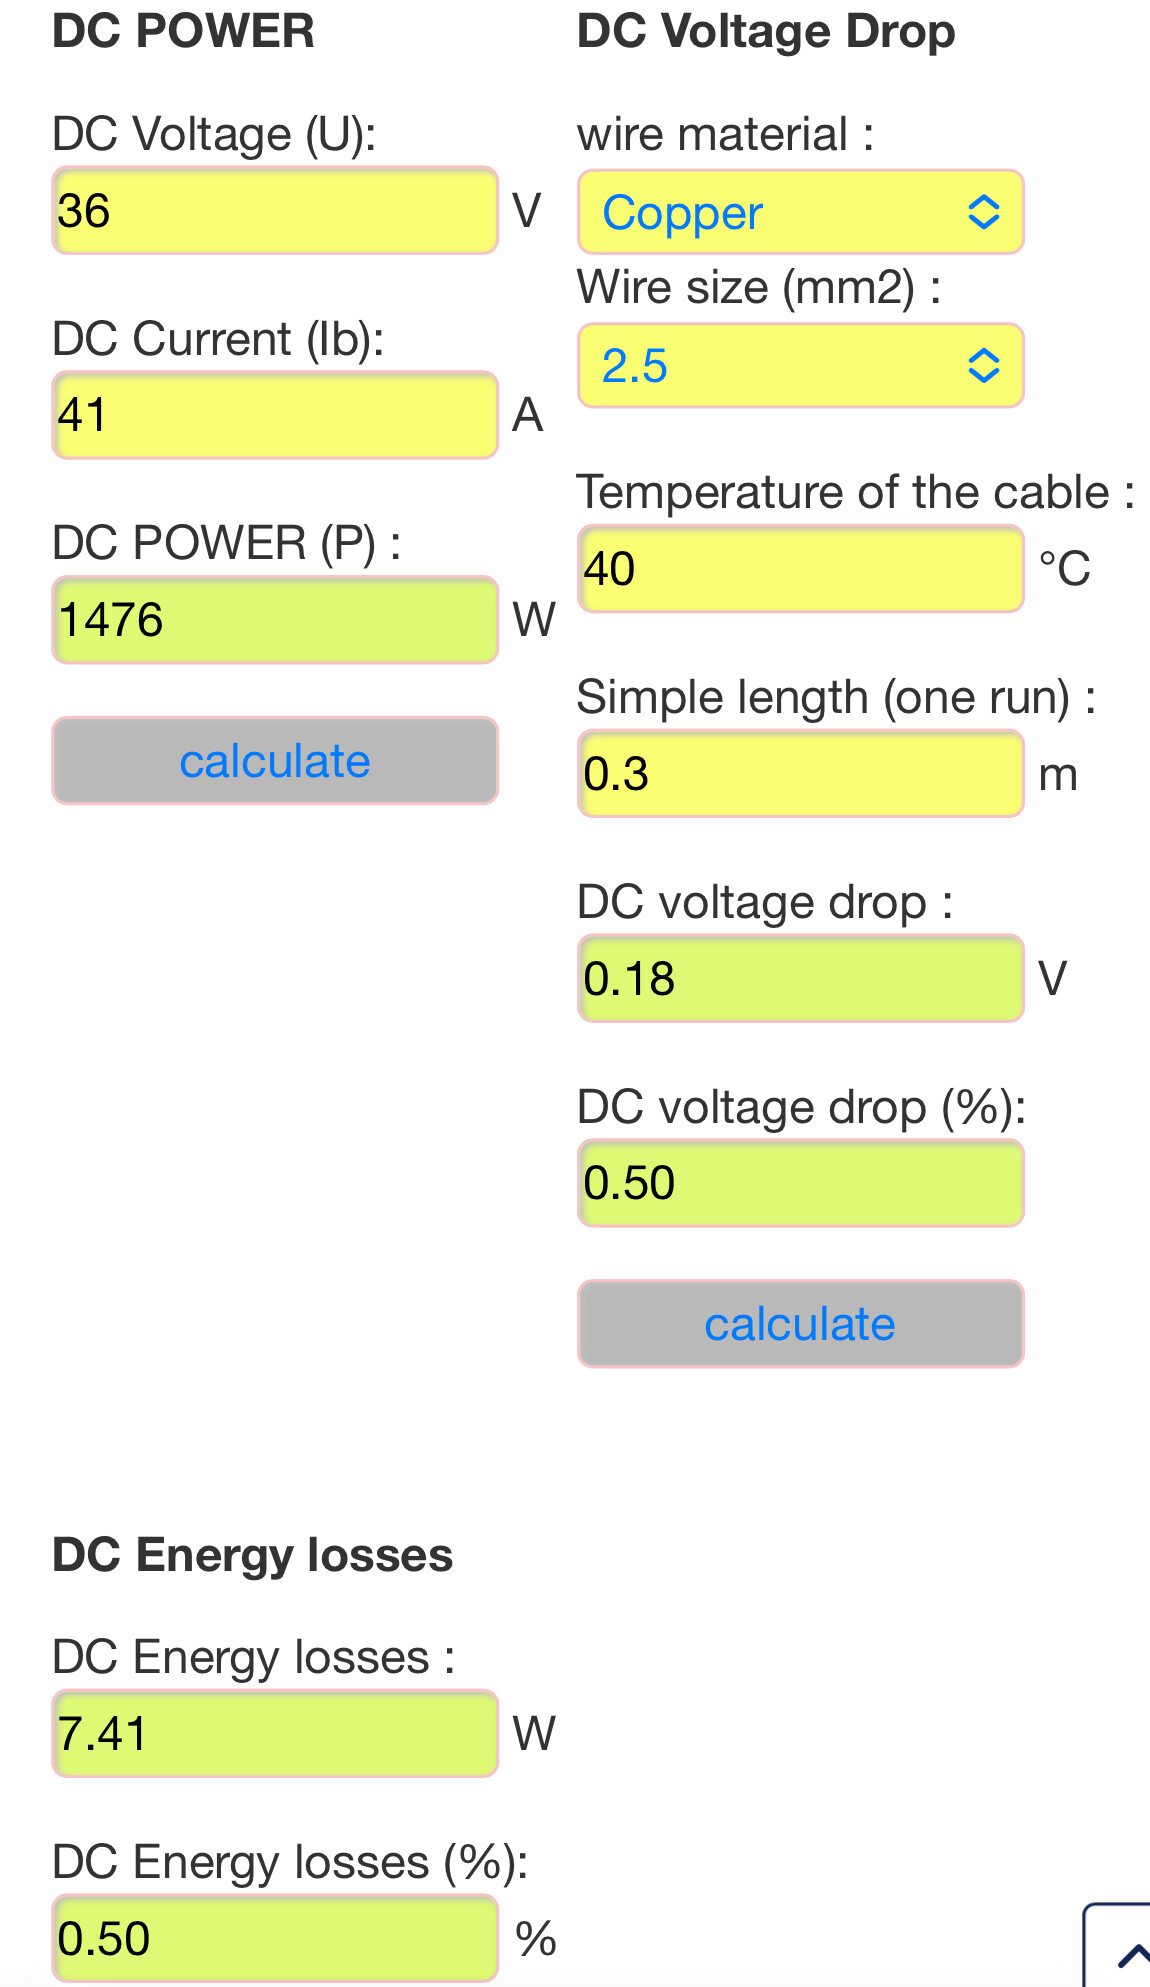
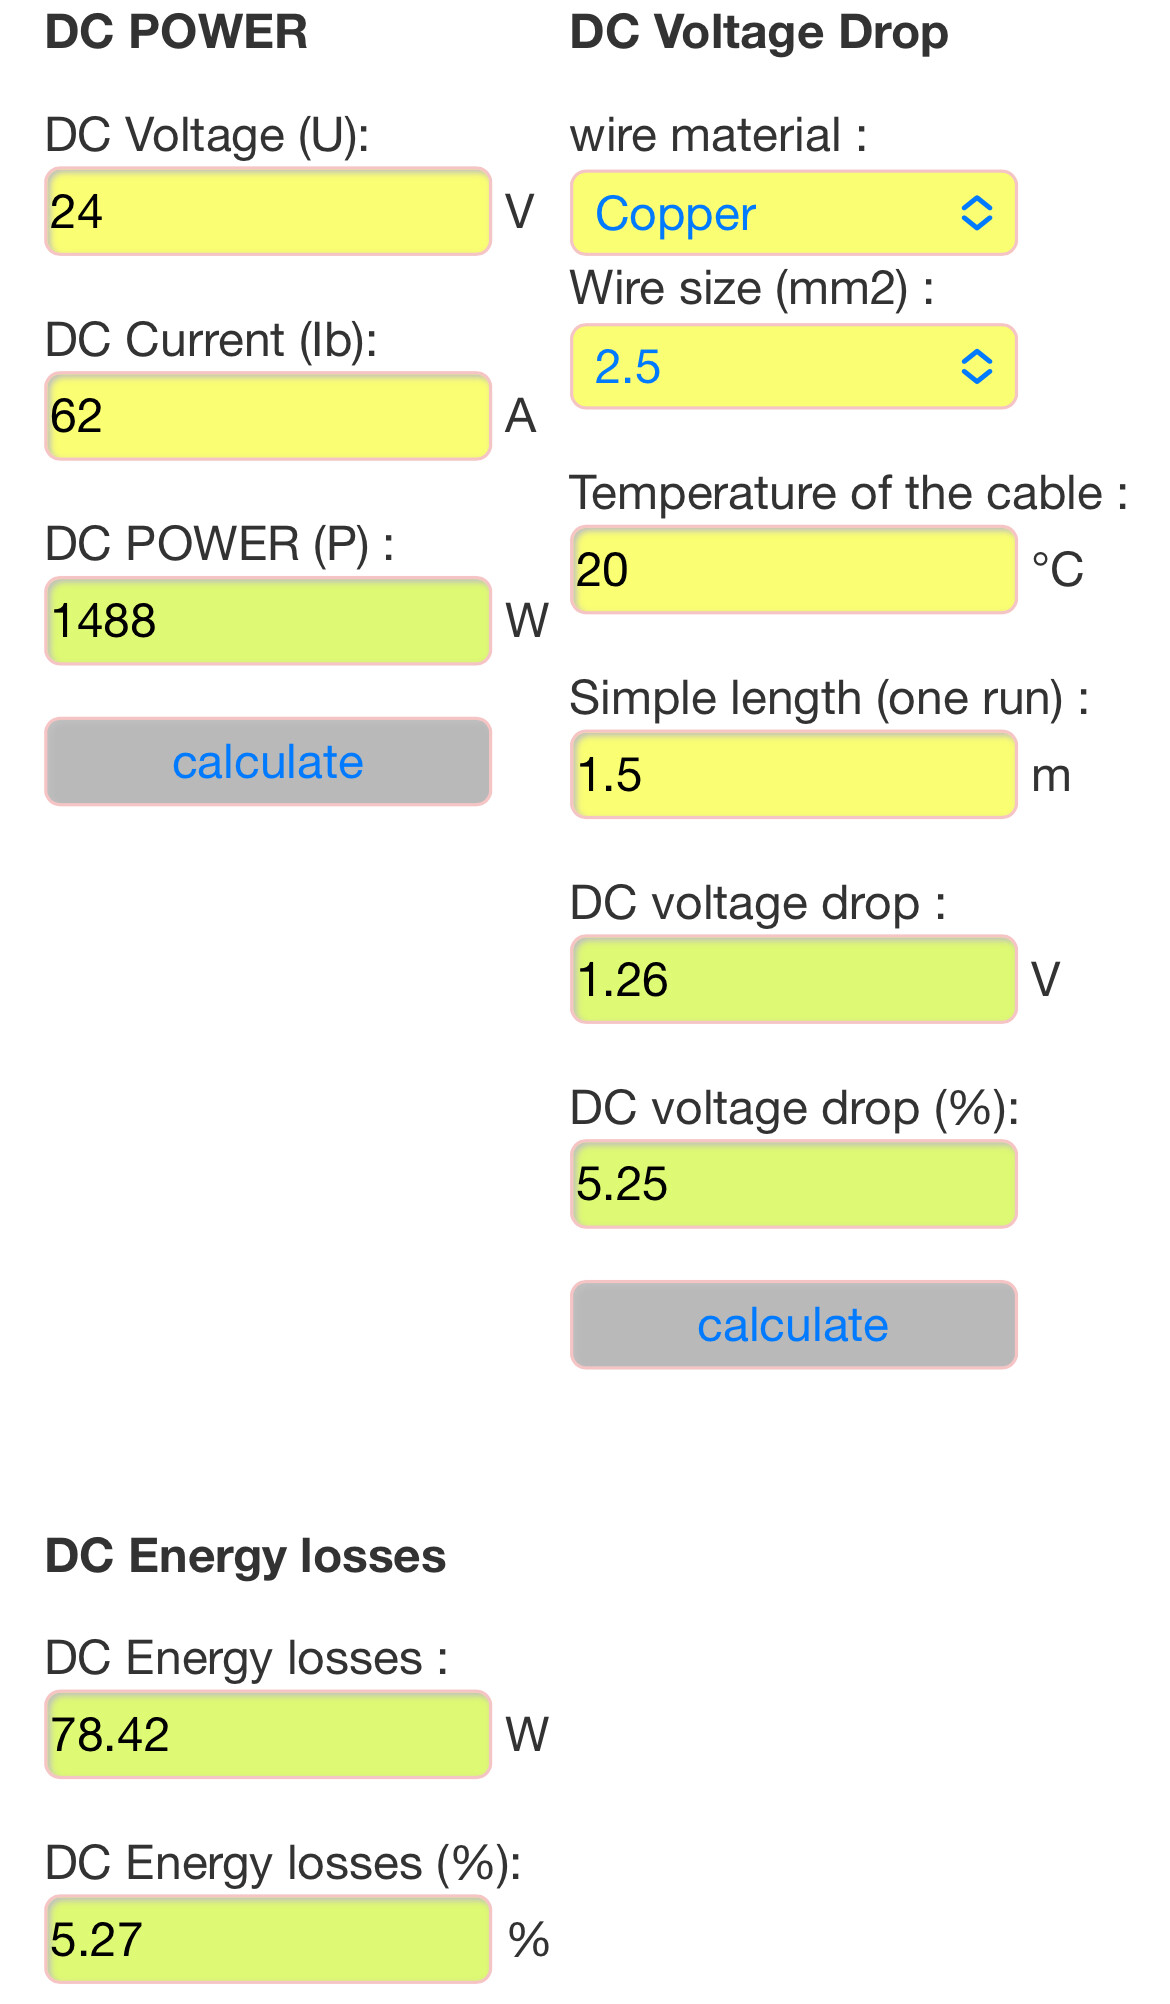
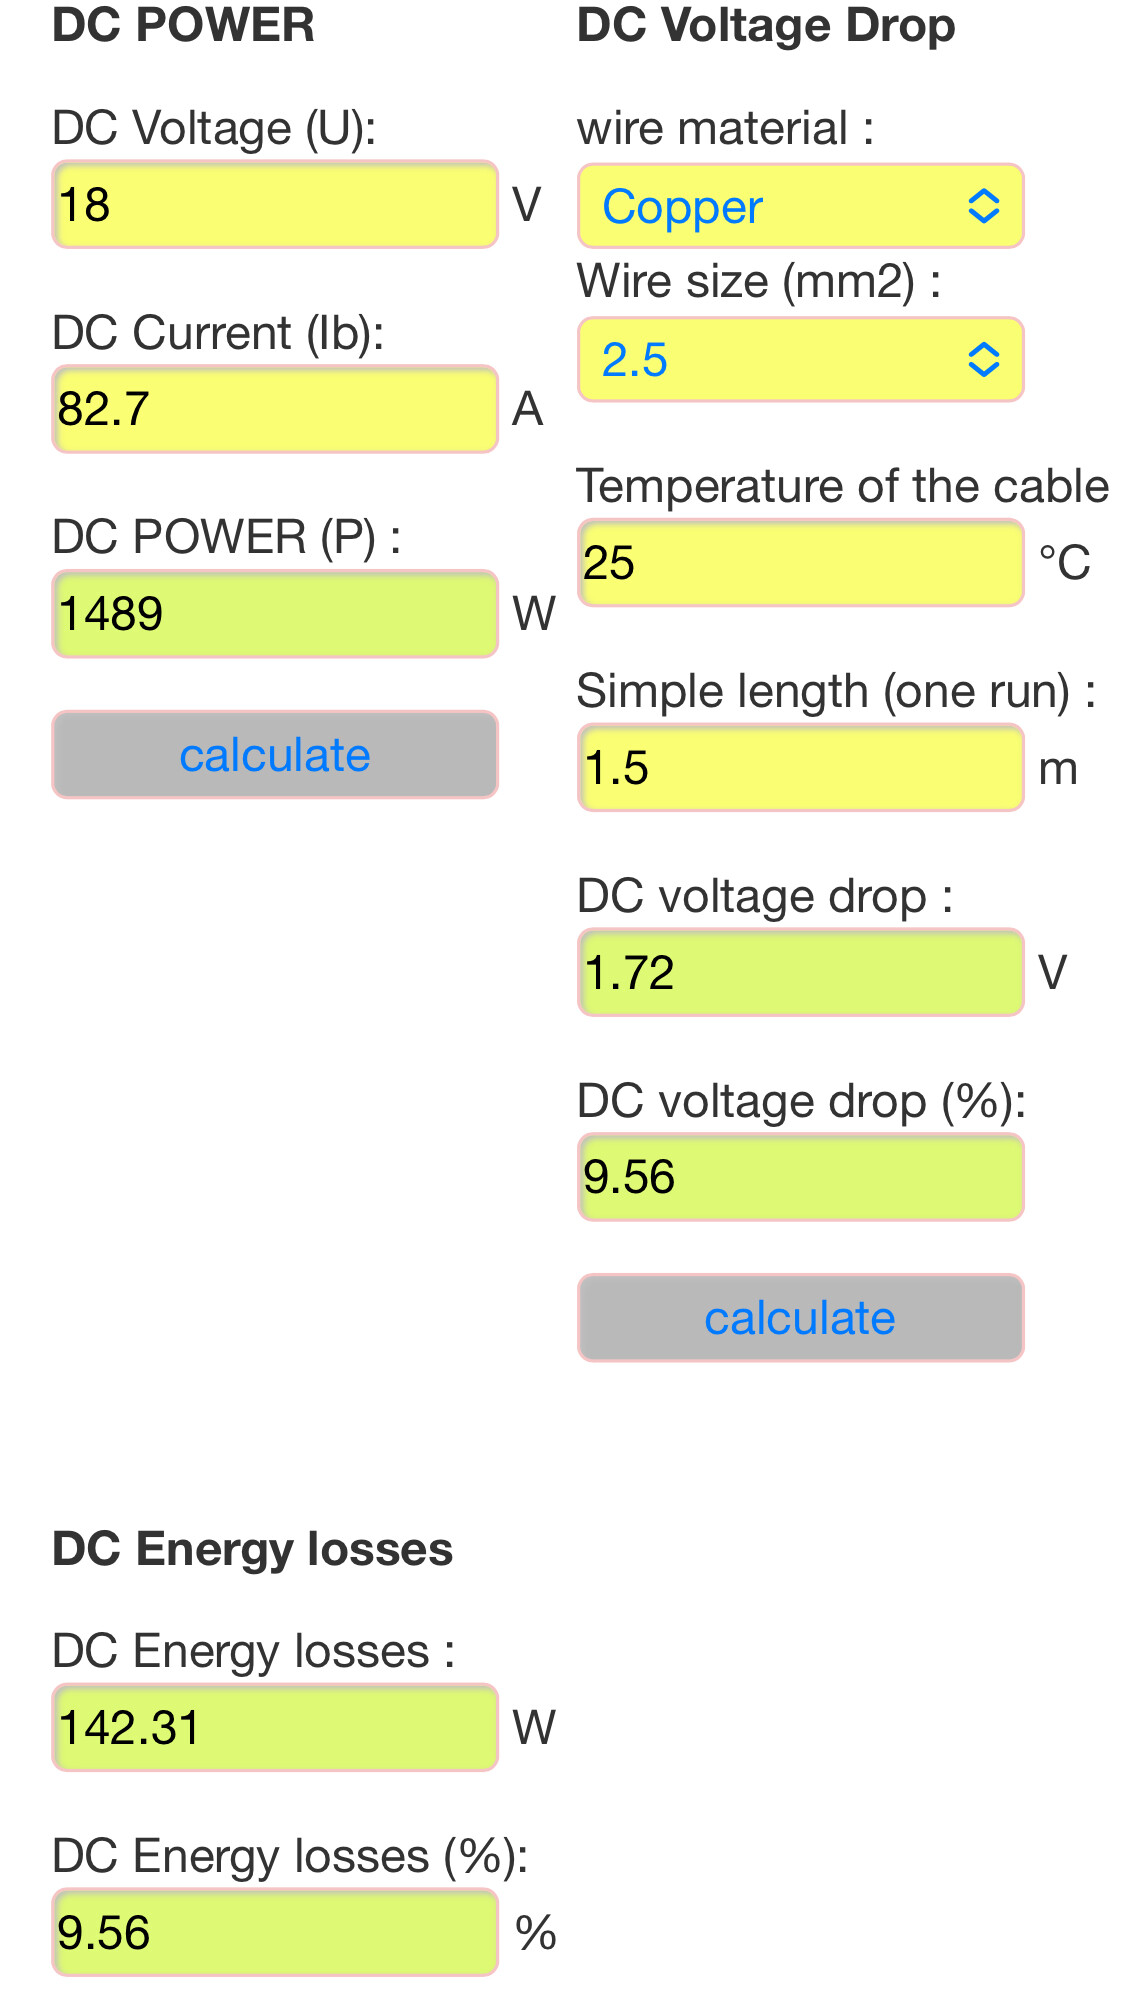
- Improve schematic and safety with battery contactors, a kill switch, and improved thermal dissipation on the wires (12AWG gets warm)
- Replace MR60 connector with a twist lock waterproof connector (This can get pulled loose when falling off the board)
- Find/Make a BMS that supports 12S
- Add current shunt and ammeter for battery telemetry
- Update XT connectors style to have pre-charge resistor to avoid pitting on battery plug-in
- Add another 6s worth of cells, I want ~3x the range I have right now!