Looking forward to your build.
To me the power wires to the vesc look really thin!
Will you be replacing them when done testing?
Looking forward to your build.
To me the power wires to the vesc look really thin!
Will you be replacing them when done testing?

Yep, they are only temporary for the test bench. Will be running 4AWG from each battery.
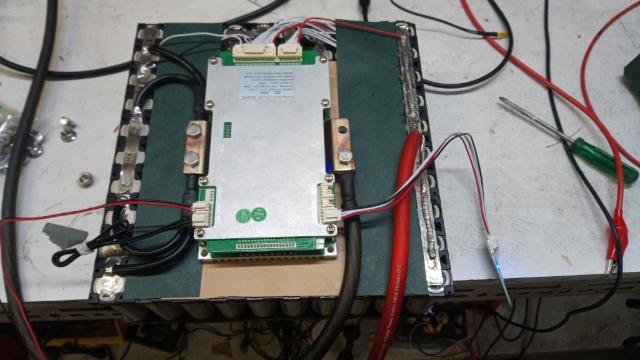
So, first battery coming together - only test leads on the main output at this stage. 10S10P with Molicell 42p. This should give me 42Ah and easily 300 amps. The internal resistance is claimed to be less than 15 mohms so, .15 ohms per strand @ 30 amps should generate less than 50W of heat at full power?
I am still debating whether I watercool the battery, but it appears that almost no one on the forum is doing that, so maybe I save myself a whole lot of complexity and hassle.

First battery now working with telemetry.
I have just seen the conversation about long battery leads destroying ESCs! Whoops! Current design is to have the batteries at the front of the board. I’ll probably lengthen the motor leads and move the VESCs closer to the batteries.
Major milestone! Have fitted the two MHZ Jet58s. Next step is to wait until the sealant cures and then put the propiulsion box in the pool to make sure it doesn’t leak.
Not exactly sure how I am going to line the motors up perfectly to minimise wear on the coupling, but will work that out later.
SO, I said it was going to be a slow build, but progress has been made.
The motor / jet / electronics box is now fully complete and tested. It took a while to have the cooling system de-leaked, but it is dry now. ESCs and motors are water cooled.
The plan for the board is to build a plywood frame and then cover it with masking tape and then fill it with two part expanding foam. This should expand past the frame so that I can then sand it all back and cover it with epoxy. The board is heavy, but I should have plenty of power - about 45kg of thrust.
Here are some photos;
Beginning to come together.
Cutting each block is painful, but the result is incredibly stiff and strong. No idea how I will cut the board to shape at this stage.
The red insert is the cooling water intake, the long black slot is for the fin.
Here is my attempt at a daylight readable battery monitor showing capacity and temperature. This will be set into the deck under perspex so that it can be read easily. BMSs are communicating via a Teensy.
Finally finished the foam layup and have done rough fairing of the bottom.
Need to now cut the outline and fair the deck.
Then, lotsa sanding and filling…
Glad to see you making progress!
What denisty of foam did you choose?
PVC 80
Finally finished shaping and now bog / sand / bog / sand…
Looking forward to glassing it this weekend.
Deck is glassed. I tried to be smart with some translucent pigment, but it is too see through. I’ll have to use an opaque top coat, but at lest the glass is down.
Almost ready for the water…
I have one issue where trhe batteries turn on as soon as I connect the ground, but I think a Uart isolator may fix the problem.
That does not look like a lot ![]()
Ahh…Kian…show us all something you’ve built.
Long long time ago.
In this video I was still having a lot of cavitation problems. Also power was set to (I believe) 70%
Also see this thread
And then he realised that he had limited the current in the VESCs to 50 amps…
But, at least it’s ready for the water.
Do you have an update?
Would love to see some jet board action