Nice plan. I’m at the same stage with mine and I plan to use similar parts. I’ll be watching close for updates.
What kind of ride time are you anticipating with the 18 ah battery? 20-30 min?
Nice plan. I’m at the same stage with mine and I plan to use similar parts. I’ll be watching close for updates.
What kind of ride time are you anticipating with the 18 ah battery? 20-30 min?
I can confirm it requires LOTS of awkward sanding  , I’m in the middle of doing mine and my thumbs are sore and cracked from all the sanding.
It does look good though when complete.
Will the nylon carbon filament not be strong enough as it is?.
Good to know I’m not the only one willing to suffer through!
Honestly I’m a little disappointed with the quality of the prints and the strength of the nylon. I’m sure there are adjustments to be made to the print settings but the parts haven’t been very rigid.
Even if it were strong enough, the nylon filament is very hydrophilic, so it would need to be sealed with epoxy and then sanded anyways.
I think 20-30minutes sounds about right. I have a bit of additional space in my battery box to stuff a few more amp hours in, and hopefully get to 40minutes.
Printed my duct in ASA-X at the time, printed the (straight) struts with a hole inside and epoxied 3mm cfk rods inside. Then added a layer of cfk only on the outside of the duct, easy to sand.
See here: Daniels (un)geared inflatable (slowly built) - #18 by JvdZ
Although I don’t use this duct anymore, it was solid enough to not deform under load, it worked quit well.
Thanks! That is a good idea, will be much easy to sand that way.
Nice , I suppose depth is 7,5cm ? You took account of the thickness of the hatch ( looks like 20mm) not much room for the battery , no ?
Good idea, it’s getting between the spokes that’s a b**ch. Mine has 6 but wish I had opted for 3 or 4 instead  , would increase efficiency too.
OK, thanks, that make sense, sure if rocker it will be easier to pump and that hull shape will also tend to lift the bow(as long as it is in the water) . I was just thinking a E driven foil would have little different requirements but as said, I have no own experience at all so thanks for good info!
Yes, 7.5cm deep, thanks for that, I corrected the post. It should all fit. I did a mock layout the other day. I am not leaving much room for expansion, so hopefully the battery life I get will be good enough.
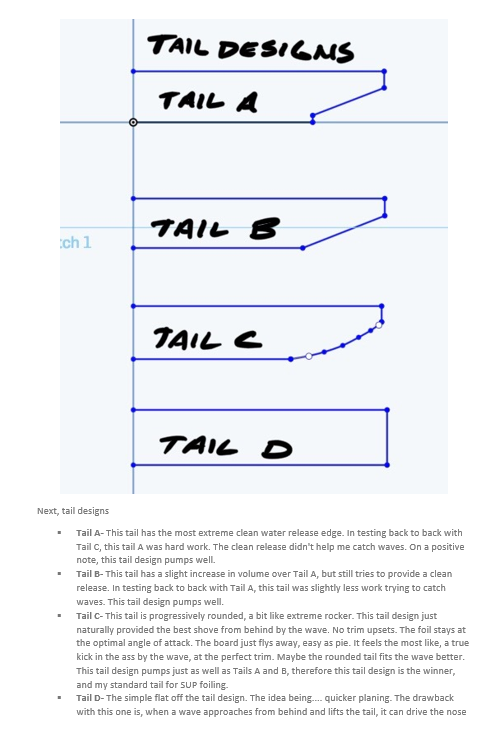
When choosing tap shape, please consider the usage of the board. Where most non powered surf-foils prefer B & C type to “kick of from waves”.
I consider an E-foil an constant flying vehicle ( I do not ride extreme waves). Due to that we want the easiest take off requiring least amount of power. I would argue that Tail D provides the easiest water separation and Tail C the hardest since water will follow the bend surface and create downforce. It feels like board is sucked into the water and then it pop ups to flight quite violently.
I ride DYI inflatable, so naturally C-type and it requires 4kw to lift, which is no big deal when only lifting once per session, so I have not cared.
I have ridden some Fliteboard Inflatables though and there is a reason it transitions super smooth to flight. They have added a sharp 90* edge to the back to mimic the D-shape.
Easy for beginner to learn, then choose D for Foil. My 5 cents.
I will start to share my CAD as I complete the components. Until something is built, the cad is a work in progress.
Hi Zephyr,
I’m from Montreal and I’m looking for a build and yours has a lot of potential. How did you figure out the exact placement of the mast and battery pack to the board as to have a proper center of gravity?
Have you considered a bigger battery pack like in the range of 2KwH for greater autonomy ?
Richard
The board dimensions and mast placement are pretty much what you’d expect for a regular kite foil board, and pretty similar to the lift e foil. I think for this early version they will work great, and I can refine for the next board.
I’d like to make a bigger battery, I think I can fit a few more cells into my current case and get it up to 24AmpHours. These batteries aren’t too heavy so I hope they’ll be okay at the the front of the compartment.
Hi,
Did you realize the motor shaft you showed in the link is “splined”? This will limit the propellers that are available to you. I know because I made the same mistake…
Great design, zephyr!
Be aware with the carbon filled nylon. I read somewhere it increases stiffness but reduces the strength. I am getting quite nice prints with nylon 6 copa.
Nice design Zephir! You never wanted to join force in the end? I would still like to talk to you although I’ve seen what a prop will do to fingers and I don’t like the potential of many curious people wanting to see such a thing up close, I think I will wait to see if a jet drive version can be made more efficiently in the future. Not to mention the stupid Canadian regulations.
Anyways you have my number and I’ll be happy to have a little chat if you’re up to it. Cheers and really nice work so far
Has the issue of open vs enclosed prop been sorted out in Canada yet? Last time I was riding up there, my Lift, with the standard duct, was considered an open prop by the marine police (a number of other people confirmed similar experiences)
I don’t think the issue has been sorted out. I heard that there was a transport Canada hearing back in November to discuss modifying the current rules.