Looking for battery options thats easily modified to fit a DIY efoil without breaking the bank. I currently do not own any of the supplies needed to make a pack suck as the spot welder, nickel, tape etc so that just adds to it. I ran across these this morning: 110 2170 M50LT 3.6v 5000mah 36v 1.98kWh – Battery Hookup
Thanks for the insight! Thats great news as its similar to what Im building. For that price I can buy two and just swap them in and out. I’ll order a couple and couple BMS. Do you have pics of the fliteboard setup? Or maybe a build thread?
Interesting! I looked at this pack a few months ago. Can you share any photos of how your pack looks? Did you keep the included BMS or swap out a new one? I’m working on a Fliteboard build myself and I was worried about some of these pre-built packs not fitting in the battery compartment. There’s only ~80mm of height and the dimensions they list say 3" height, which cuts it close. Their warehouse is also only 30min from where I live so I can skip shipping.
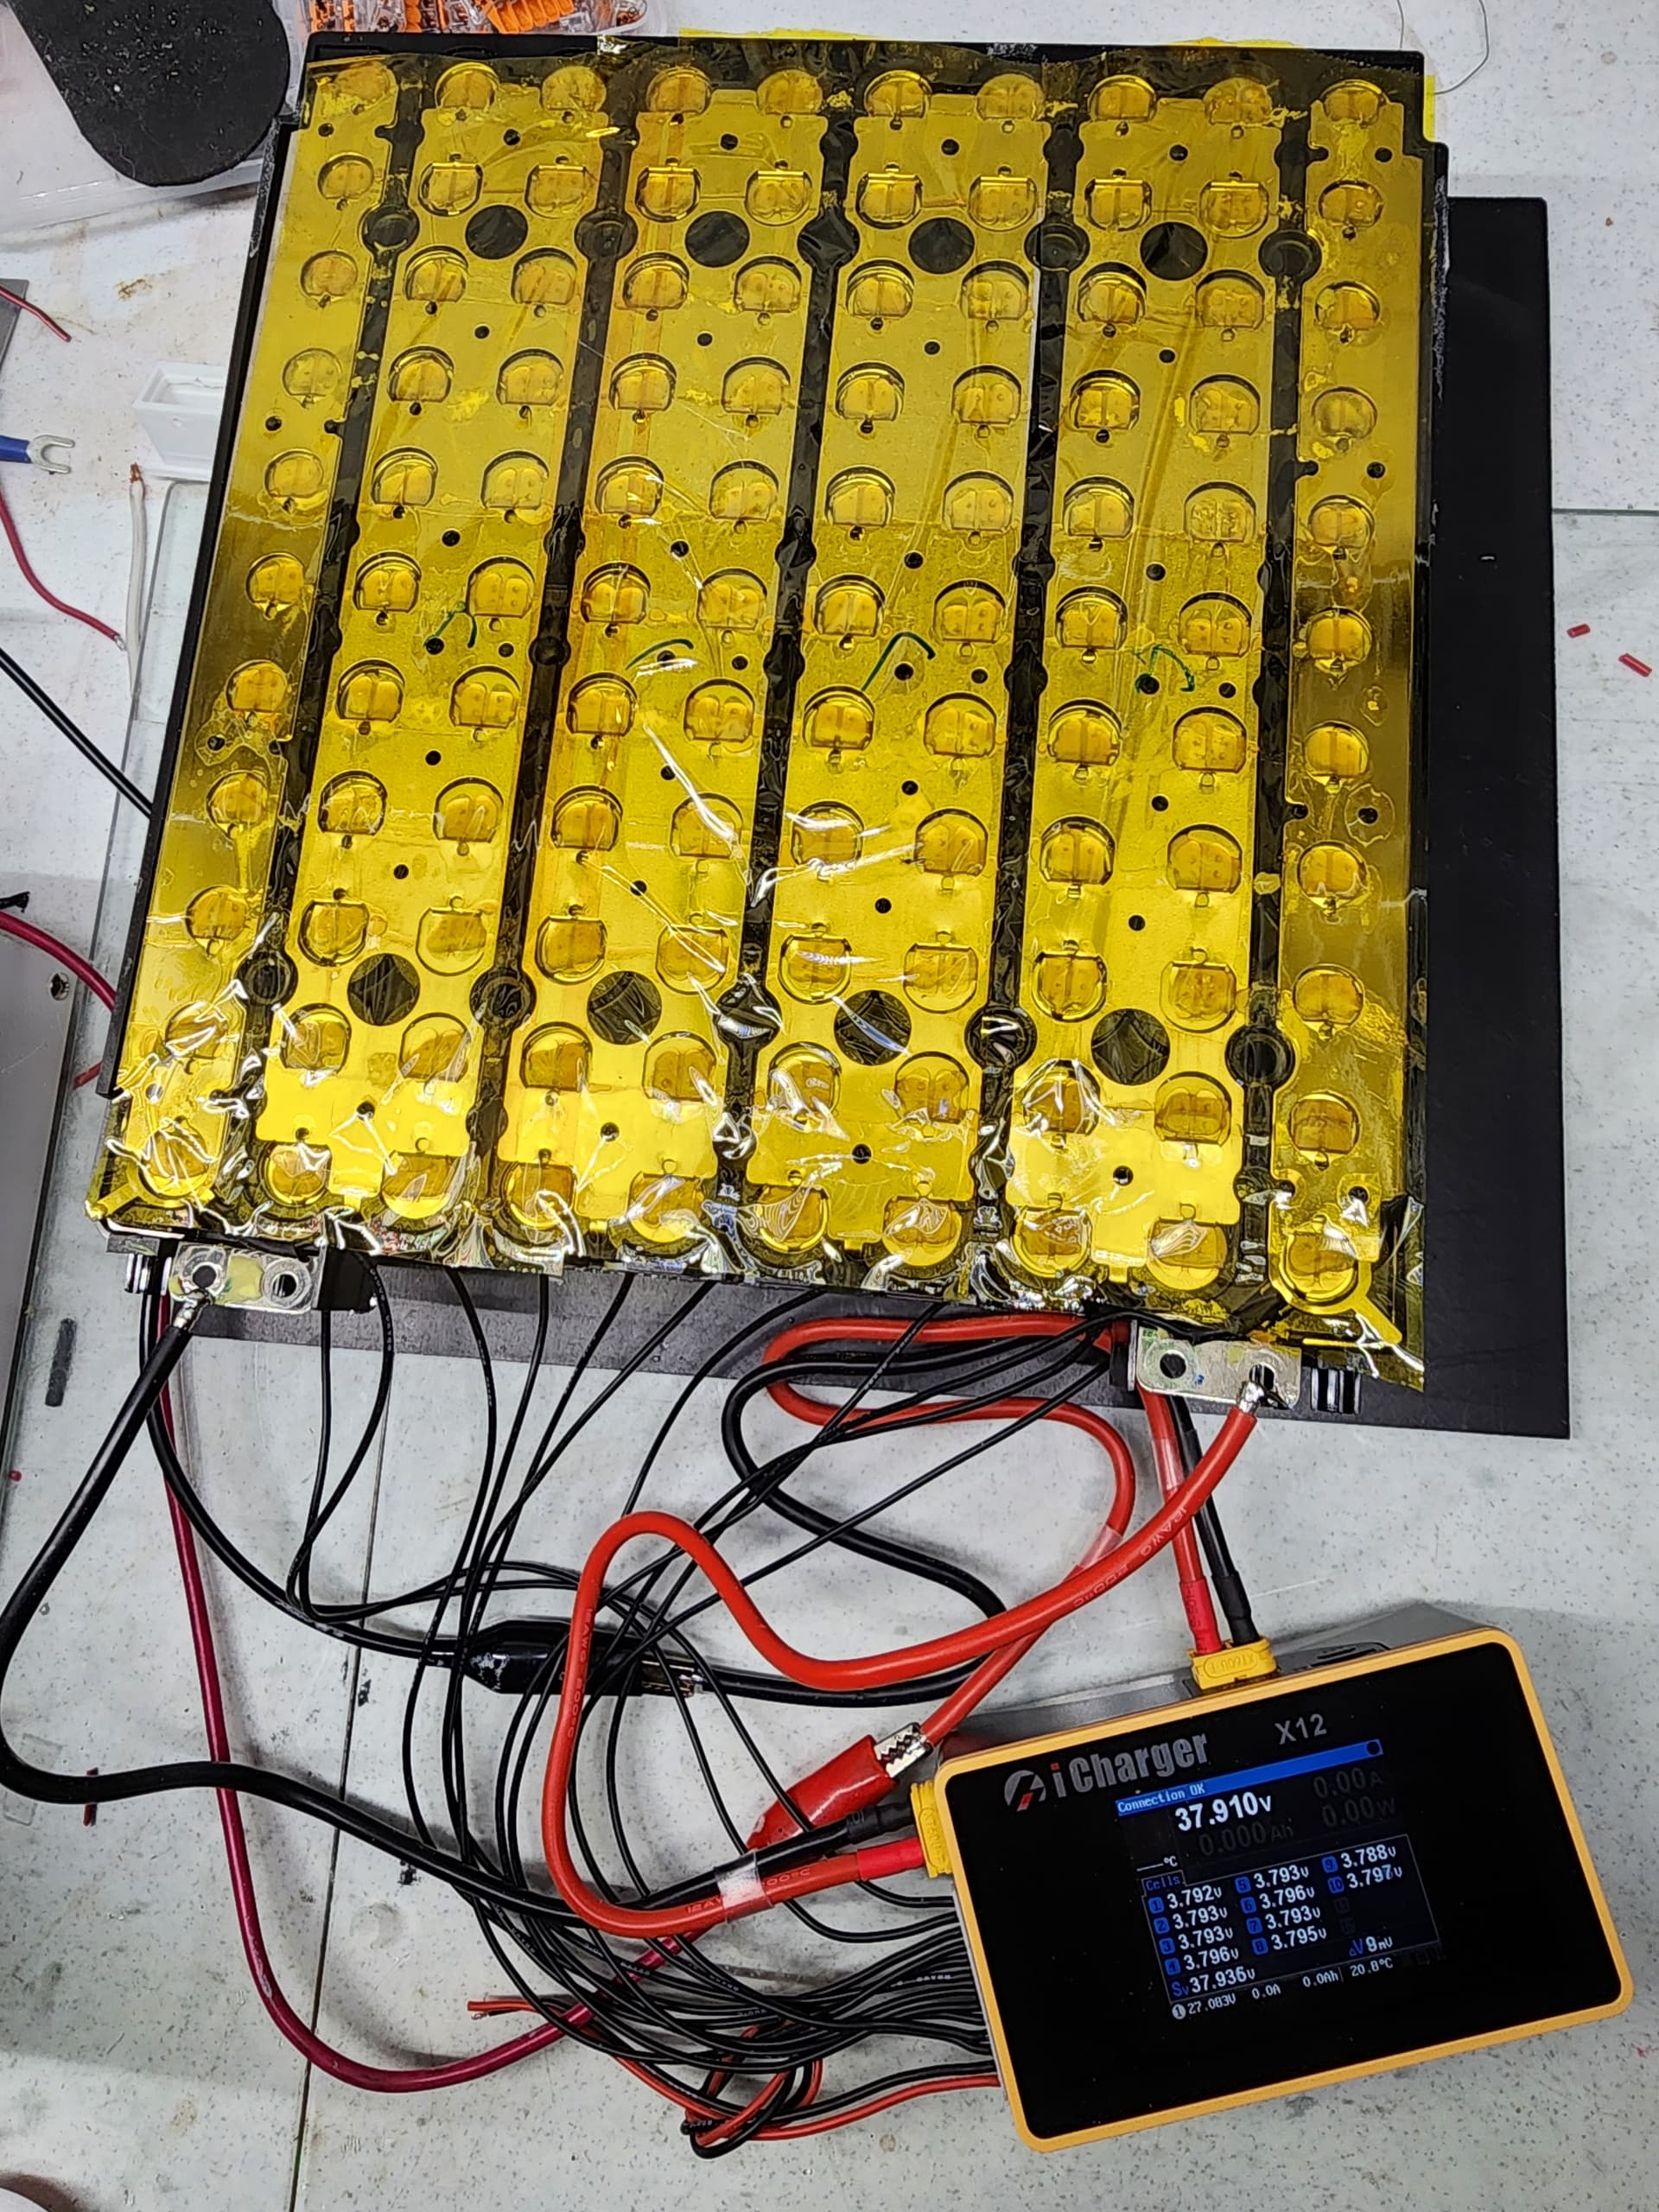
I removed everything and wired up a new balance cable for the icharger x12. They do fit in the fliteboard perfectly. I will just be shrink wrapping and use a membrane inside to waterproof. The fliteboard hatch system is really good and dry. Really well battery packs.
I would qualify my experience by saying that my initial concern was whether 10S of those cells would provide sufficient “punch” to go from standstill to standing up. With my relatively voluminous board and slow to stand up style I don’t have any problem but others might.
In my opinion the price per cell is quite low so that pack is worth buying even if you have to alter it more than I did.
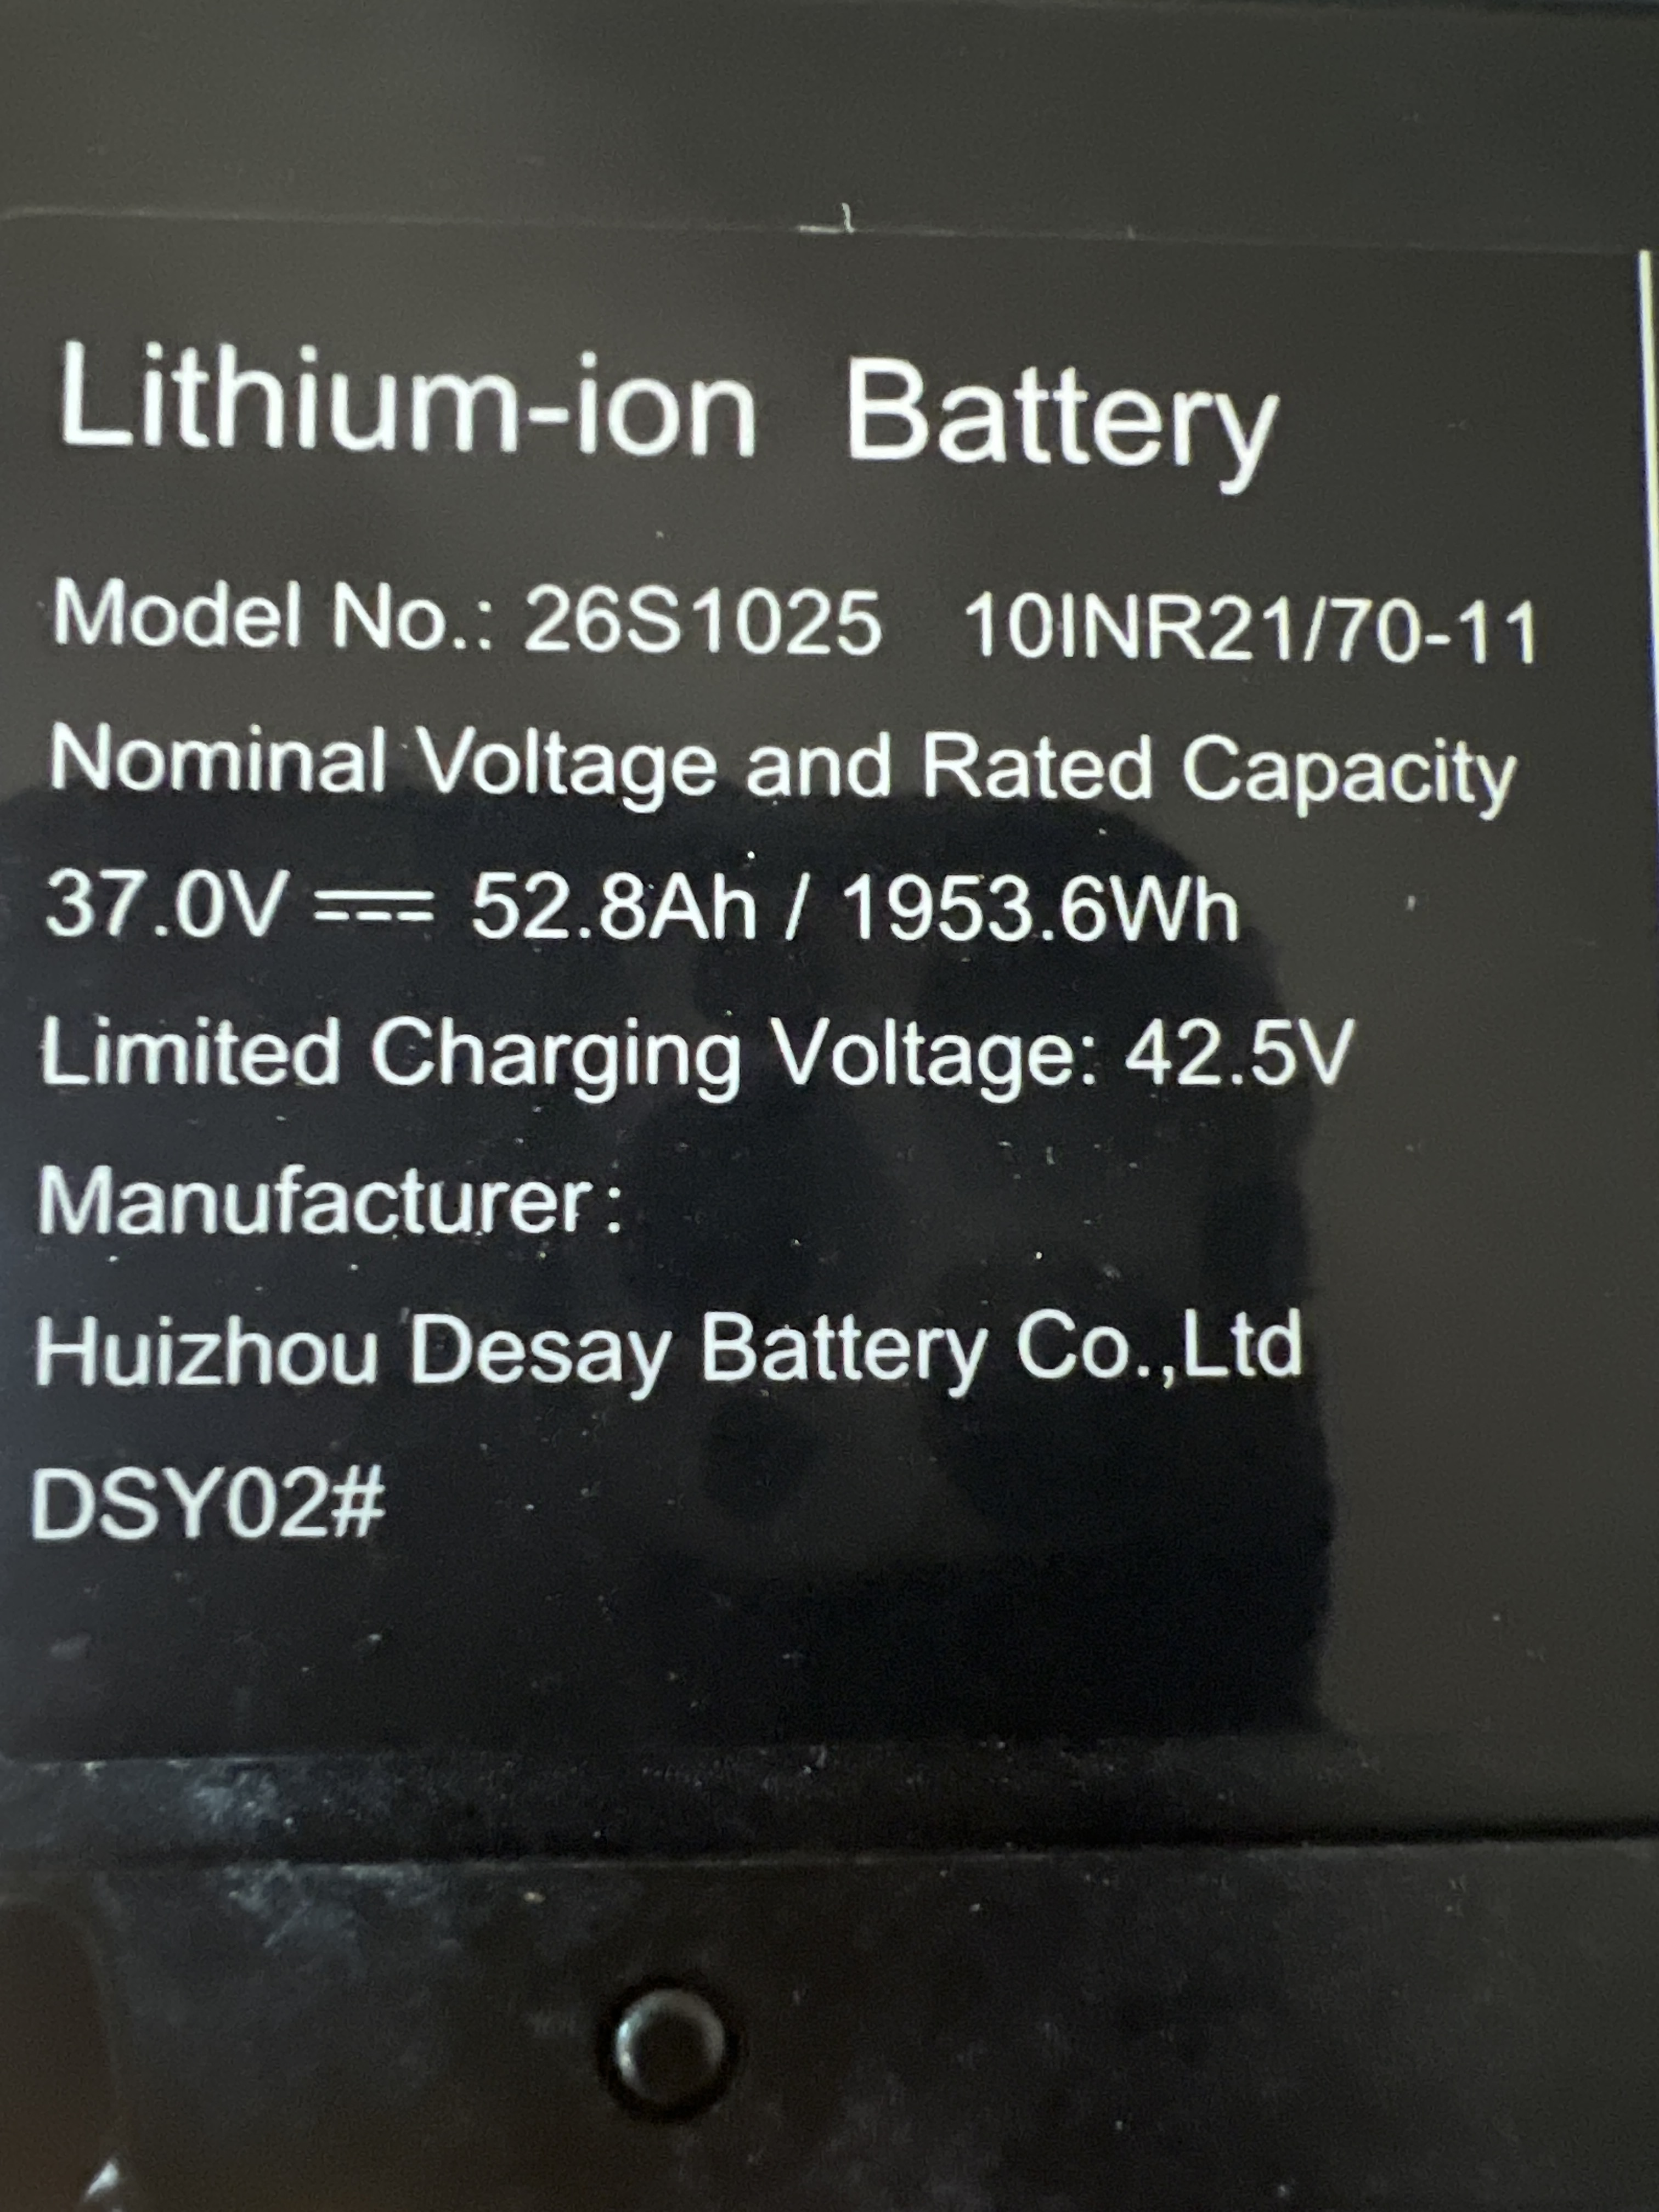
The pack comes with a metal enclosure and a proprietary BMS so once you take that “extra” stuff off the cell package is ~ 24x26cm. Add on a bit to the 26 dimension for power lead connection and the width of your BMS on the 25 side (the BMS needs to be within the space limitations as well). The finished height is the height of the cell plus a few mm as there is a plate stuck to one side of the cells. I followed the video link that’s posted on the BP site and took the plate off the one I was testing with. I concluded that since I wasn’t taking the cells apart I could leave the plate on for additional strength and not go through the removal effort (which is significant😀).
Lots of space in the Fliteboard for the pack so I made foam spacers on the sides to keep it from sliding around and didn’t have to add any spacer on the top of the pack. So although snug the hatch closes properly.
I don’t have a build thread - just followed the existing ones already here.
Thanks! Looks like you just skipped the BMS and went with a balance charger? What sort of membrane will you be using? I don’t I’ve seen that sort of approach on the forum for a battery build. Everyone seems to put things in a waterproof hard case
@windego@Foilguy Thanks for sharing. I actually already bought a bunch of Sony VTC5a 18650 cells from BatteryHookup and I’m building them into 14s9p pack now. But that will only have about 1kwh. At $175 with minimal modification I might as well grab that pack too. Unfortunately I would probably need to redo VESC settings to swap packs, so probably won’t try both in one day.
Yes I will just balance charge and let the vesc limit the low voltage cutoff. These packs so far are very well balanced. THe first few times I use it I will not take it very low to see how well it stays balanced.
The membrane I use is tpu same as used in kite bladders. I make a bag with a vacuum sealer then use sealant tape to finish the one end where the wires come out. Then heatshrink over that. I also will try and use liquid electrical tape to seal the heatshrink ends too. On these packs I will keep the lower plastic protection and add a abs same size on the top. It just fits in the FB that way.
Just a heads up. The shipping V of the pack is approximately 35V (or at least the two that I have worked on so far are). Based on what I know the correct long term storage is 38V so if you are buying now but won’t actually use them for awhile it might be a good idea to bring them to that V level.
Easily checked by shorting the smallest two wire connector and checking at the largest 4 wire connector.
The 3 I have all shipped at 35v. I raised the one I’m working on to 38. I guess I will open the other 2 and set hem to 38v and wire up the x12 balance leads sooner than later.
@Foilguy did you make any sort of enclosure around the pack you’ve been using? The Fliteboards have good hatch seals, but I would still worry about having nothing at all around the battery pack.
I didn’t have time to put something together before end of season. I wanted to confirm the 10S was a viable solution so just wrapped the pack in Kapton tape and used it.
I haven’t completely decided yet but this is my logic for what it’s worth.
The casing protects the pack when it’s outside the Fliteboard. Once inside the hatch the only real risk is water exposure from a significant leak imo.
The top hatch and motor mount seals on Fliteboard products are robust so the chances of a leak are minuscule unless of course I hit a submerged rock at high speed and rip the mounting plate out of the bottom.
If the interior floods a lot there are still live electrical connections that are not “inside” the protective case so I could end up with a serious failure anyway.
There isn’t much delta between the height of the 21700 cells and that dimension of the battery cavity for casing material. Likely why Fliteboard makes their case out of expensive materials. @vincent built one for his cells so it’s possible to do for not a huge $ outlay.
I don’t have much rough handling risk so I’m leaning towards using @windego approach of having top and bottom protective layer and making a serious attempt to “waterproof” the pack.
My fliteboard should be here this week so gathering a parts list. Which charger would best suite this battery? Also looking at a 10s 10p 60a BMS or would 40a work?
Like everything else in a build it depends on what you want to accomplish and how much $ you want to spend.
I have multiple packs so I don’t require a “fast” charge. I also rarely ride for several hours at a time so it’s easy for me to have several packs charged and ready and when one is depleted I don’t care how long it takes to charge to full again.
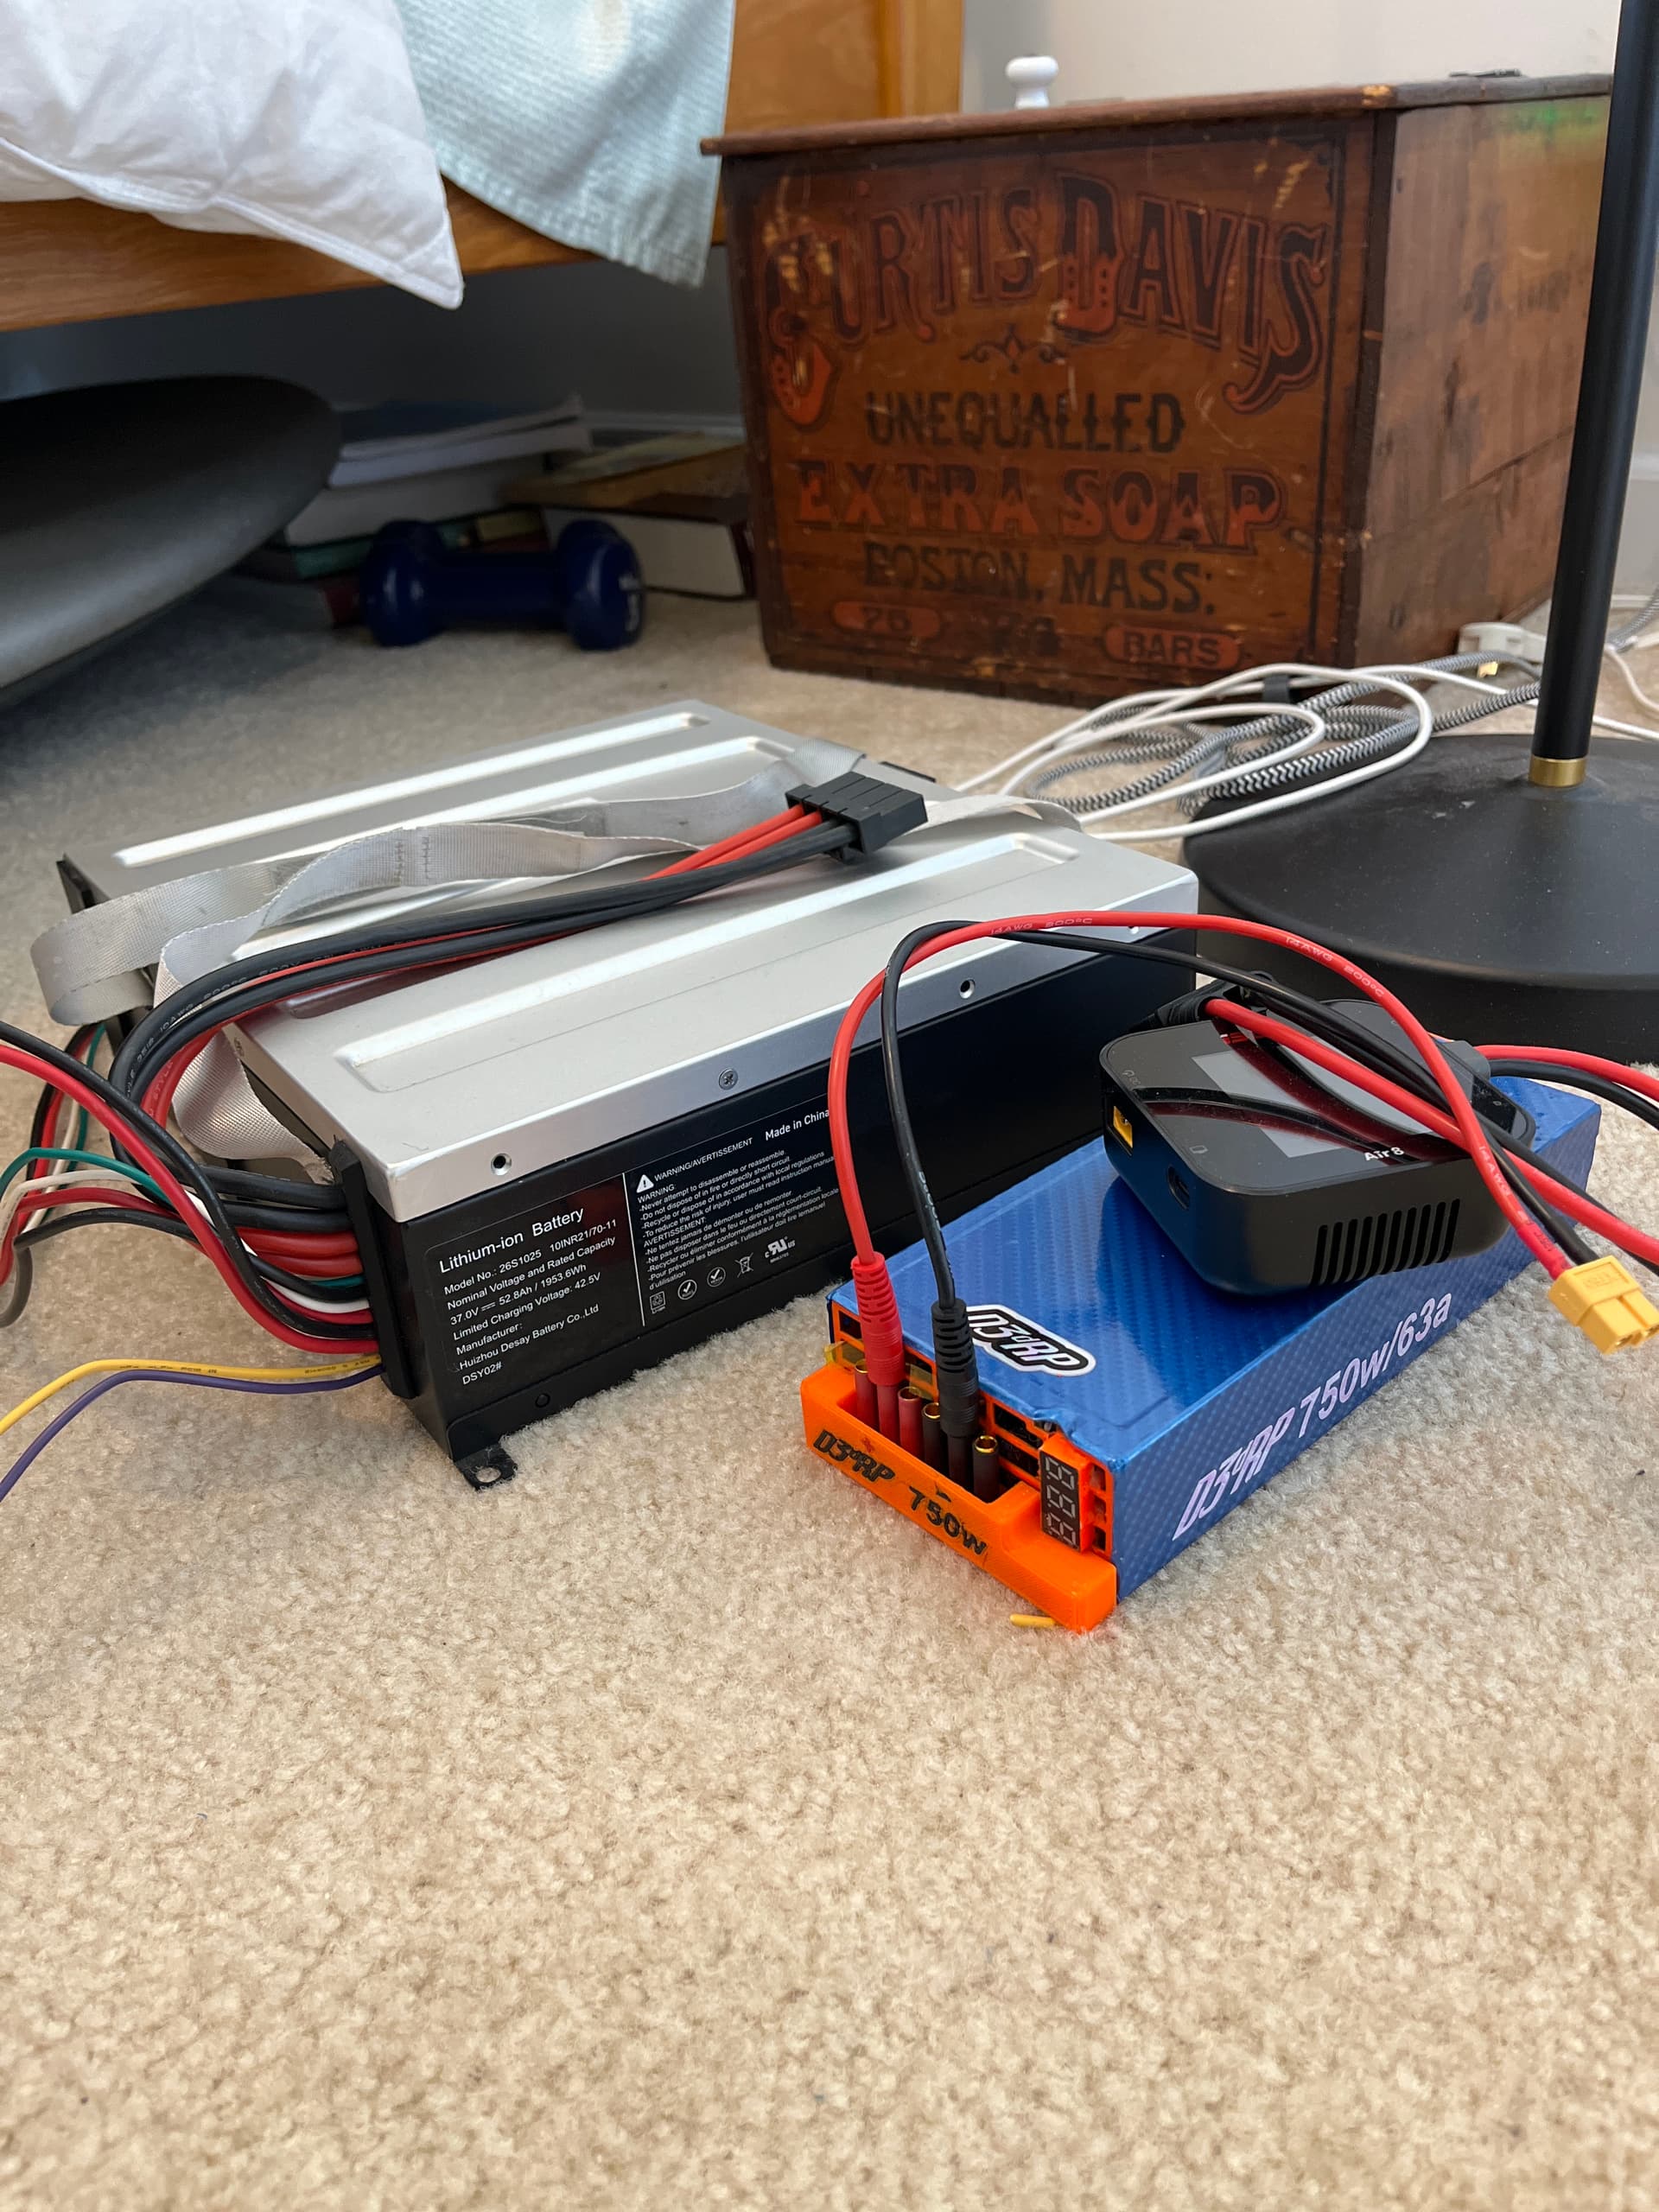
I have a 60V - 5A variable power supply I found on Amazon I think less than $100. I set it for 41V and full A and in the few times I’ve used it it takes several hours to bring the pack to 41V.
If you want faster charge speed you need to up the A rating which drives the price up very quickly. I chose to spend the extra $ on more packs😀
I also chose to not involve a BMS is the discharge cycle. I depend on the VESC to control any of the limits required.
I do use an “equalizer” during the charge cycle to keep the cells balanced that can intervene in discharge if required. It has Bluetooth capability so I can monitor activity with my phone.
I drove over to their warehouse last week and picked up one of those packs too. Mine is resting at 32V, so I would like to get it up to 36/37V and let it rest there until I have time to work on it. I have a modified server power supply from ebay (pretty cheap!). It puts out 12V and supposedly 750W. I am getting a boost converter to bump the voltage to charge this pack. @Foilguy, so do you have BMS at all or just the balancer module? Without a BMS would you just charge to the set voltage of the power supply and then it stops on its own?
I don’t have a BMS but the “equalizer” monitors the cells and intervenes if the differences go outside the parameters it is set for - so sort of the same thing as a full BMS in a simple format.
The power supply I use brings the pack to full charge by slowly tapering the A off as it nears completion. I monitor for safety but don’t have to physically intervene until charge is complete.
okay, so I guess overcharge protection in this case is: 1. Set an appropriate voltage on the power supply and 2. “Nobody touch my power supply while it’s charging”
I don’t have a worry about anyone touching the dials on my PS so not likely to overcharge but agree that it is possible. Using a full BMS would of course let you deal with that unless someone changed the limit value in the BMS without telling you😀