Just watching this excellent video on how to calc what size and how much nickel strips to use…
How do know how many amps the system will draw? (I’m going for 6384 motor, 80aESC, 8s3p battery and either 3d printed folding prop or propellerking)
That is a better price per battery - $2.5, I got $3.5.
If only the shipping was not that high - $200 …
Please report back about the quality when you receive them - voltages should be very very similar and the qr code should reflect the code written on the battery.
From reading on the forum I got the conclusion that 8s is to low as under certain conditions it will be hard to start, though there are people succeeding. And the 80A esc is too low as start current may reach this value. The on the foil power consumption supposed to be around 1kw.
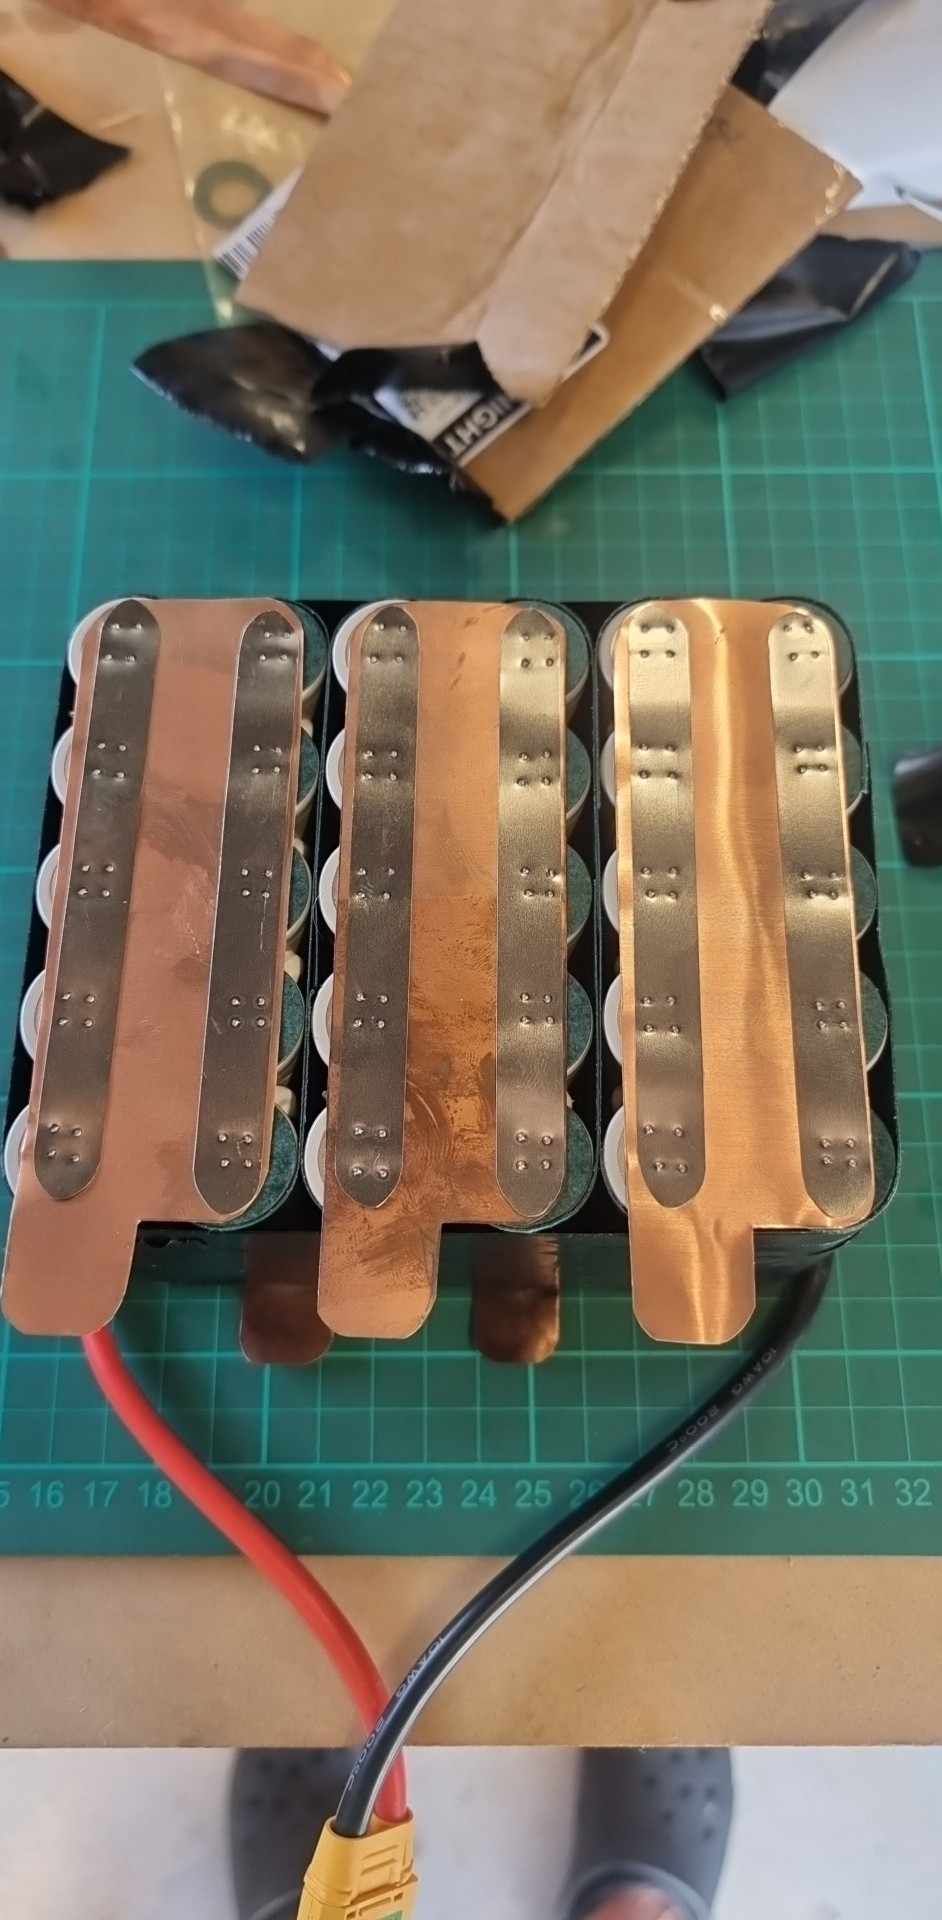
I came to conclusion that 0.15X8mm pure nickel is enough, just make sure it is pure nickel and maybe put more layers on serial line. For 0.15 also easier to find welder as oppose to 0.2.
I have ordered Fnirsi on AliExpress, this company is hot now, people review their products as high quality, they also do oscilloscopes, multi meters etc.
1 Like
As a beginner how hard it is to learn foiling with the help foil-assist on a regular prone board ?
(The common recommendation is to start with a large board, but it is pity to buy it only to learn e-foil)
I intend to do pumping, surfing etc. E-foiling will just assist me.
At the start I intended to do dock-start. For pumping people choose small board.
And how to choose begginer foil? Does it matter the make/model or just choose low aspect and high surface area?
Thanks
You’re right for a low aspect and high surface area to learn on. If your foil assist is 8s or more you should be able to efoil for short times which will help your initially progression.
0.15 x 8mm nickel is not enough for an efoil battery. I would highly recommend copper nickel sandwich.
1 Like
Myself and son paid for lessons where a guy towed you up behind a boat - using a large sup with large foil. Def worth doing so you learn what it feels like when up and how to trim the board. Learning via proning would be very very lengthy - I still struggle proning although my son is now an ace. We set up a small dock in the local lake and have been using this - I reckon one could start straight off with that - while it takes a few attempts to get used to taking off -you are starting already up on foil… so just take it slowly, start with simply gliding and once you can run, jump on then glide down to surface without falling off then you can try starting to pump. Another option is buy an old SUP foil - as you are already standing would be way easier than prone. The trick with both prone and SUP is start by keeping the nose down and slowly take turns at coming up on foil then down again. - If you rush you will get kicked off the back.
Oh - and yes larger foils are much easier, particularly to pump with - see the Axis PNG foils 1150 and above for pumping. Note that very high aspect foils (Axis HP and ART) require a high speed so not as easy for pumping for newbies but, apparently, when you get good, they are the ticket for in the surf (I’ve not tried these but my son reckons the large PNGs are too slow for our beach breaks) .
Pumping requires an ollie type movement - jump upwards off back foot (leaning forwards) then down on front foot. Pretty much all your weight on front foot except when doing this kick with the back foot (which is more about changing the angle of attack of the wings while taking weight off the board so it can glide up the water column, then down on front foot to change angle of attack back down to gently glide forward/down)
HTH
3 Likes
It’s interesting to see how pumping techniques and gear evolve.
At least on short boards, masters who do it effortlessly are against the “Ollie technique” and recommend a more classic “jump flat on two feet” one. Here, the “Kane method” post n°10 on his 2,5’ (75cm) board. See also the McKite vid post n°4.

As a good daily cardio and muscle routine, don’t use the lift, use the stairs each time you can … 6 floors (could be 3 times 2) or nothing ![]()
Thanks for sharing these.
Can anyone point me to how to assemble… not exactly sure where threaded inserts are used vs nuts. Also does the folding prop use some kind of bushing and/or what pins?
Also wondering if anyone has moded the CAD files to allow a SS or alloy strap as a safety measure incase the printed plastic fails- eg a aluminum or SS base plate inside the rear mast mount and a front strap inside the nose cone that the threaded rods go through (around the front of the mast in side the cone with 90 tabs that the threaded rods pass through)?
Anyone experience with this MICHOBBY folding prop regarding performance and durability?
only compatible with maytech motor, too large in diameter, mine lasted 2 sessions before the blades broke. The hub itself is quite strong and I still use it.
Mine came with M3 bolts that I replaced with M4 as it was designed for this size.
1 Like
Thanks. Thats all the info I need to steer away from this prop. I might as well go for a 3D printed if Ali nylon prop breaks that easy
Do you have any ideas for a locking solution for the 3d printed cover of this box?
There’s only a 2mm clearance inside for battery replacement, with minimal protrusion outside preferred since it will eventually be submerged underwater.
I’m considering something as simple as using a strap along the length of the box to secure both covers in place, while silicon insert will be used for waterproofing.
1 Like
@Jezza Love this design - how did you get on with this?
Are you planning on using 3D print (is this strong enough?) for final or mill/CNC aluminium?
Have you shared your plans? I am keen to do similar. I was thinking 3D print shell with some aluminium bar inserts to take load between foil plate and board (with holes for screws to pass through).
1 Like
How is the FDGen2 waterproofness ensured at clamp level between nose (or tail) and main body ? What’s the principle behind it ? Close-up pictures welcome.
I’d 3d print a mold and make a thick U-seal using gasket silicone, but TPU printed seal in 95 ish hardneds should also work from what I understand?
Edit: Looking at your alu case opening I’m thinking that it would cut and split the seal if clamped
1 Like
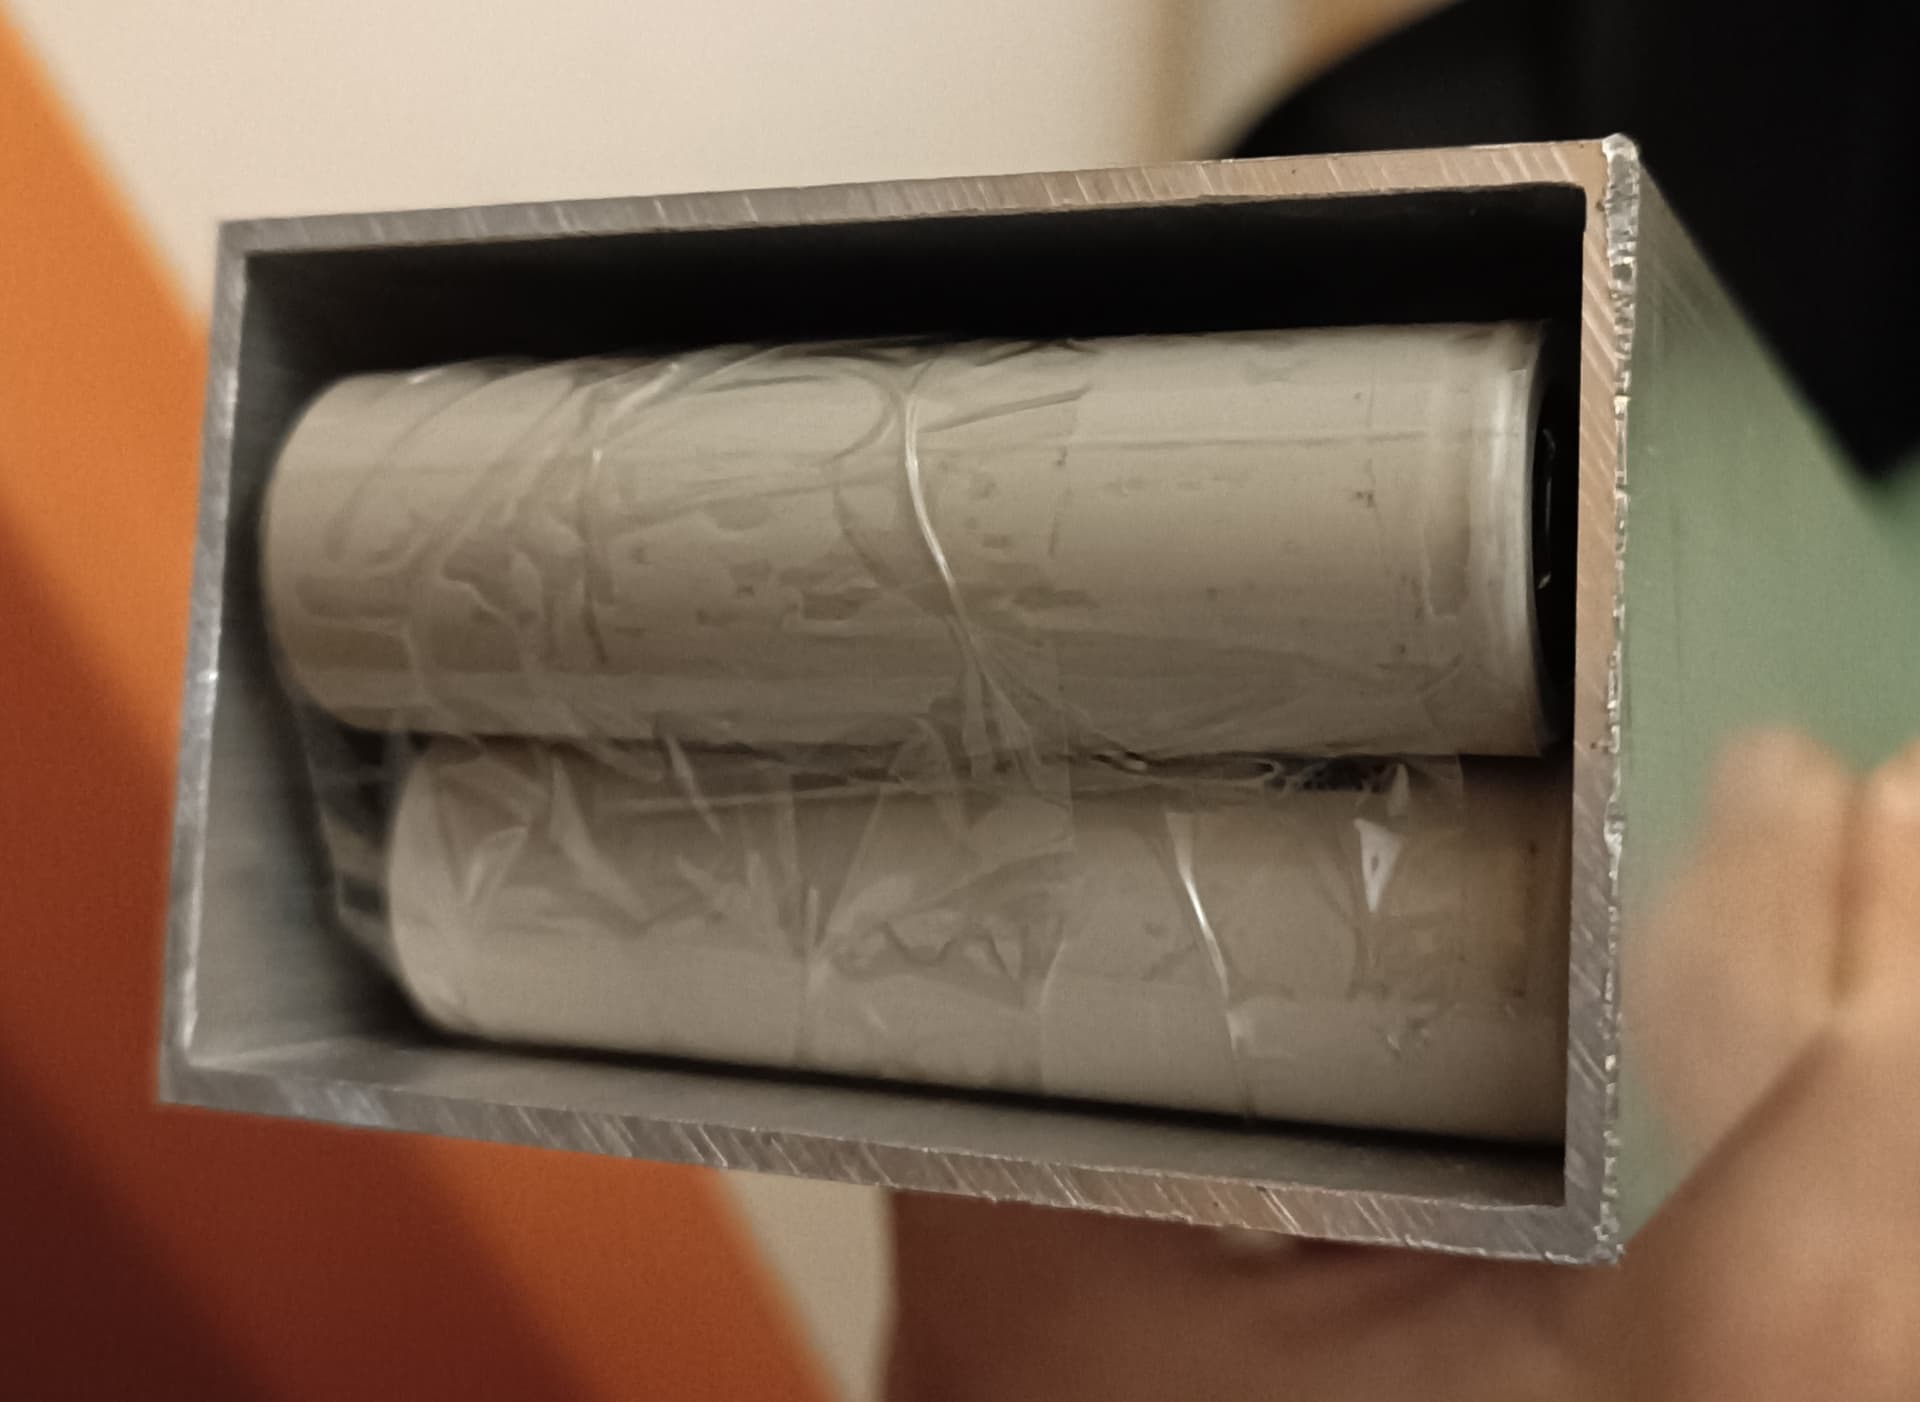
Hi I am also interested on how to waterproof Li-ion battery pack. It’s hard to find some info on this. I was thinking a mold of PU foam bi component but how does it perform with heat ?
Options I know include mg chemicals thermal epoxy, natural cure silicone (marine type - not vinegar/acid), potting silicone, normal epoxy, glue + vacuum bag (kitchen souse vide type, seal over outgoing silicone cables),…
All options should resist 150C+ afik but resulting weight and application complexity varies. Durability…? Thin epoxy is heavier and less risk of air pockets, thick silicone harder to get tight?. Vacuum can perhaps be used when potting with silicone?
Battery design should ensure limited heating to avoid puffing. Potting at right room humid/temp cant hurt either.
Thanks for the detailed options on heat-resistant materials and application insights - will help me to get deeper on this.
I intended to pot with electronics silicone the ends of the cells including nickel.
But now I intend to only double heat shrink the whole battery + put glue between the heatshrink and isolating paper at the end. Watch my build.
The special feature of electronics potting silicon is thermal conductivity.
This thread is such a great resource! The countless hours on this forum gave me the confidence to start my own build even if I have no previous experience in such projects. I have started ordering parts for my build over the past few weeks, including 24 Molicel P45B batteries that I plan to use in a 12s2p configuration.
However, this will result in a 26 cm long batterie pack, which I find a bit awkward to fit in an assist case. Could anyone tell me if there is a straight forward way to physically arrange the cells in a 8s3p configuration, but to weld them so they are in 12s2p? I think I have a rough idea, but having one of you help me with this would be very helpful.
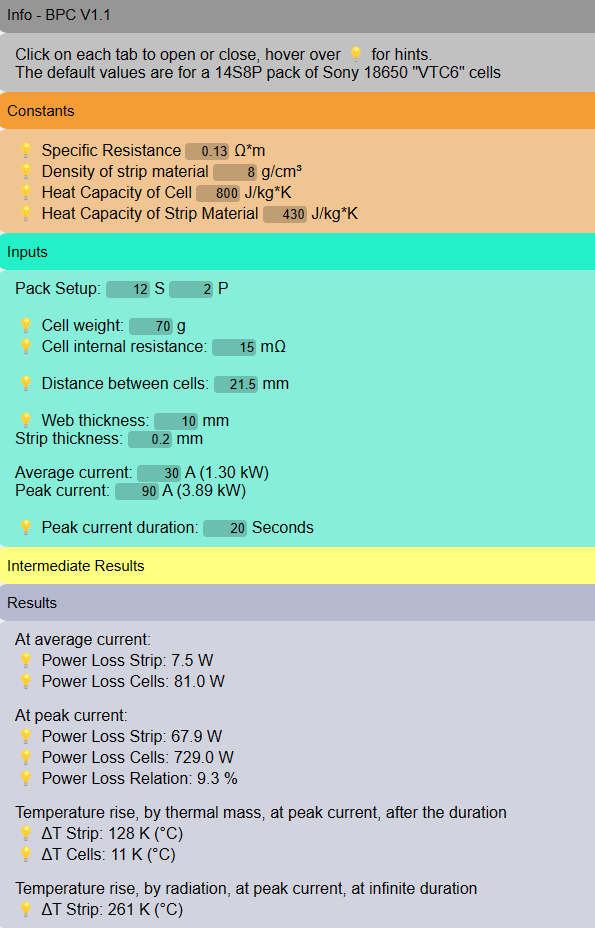
Also, I have used @ludwig_bre Battery Pack Nickel Strip Calculator to help me decide on which material to use for my pack, but I am not 100% sure how to interpret the results. Would using the steel strips with nickel plating sufficient? I cannot find the pure nickel strips at a reasonable price, but don’t want to create a bottleneck or a dangerous situation to save a few bucks either.
8/3 you can connect like this
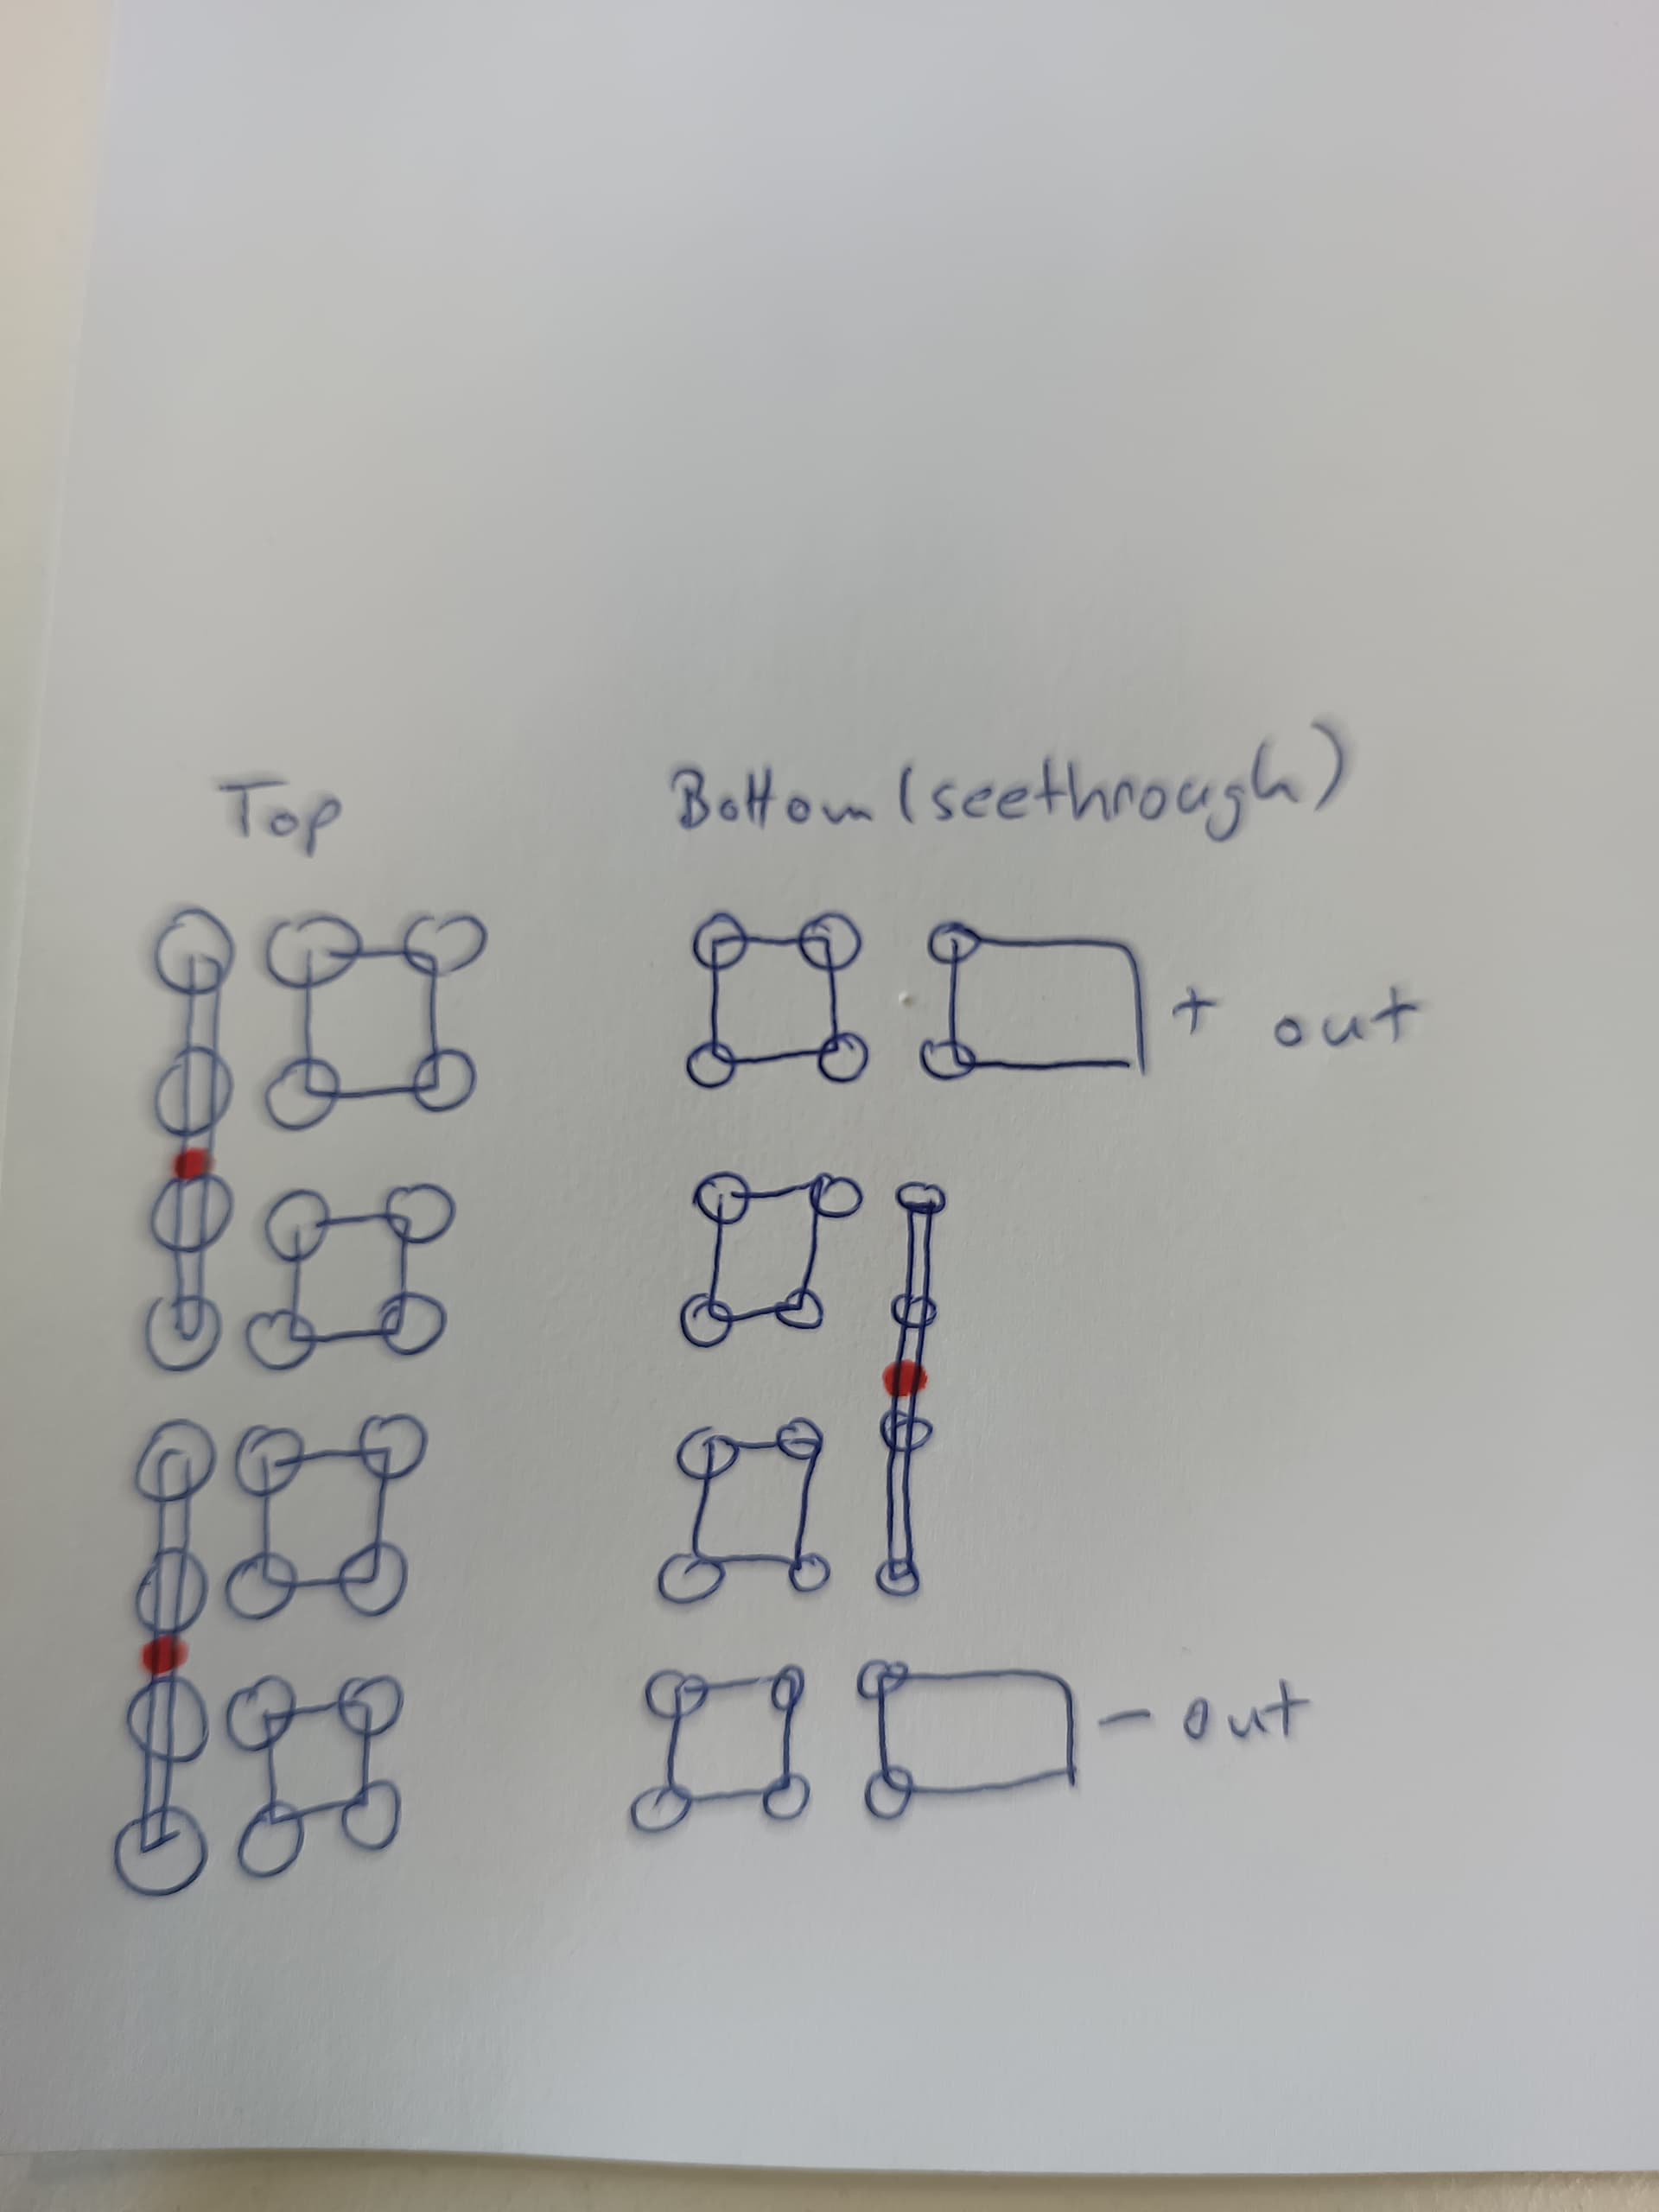
Make sure to pay extra attention to the areas with red dots, they will see a lot of current, so make them at least double what the rest is
Regarding result of the calculator: The strips heat up to more than 250°C above ambient, that is way to hot! You need more (thicker) material for the strips for sure
Also be aware the cells you chose are only allowed to be discharged with 45A if you monitor the temperature and keep it below 80°C
5 Likes