A good wetsuit and heated vest will keep you more than toasty in winter…
1 Like
Could you tell us more ? How, where, how much ?
The adapter is DIY from aluminium and CNC’ed by PCBway.
Price (with shipping) was just over $80 US.
My dad who did the 3D stuff was a little bit to “tight” with the sizes, and the two fingers going into the Gong V2 mast did not fit (a little bit to big).
Kwint (from Efoil Holland) helped him today with some fine tuning, and now it fits perfect.
(even better than the original Gong V2 adapter!)
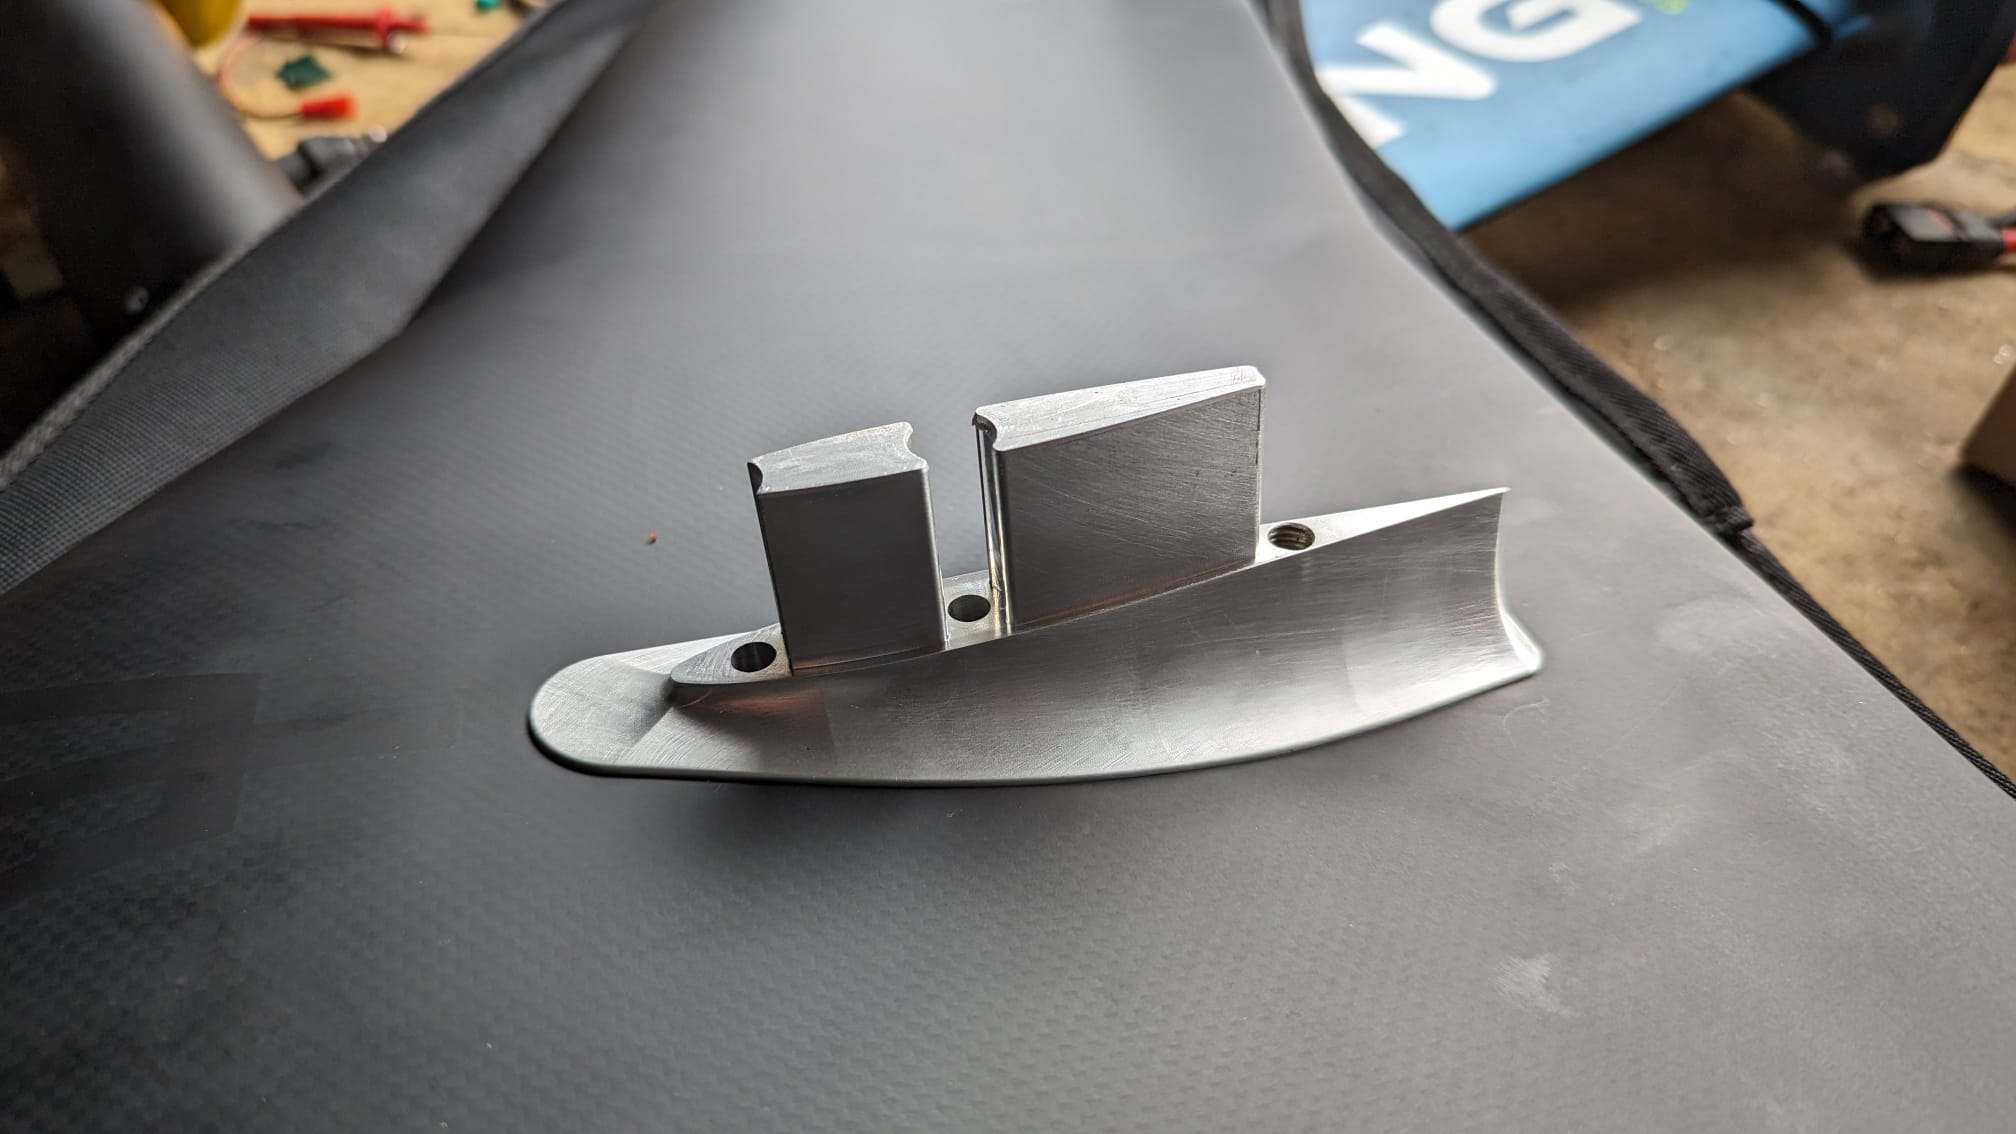
Step file will be shared here when it’s perfect.
6 Likes
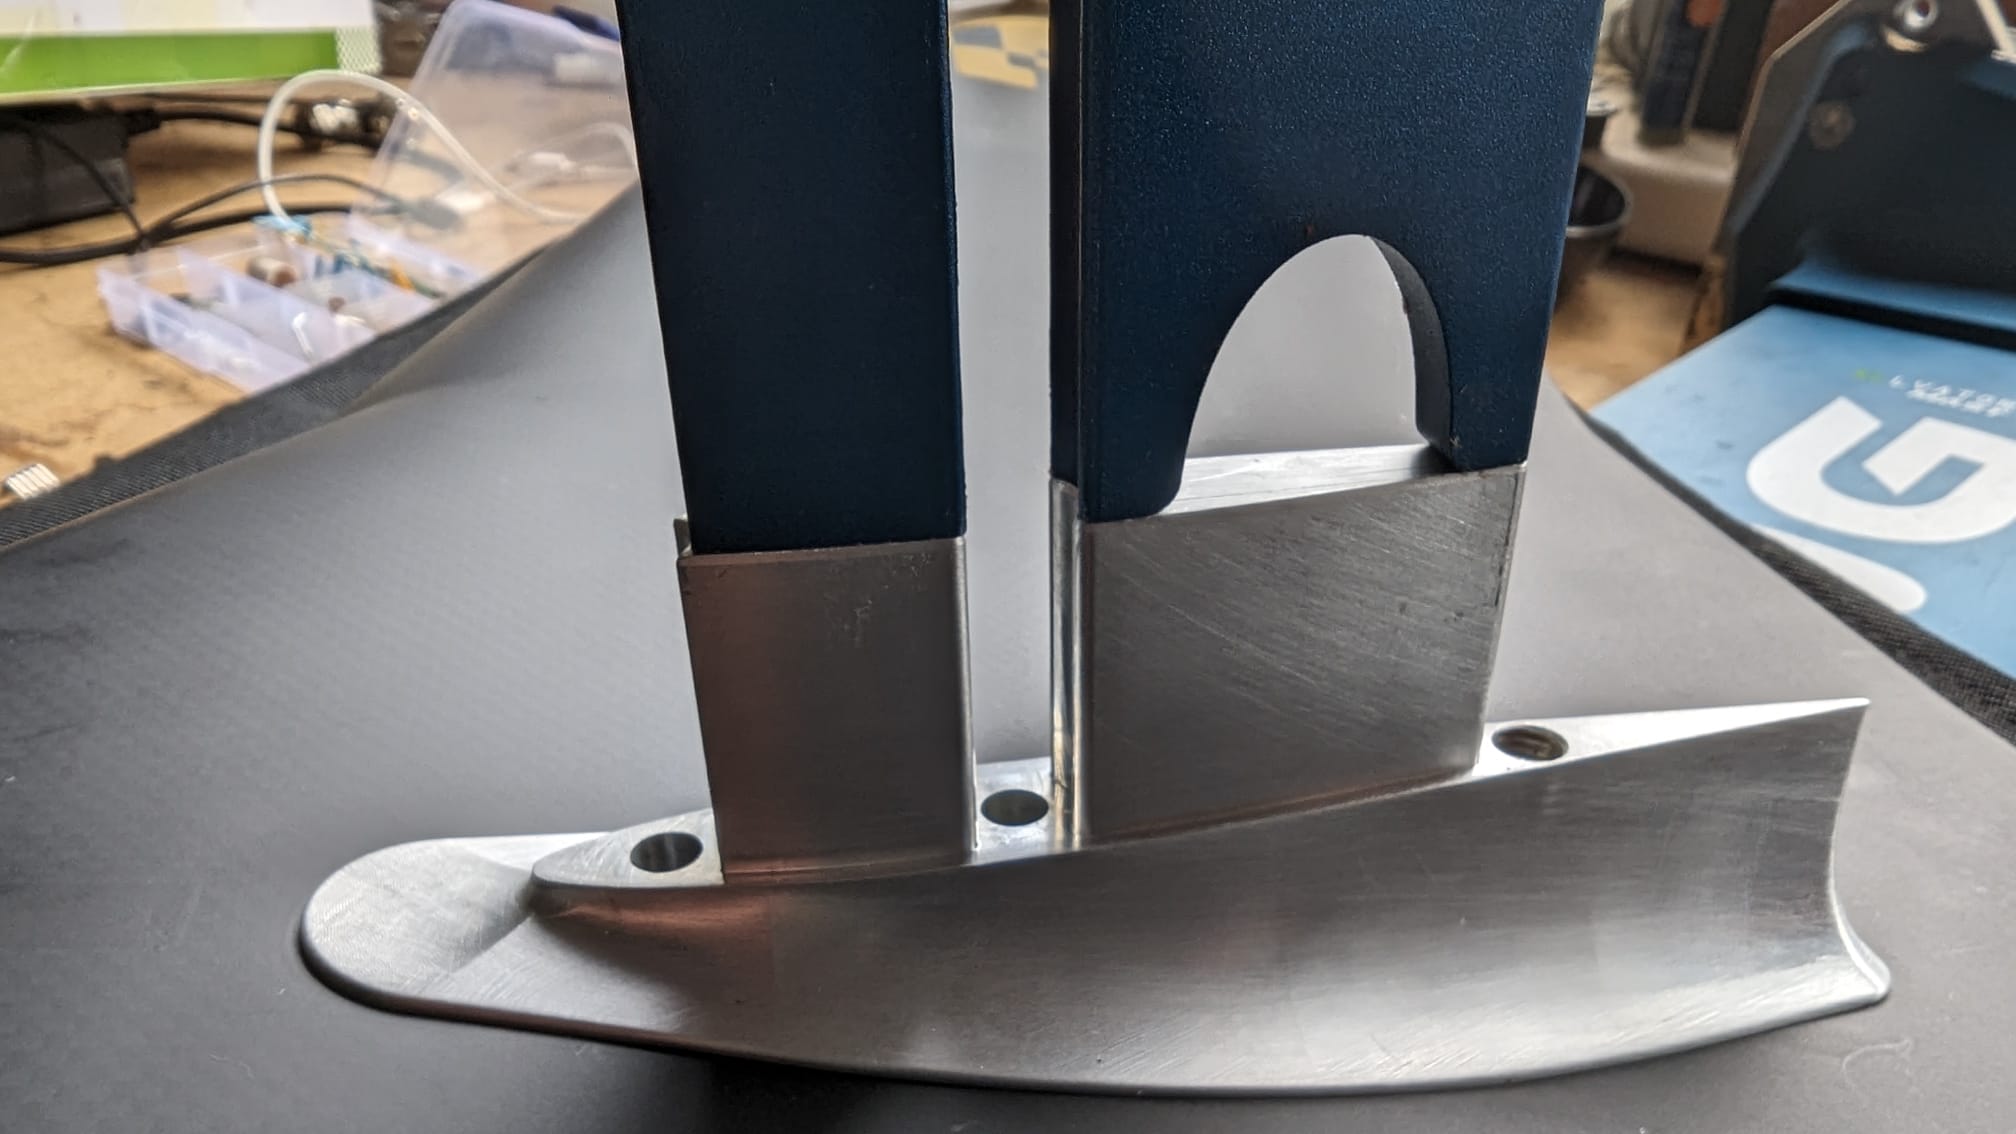
That must be a snug fit as the Gong part is really tight on my V2 mast.
Nice looking rig. Not sure I would have the patience to wait until spring to ride it though😉
1 Like
I know. The Gong adapter fits tight.
This one fits tighter, and needs some more force to pull it out.
1 Like
I did some searching but haven’t found info on how you made the “box” that covers the vesc.
I would like to replicate what you did so that I can easily remove the mast from the Fliteboard.
Can you repost and/or point me to the thread please?
2 Likes
Congratulations, a piece of art !
With this Gong adapator, there is a significant saving: the 85cm Gong mast costs 75€ incl tax, the ALU Triton mast cost 375usd excl tax that is 6 times as much incl tax.
No Limitz V2 85cm ultra stiff carbon is 1500€ incl tax or 1350usd excl tax + Triton adaptor !!
1 Like
The box is 3d printed with PETG, and held down in place on the plate with 4 small M4 screw’s.
It has a lid, and is also partly filled with potting (just above the vesc) for extra security against water.
Sharing the stl file for this is useless as it needs to be adjusted to whatever plate you use for mounting the vesc on.
Also. I was going to create my own thread about the build, but about everything needed to know is posted in this or @MBard thread.
1 Like
Would you post pictures ? The idea for a given ESC is to use the best plate/cavity couple among small/medium/large cavities … or the largest possible (what can do more, can do less).
The VESC “cover” is the black piece on the top with the red and black power leads sticking out of it.
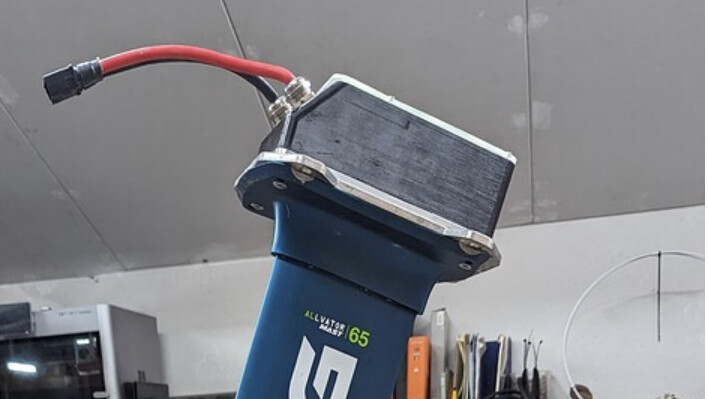
The shape of the cover conforms to a cavity in the Fliteboard. The height of the cover depends on the “thickness” of the adapter plate.
Not sure what your statement about ESC is about???
What Case are you using for your battery box? Looks like some kind of commercial case? Thank you.
Interested in sharing the mast clamp file? The alum one?
It looks like @th3v3rn might have used the motor mount developed by @jkoljo that he kindly shared here: FS65161 motor mounts for Gong V1 and V2 masts
There are links to the 3D print files he has posted to Thingaverse and are available to download. If you want to go the full aluminum CNC route those files should work fine. There is also an option to 3D print and use a metal plate for reinforcement.
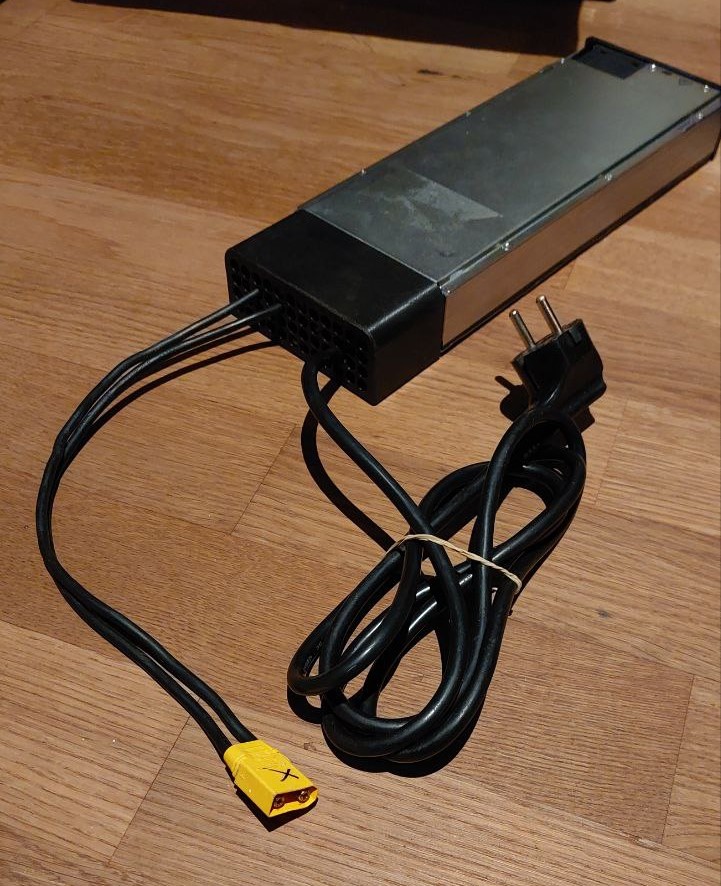
Since many users @th3v3rn @stinkwhistle @ are unsure which charger is suitable for their eFoils, I would like to introduce one of my trusted chargers.
I successfully use the Huawei R4850 power supply to charge my battery packs with integrated BMS; the R4830 ans R4875 also serves its purpose. This high-quality and compact power supply is designed for continuous operation and is characterized by an excellent thermal design. It is especially interesting that it can be controlled via a CAN bus, which is why it is often used in DIY photovoltaic systems. Surprisingly, this power supply unit does not seem to have been widely discussed here on FOIL ZONE.
The CAN bus allows both the current and voltage to be set precisely, with real-time data also available. Furthermore, the control of the fan enables a pleasant operating sound level of just 35 dB.
This opens up the possibility of controlling the power supply unit using an Arduino or ESP32. Personally, I mainly use the power supply unit in standalone mode. In offline mode, the power supply retains the settings even if the power is interrupted or the CAN connection is lost. In online mode, it applies the values transmitted via the CAN bus. Without CAN bus, it automatically switches to offline mode. This means that you can send a CAN bus signal via the Arduino that causes the power supply unit to set the voltage to 50V and limit the current to 25A in offline mode, for example. The Arduino can then be removed and the power supply unit will from then on supply a constant 50V at 25A.
For those who appreciate additional functions, it is possible to add an OLED display similar to the one on the Maytech remote control. This enables the display of data such as temperature, voltage, amps, watts and efficiency. In combination with a rotary encoder or a button, the voltage and current can be variably set between 40-60V and 0-50A, which corresponds to a maximum output of 3000W. In addition, various presets can be set, such as for a small 10S assist battery, a small 12S battery or a large 14S long range battery with 30A charging current, as well as options for electric longboards, Onewheels or eScooters.
For those who want even more functionality, an ESP32 can be used to read out the CAN bus data and display it on a website. The settings can then be made via a smartphone and the power supply unit can be switched off using a timer. This allows the batteries to be charged in the garage or basement, for example, and monitored from anywhere - without a camera, of course. Thanks to the variable voltage setting, the battery can also be charged to 50% if it is only intended for storage.
The power supply unit is perfect for those who use a BMS and need a high-quality, small, lightweight, robust and quiet power supply unit with an efficiency of 97%. These power supplies are available from 65-100$ and are therefore significantly cheaper than many comparable models on AliExpress, which are also not remote controllable.
It can of course also be used in combination with a model charger, but does not make much sense here
For technology enthusiasts, it should also be mentioned that the power supply can also be integrated into ESP Home/Home Assistant.
Shopping list:
- Huawei R4830 (2000W) or R4850 (3000W) from approx. 60$ (optional with plug for 14$)
2000W 48V Netzteil für Amateurfunkverstärker Huawei R4830S Power Supply 2000W | eBay
R4850g2 r4850n2 r4850n6 r4850g6 Leistungs modul für Ein-und Ausgangs stecker - AliExpress
-
Arduino Nano 2$
-
CAN bus module MCP2515 2$
-
Further optional parts:
-
Rotary encoder KY-040
-
button
-
OLED display 128x64
-
RFID module RF522
-
ESP32 or ESP8288
7 Likes
HI Vincent
Can you explain more about the power supply you like.
… At the moment I use the R4850 or R4830, R4870.
Wondering how you set it up to have adjustable volts and amps.
Thanks
Stan
OMG I see your info about it now!
Here is a detailed description of the power supply and where the slot detection pin is to start the power supply.
If you use a tja1050 instead of the MCP2515 Can module. You can use the same circuit as for the DIY VESC Express USB-C to VESC CAN-forward adapter - cheap and DIY! - Esk8 Dev - esk8.news: DIY Electric Skateboard Forums. Then everything is nice and compact and can be stored directly in the power supply.
Here is the link to the Github Repo for the simple Arduino CAN bus standalone
solution which can be quickly customized or simply flashed to the Arduino. To use the power supply for charging only, simply enter the desired voltage and current in the code below and you’re done. Thanks to Bremote, this should no longer be a problem for anyone.
And here is the link for the enthusiasts who use Homeassist.
I hope this helps.
1 Like
@vincent I really like this elegant passive cooling solution and would like to use the concept for a DIY board build. I guess since I am not restricted by a Fliteboard mounting shape and cutout, I can make a simplified adapter plate with the ESC mounted on it and probably get the cabling straight through down the mast, right?
That is correct. But make sure that the holes don’t go all the way through so that no water gets in.
1 Like
So if I design an adapter plate with 8mm thickness and mill out 6.5mm for the thread of the mast plate, it should be fine, right?
My idea is to make a simple flat adapter plate of 8mm with threads for the mast plate and holes to screw it to the board. On the top side the plate will get two more threads, to add another small plate, so that the ESC is mounted a bit higher up and get a 3d printed case for water protection