Hey everyone,
Long-time lurker, first post. I’ve been reading through build threads here for weeks and finally pulled the trigger on my first eFoil build. Wanted to share my plans and get feedback before I start cutting foam. This community has been an incredible resource — the Danish V2 build, the French BOM build, the board construction tips thread, and dozens of others have shaped every decision below.
About Me & The Project
- Rider: 190 lbs / 86 kg
- Location: Boise, Idaho — riding at Lucky Peak Reservoir (freshwater)
- Budget: ~$2,700 all-in
- Experience: Zero foiling experience, decent with hand tools, have a Bambu Lab A1 Combo 3D printer
- Other riders: My girlfriend and a couple friends will be riding too, so the safety system is designed with beginners in mind
- No CNC, no vacuum bagging — hand tools only for the board build
Components
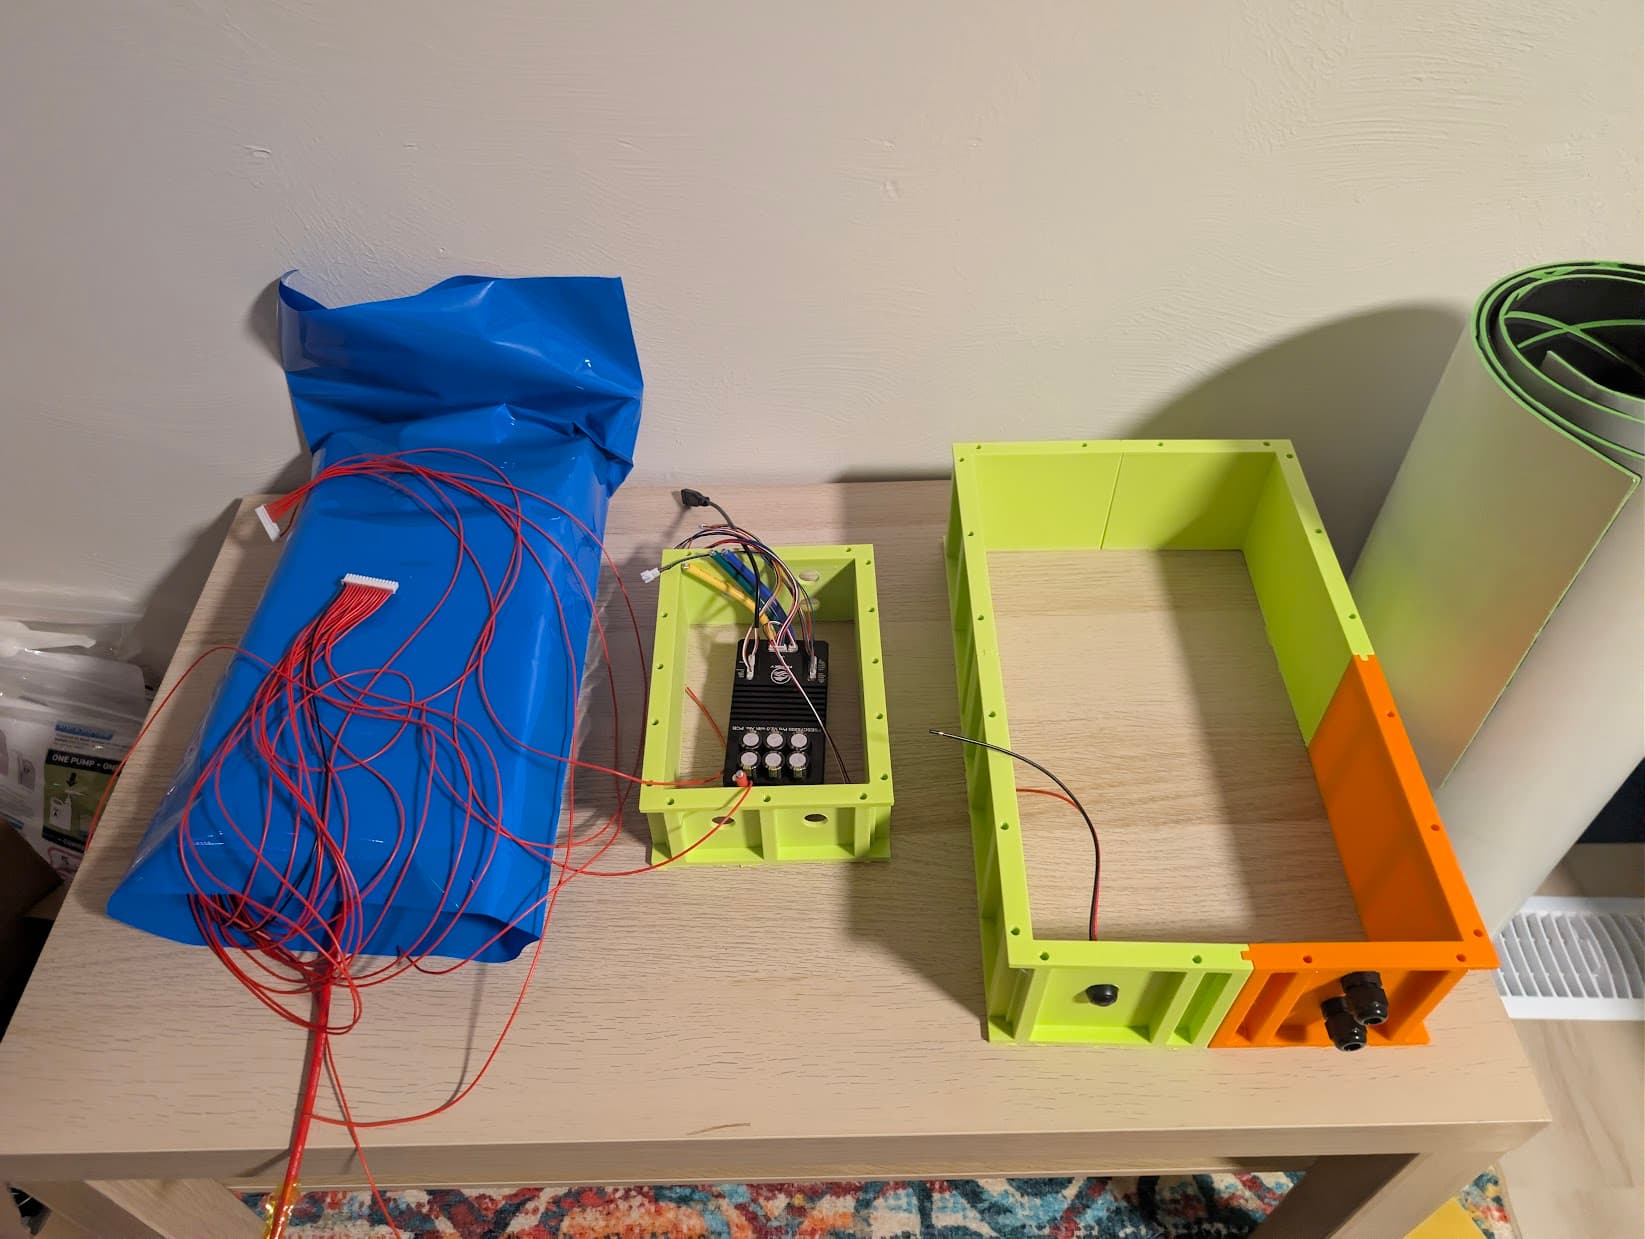
Propulsion:
- Flipsky 65161 120KV (round, threaded shaft — chose threaded for community prop STL compatibility)
- Flipsky 75200 Pro V2.0 ESC with built-in power button (aluminum PCB)
- Flipsky VX3 Pro remote + wireless receiver module
Foil:
- Gong Allvator V2 complete setup, pieced together from Bons Plans:
- Alu Mast V2 85cm
- Top Plate Alu V2
- Mast Fuselage Connector V2
- Pro Alu Fuselage V2 (Regular)
- Front Wing X-Over V2 XL (~1300cm²)
- Stab X-Over V2 48cm
- Complete Screw Kit Alu Foil V2
Battery:
- 14S9P using BAK N21700CG-50 cells (5000mAh, 15A continuous)
- 126 cells, 45Ah, ~2,331 Wh
- P-group layout: 1×9 rows (9 cells side by side, single nickel strip top and bottom — trivial to weld)
- 14 P-groups stacked in series, zigzag serpentine pattern
- Pack dimensions: ~200mm × 305mm × 90mm (8" × 12" × 3.5")
- Connection: 0.2mm × 8mm pure nickel strip spot welded for parallel, nickel strip + 8AWG bus wire for series (redundant path for 80-100A takeoff demands)
- JK BMS BD6A20S10P 100A with 0.6A active balance — charge only, bypass on discharge
- 100A ANL fuse between battery and ESC
- XT90H main disconnect
- 58.8V 5A charger (~9 hour charge time)
Estimated current demands:
- Cruising: 15-25A battery current
- Takeoff: 50-70A (~10 seconds)
- Full throttle: 80-100A
- Per cell at takeoff: ~8-11A (well under 15A rating)
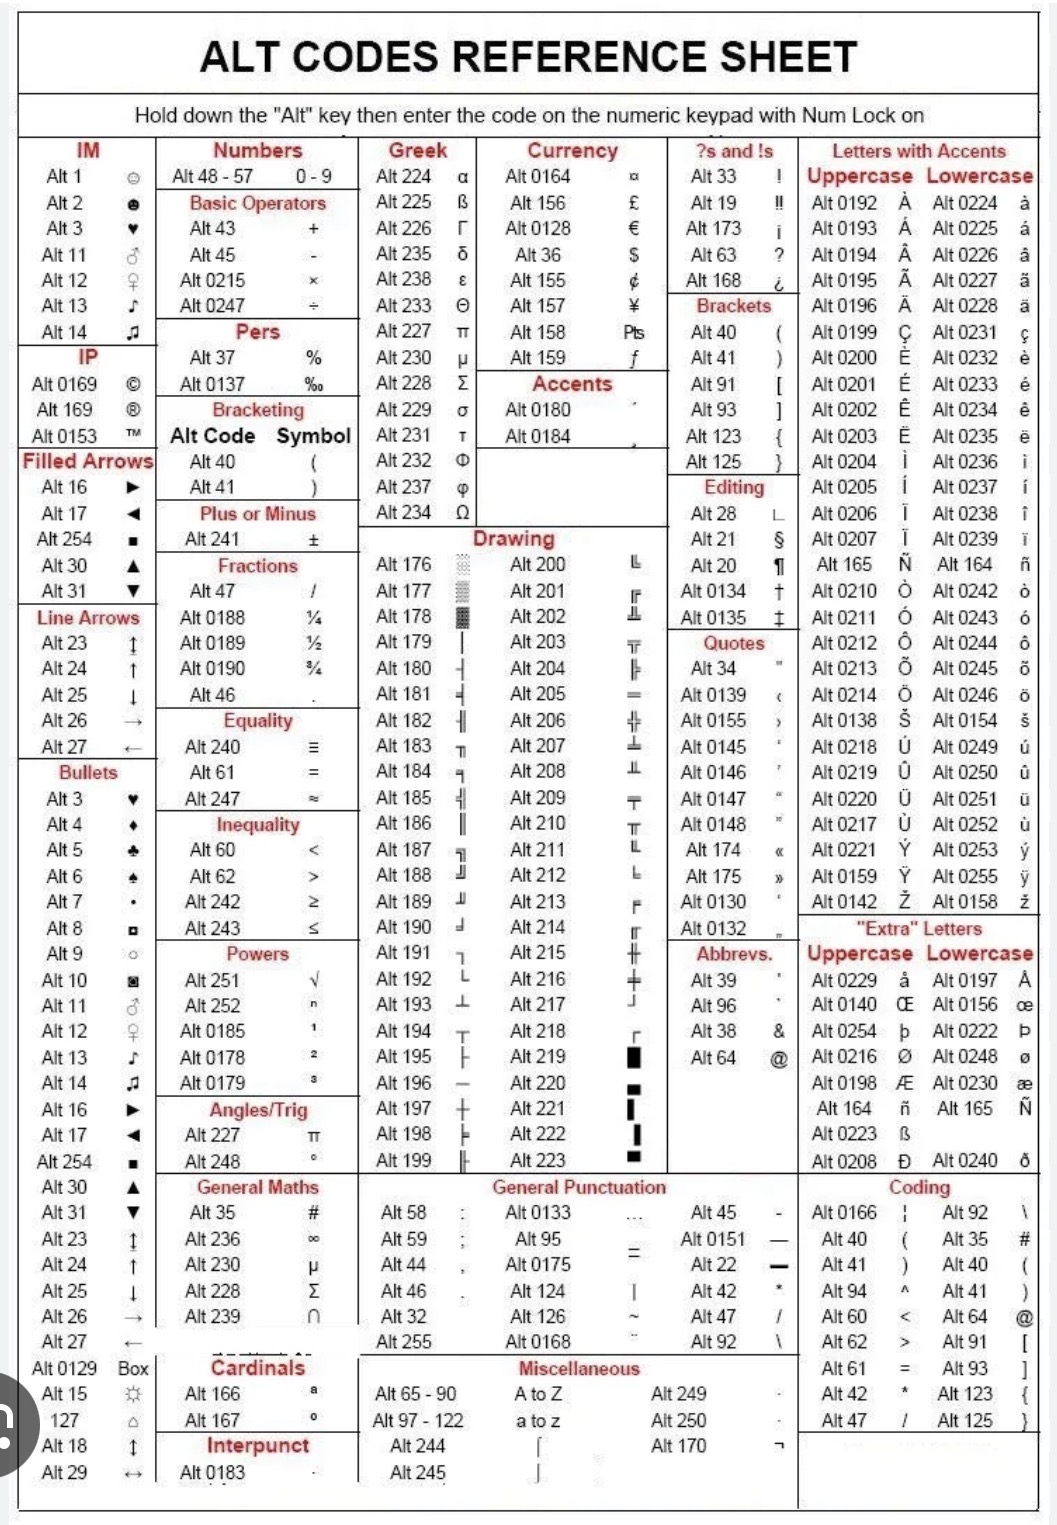
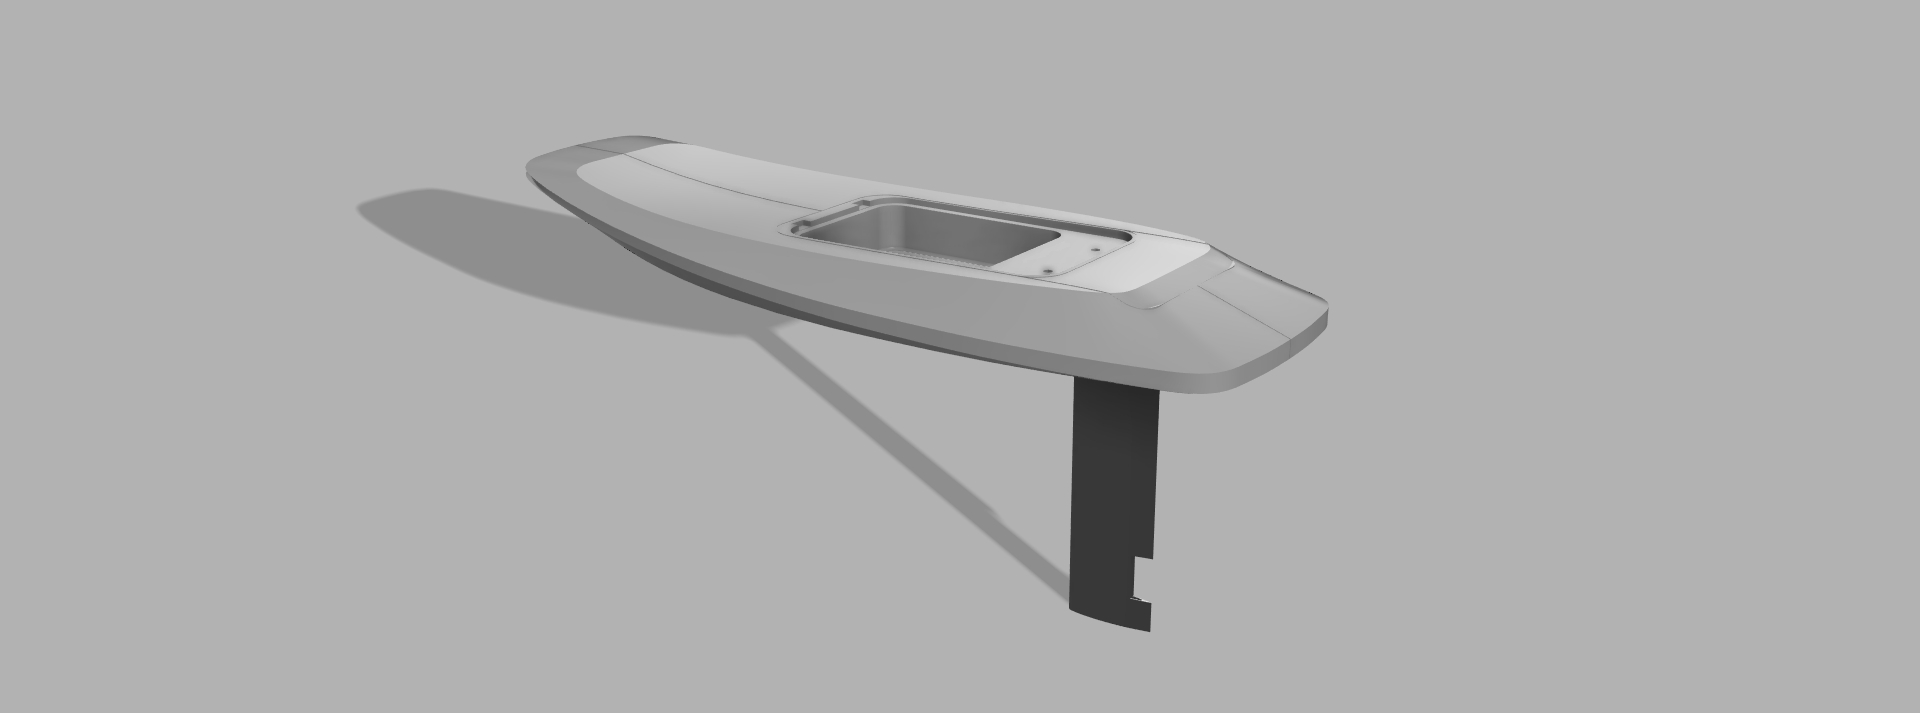
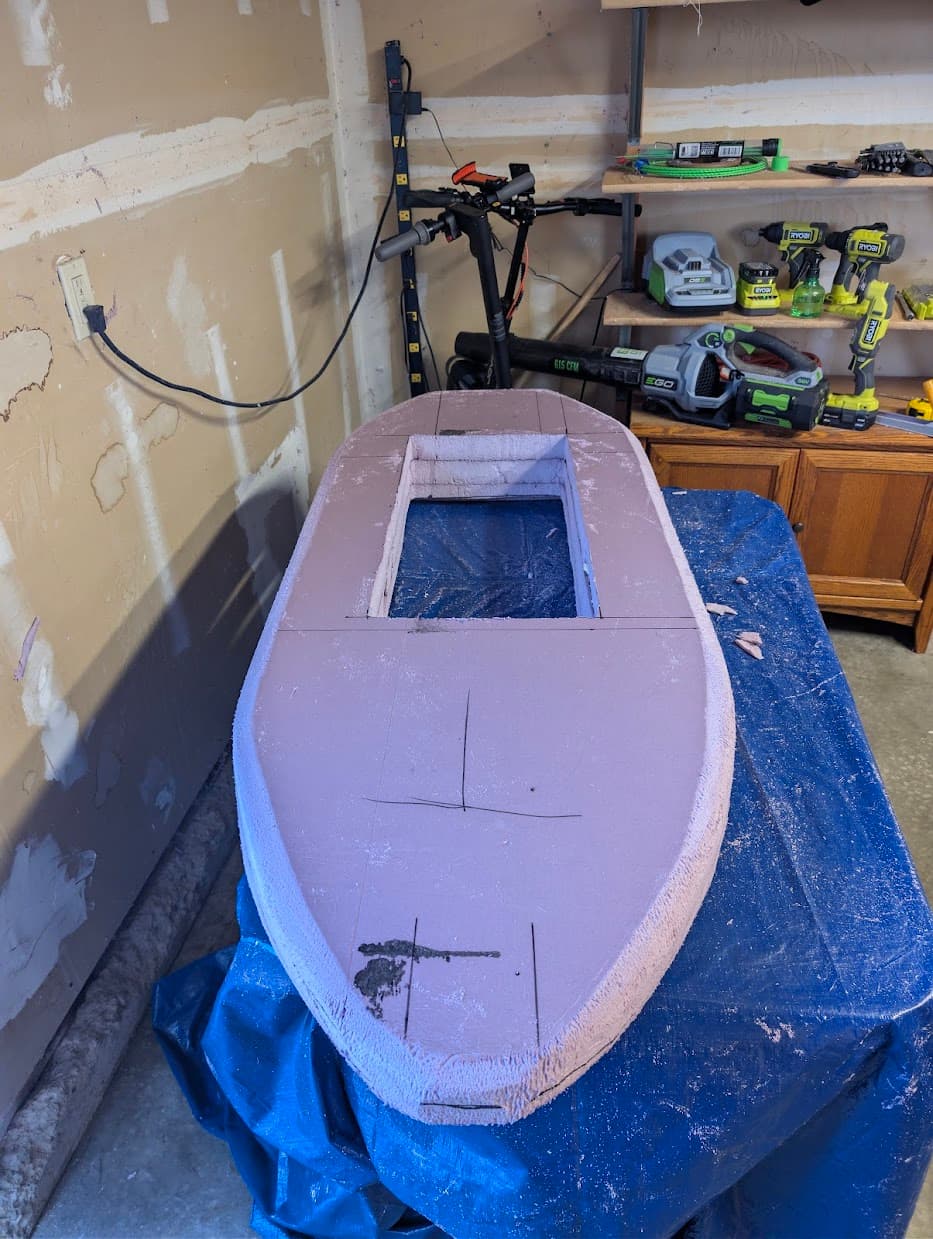
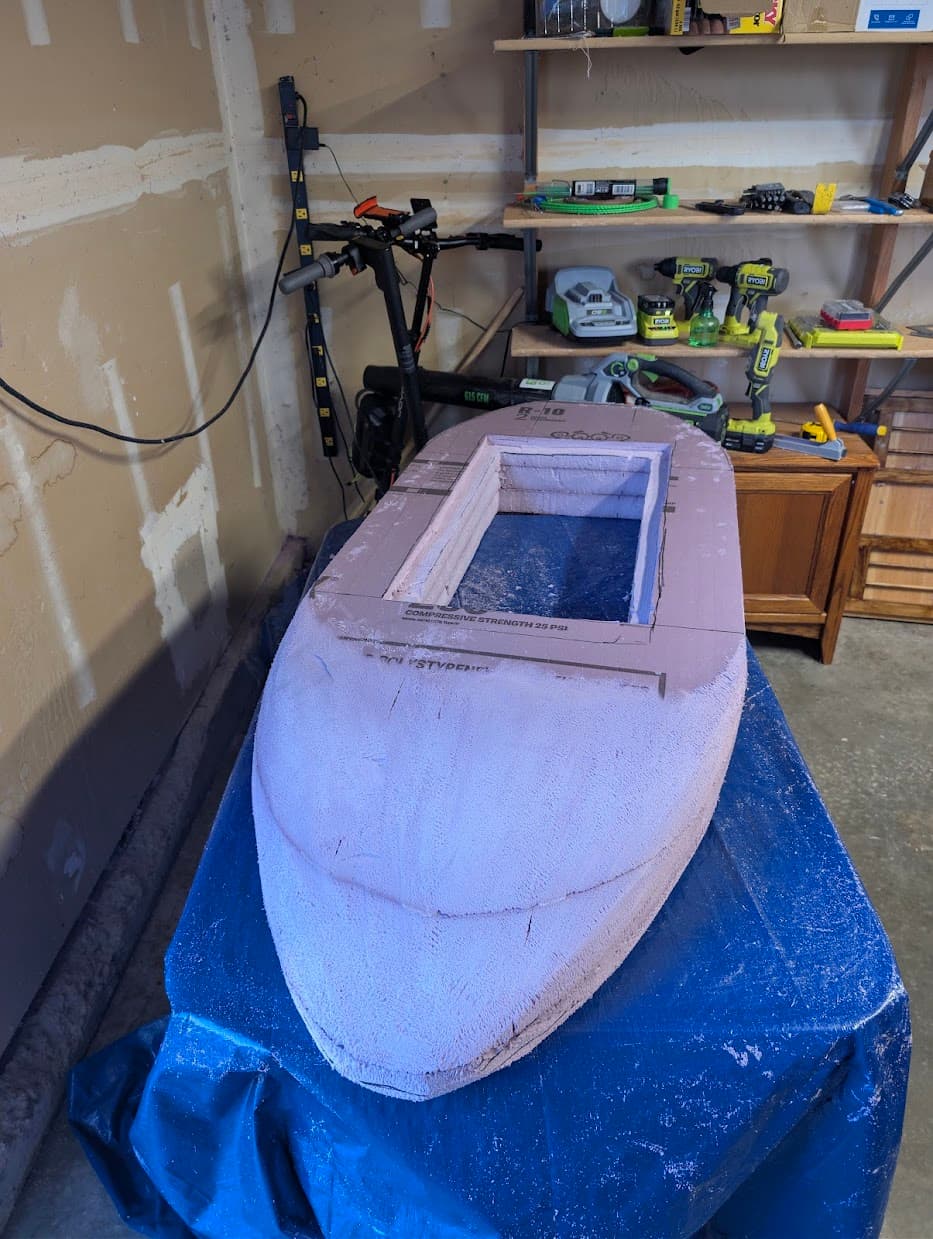
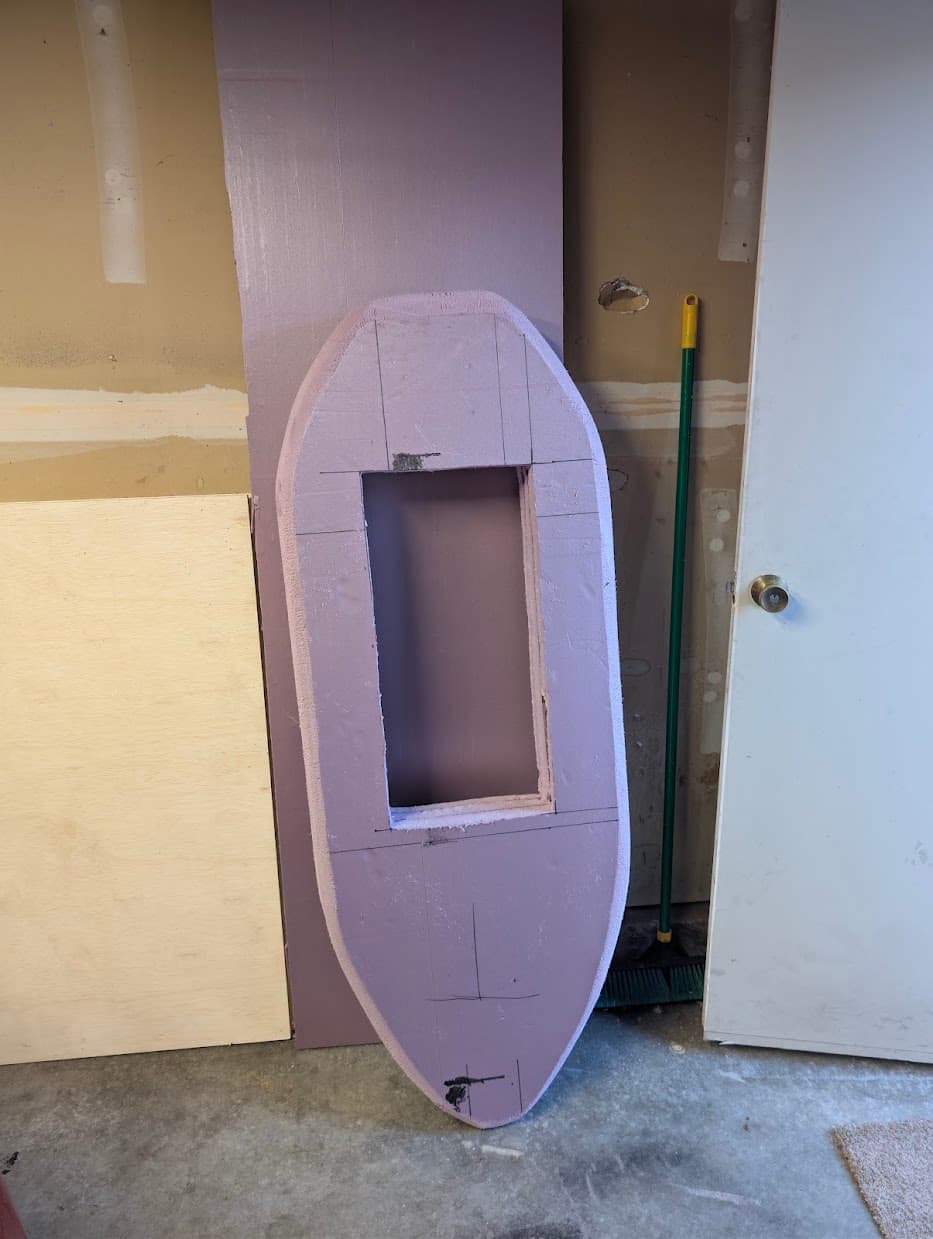
Board Design
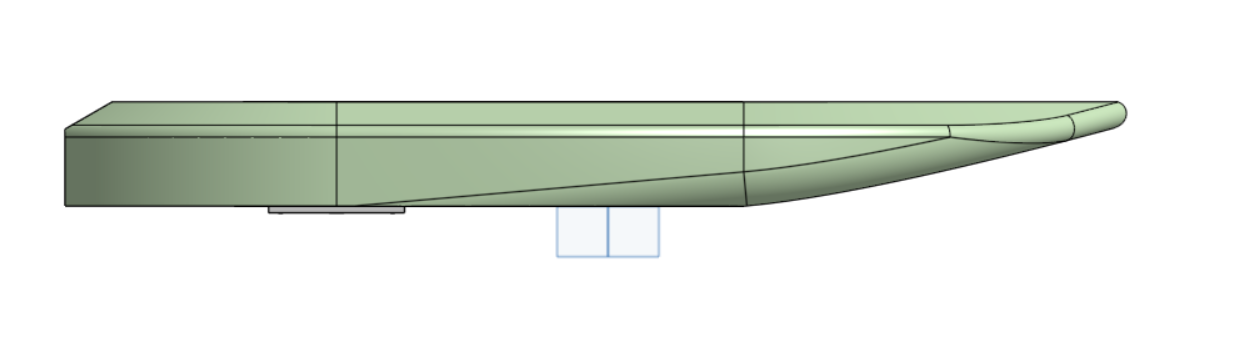
Dimensions: 1524mm × 650mm × 120mm (60" × 25.5" × 4.7"), ~95 liters
Shape: Blunt rounded nose (R~200mm), nearly parallel sides, squared tail (R~100mm), soft rounded rails. Minimal rocker — just 10-15mm nose kick over the front 300mm, flat from there to tail. Slight deck crown 5-10mm.
Construction: 3-layer XPS foam (Kingspan 2" sheets from Lowe’s), all internal cuts done on flat sheets with hand tools before gluing layers together with Gorilla Glue. Outline cut from a cardboard half-template for symmetry, rails shaped with surform rasp + orbital sander.
Fiberglass: 4-5 layers of 6oz (280 g/m²) each side, wet layup by hand. Extra 2-3 layers on hatch flanges with thickened epoxy corner fillets. All internal cavity surfaces fiberglassed for waterproofing. TotalBoat 5:1 epoxy with slow hardener.
Finishing: Lime green (Rust-Oleum Painter’s Touch 2X Gloss Key Lime) with black/green diamond EVA deck pad covering the full deck.
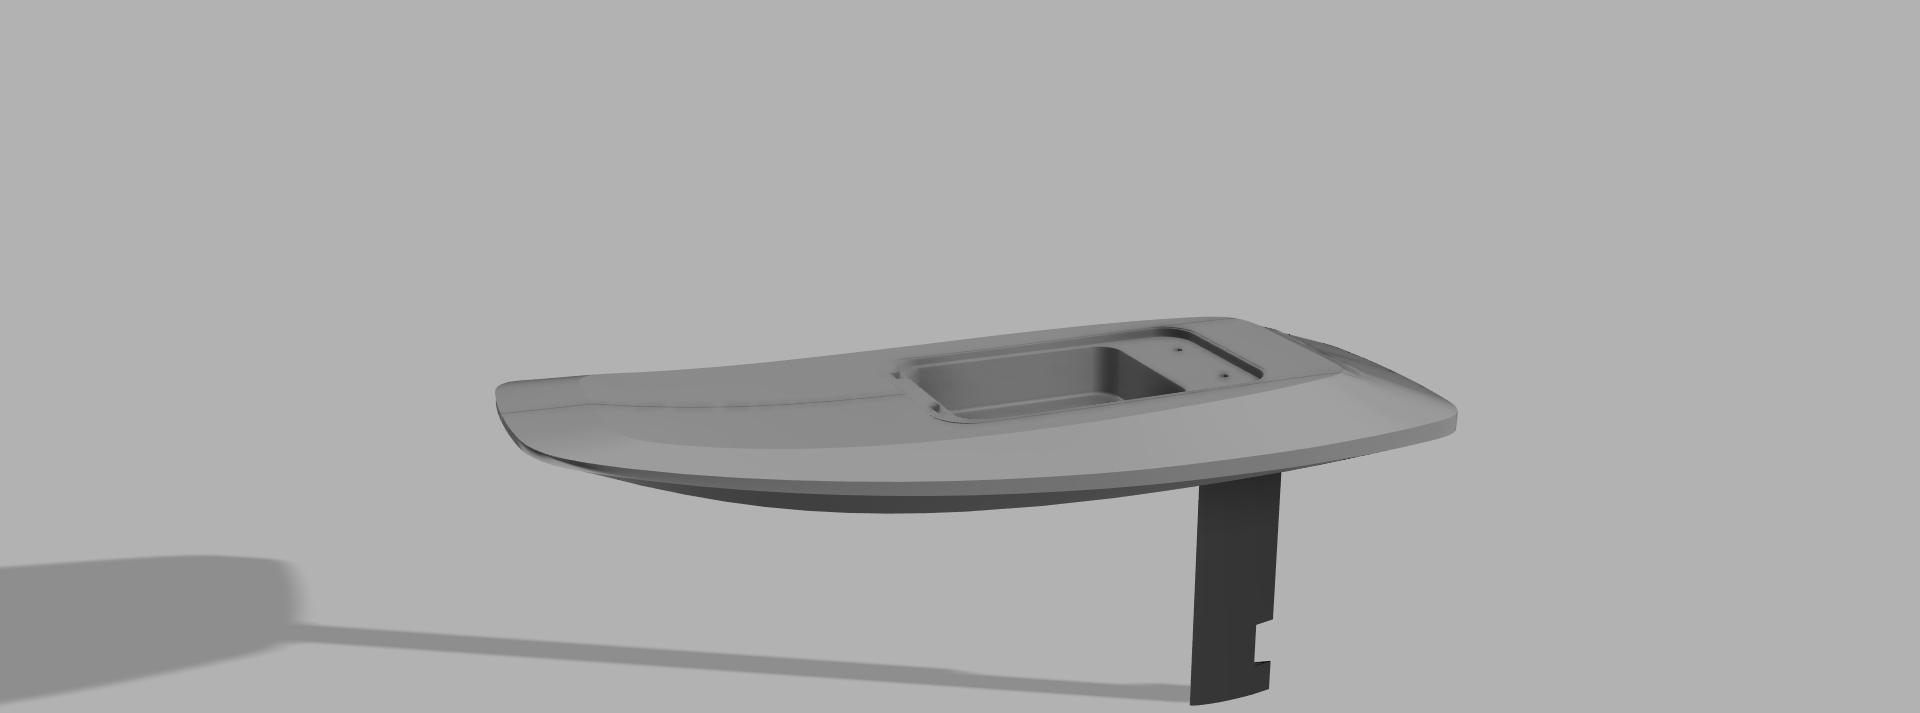
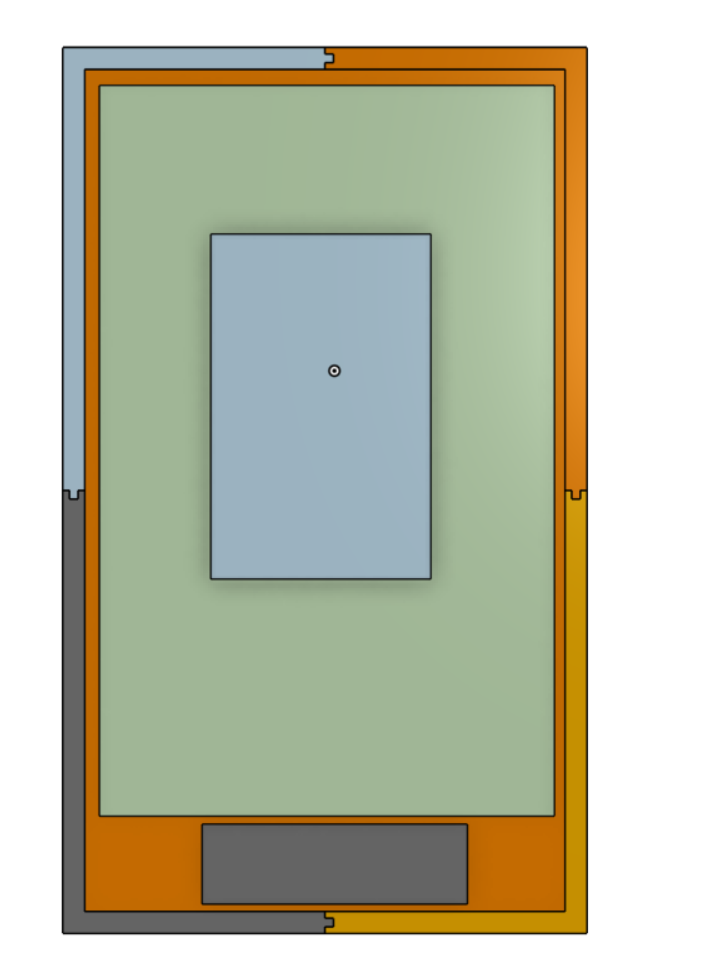
Internal Layout (all dimensions from tail)
TAIL ←————————————————————————————————→ NOSE

0"    11"      19"       27"            43"         60"
|      |        |         |              |           |
| Tail | Mast   | Service | Battery/ESC  |   Nose    |
|      | Zone   | Cavity  | Cavity       |           |
|solid | plywood| 8" port | 16"x10"x3.7"| solid     |
|      | deck   | Cnlinko | birch ply    | foam      |
|      | to     | power   | hatch lid    |           |
|      | hull   | charger | EPDM seal    |           |
|      | solid  | button  | M6 bolts     |           |
Mast Hardpoint
This is the area I’ve thought about the most, based on the excellent advice in the “board construction tips and learning from failures” thread.
- 1/4" birch plywood recessed into bottom of Layer 1, flush with hull surface
- ~8" × 12" footprint, larger than Gong V2 top plate
- M6 stainless steel flanged threaded inserts (E-Z LOK) epoxied into plywood from below
- Foam remains solid above plywood — full deck-to-hull structural connection maintained (no cavity above mast zone)
- During fiberglass layup: bolts threaded into inserts with wax on heads to prevent epoxy from filling threads
- After cure: unscrew bolts, drill through thin fiberglass to expose clean threads
Wire Routing
- Gong V2 mast is hollow — rubber plugs pop out for wire access
- Drilling a wire pass-through hole in the Gong V2 top plate, aligned with a matching hole in the plywood hardpoint
- 3/4" split wire loom tubing embedded in foam channels from mast wire exit to service cavity — allows future cable removal/replacement without cutting the board open
- Phase wires route: ESC → main cavity → loom → service cavity → Cnlinko LP-20 3-pin disconnect → loom → plywood wire hole → top plate → hollow mast → motor
- Enough slack in the service cavity to fold the mast flat against the board for transport (Prius life) without disconnecting cables
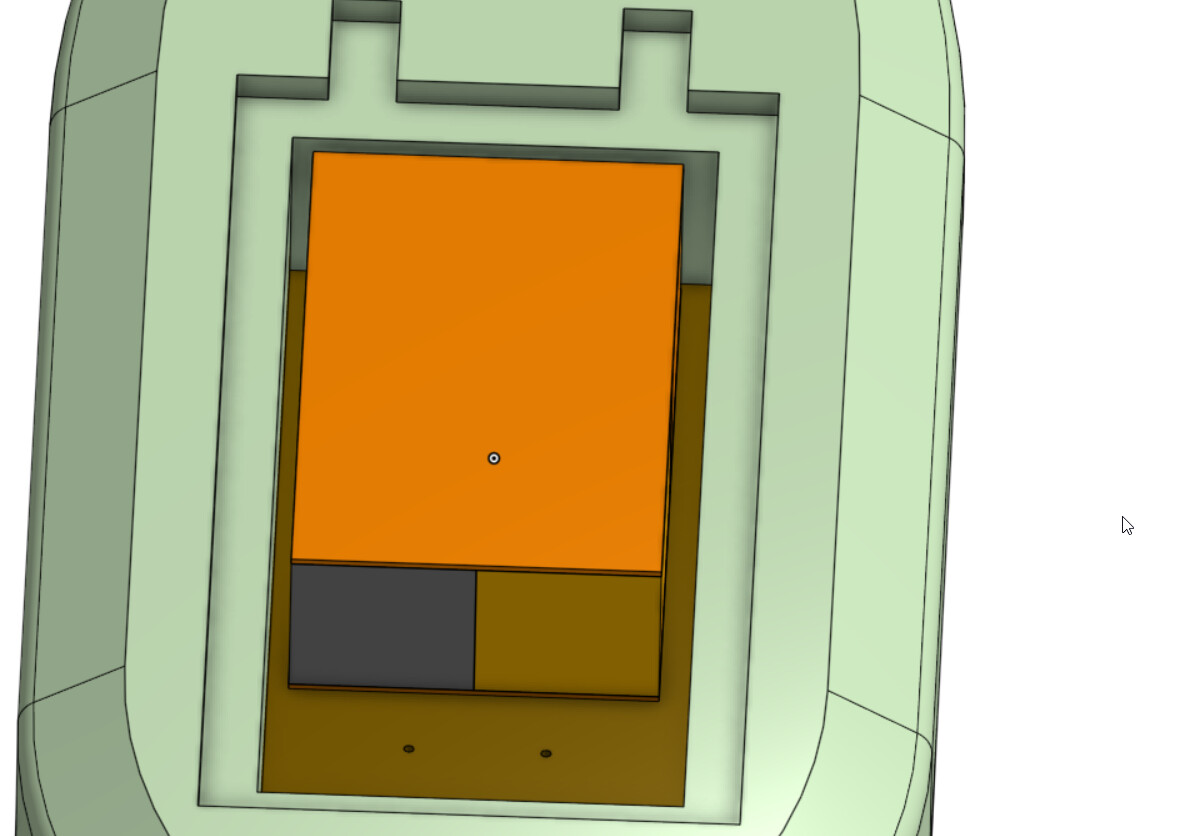
Service Hatch (Daily Access — 8" Smartmarine Round Port)
Everything I need for a session is accessed through this single hatch:
- Cnlinko LP-20 3-pin: motor phase wire quick disconnect
- Cnlinko LP-20 2-pin: charging port
- 75200 Pro V2 power button
- Phase wire slack loop
- Water alarm sensor
Pre-ride: Twist open → click phase connector → press power → twist closed → stick magnet to deck → attach leash → ride
Post-ride: Twist open → power off → unplug phase connector → plug in charger → leave open for ventilation
Main Hatch (Rarely Opened — Bolted Plywood/Fiberglass Lid)
The hatch lid uses a rabbet/ledge system across the top two foam layers:
- Layer 3 cutout: 18" × 12" (wider), cut only ~0.5" deep as a shallow rabbet
- Layer 2 cutout: 16" × 10" (narrower), cut all the way through — creates 1" ledge all around
- Lid: 1/4" birch plywood core wrapped in 2 layers fiberglass each side (~8-9mm total)
- Lid drops into the Layer 3 rabbet and rests on the Layer 2 ledge, flush with the deck surface
- EPDM D-section seal (Frost King) stuck to underside of lid, compresses against the fiberglassed ledge
- E-Z LOK M6 brass knife inserts epoxied into fiberglass flange around cavity
- M6×20mm stainless countersunk bolts flush with deck
- Contains: battery pack (12"×8"), ESC (5.1"×2.7"), BMS, fuse, XT90, all main wiring
- Only opened for maintenance or if water alarm triggers
Kill Switch
- Reed switch (normally open, 1.8×10mm) embedded in deck foam near rear foot (~20" from tail), fiberglassed over (invisible)
- Steel disc (~30-40mm) embedded above reed switch as magnet target, also fiberglassed over
- Neodymium disc magnet (20×3mm) on ankle leash sticks to steel disc on deck surface
- Fall off → magnet pulls away → reed switch opens → VX3 receiver loses 5V power → ESC signal timeout → motor stops
- Chose this method over ADC2/hall effect approach based on the “cutting ESC power under load” thread — avoids VESC stuttering and cruise control restart issues
Water Alarm
- XH-M131 module powered from main battery via BMS (always on, ~1-2mA draw — negligible)
- Sensor probes mounted at lowest point of main cavity
- No separate battery to go dead — always monitoring as long as pack has charge
- Buzzes loud enough to hear through the sealed board
ESC Cooling
No water cooling, no aluminum base plate. The 75200 Pro V2 with aluminum PCB runs at ~25°C reported by other builders on this forum — barely above ambient. At 14S pulling 80-100A max (50% of the ESC’s rated capacity), the aluminum substrate handles heat dissipation on its own. ESC mounted with aluminum side facing down toward the hull for passive thermal transfer toward the water.
Propeller
Planning to 3D print V_S 2-blade props on my Bambu Lab A1 Combo:
- PETG, 100% infill, 0.12mm layer height
- 140-155mm diameter, medium pitch, 12mm threaded bore
- Post-processing: sand → epoxy coat → wet sand → second epoxy coat → wet sand
- Balance by hanging on bolt through center bore
- Printing 4-5 copies as spares
Motor Mount
Using the community-designed FS65161 motor mount for Gong V1/V2 masts from the forum. 3D printed PETG. Designed so motor wires don’t need to be removed from mast during assembly.
Budget Breakdown
| Component | Cost |
|---|---|
| Battery Hookup (130 cells + spot welder) | $364 |
| Flipsky (motor + ESC + remote) | $664 |
| Gong V2 foil (7 parts + screws + tariff) | $613 |
| Amazon (fiberglass, epoxy, deck pad, tools, hardware) | $549 |
| AliExpress (BMS, charger, connectors, fuse, leash, electrical misc) | $206 |
| Lowe’s + Home Depot (foam, plywood, paint, tools, workspace) | $340 |
| Total | ~$2,736 |
Expected Performance
Based on the efficiency thread and similar builds:
- Comfortable cruising: 12-15 mph at 1,000-1,500W
- Fast cruising: 15-19 mph at 2,500-3,500W
- Full throttle: 22-25 mph
- Estimated ride time: 75-90 minutes at cruising speed
- Efficiency target: ~52 Wh/km (per the 95kg rider benchmark)
Parts are all ordered and on the way. Battery Hookup cells should arrive first, then I’ll start the pack build while waiting for everything else. Build updates to follow.
Thanks for all the knowledge this community has shared. Couldn’t have gotten this far without it.
— Derek, Boise ID