First build using Flipsky 6384 140kv waterproof motor, Flipsky ESC 75200 200A, Flipsky VX3 PRO wireless remote. After reading posts on this site for endless hours I finally decided to throw my hat in the ring and give it a crack. I will eventually provide a full component list coupled with pictures and details of the build to give back to the community.
I sourced most the components via AliExpress, except the bus bars that I had made custom from WELLGO through Alibaba, and the prop through Foil Drive.
Component list:(all cost is AUD)
Main components:
Flipsky 6384 140kv waterproof motor $224.99
Flipsky ESC 75200 200A $239.99
Flipsky VX3 PRO wireless remote $181.99
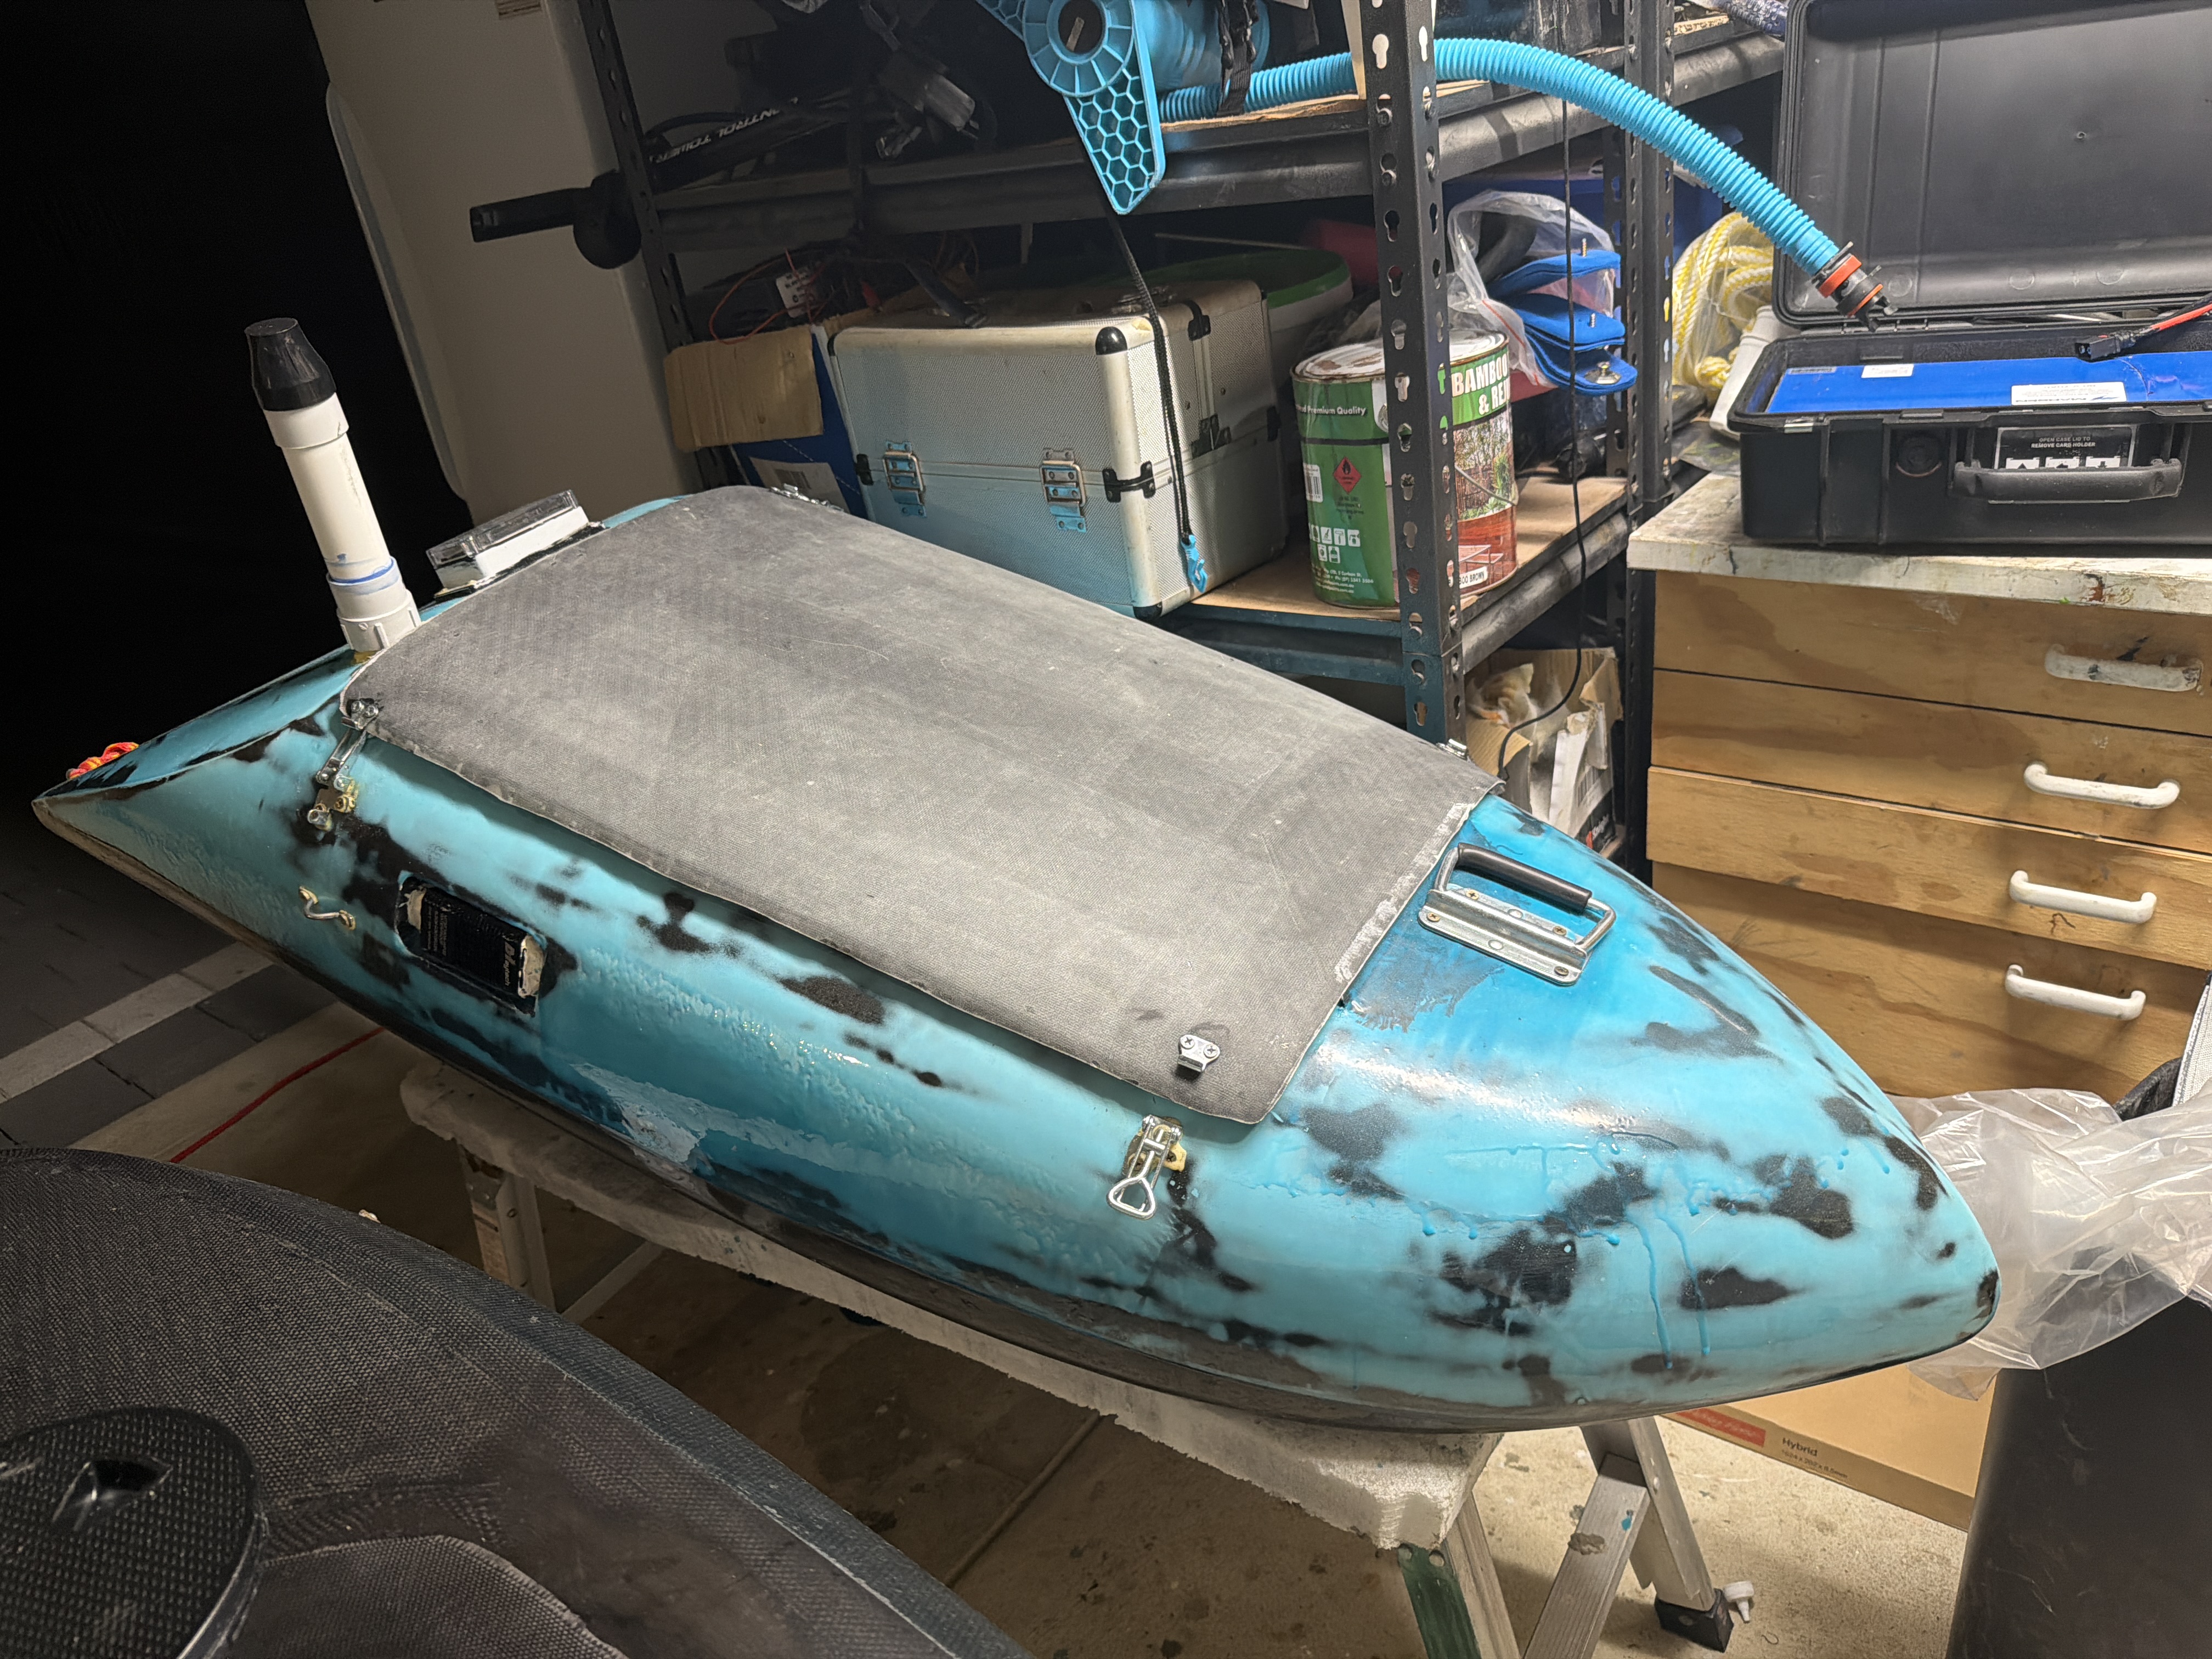
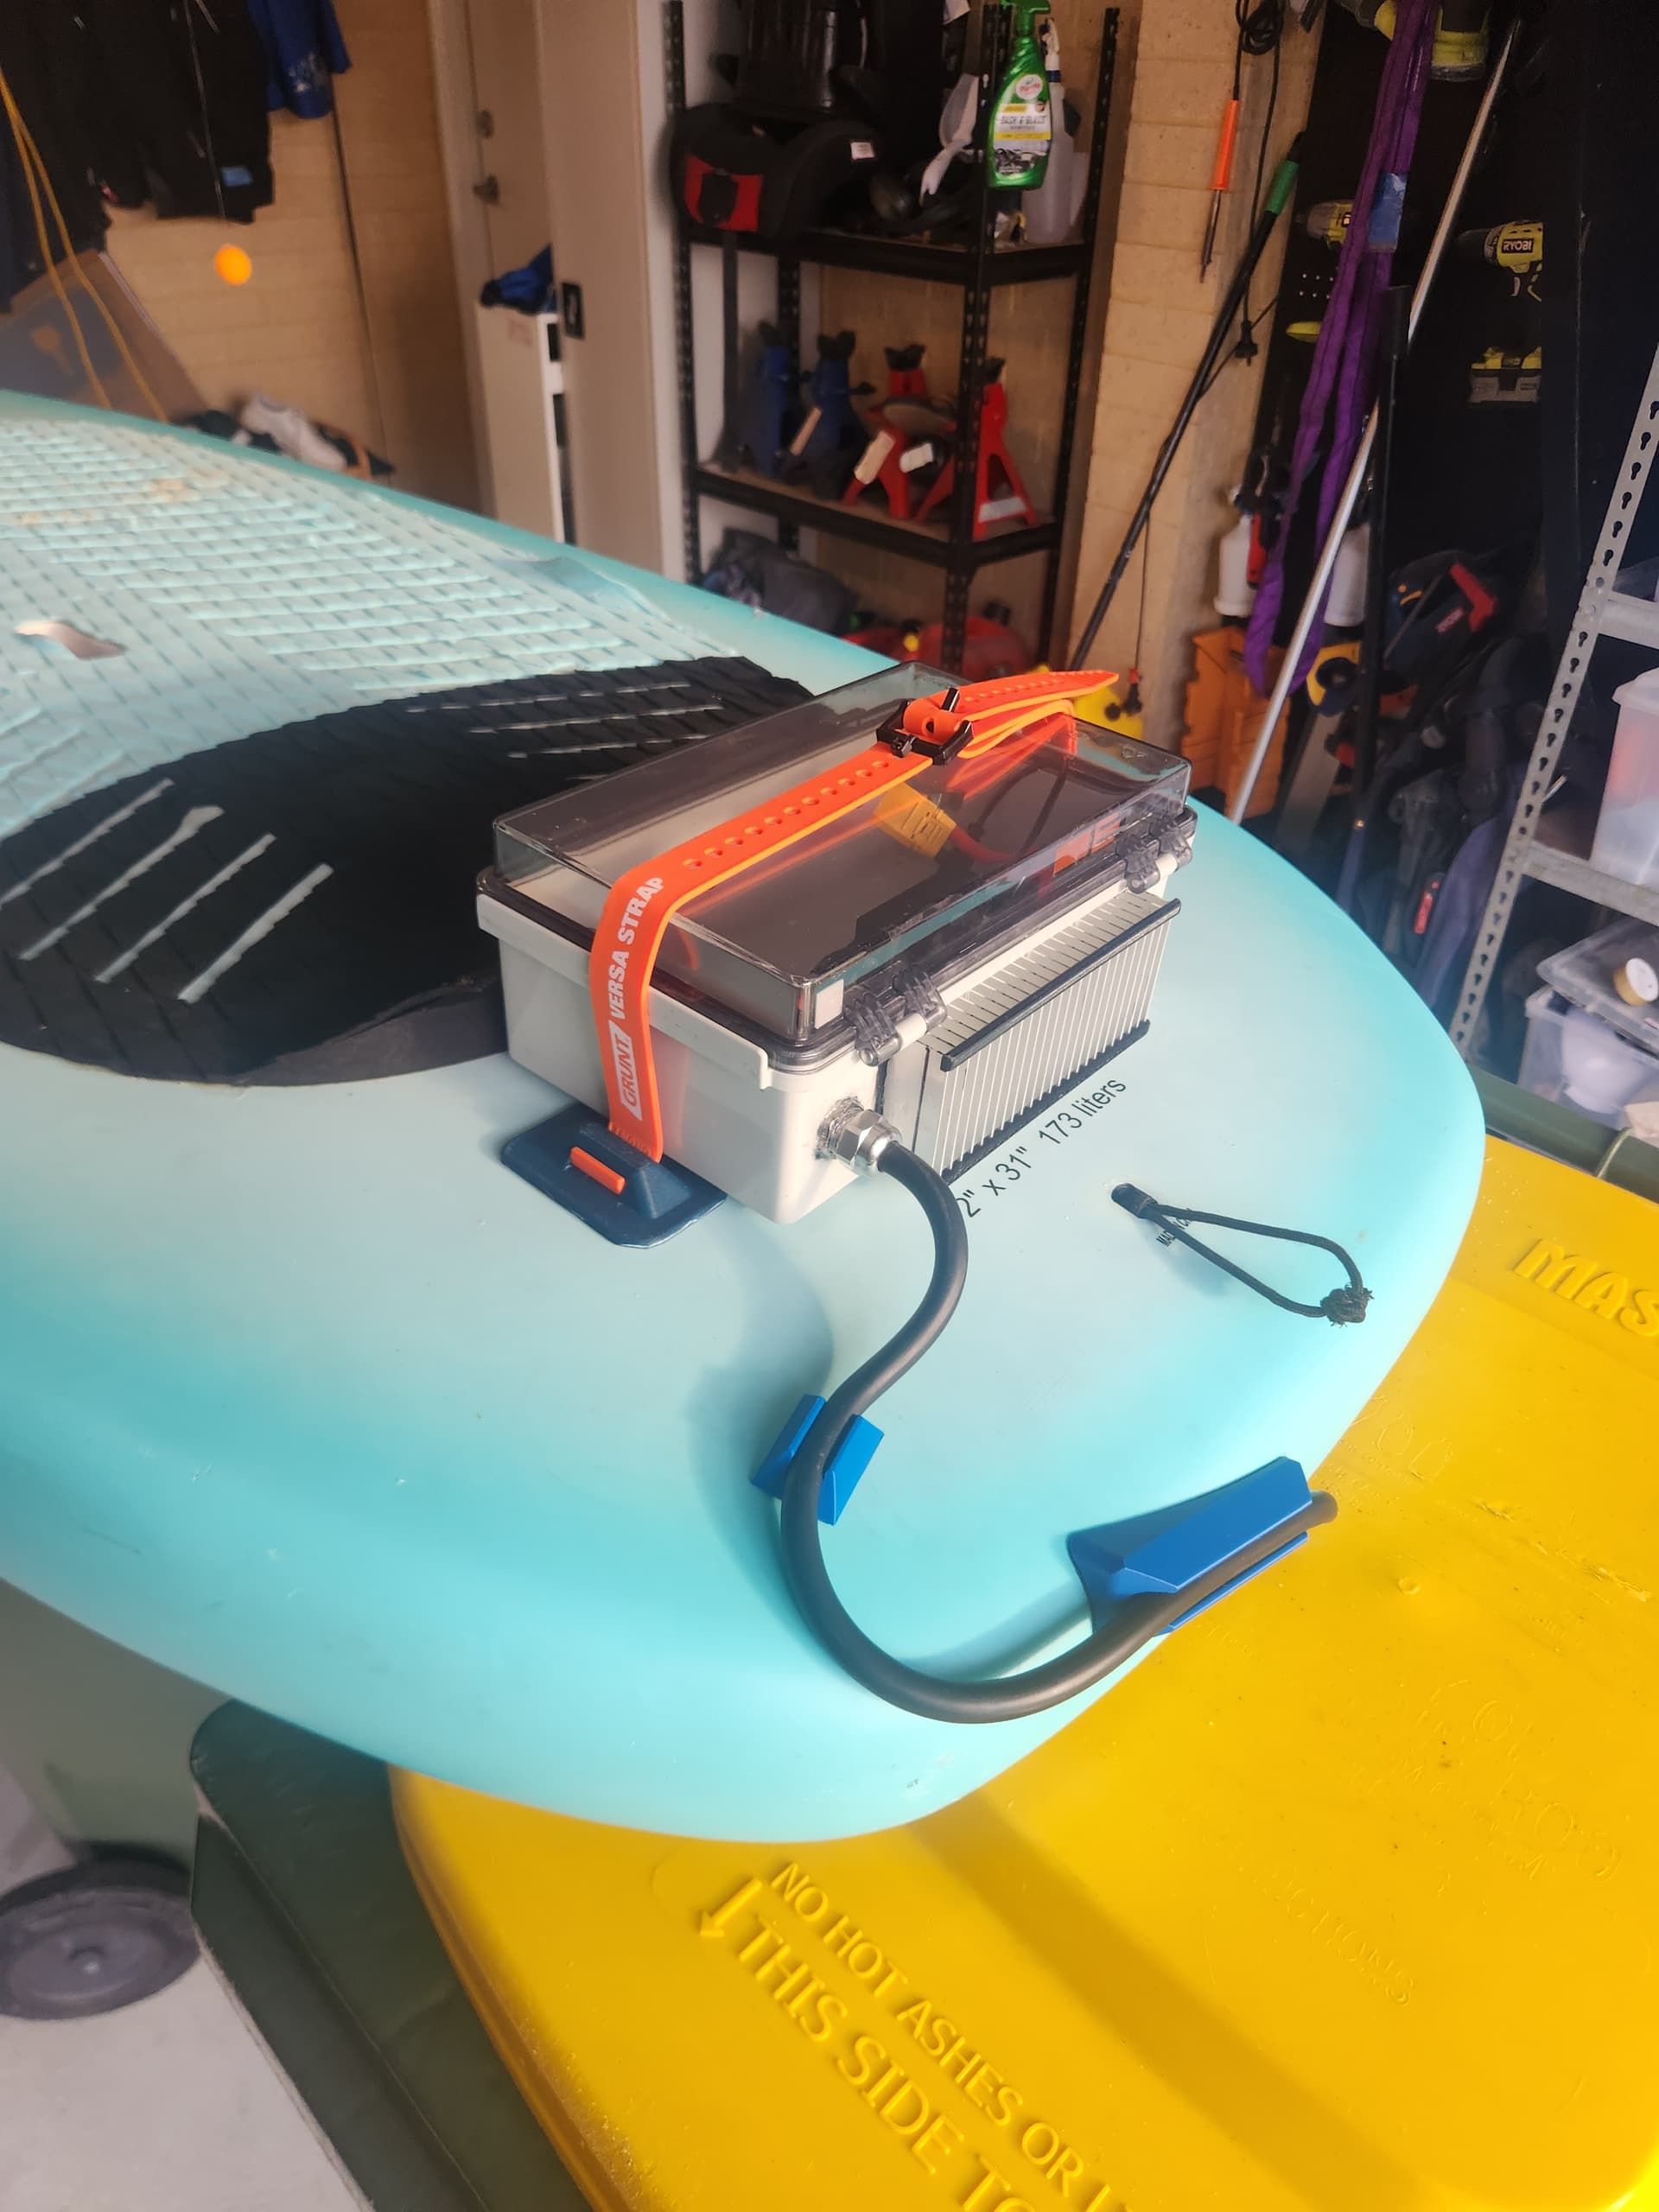
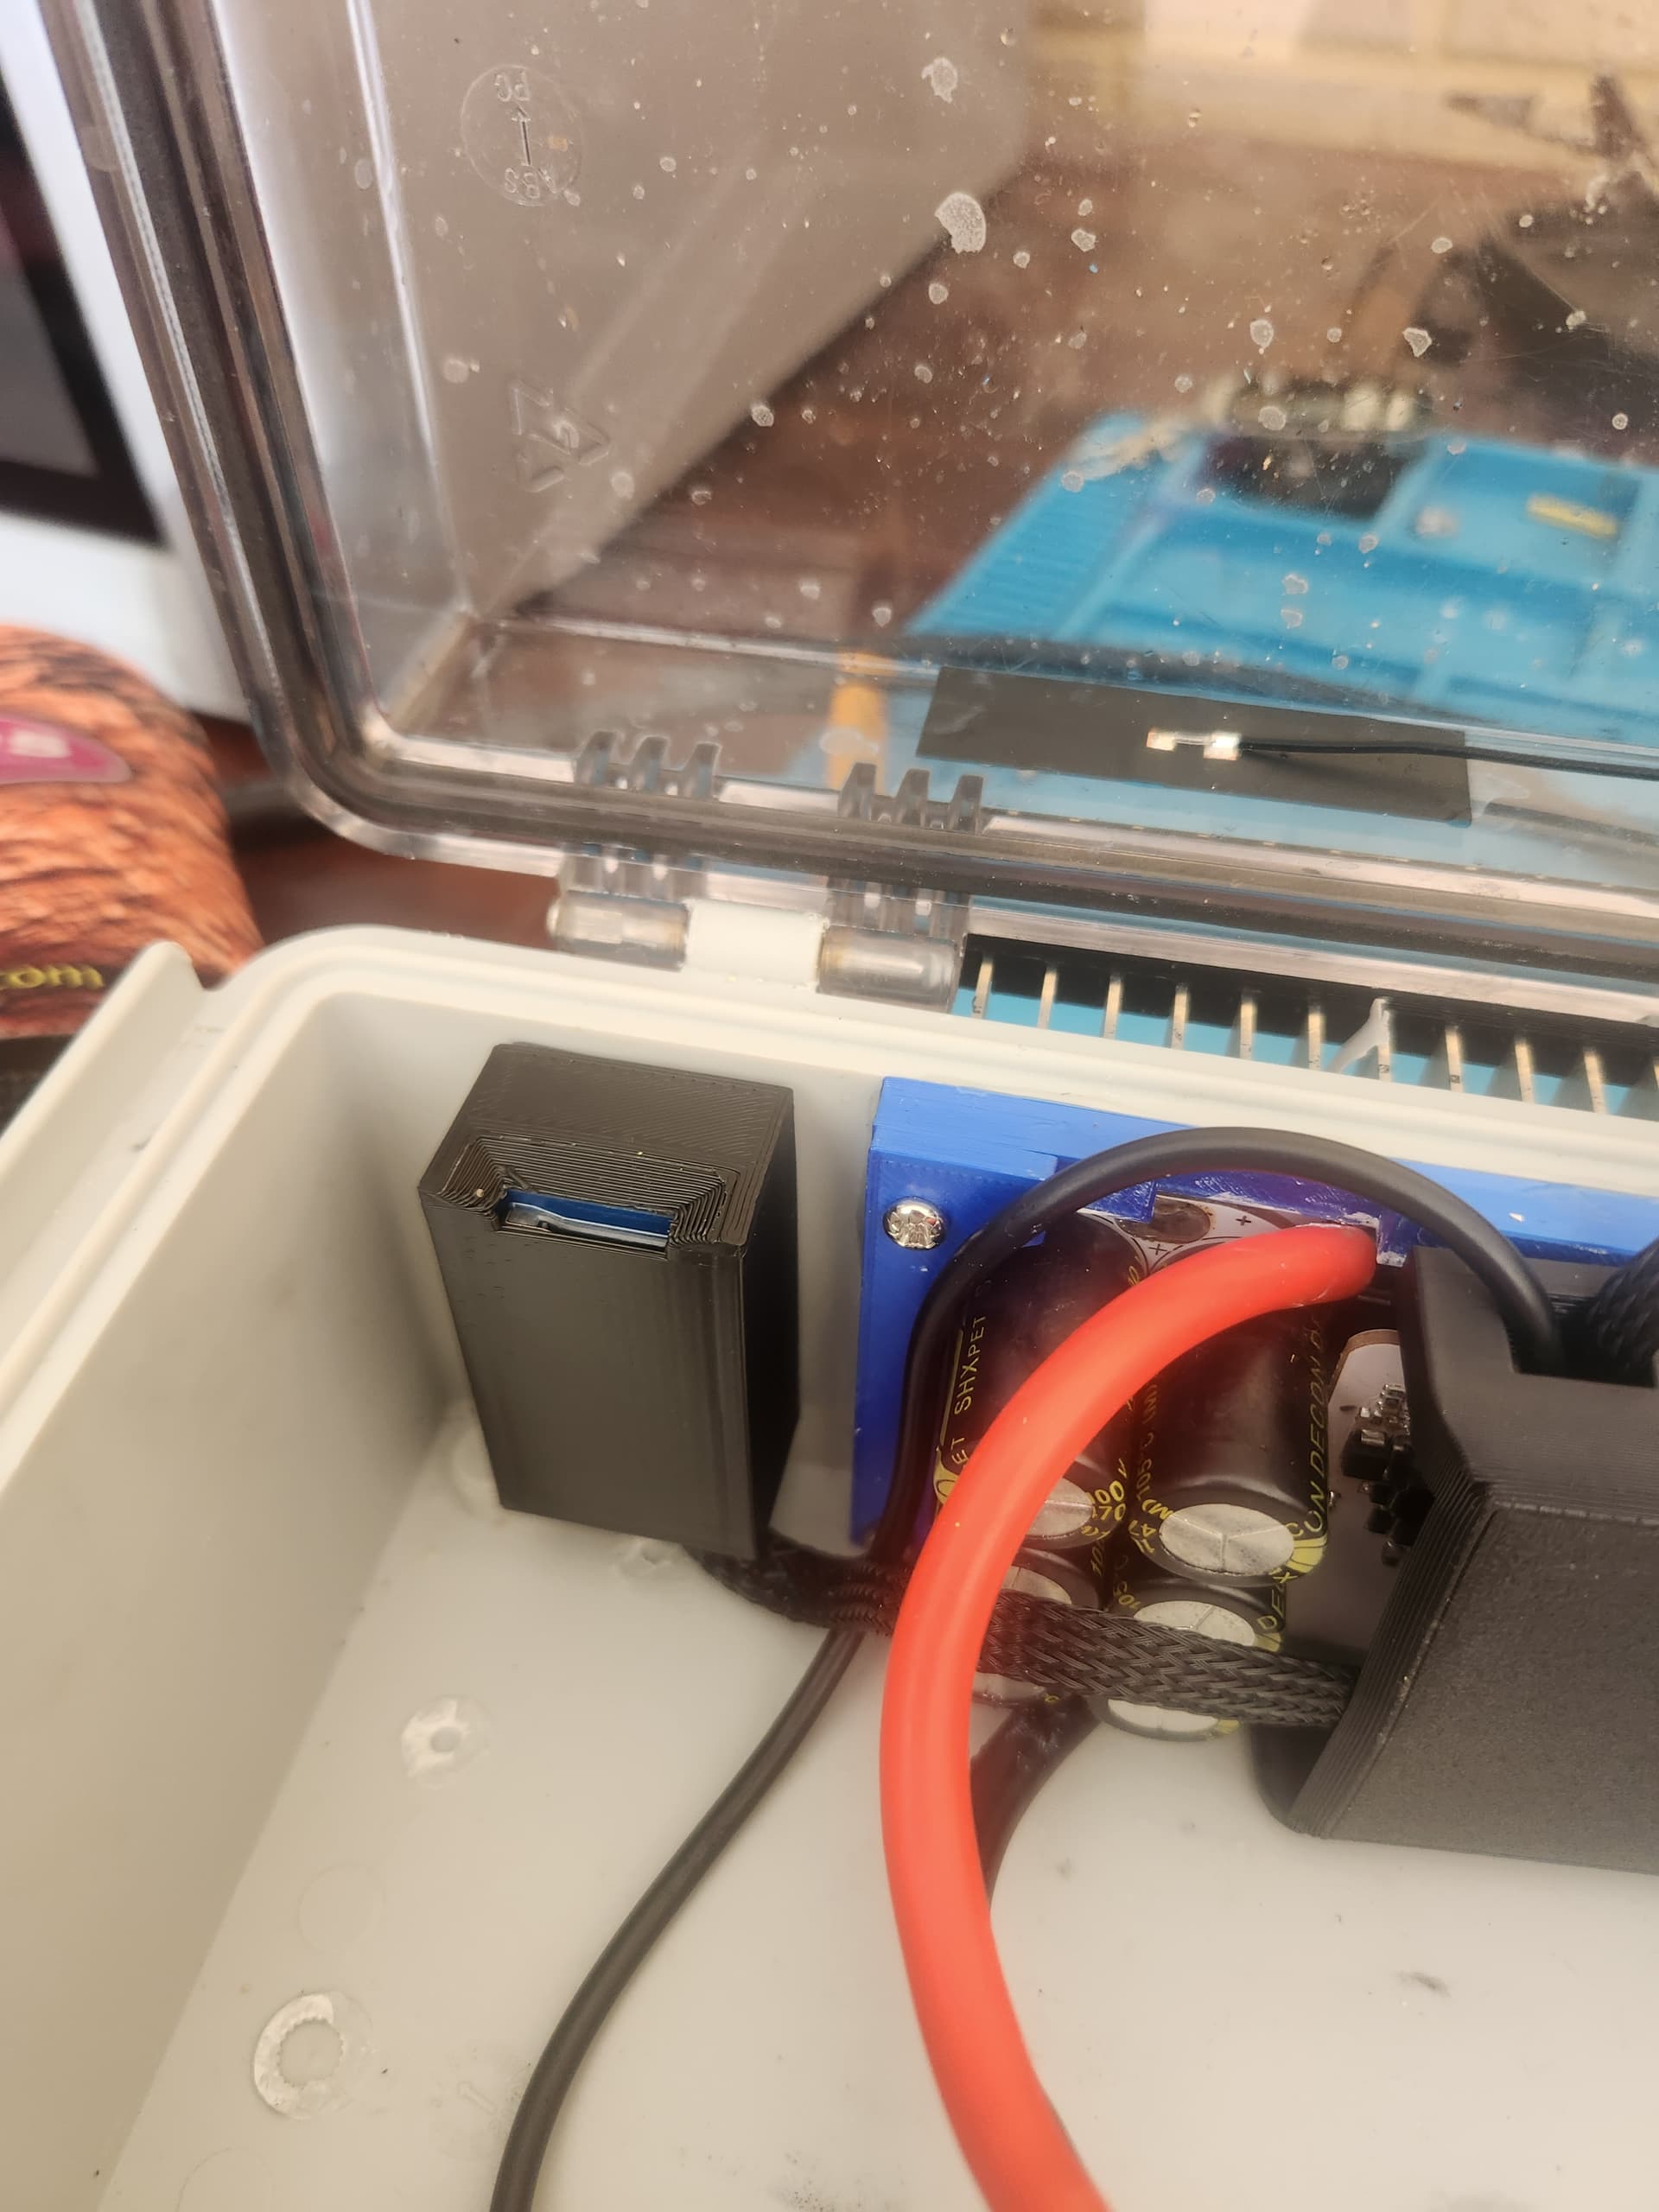
IP67 Waterproof grey 260 x 160 x 100 $47.99
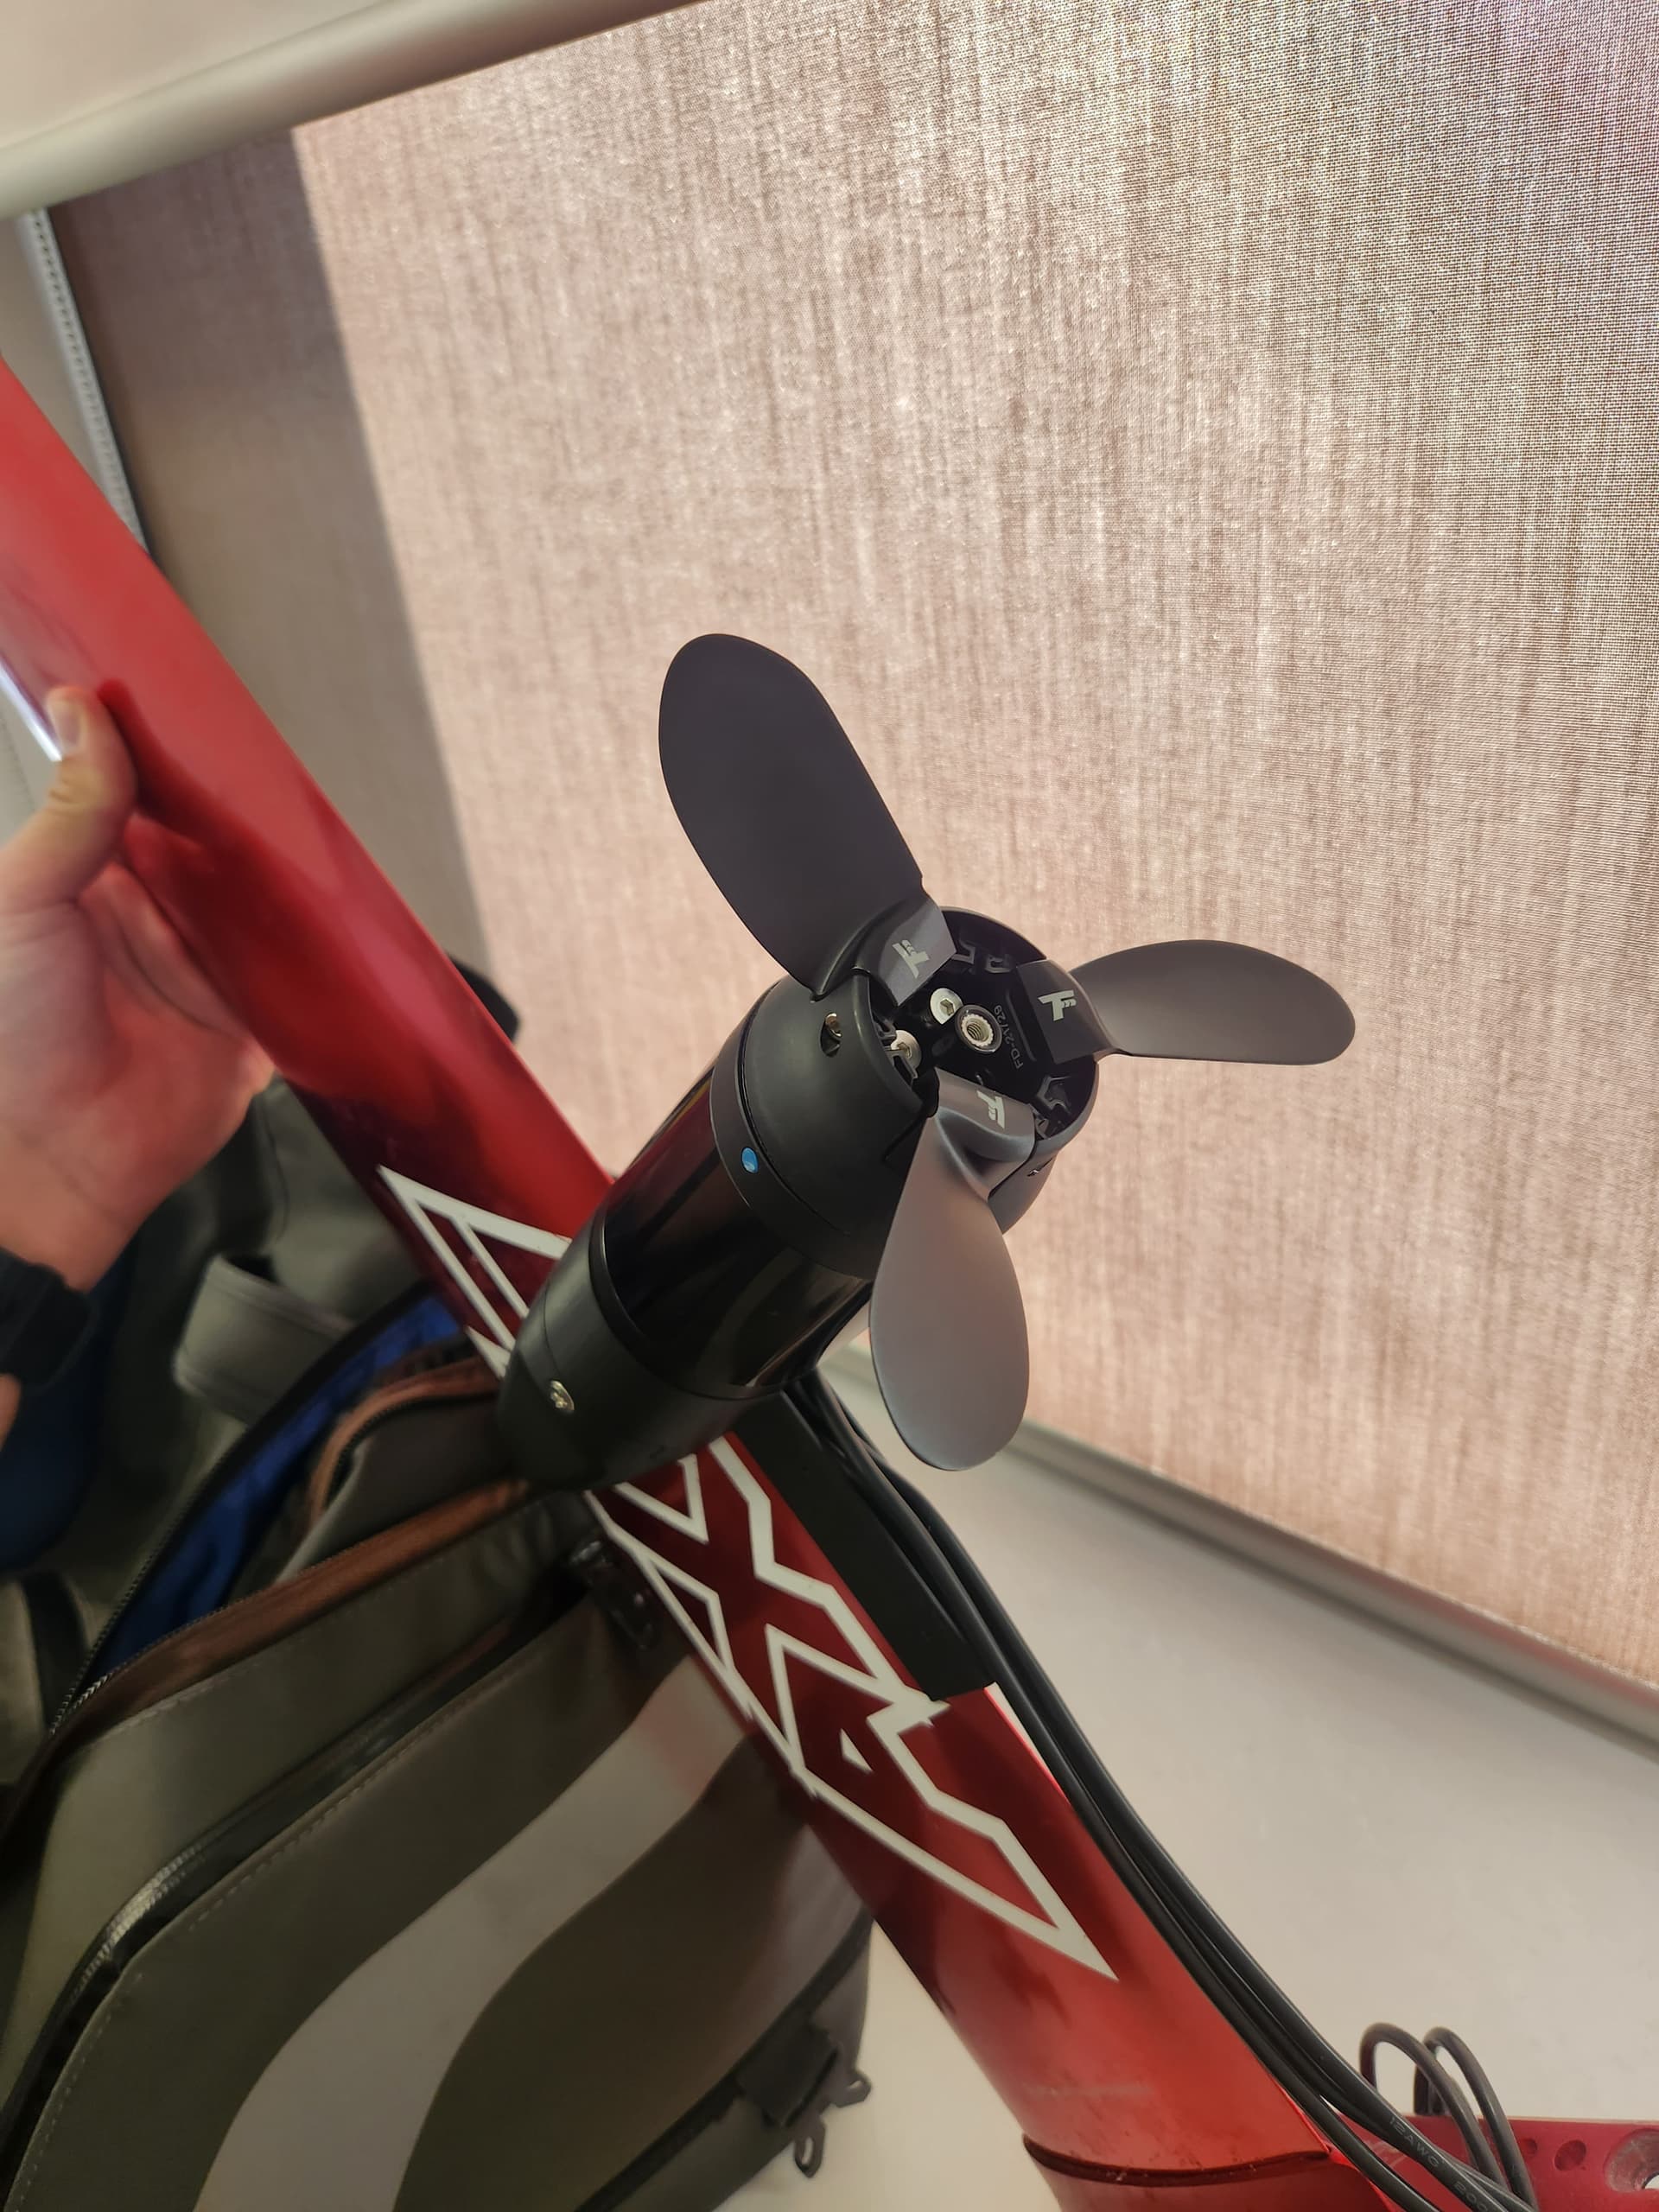
Foil Drive Three Blade Propeller Hub Set $440
3 Core x 4mm Power Flex RVK cable 3M $19.62
TJA1050 Can controller interface $4.72
Micro SD Mini TF card reader module SPI $3.96
Alluminium Heat sink 60 x 150 x 25 $30
SD card 1TB $8.88
ESP32-C3 OLED development board $6.89
Total: $2009.03
Battery:
Fly paper (roll) $5.93
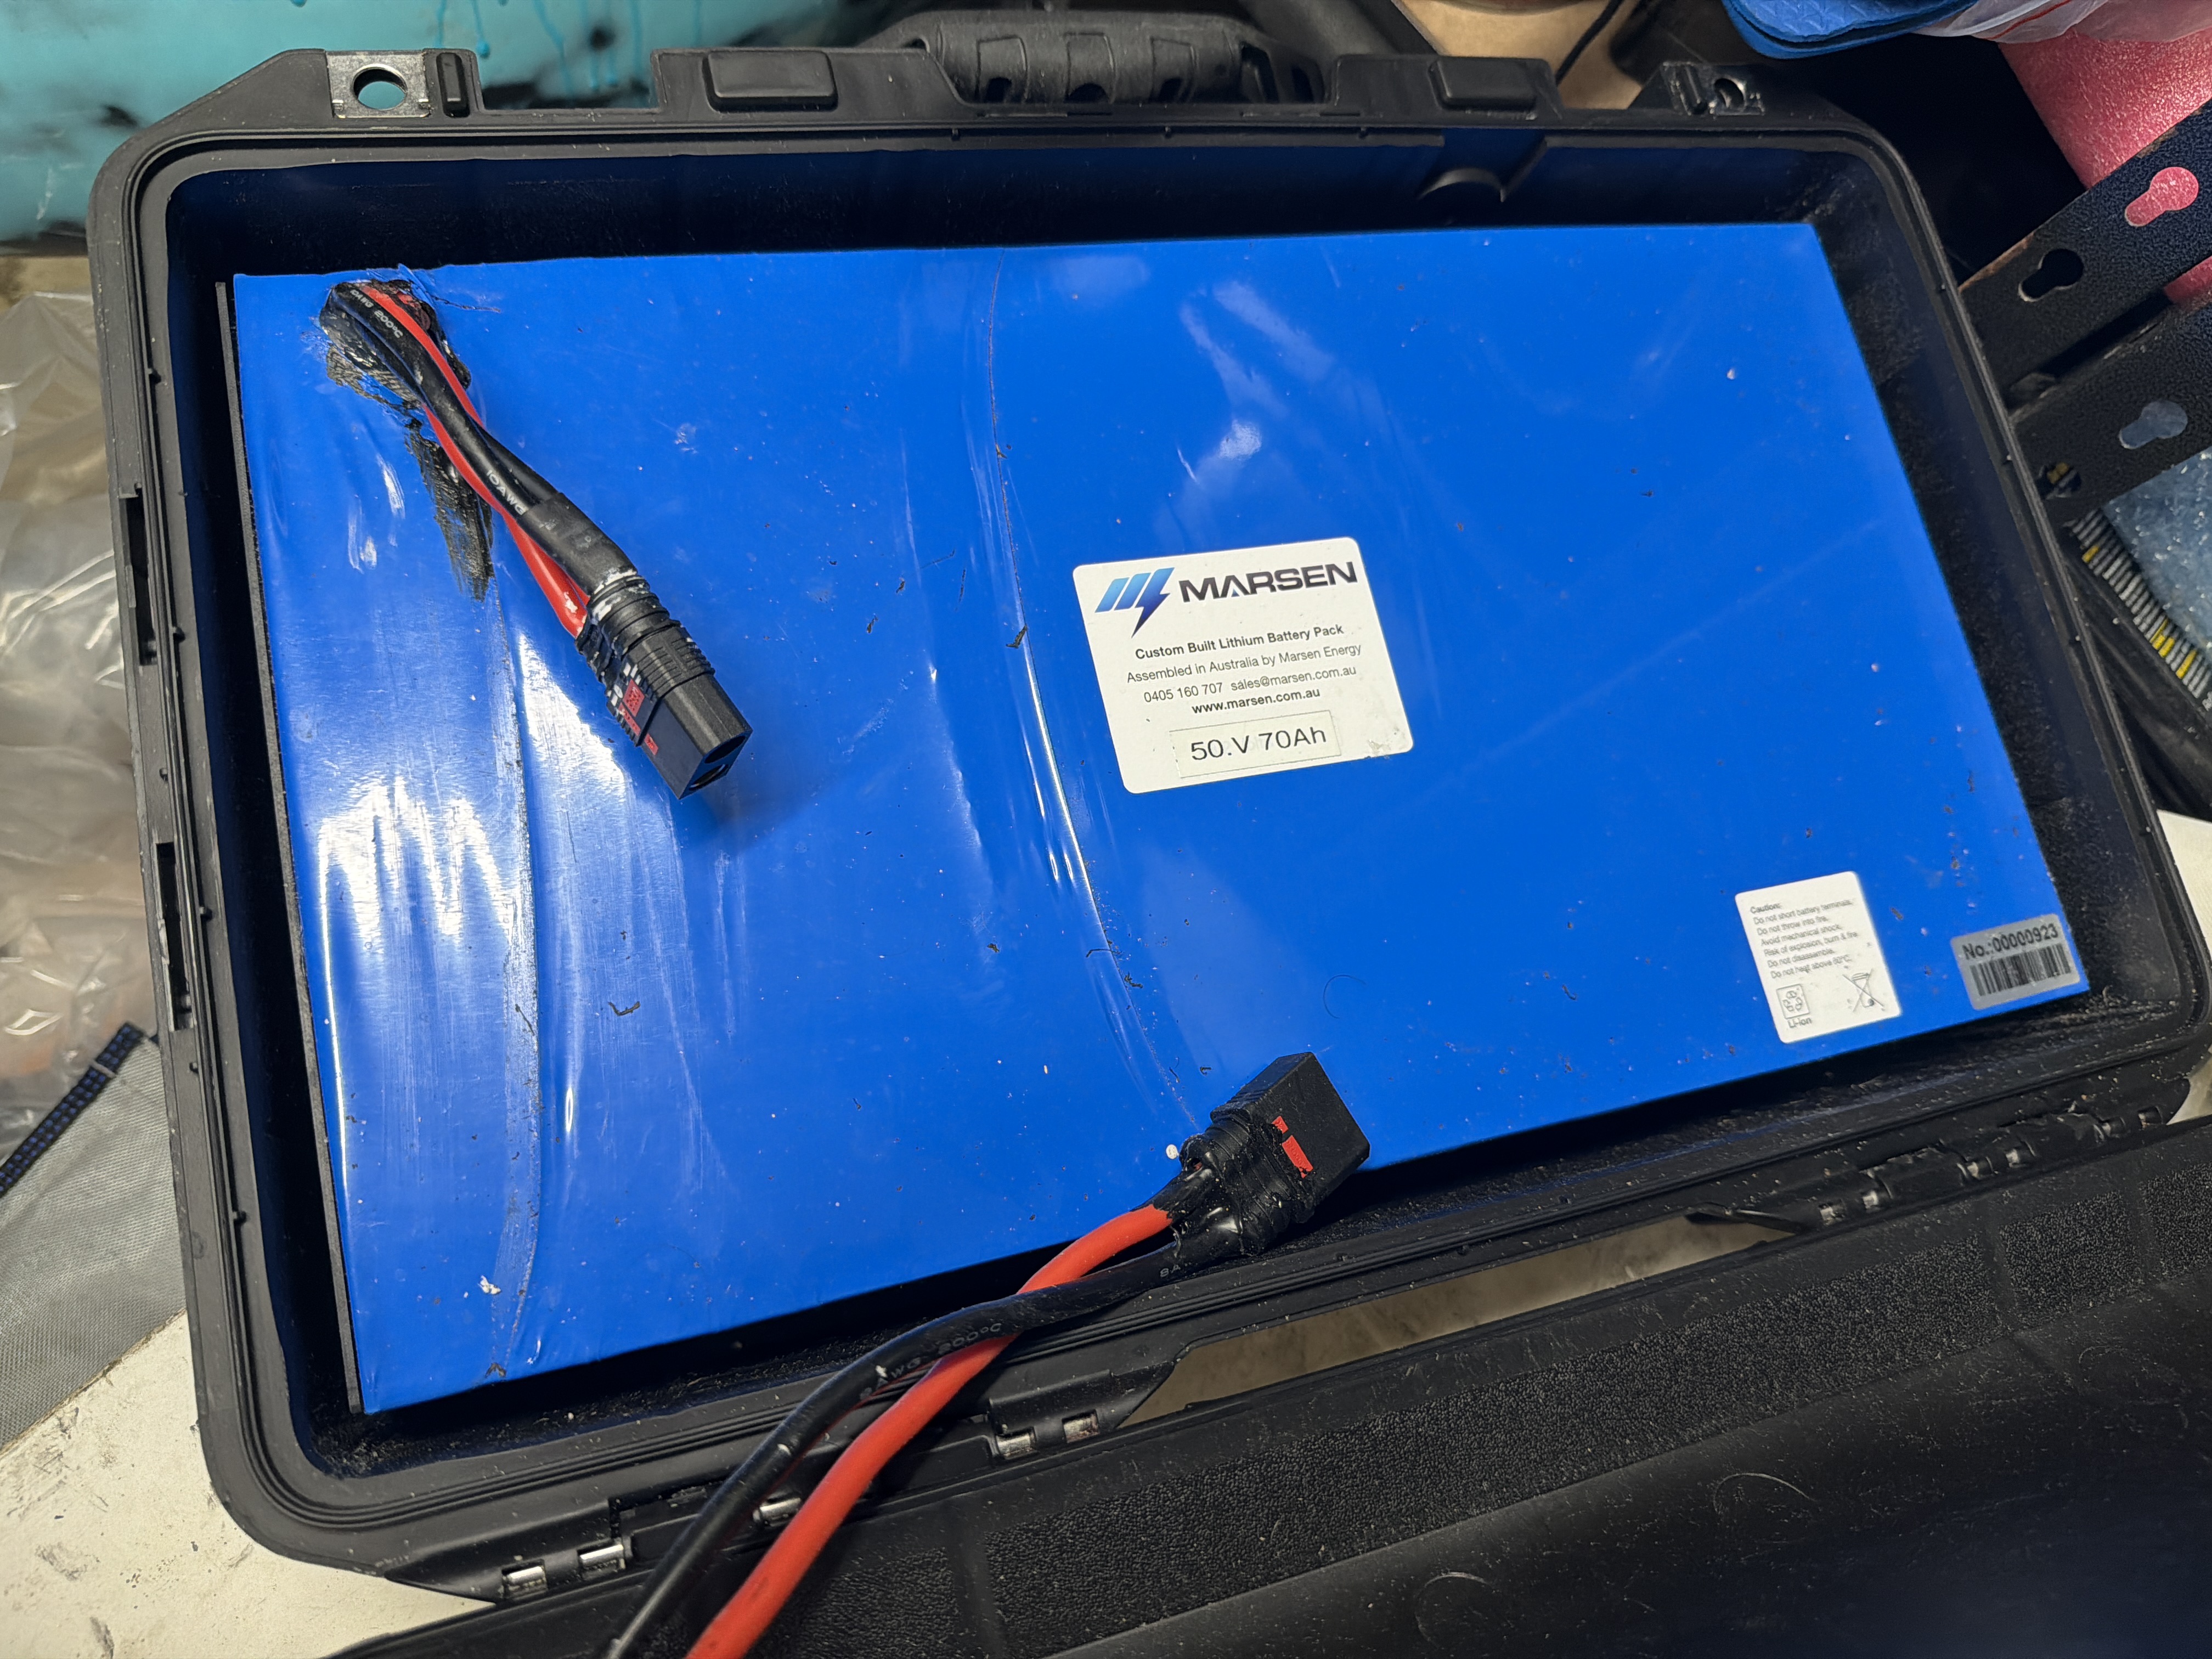
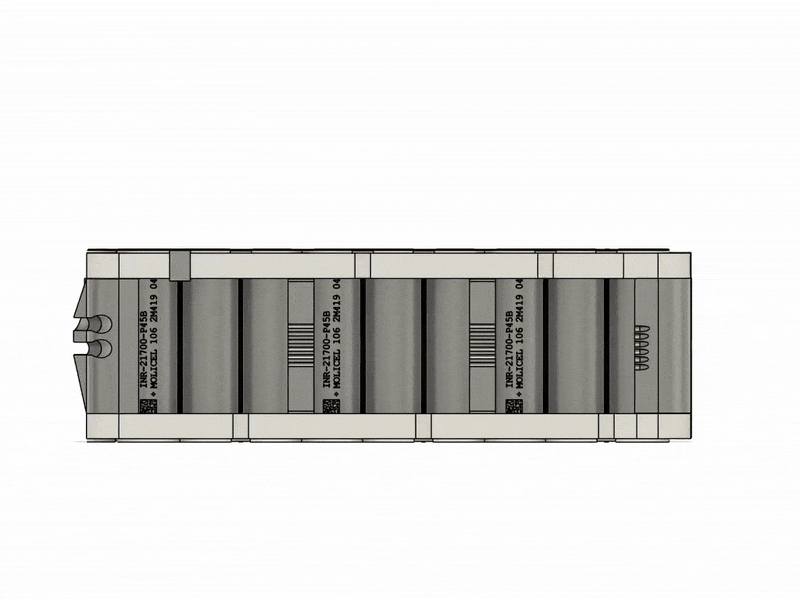
40 x Molicel 21700 P45B $436.82
XT90s $16.39
2 x Silicone wire 22AWG (grey, red) 2m $4.80
Fiberglass Tape (25m roll) $18.16
10k NTC Thermistor $2.89
2 x Silicone wire 8AWG (black, red) 2m $30
XH2.54 13Pin connector (male, female) $1.40
WELLGO Power Battery Pack Busbar $47.40
PVC Battery Heat Shrink tube 350mm x 1m $5.52
PVC Battery Heat Shrink tube 180mm x 1m $2.50
Exotronic Inline Single Midi Fuse holder $6.90
Midi 58V 100A fuse (x5) $5.39
70mm x 33m High Temperature Polyimide Tape (roll) $48.00
Total: $633.10
Other materials:
3D filament used was ABS, ABS -CF and PLA.
Tooling considerations:
3d printer (Bambu X1c)
801H Spot Welding Machine $328.69
Battery Charger
Icharger x12 $319.69
HPE HSTNS-PD19 1200W DPS-1200FB-1 A $39.00
Skyrc Temperature Sensor $6.24
Total: $364.93
Project total: $2535.81
2 Likes
Being a large bloke (120kg) I wanted to build a simple system that would have enough grunt to get me up on the foil and that I could transition from a foil assist position for winging and SUP to a lower Efoil position for when there was no wind of surf. I also wanted to make sure I had logging so that I could obtain some usable data to further refine and gather information, if I decide to take on a full dedicated efoil project in the future.
As I am already having a crack at wing foiling I already had a 170L learner board which has lots of space so used it for the test vehicle paired with an axis 19mm mast Axis BSC 1120 front wing and 500 rear stabilizer. I was pretty confident that I would be able to get up on foil but was still unsure of the Max current needed to get me there and wanted to allow enough headroom for when I do eventually drop the board and foil sizes. This led me to the 12s3p battery design with a comfortable 100A max as a starting point. More information when I get a chance.
Bench test
Wet test of DIY Foil assist
First flight video ← Video of first flying function test
1 Like
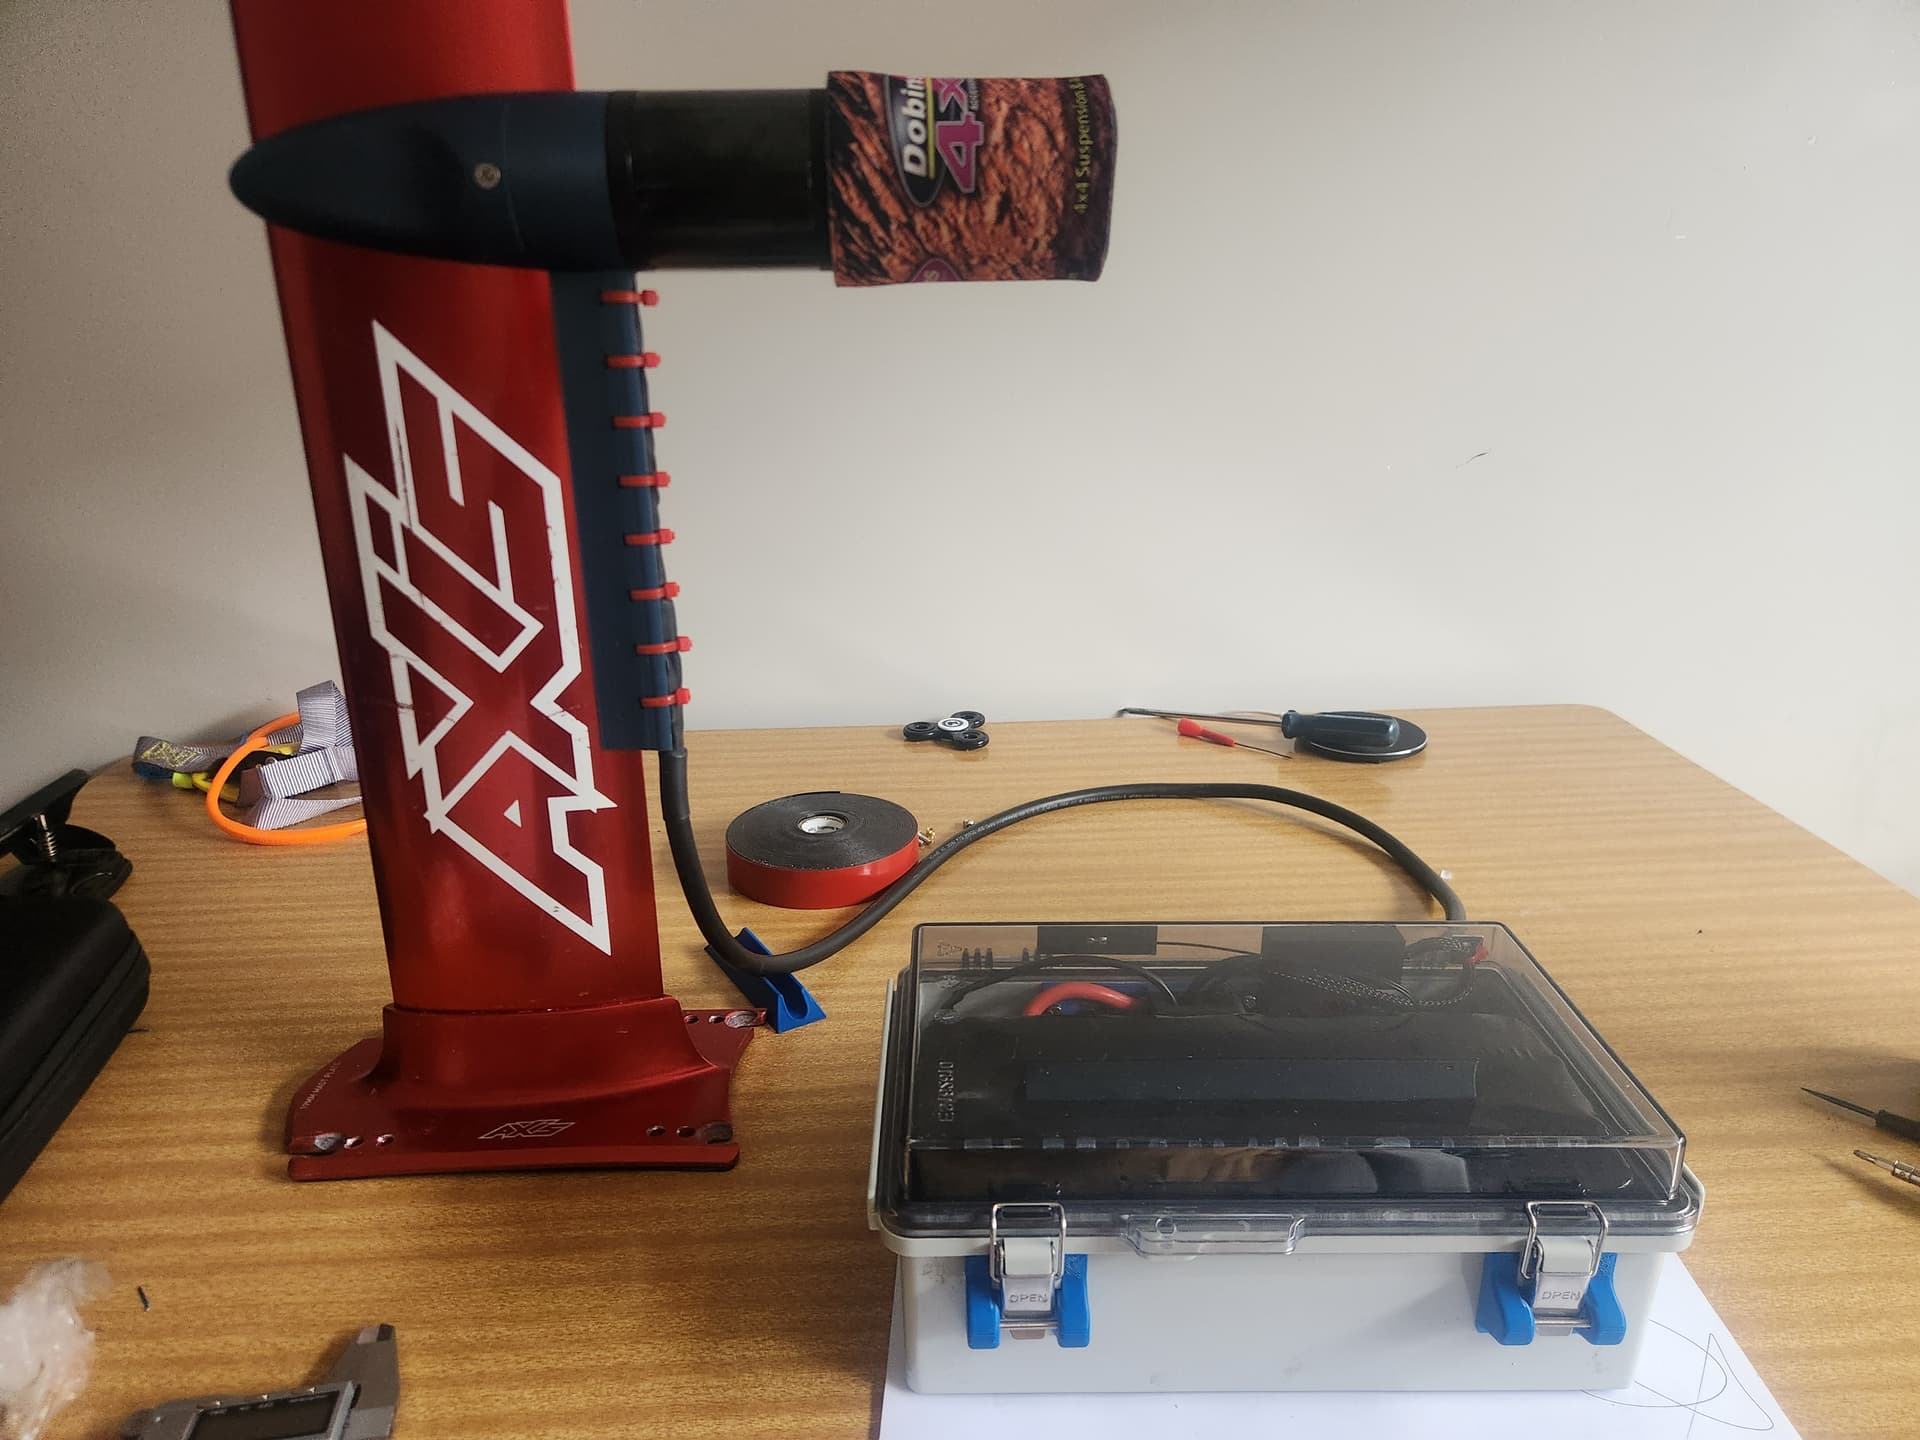
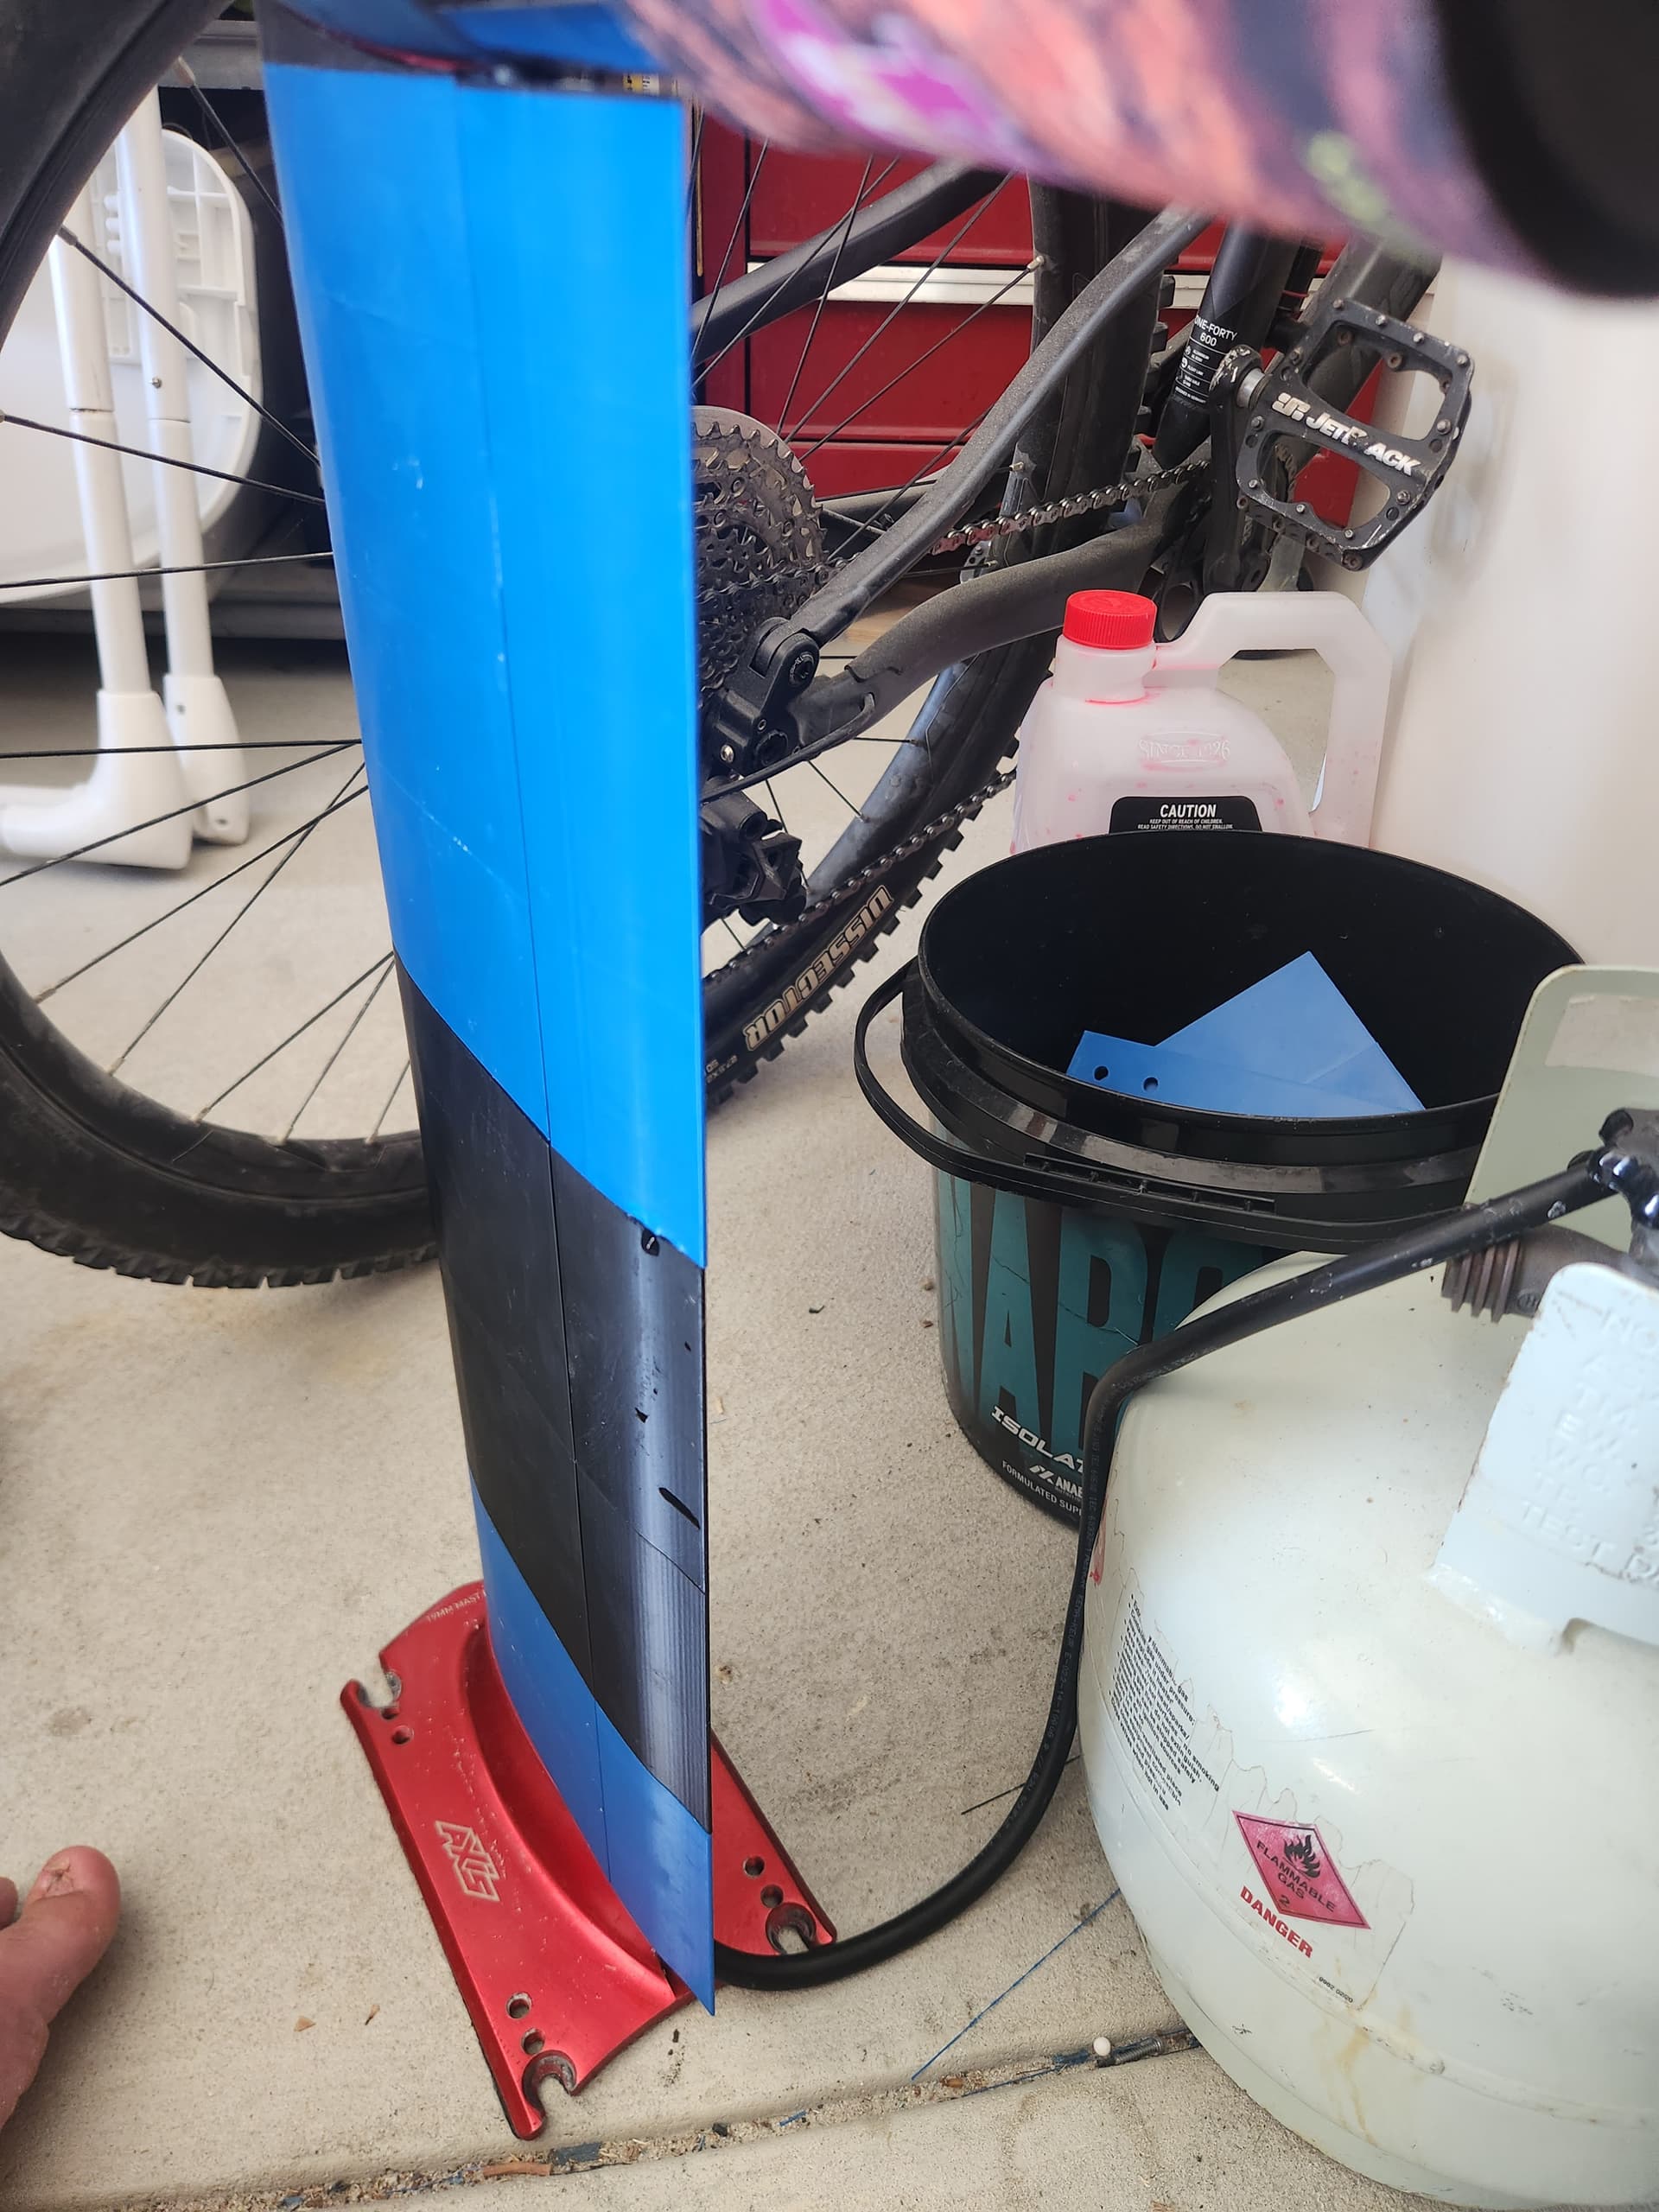
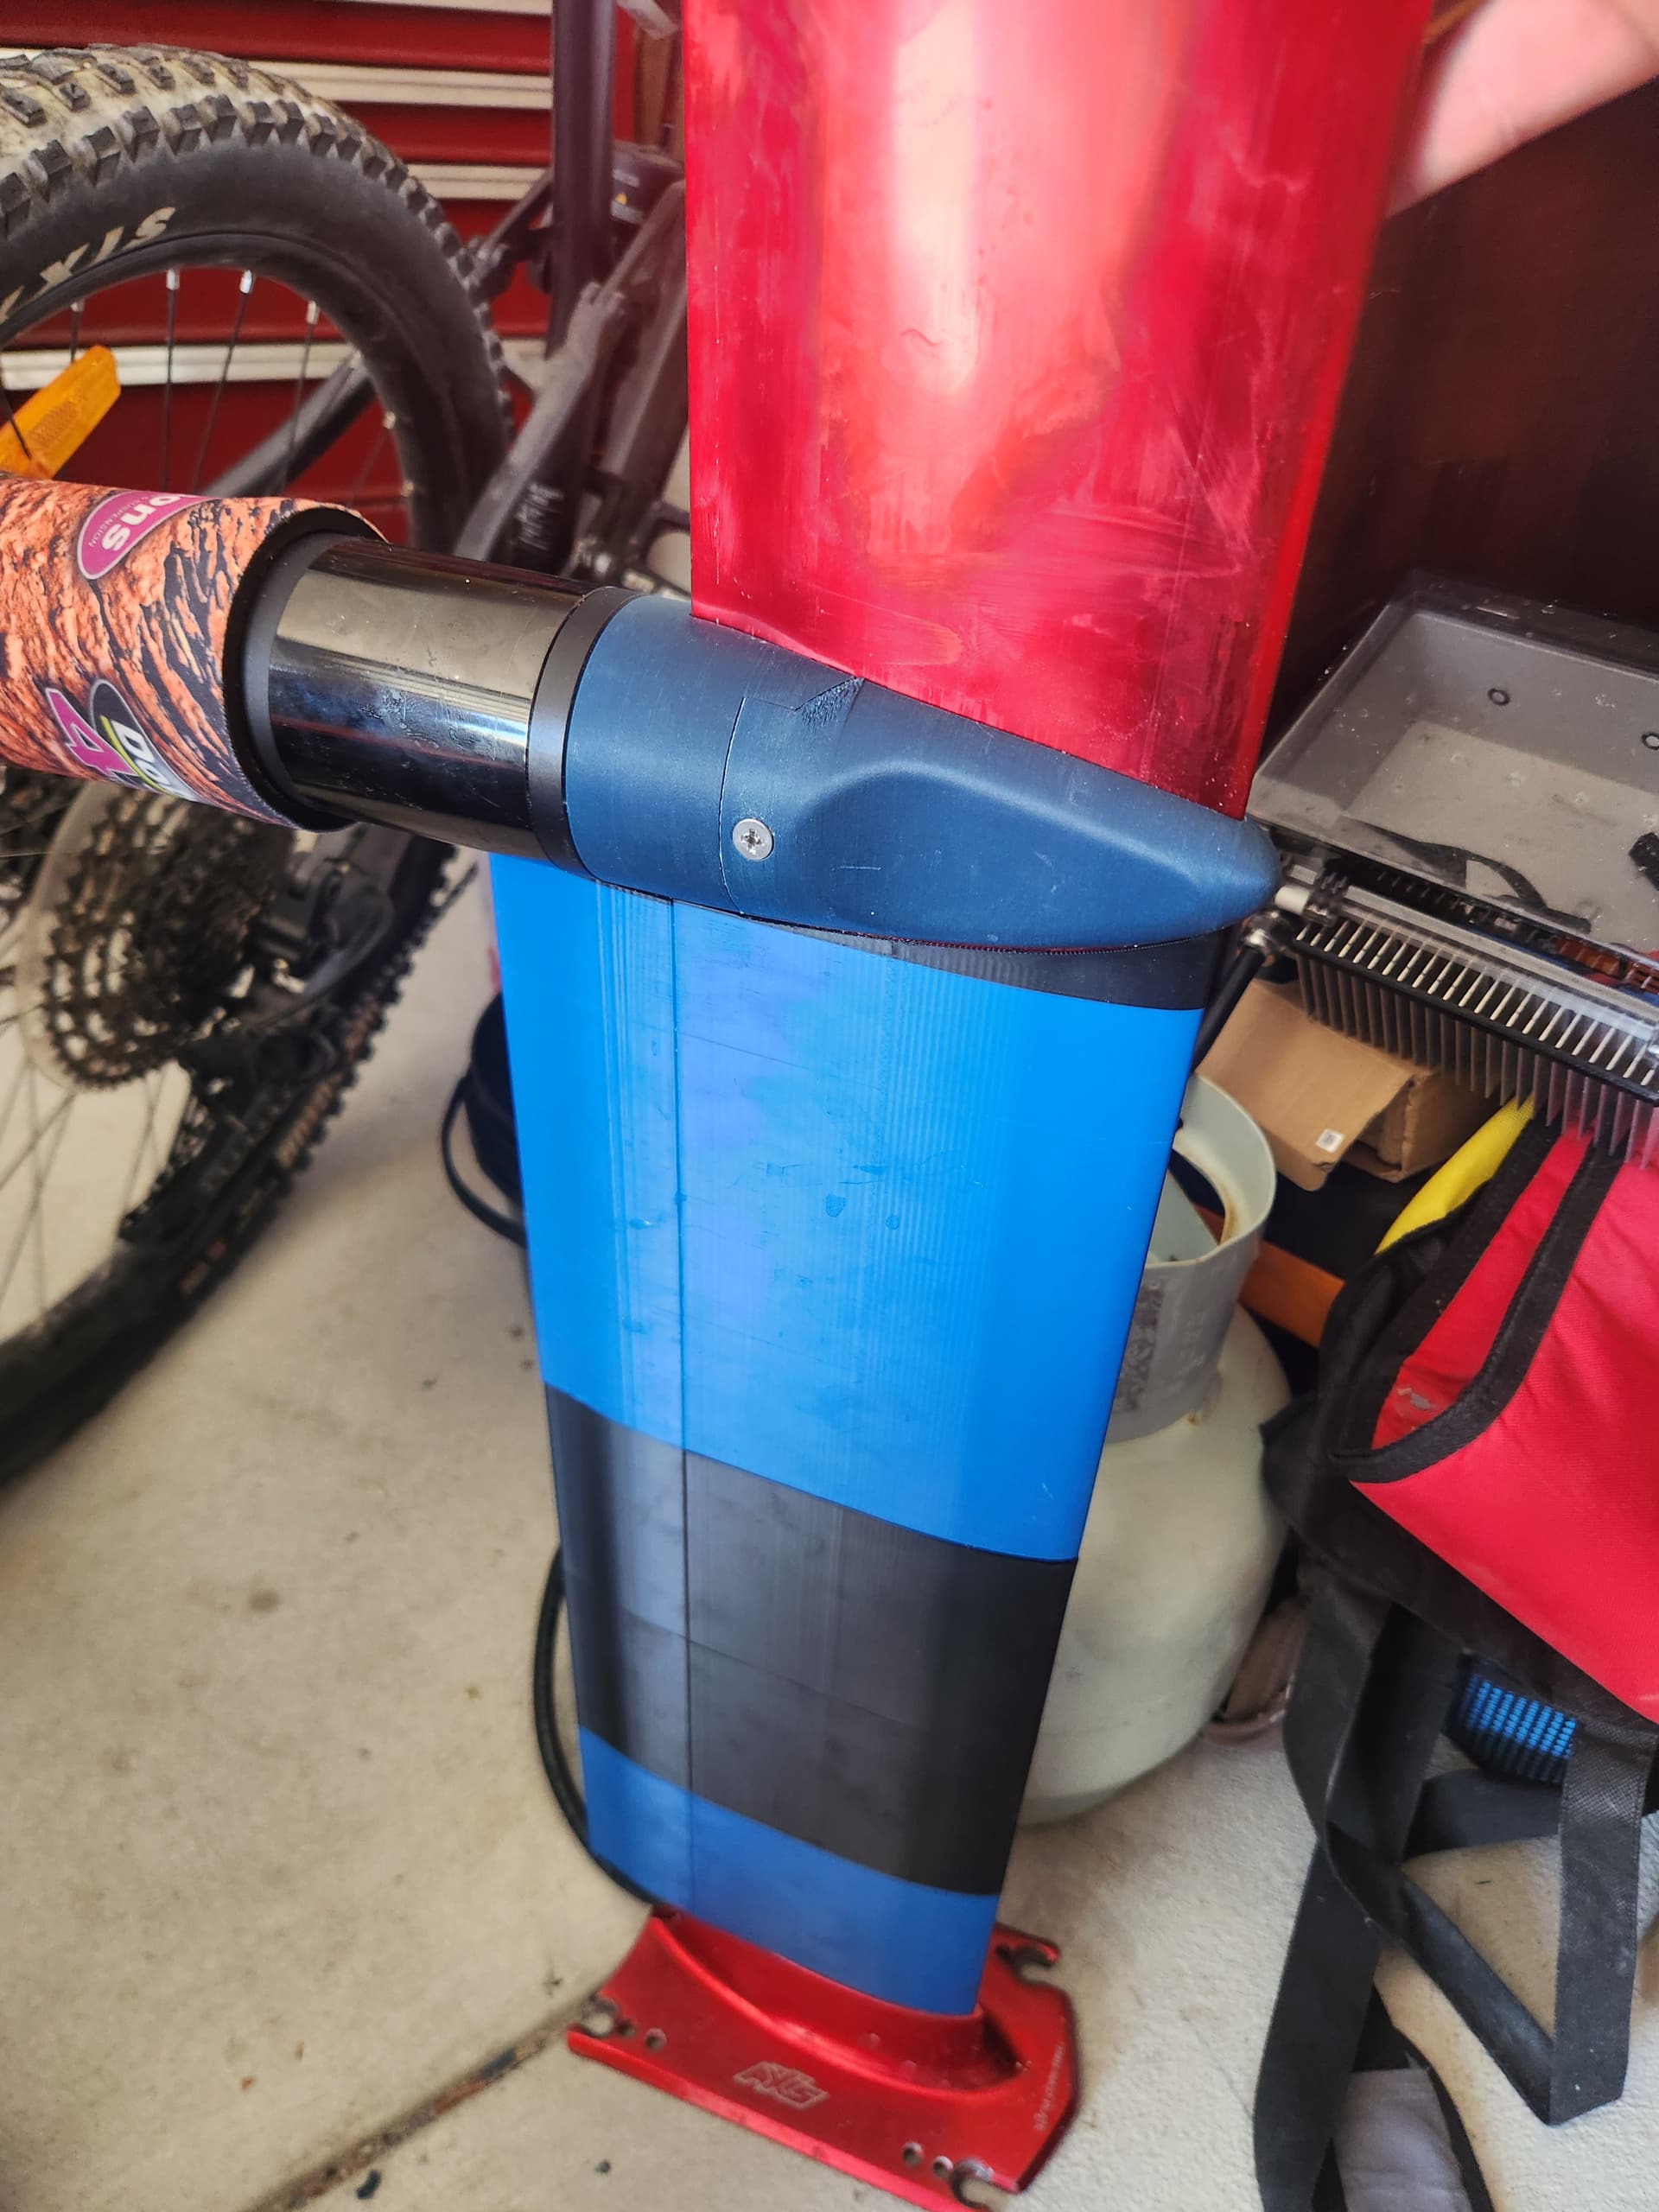
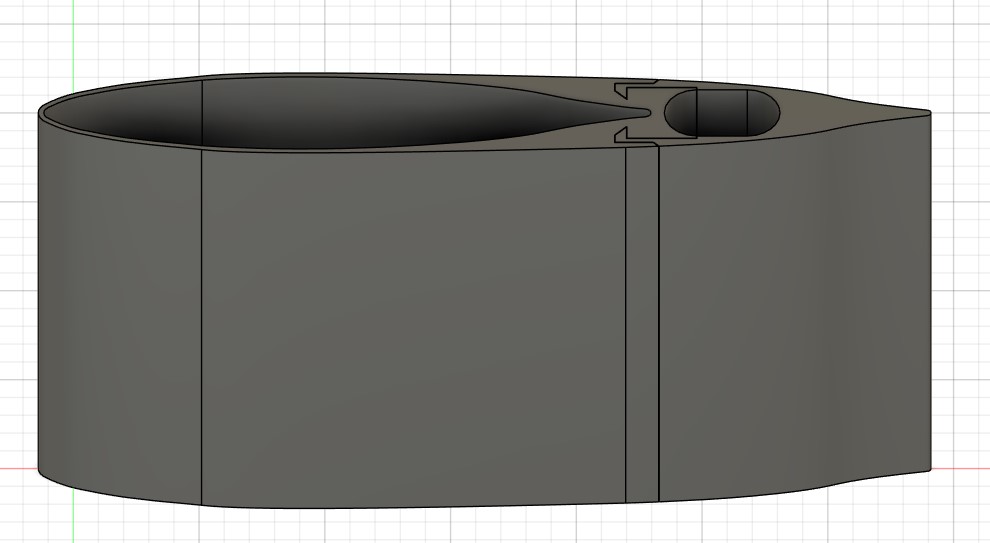
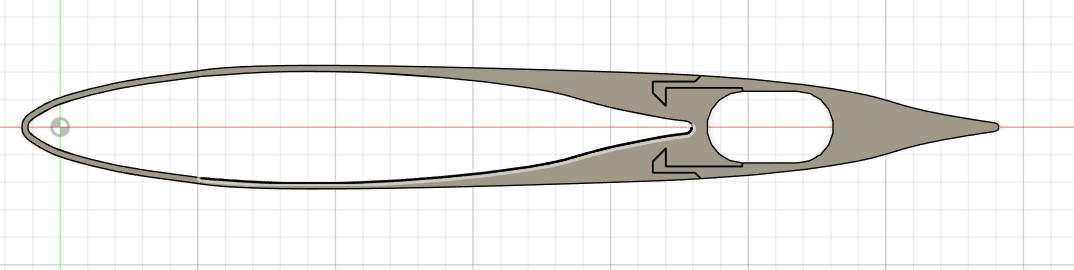
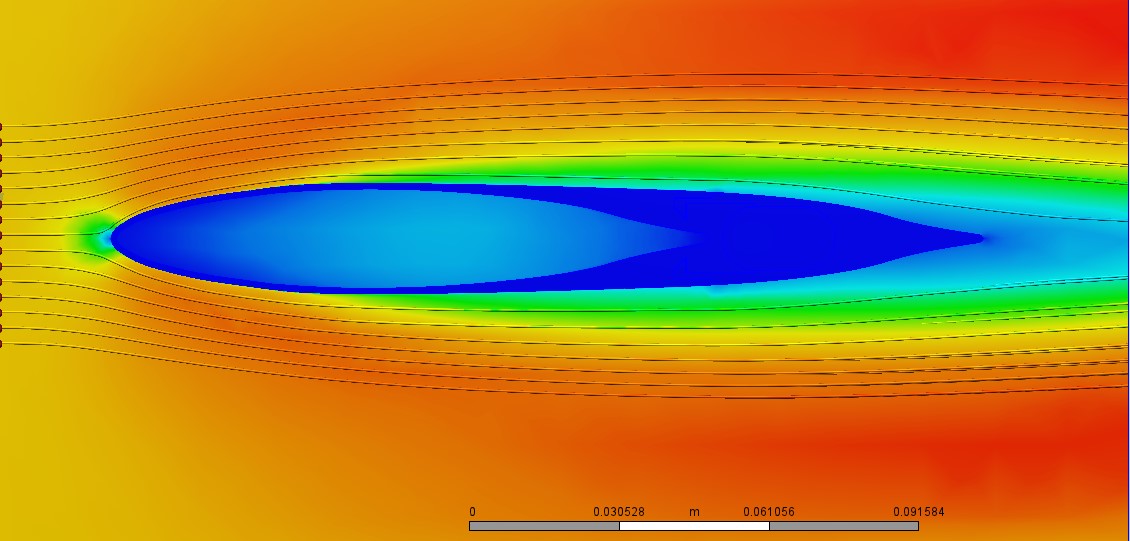
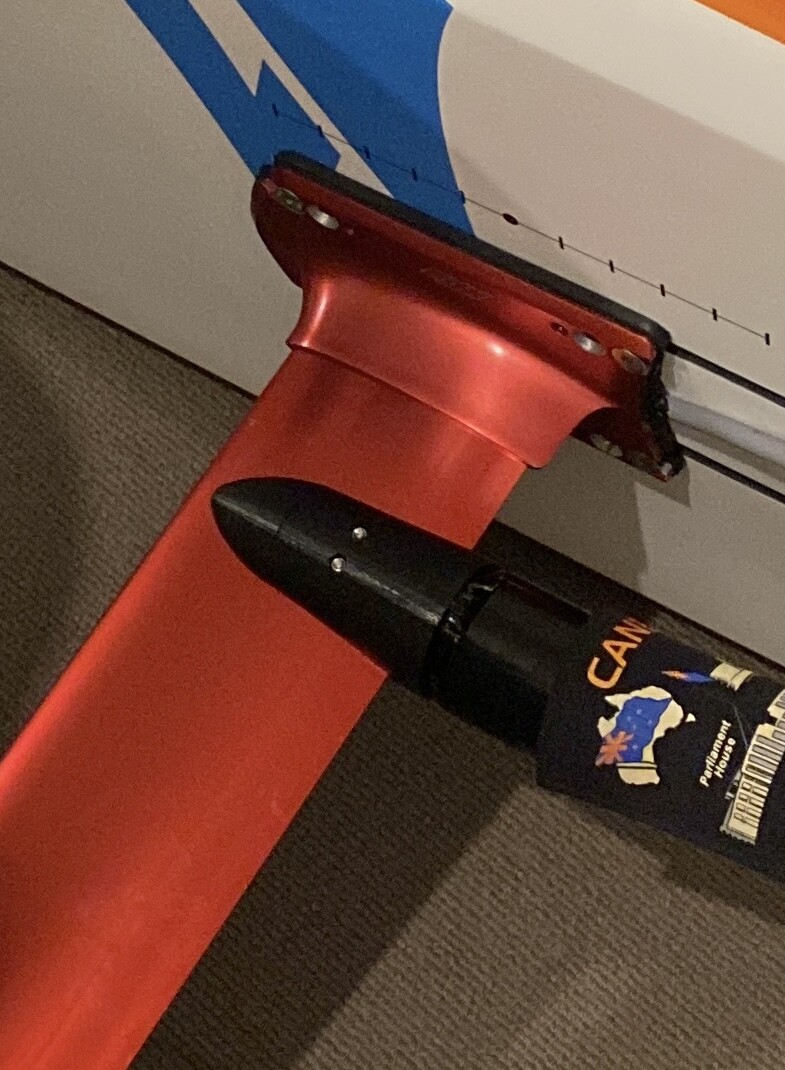
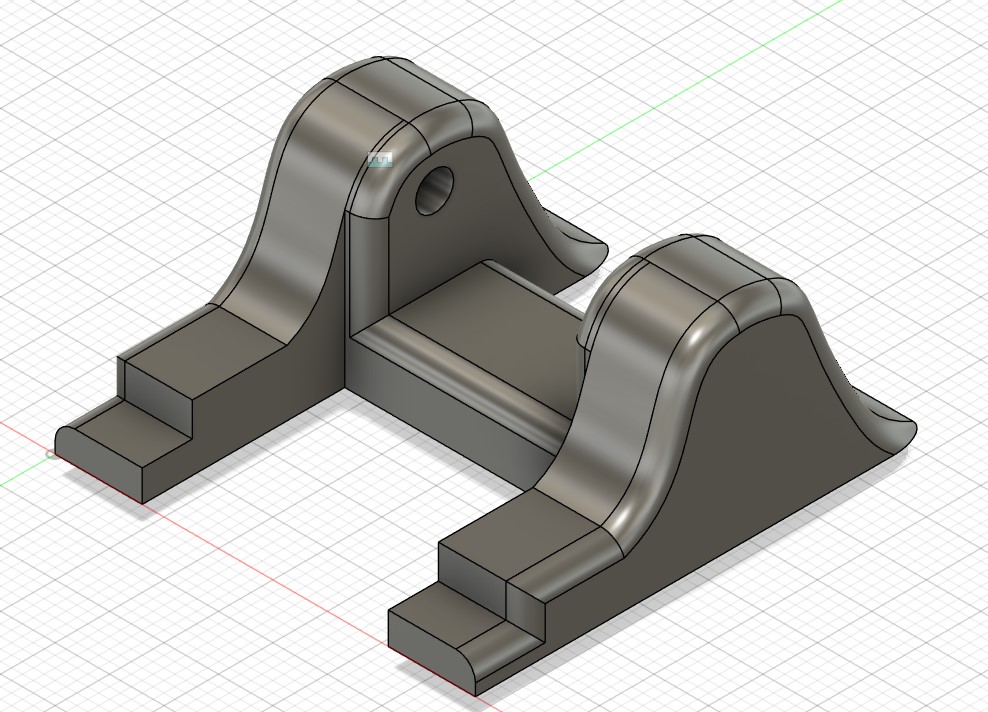
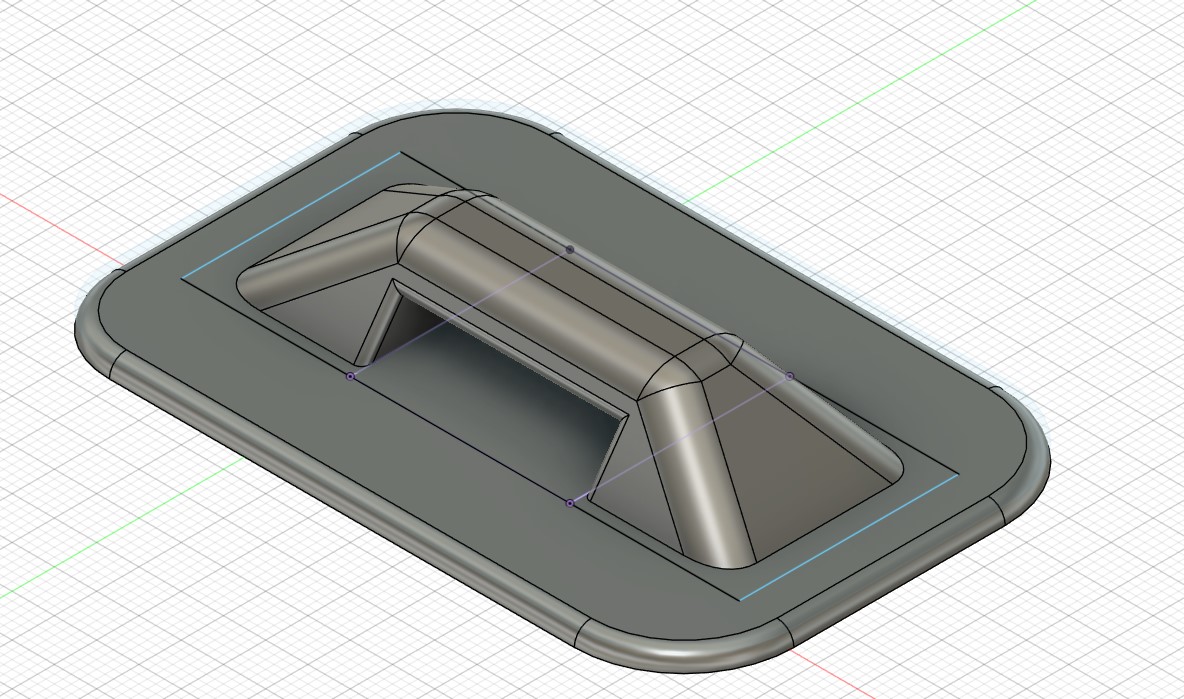
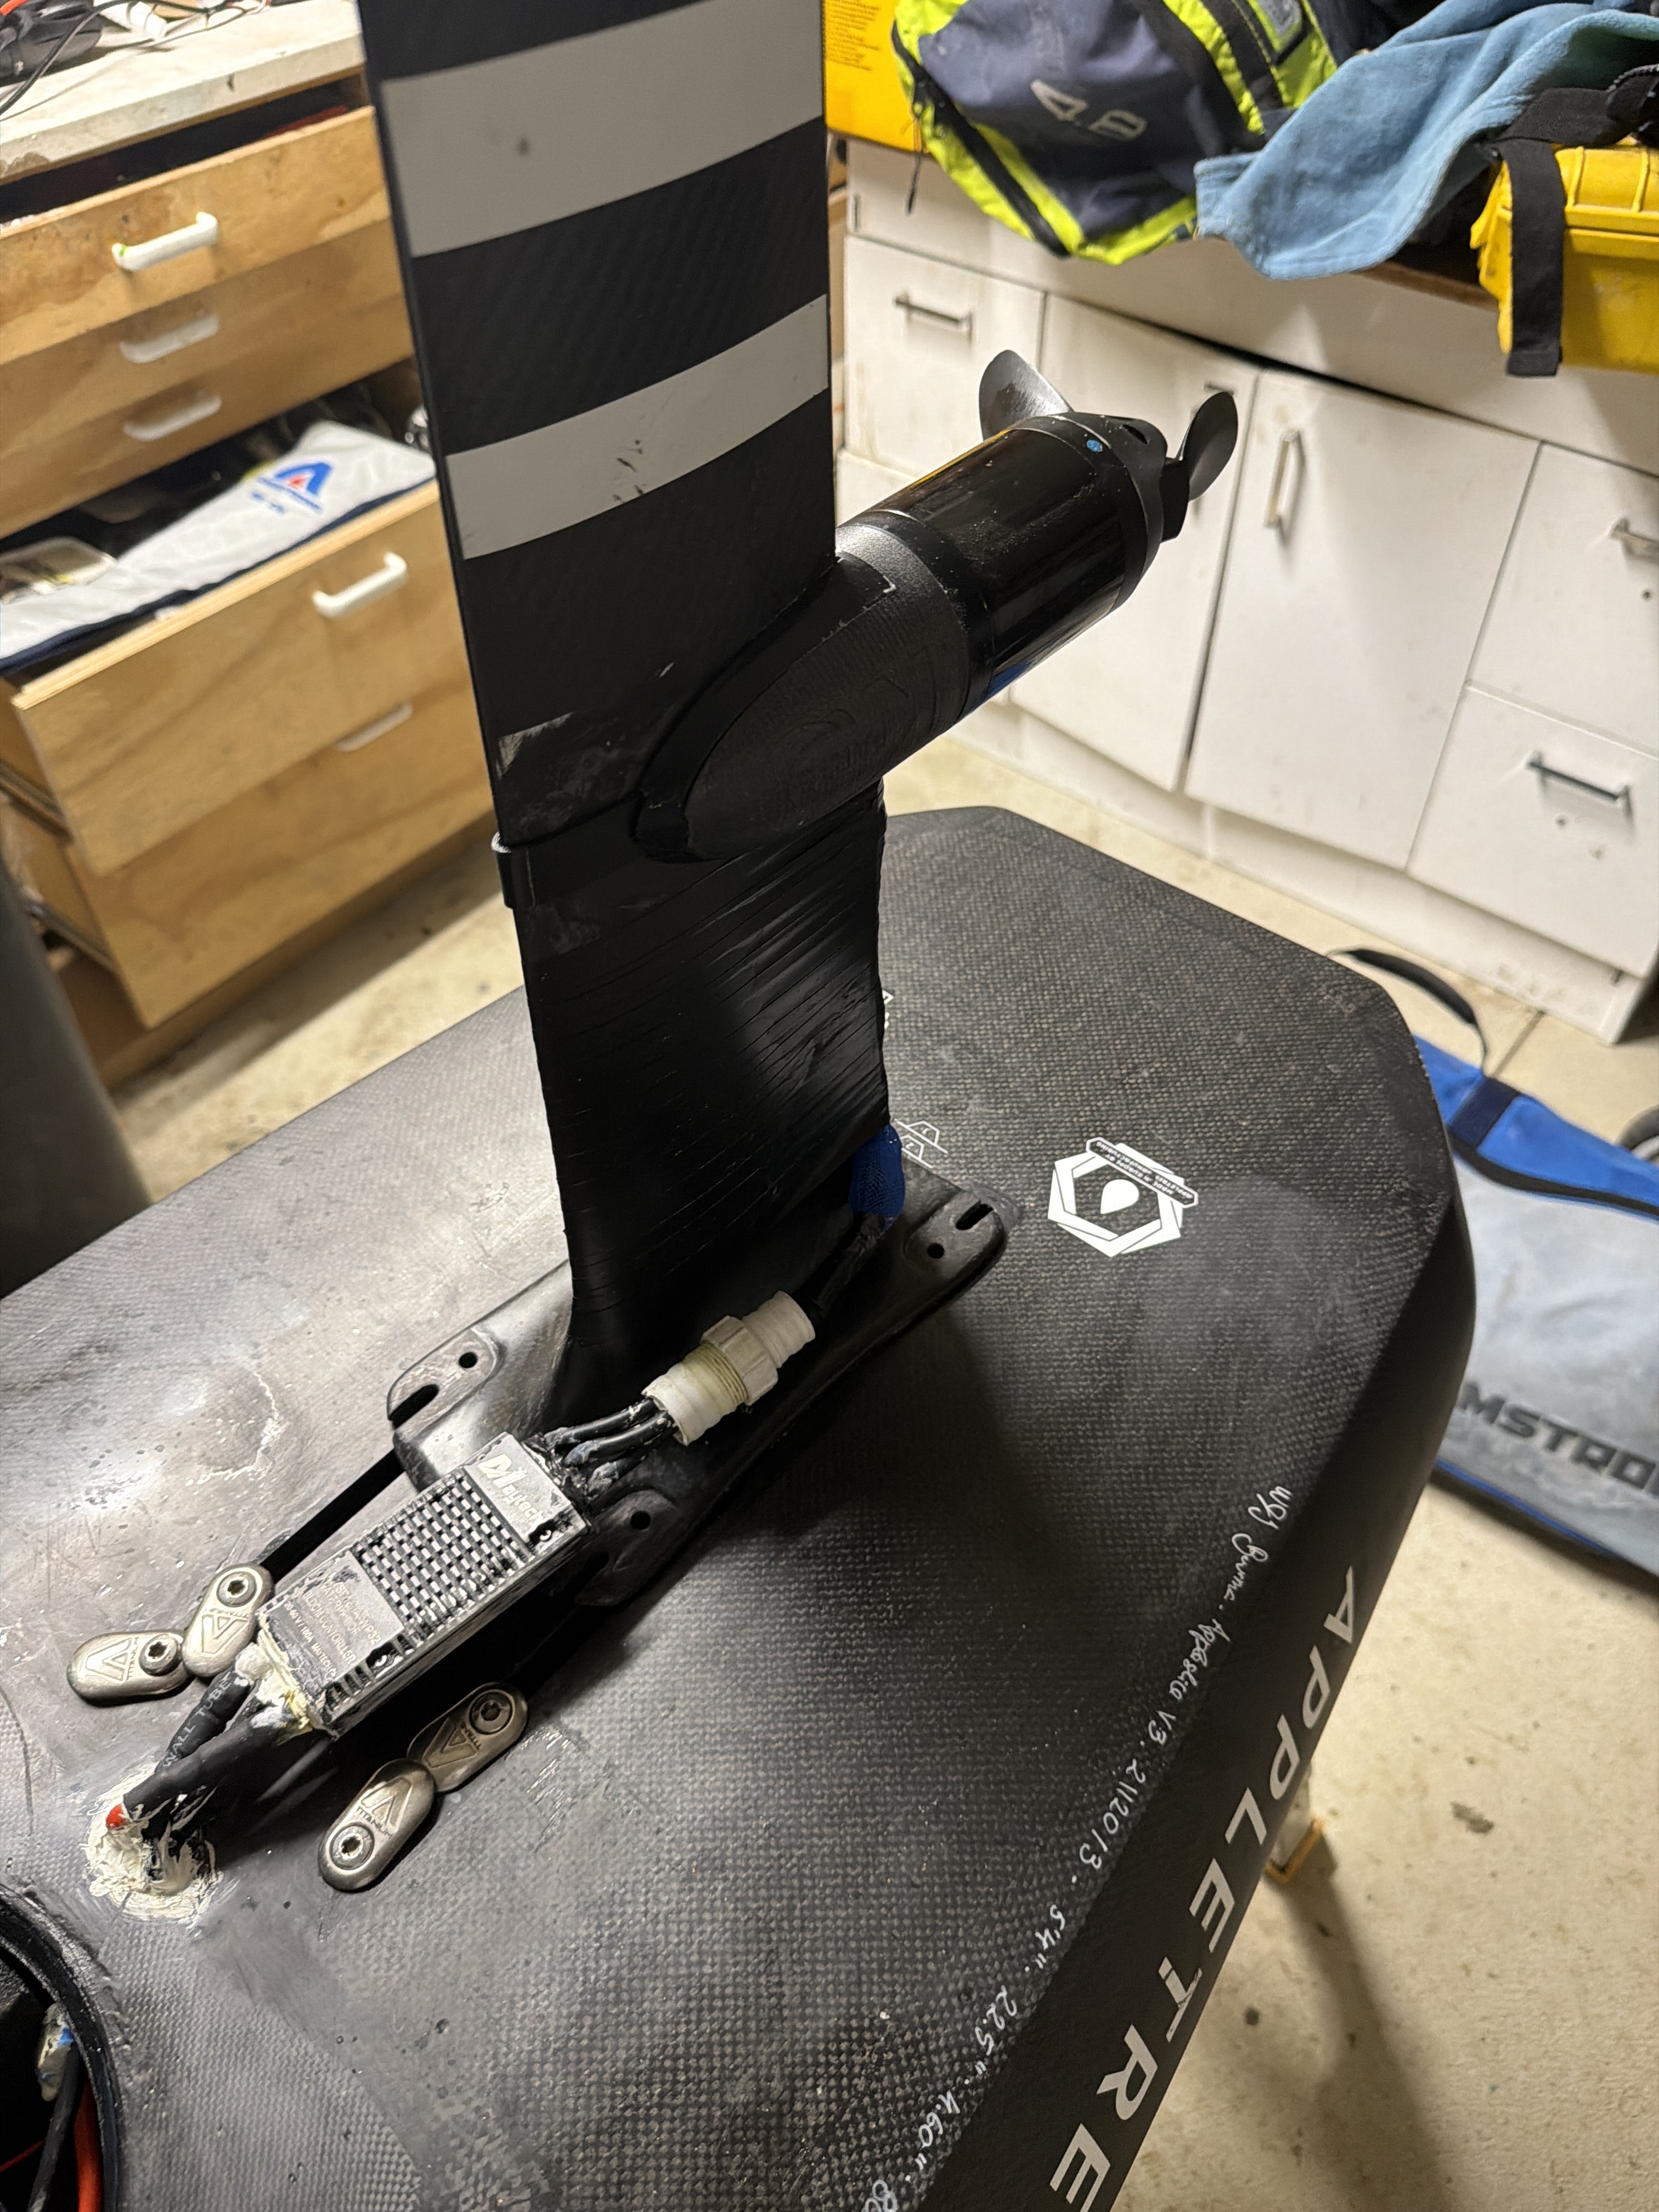
For those looking to get started the whole site is a treasure chest of information. Hangloose deserves a lot of credit with his sharing of 3D files which made my life a lot easier I highly recommend reading Hangloose build. I modified his motor mount and then did a scan of my Axis mast and created a fairing to hide the motor cable as I felt it was causing quite a bit of drag which I confirmed with some Computational Fluid Dynamics analysis. I will look to upload them if anyone shows any interest in trying them.
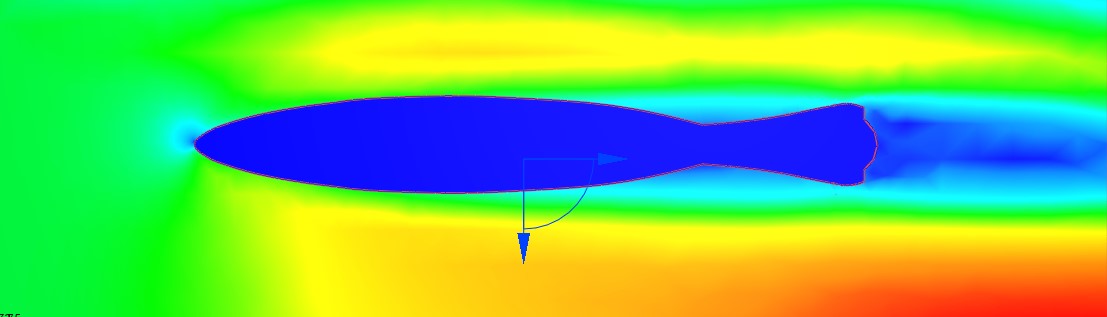
First cross section is of the of the original cable mount. You can see the dark blue drag turbulence it causes. While running wires inside the mast is the best solution I did not want to drill may mast as I am yet certain on what postions I wish to use it. so I created a fairing that slides over the mast and has a channel to run the cable.
Which resulted in the following CFD results. You can see that the drag is reduced significantly and I do notice a difference.
5 Likes
Welcome
Congrats on successful build and flight. ![]()
The VESC tools logging function will provide lots of data
Nicely documented build topic as well!
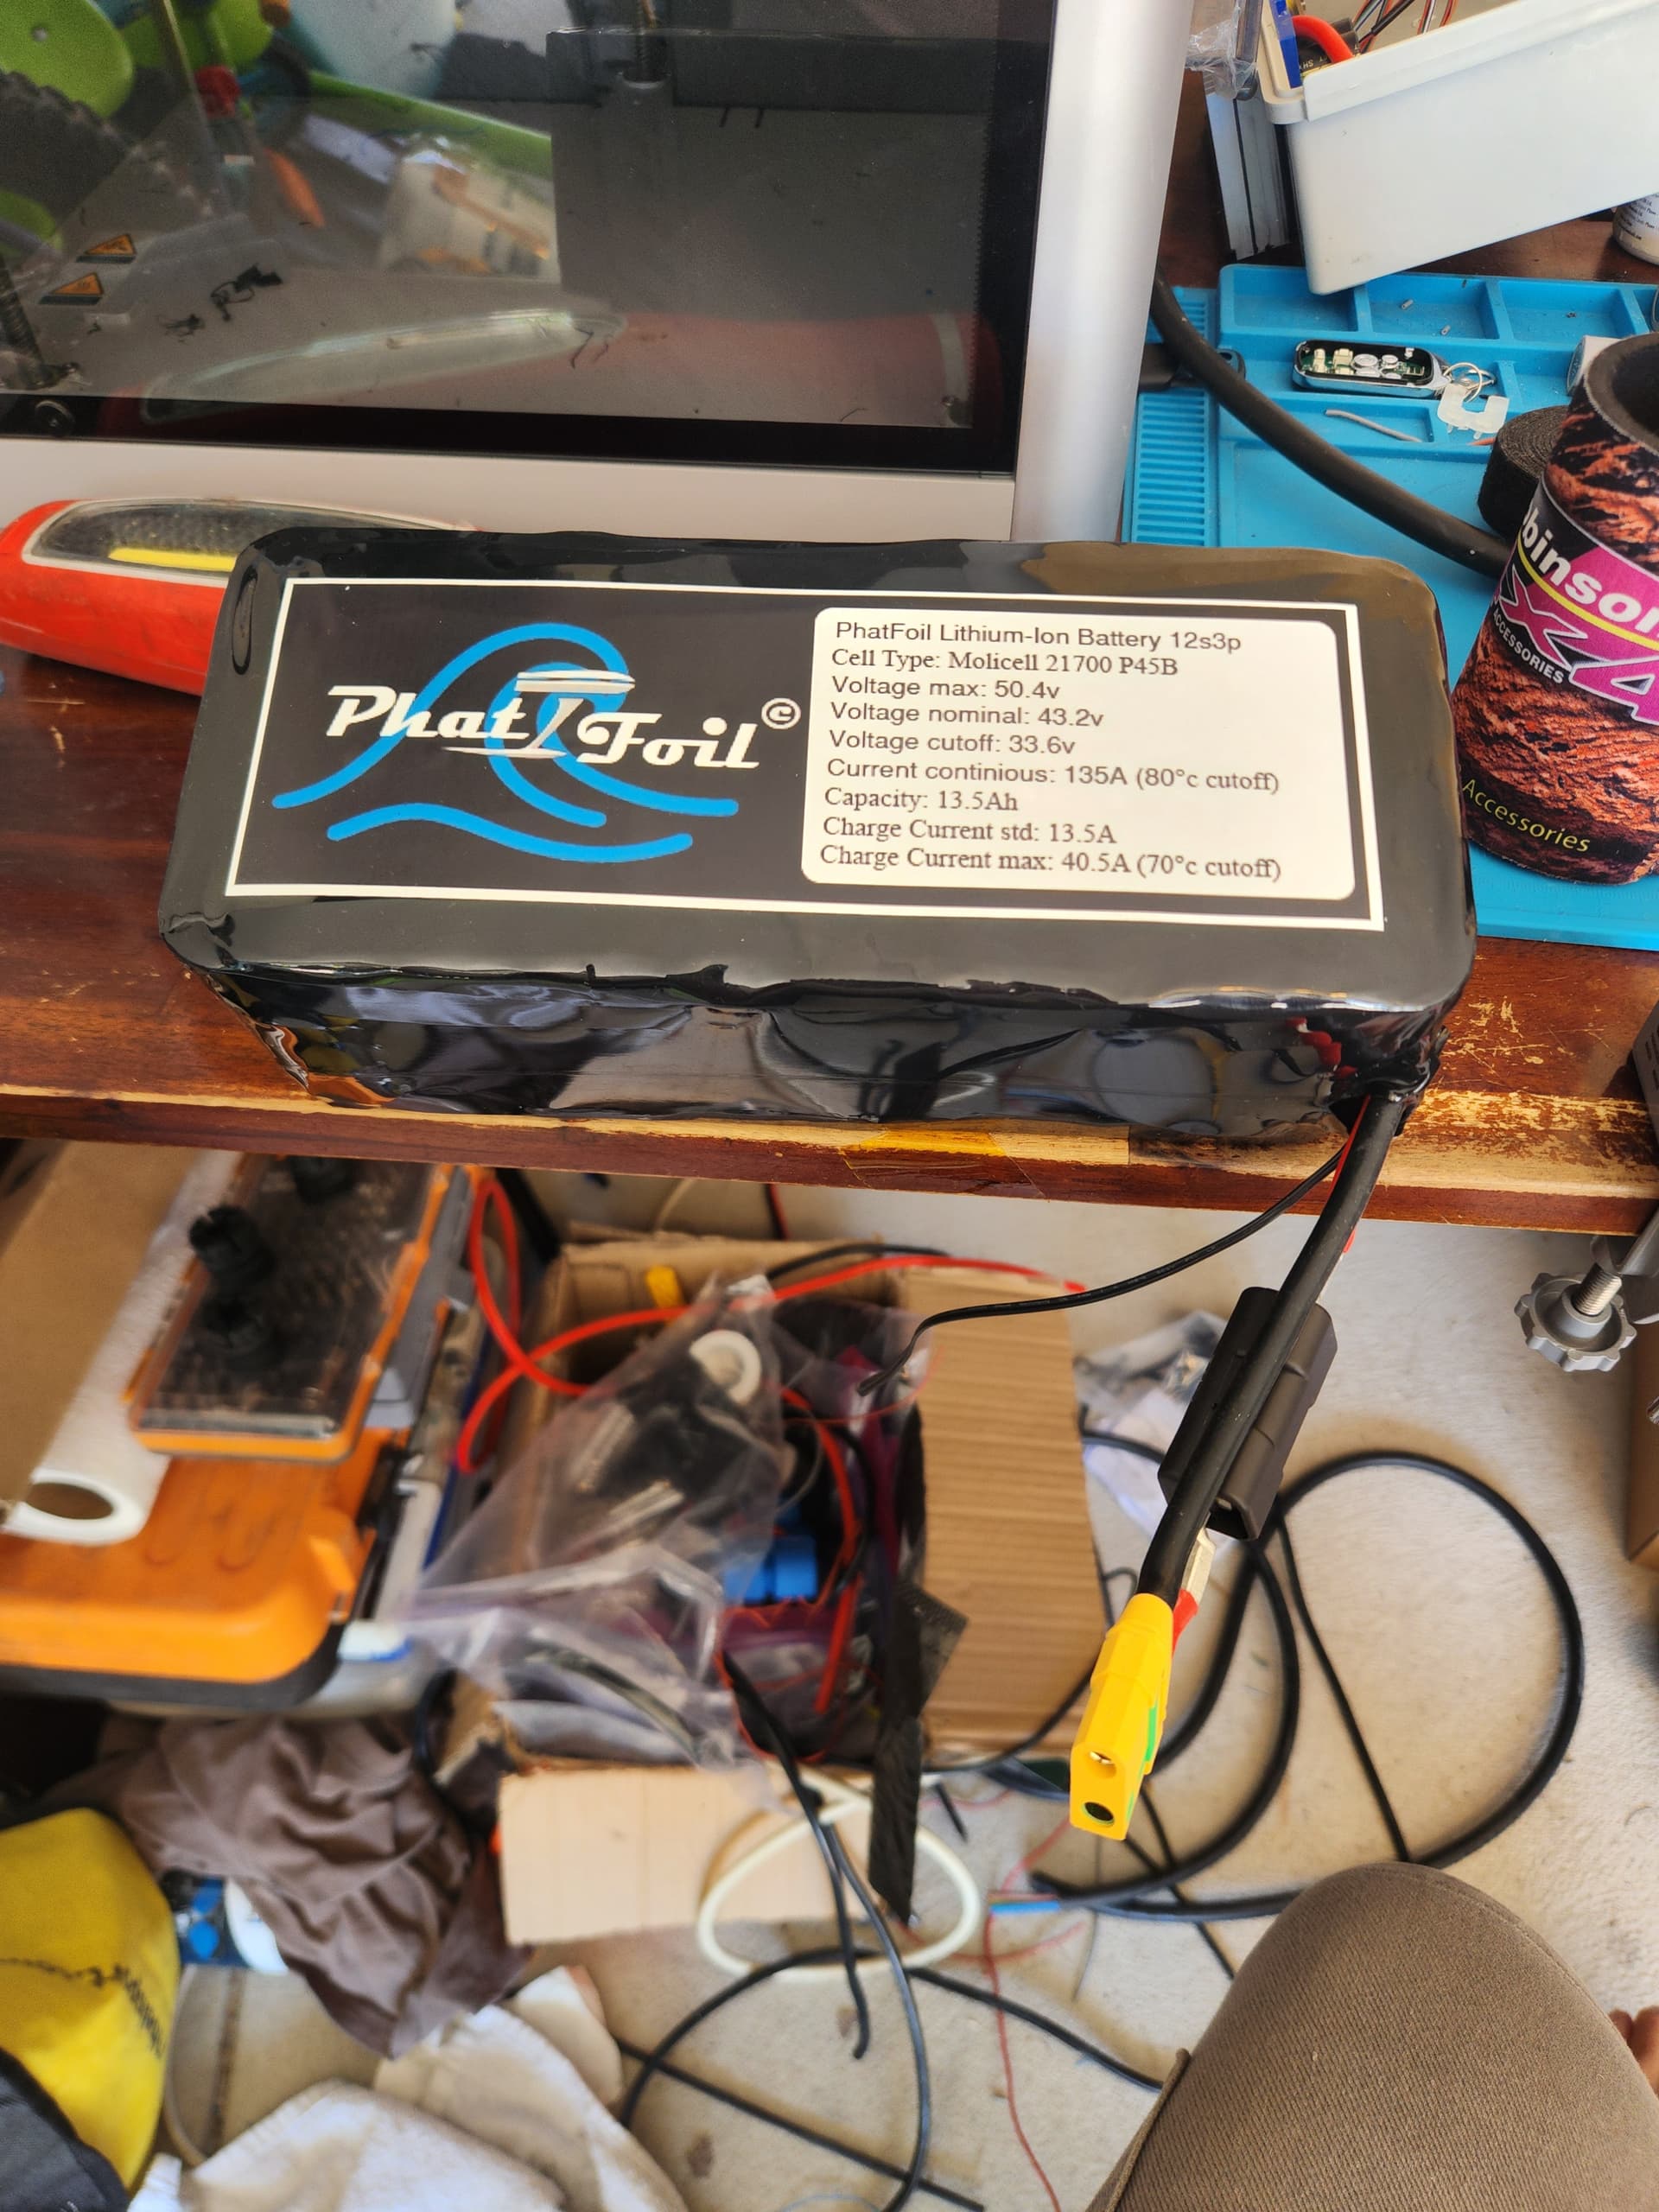
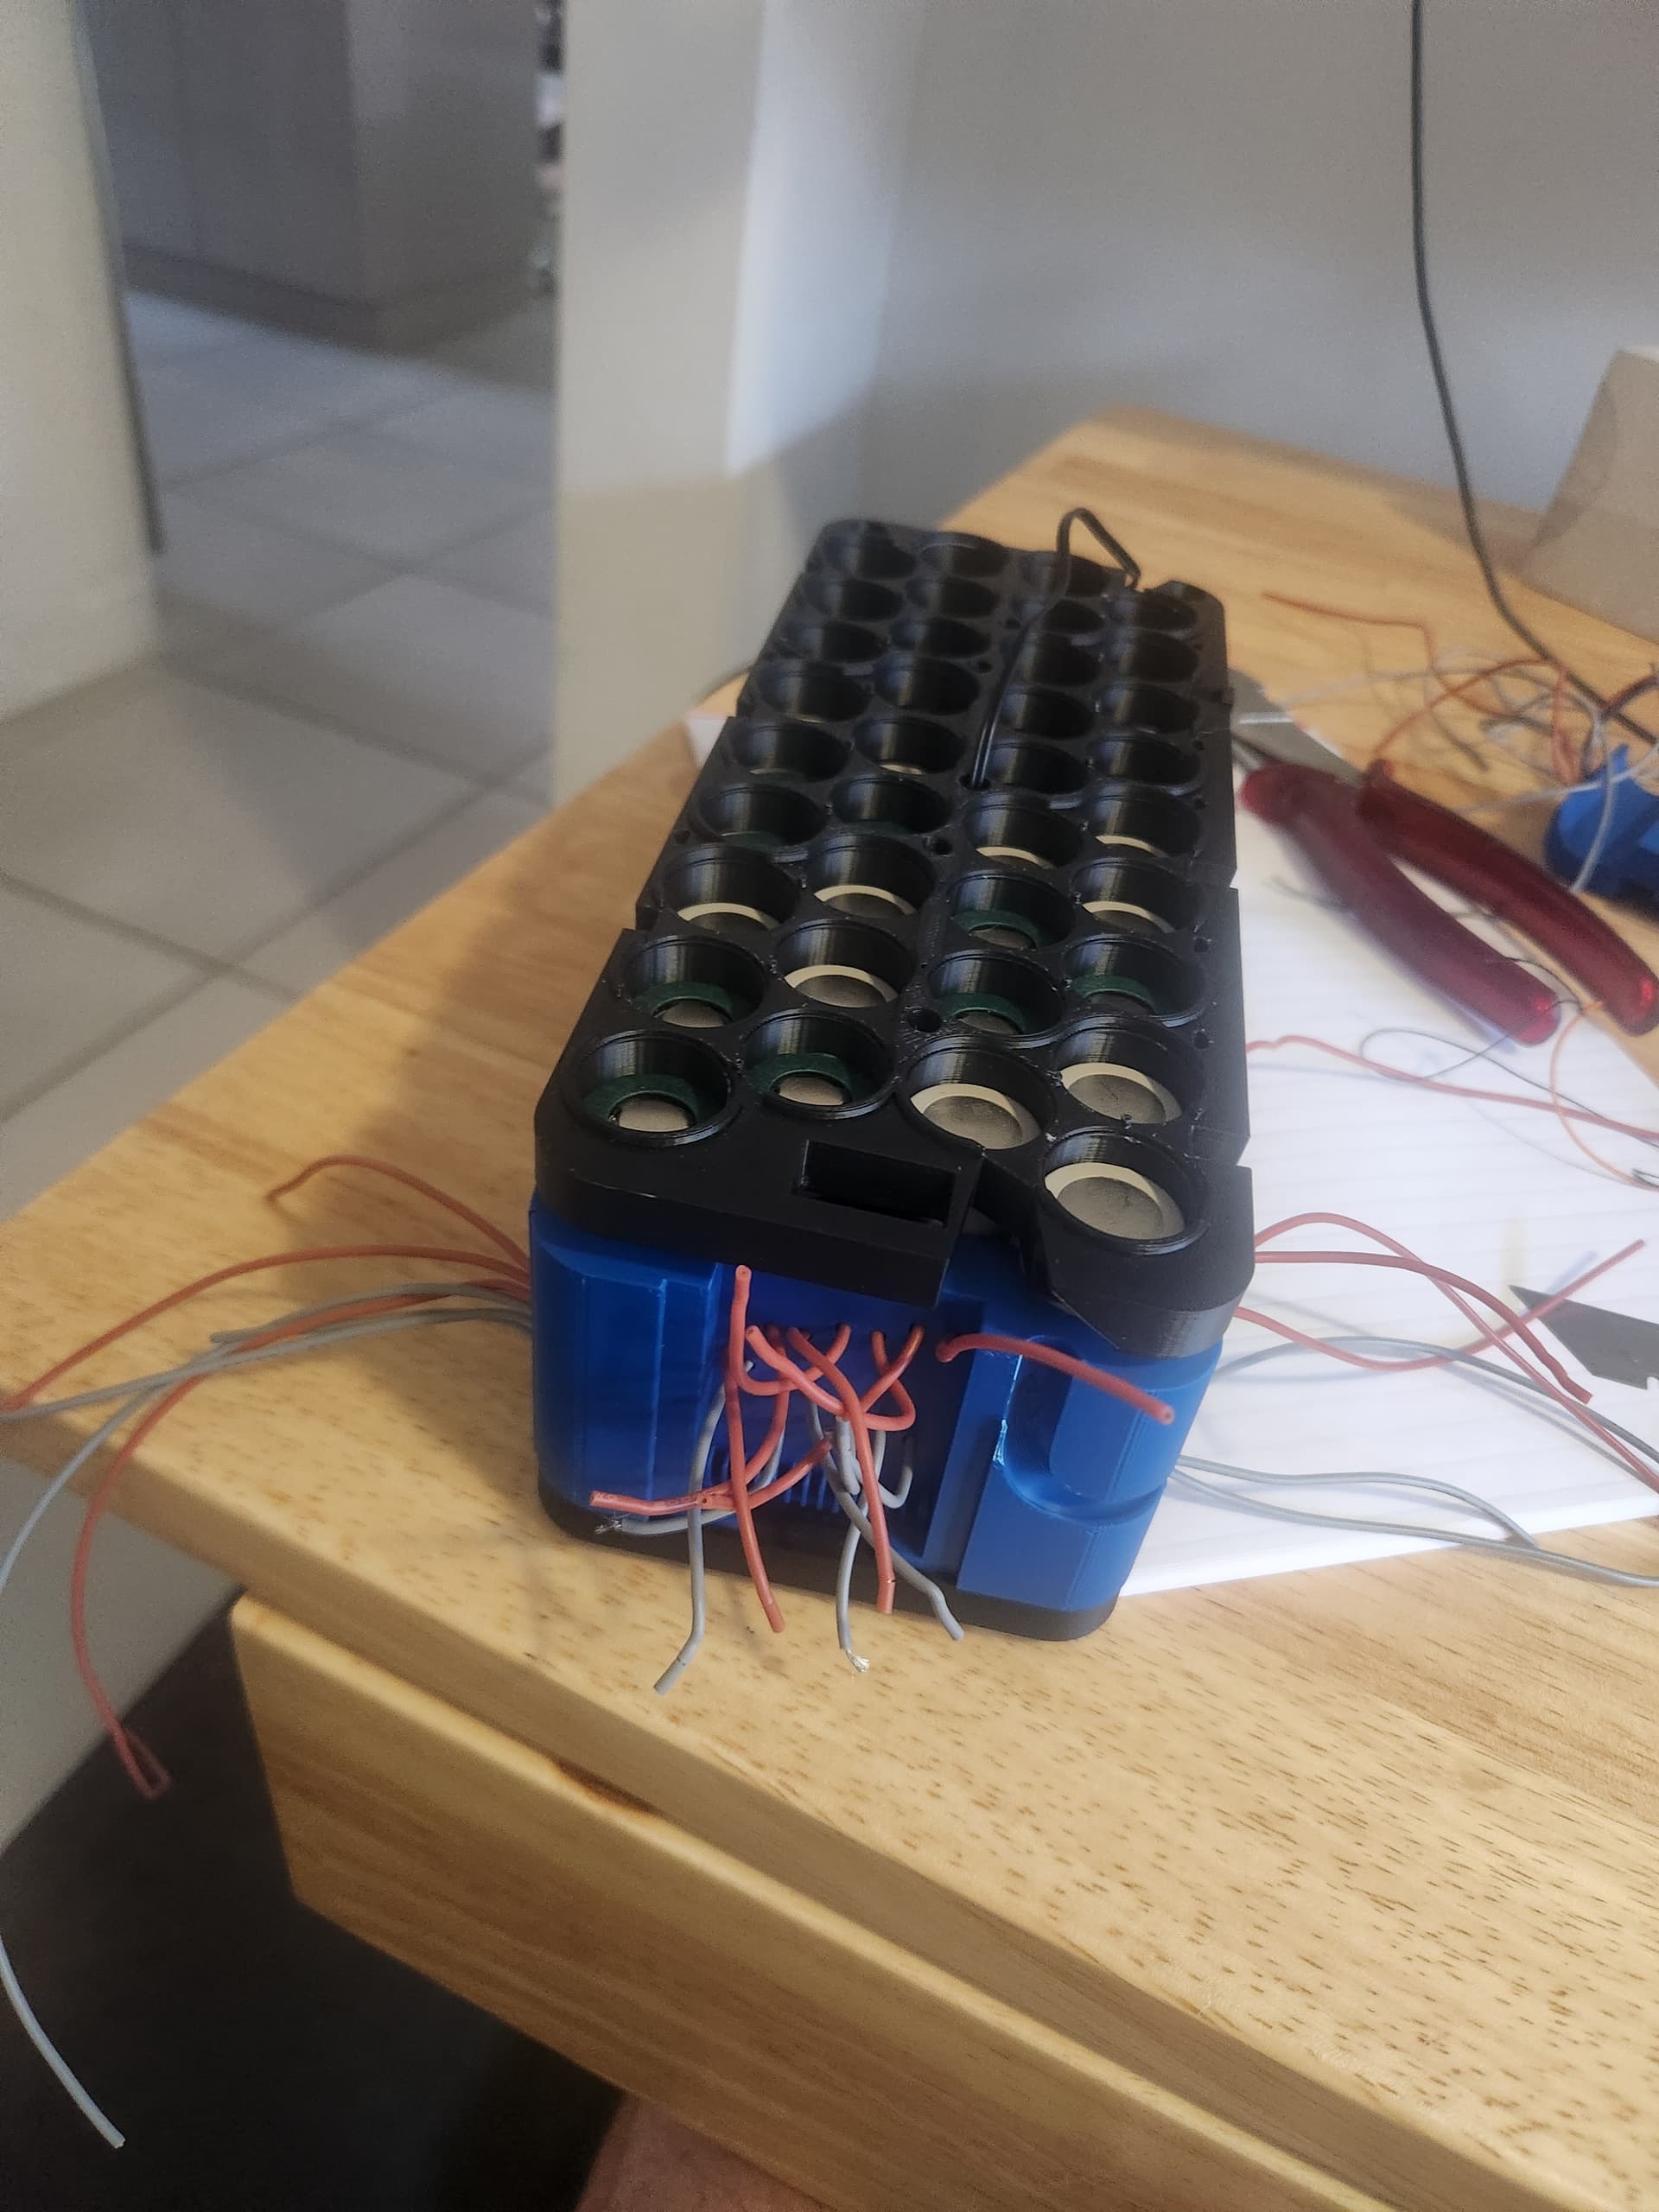
I did about 6 months of research before building the battery and a lot of calculations and changes in my design for about another 6 months after. The first question I had to answer was what configuration was I going to use which was answered through the desire to make sure I had enough power to get up on the foil and as I was not sure how much I was going to need I opted for a 12 cell in series for a total of 43.2V as that was the largest hobby battery balance charger I could find and figured that it would then allow me to try with smaller batteries later on. As I had the balance charger and the Flipsky 75200 has VESC I saw no need for a BMS, as most BMS units that allow large output currents are quite chunky and figured the VESC can handle the current and voltage management.
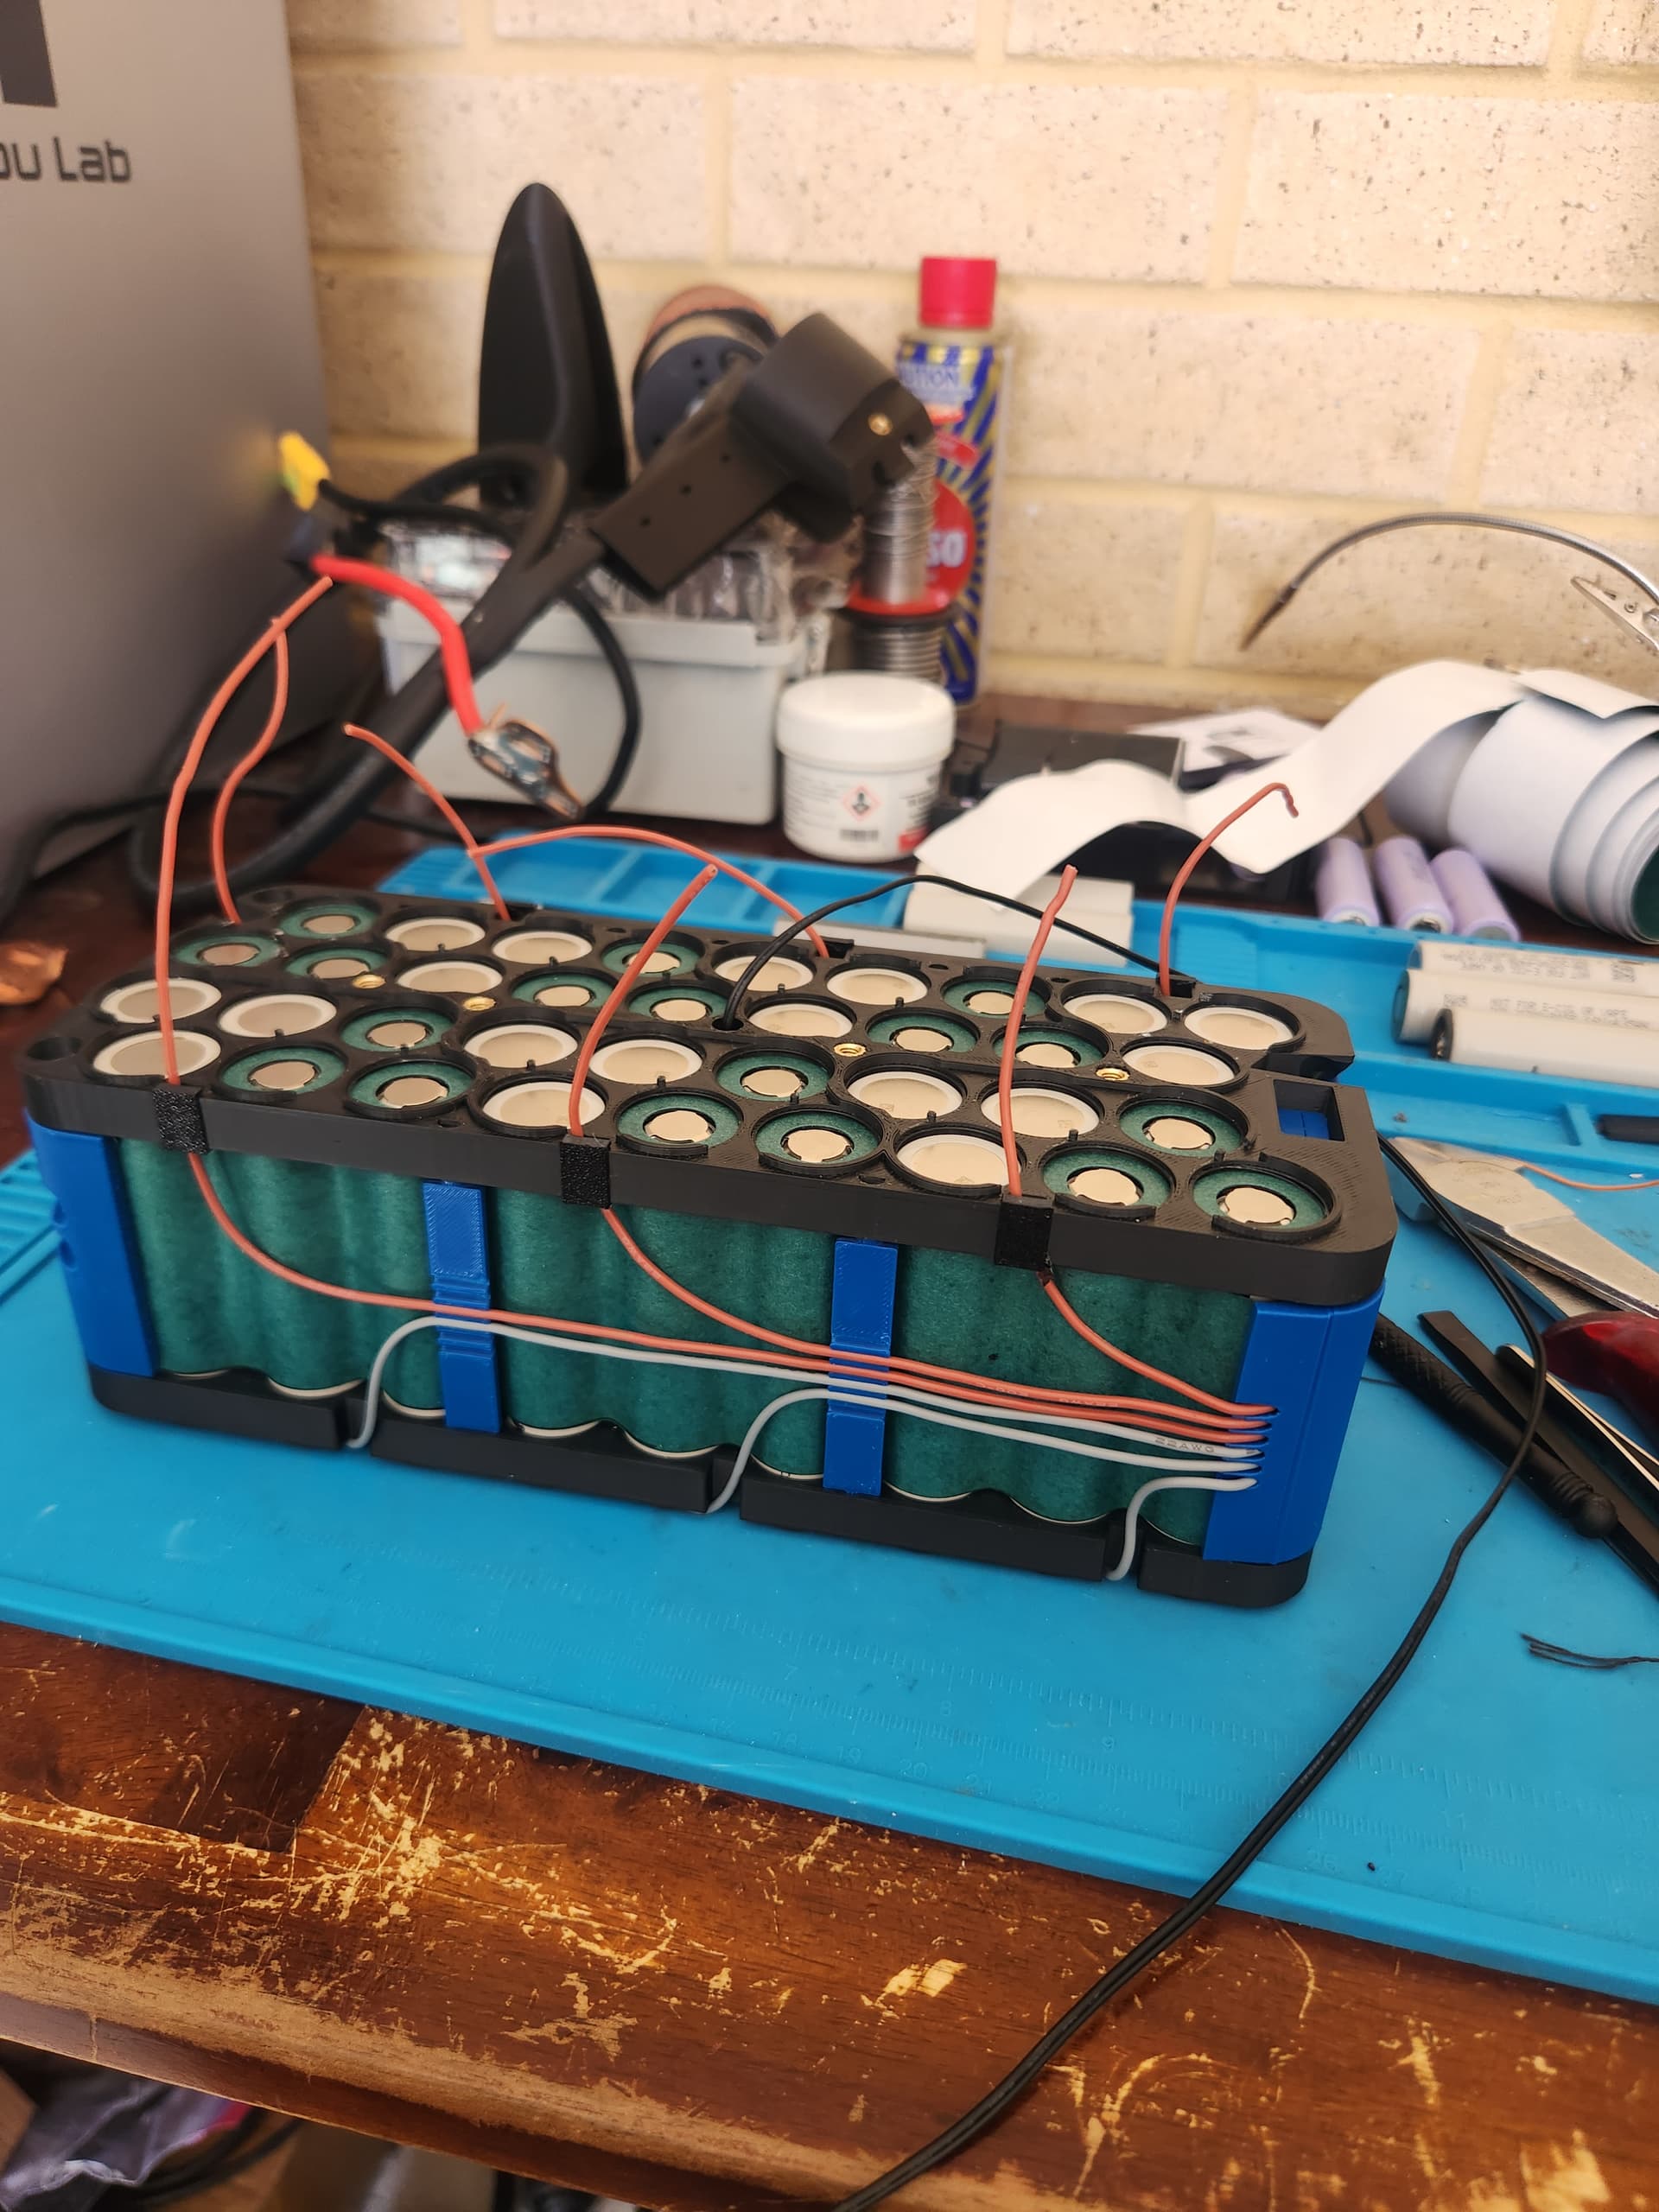

I choose the Molicel p45B cells as I opted for a 3 parallel configuration giving a total of 13.5Ah and the ability to run 135A constant with temp monitoring if required. As the 6384 specs state 4400W max I did not plan to exceed 100A but wanted the head room as I may use the battery for other projects. Turns out with my current board configuration I was flat out getting to 70A from the battery with the ESC maxing out at 130A so it has been a good fit.
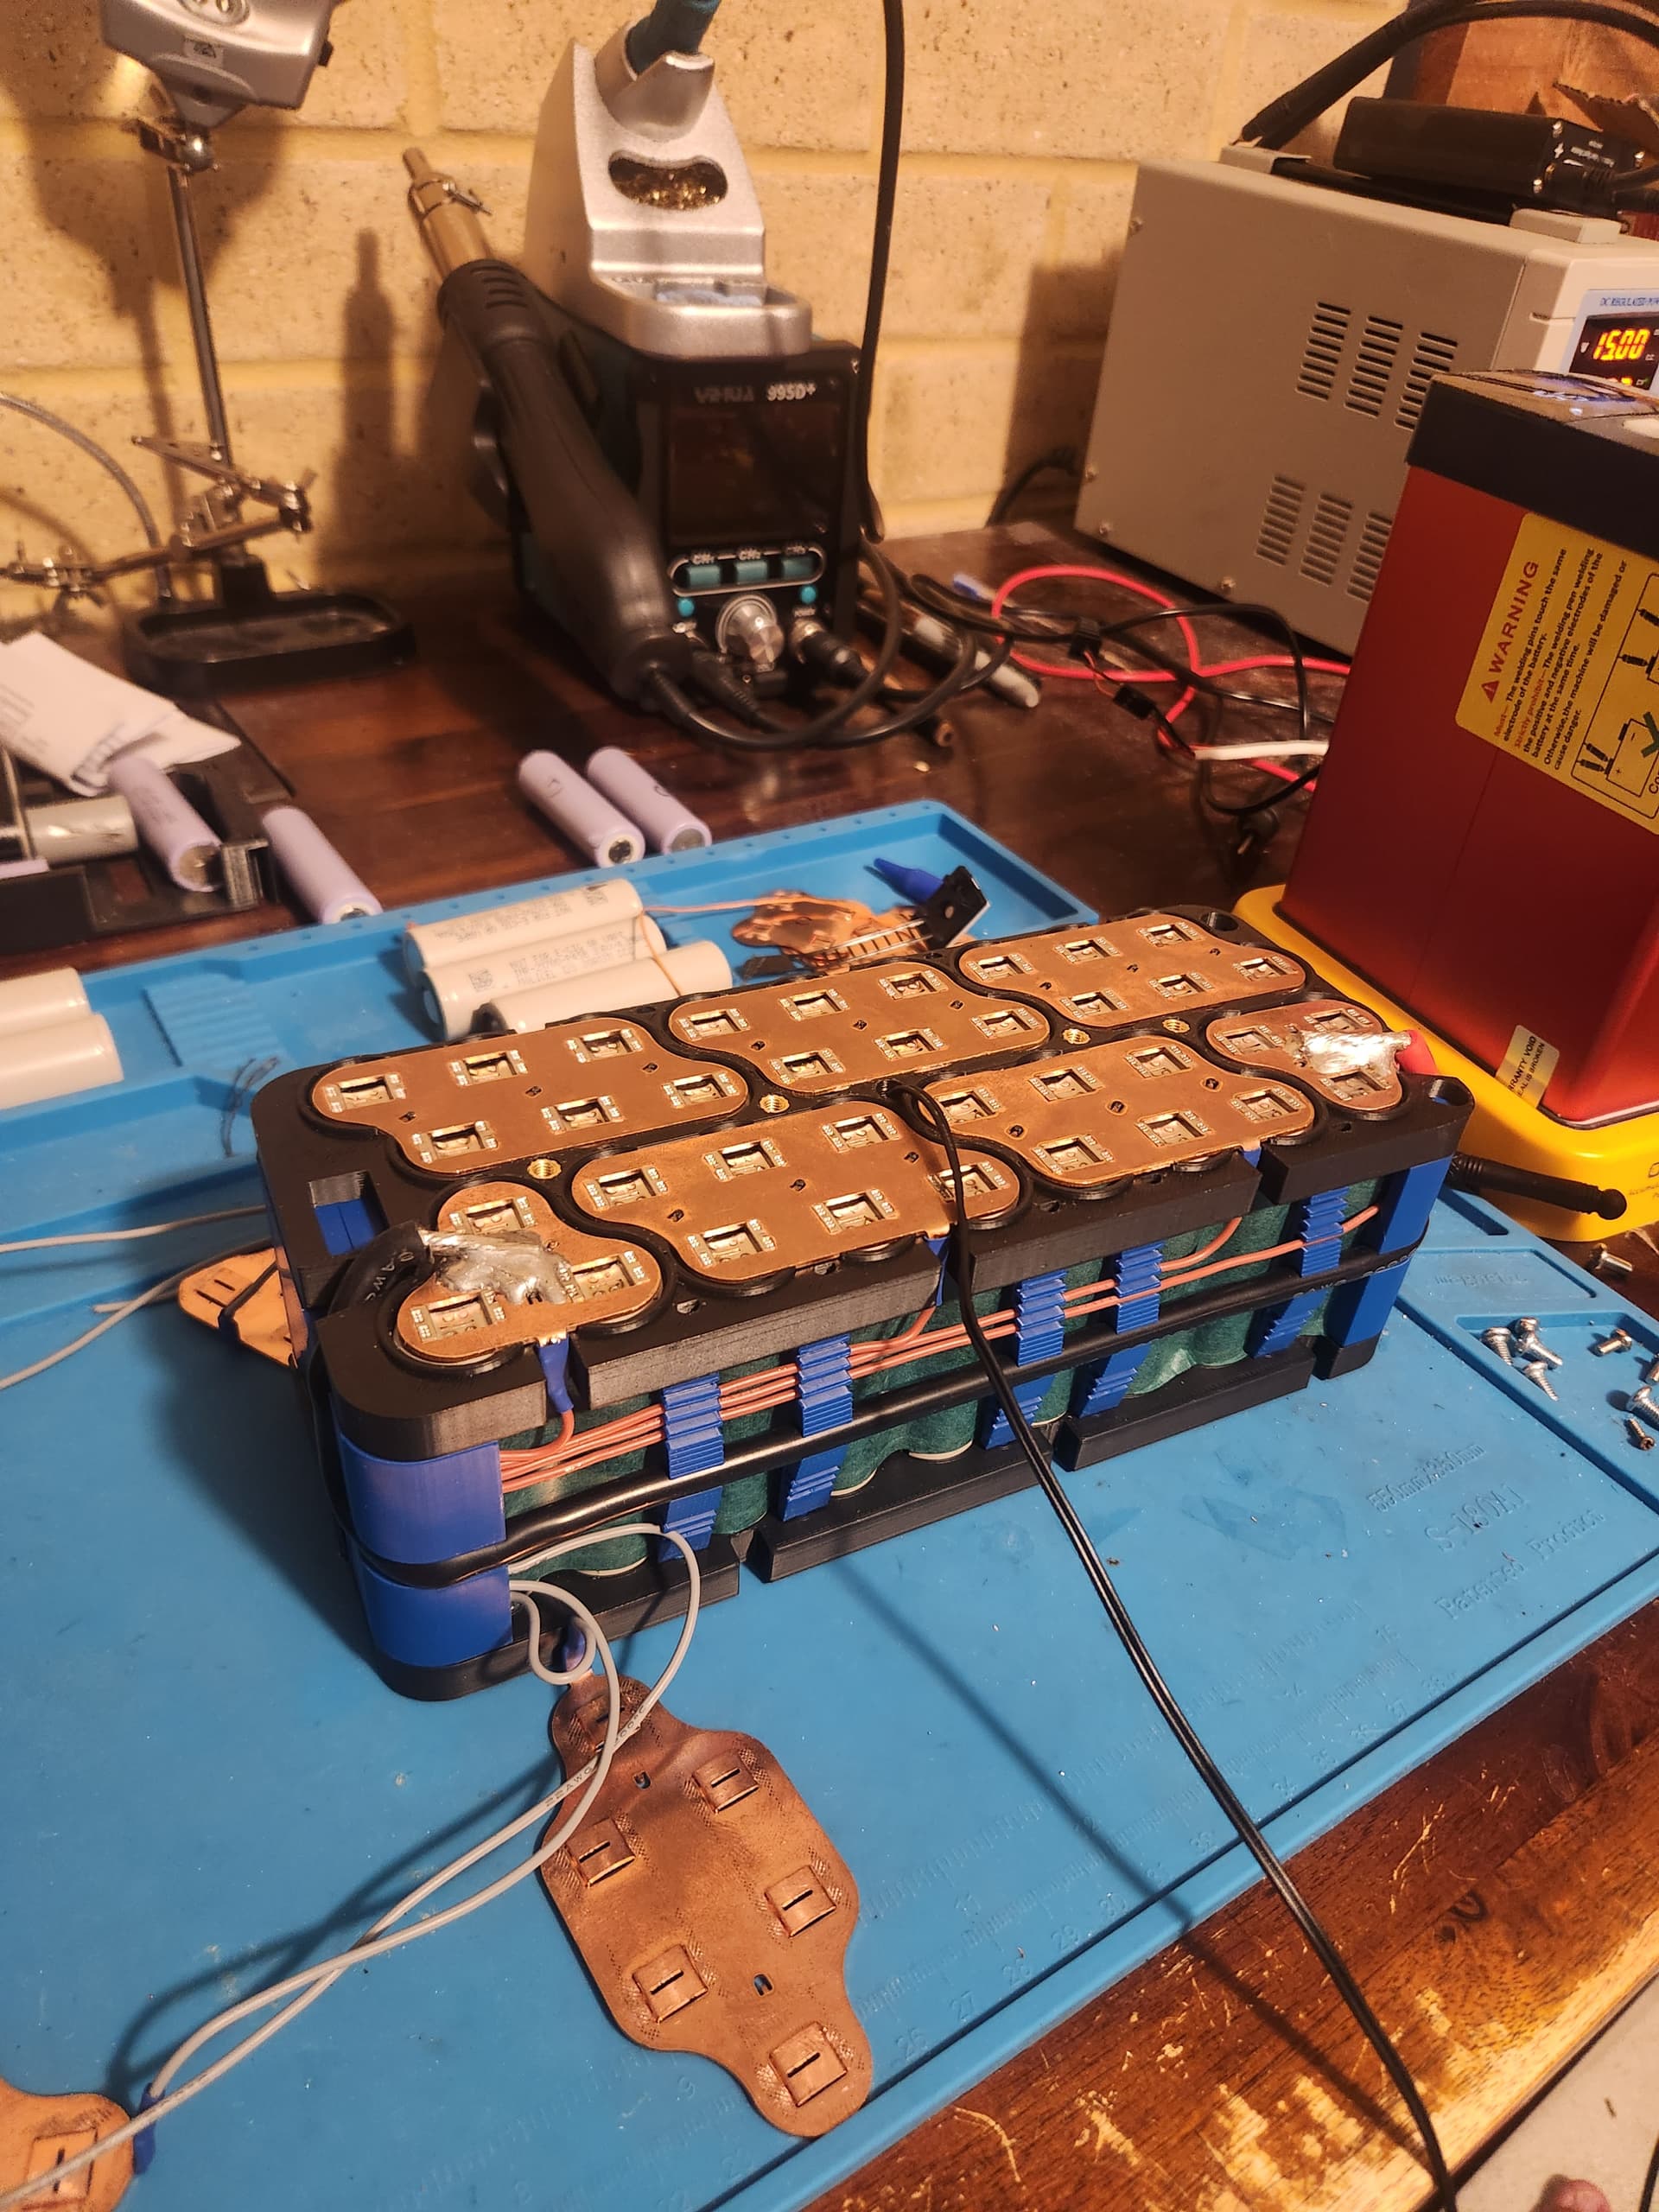
Originally, I planned to just use nickel strip with a cheaper spot welder but it came apparent that to support the potential higher current that copper would be the best way forward. This lead me to trying to achieve the Nickle Copper sandwich technique which is quite popular for higher amperage pack building. However, the AliExpress supply of copper large enough to laser cut out my busbars was not available and I saw the WELLGO busbars on AliExpress so I reached out to get a quote for my custom designed bus bar which was relatively cheap, with the only draw back being that I had to order a minimum number of 5 sets. I thought that this would be good anyway as I would most likely stuff one set getting the spot welder setup. Turns out they gave me some scrap pieces to practice on so I have 4 sets left to build more latter or maybe sell them if there is any interest.
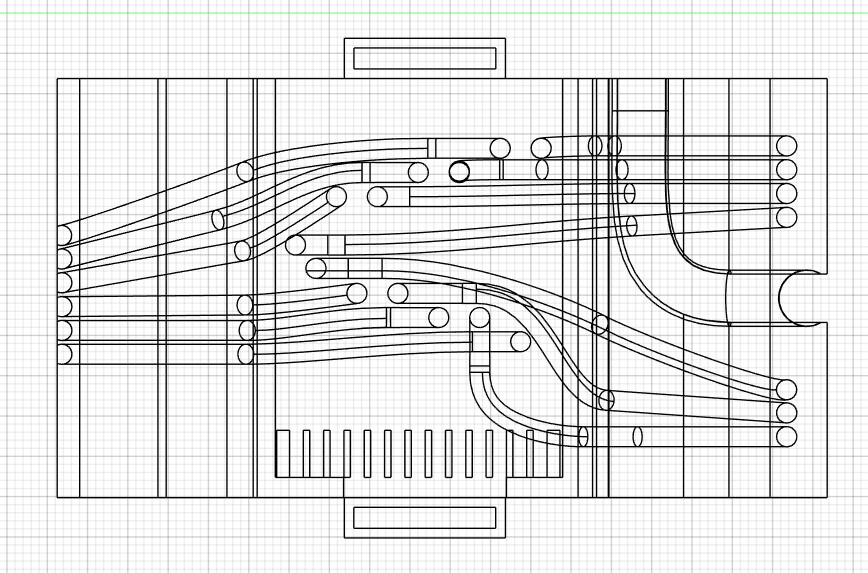
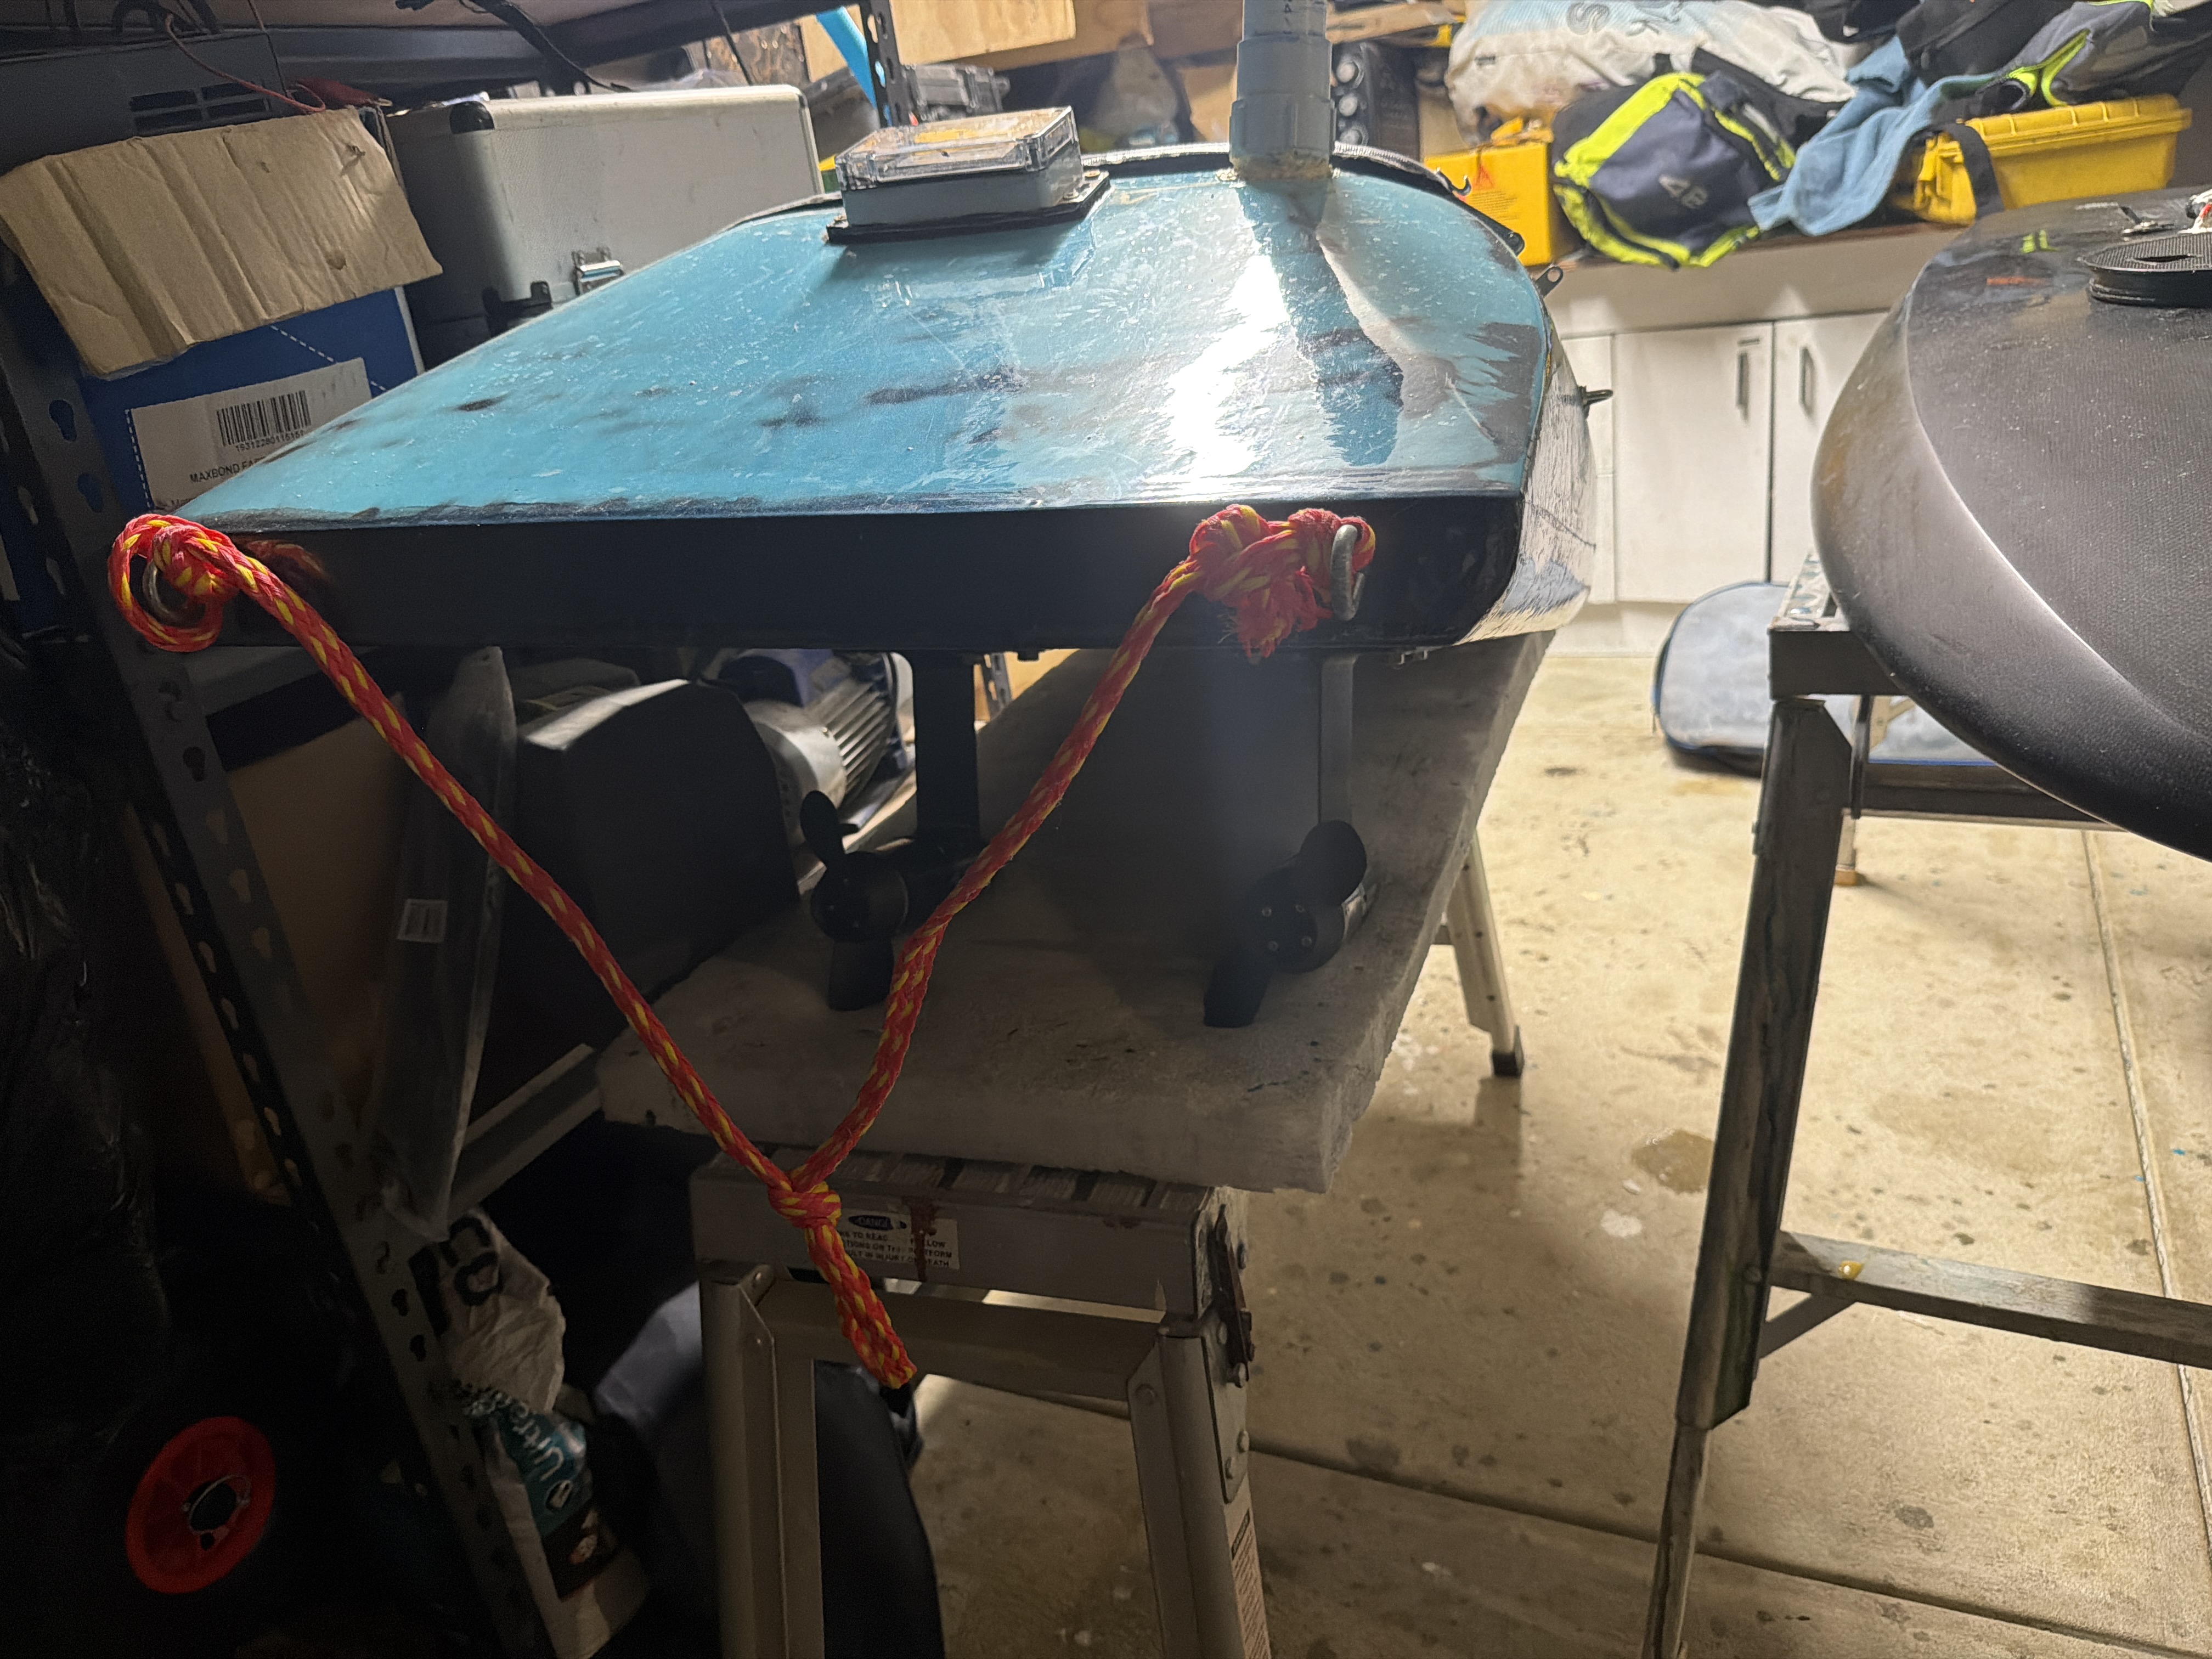
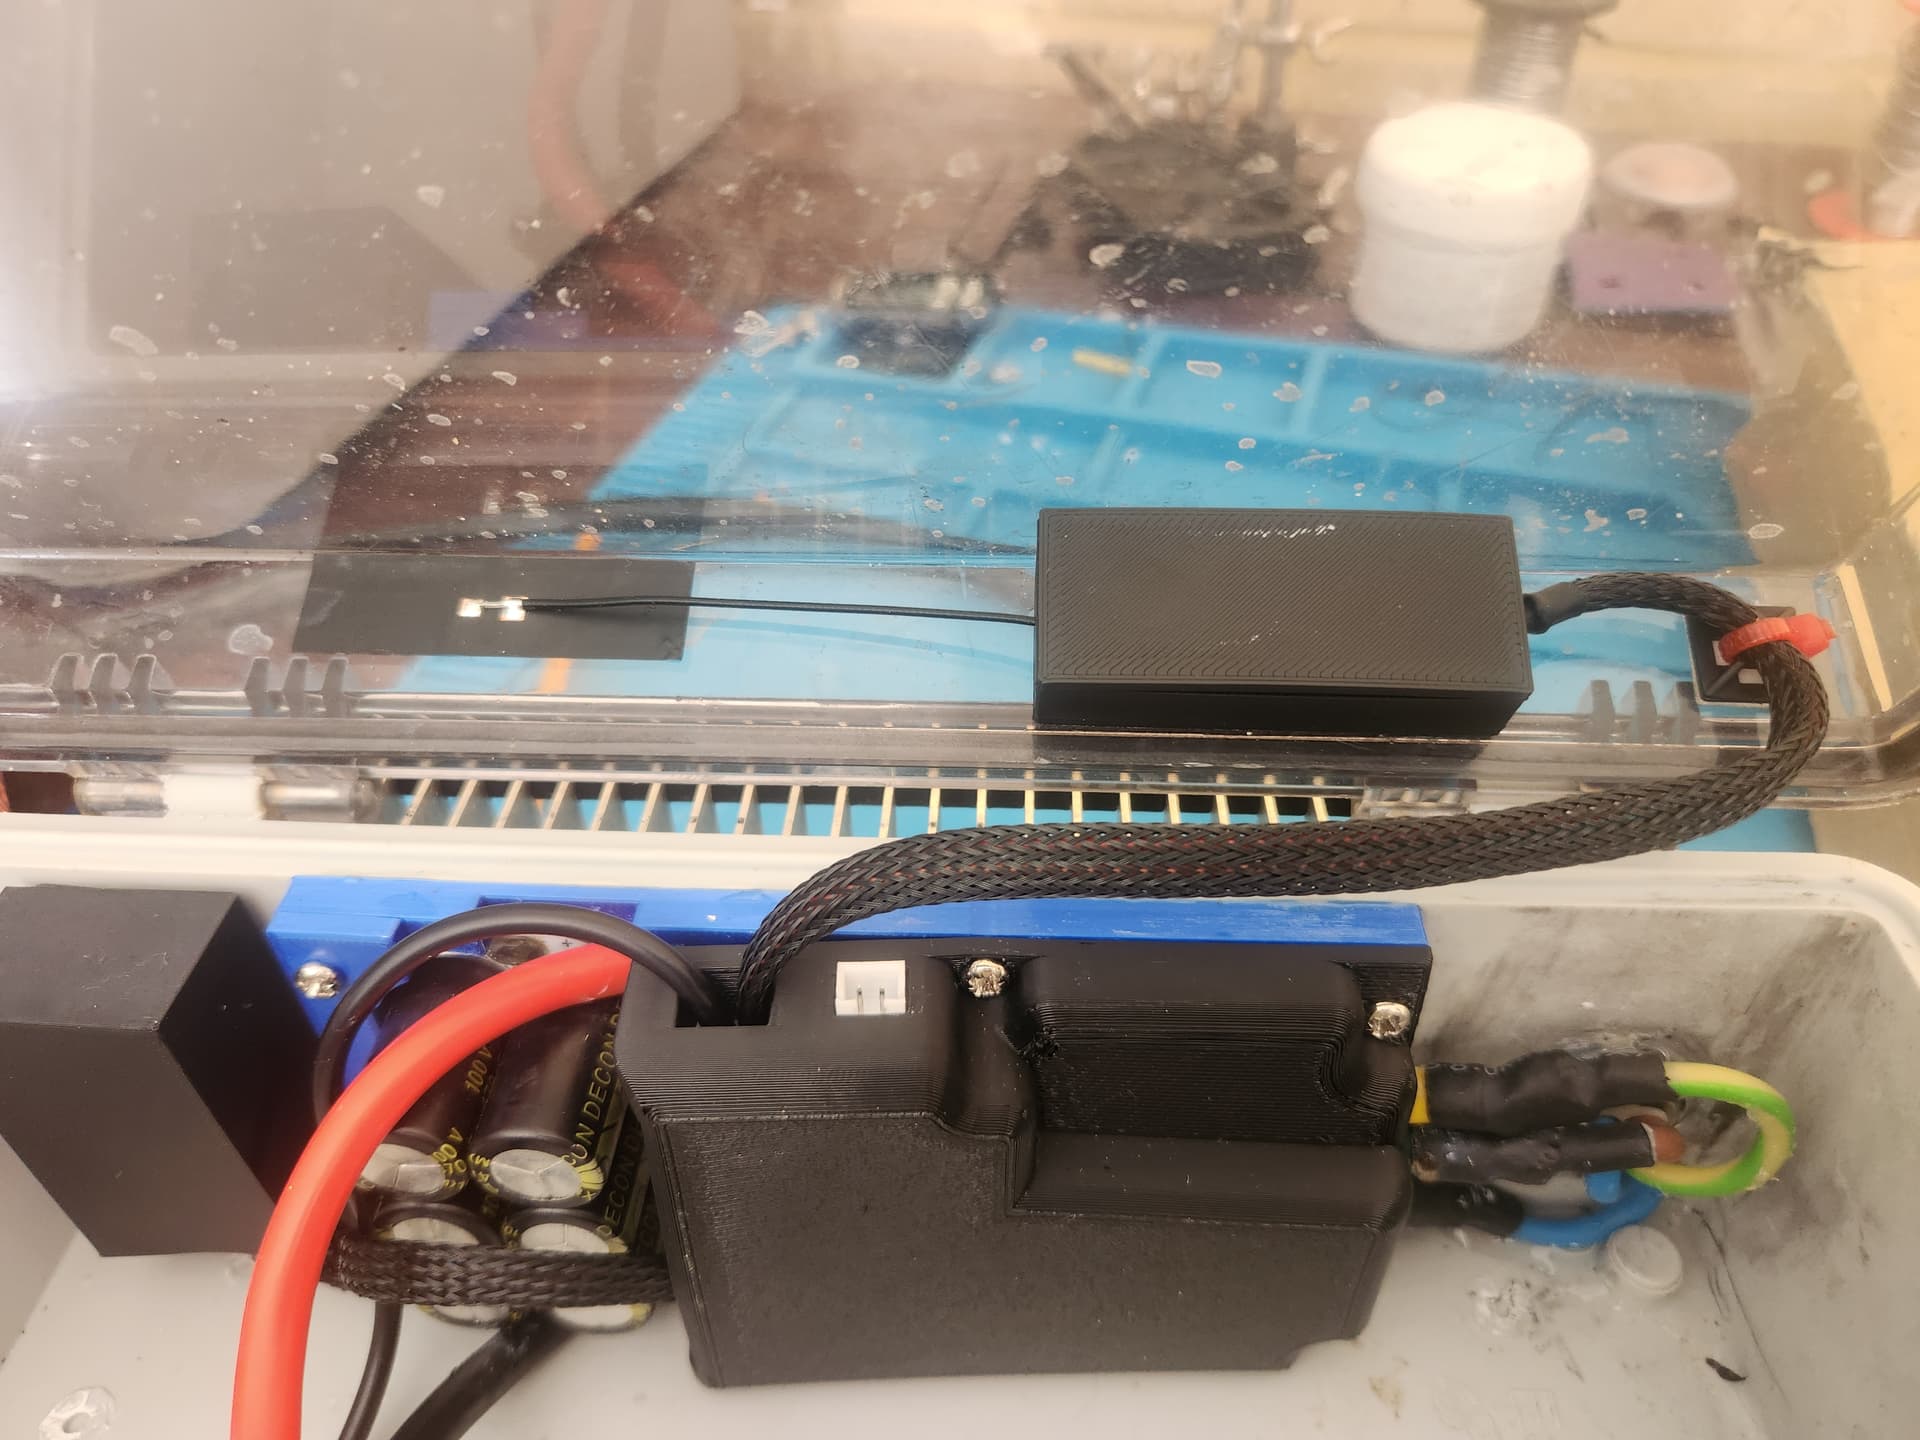
I took a great amount of time designing the battery cable routes to make sure all wires never crossed over. I definitely spent to much time creating the end piece with the 13 pin connector so that the wires would not rub. As part of the battery monitoring I used a 10k NTC thermistor mounted in the middle of the pack that runs to a connect for the 75200 ESC which is usually used for a motor temp sensor so that my logging can show how the battery deals with the heat. I also added an inline fuse of 100A just as a safety factor incase things go horribly wrong.
4 Likes
Very nice! I did something very similar. My cable guide became lose while foiling and I cut the wires with the blades. Maybe consider securing it with a layer of tape or a cable tie.
Thanks Joka .The mast faring is printed with ABS and is a slide in design so seems pretty strong but I will have to keep an eye out for that!
This is a really well thought out build. Thanks for sharing all of the details.
Wow PF, that’s some impressive attention to detail and huge amount of work to get it all so polished.
Interesting that the shape for the cable fairing you ended up with is so similar to the profile of the Axis alloy mast.
Well done !
Getting to the point of going for internal cable with mini pod makes a huge difference
Thanks Jonathan. I 3D scanned the mast aerofoil design and basically just stretched it. I figured axis would of done the RnD so hopefully my stretching it at the right place should allow it to continue doing its job.
I’ve moved on from the Axis alloy mast despite the elegance of internal cable. Wanted the stiffness of carbon mast and ended up going for the One Axis compatible mast
I’m less than 70kg, can only imagine how wobbly it would feel at 120!
For those looking at having a go at building there own battery I found ludwig_bre has done a great job with his youtube video https://foil.zone/t/efoil-battery-build-video-tutorial/18891. If you happen to get the 75200 standard ESV but want the bluetooth connectivity then I found this thread https://forum.esk8.news/t/usb-c-to-vesc-can-forward-adapter-cheap-and-diy/79789 very handy and it also provides information on how to add an SDcard module for logging.
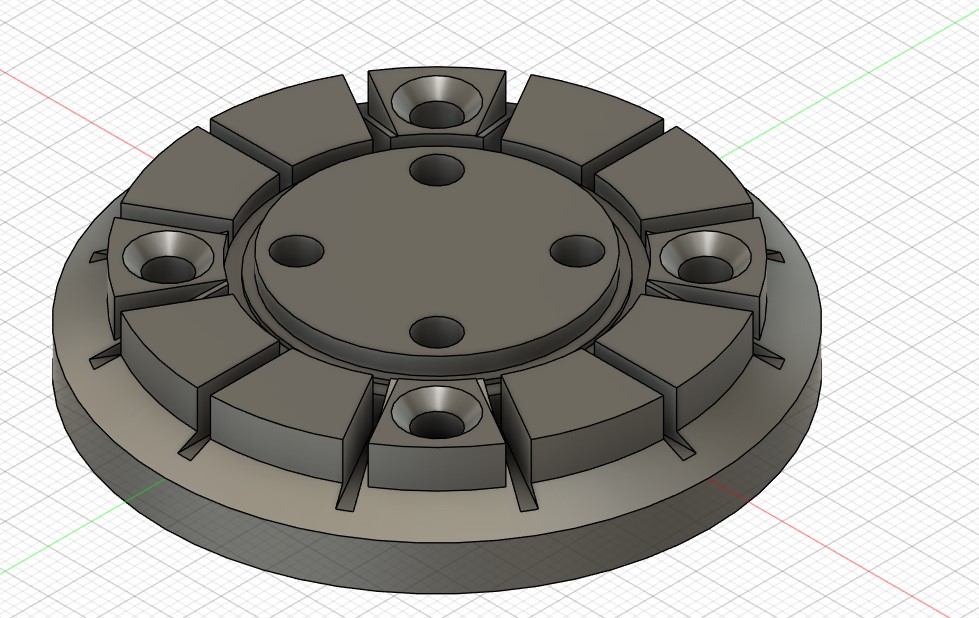
I really wanted to use a PropellerKing Triniity NXT however the cost difference and shipping to Australia was just too much. Also, if I needed replacement blades it just was not cost effective. Maybe in the future the AUD with get stronger and that will be a possibility. For those in Australia who want a no fuss metal Prop while expensive its hard to look past the Foil Drive Prop so I made an adapter plate so it can be mounted on the Flipsky waterproof 6384.
I will also upload the files for the snap lid latch securing brackets.
and strap slimline that you can use with a GRUNT 25mm x 80cm Extra Wide Versa Strap for $8 AUD from Bunnings and water resistant mounting tape also available from Bunnings if in Australia.
I forgot to add the 3M dual lock tape to the list which i use as the primary mount tape which you can get 1M for the 1 inch wide clear for $16 AUD.
I also have an enclosure to mount an ESP32 C3 with the required CAN board and SD board with a TPU cover if anyone is interested.
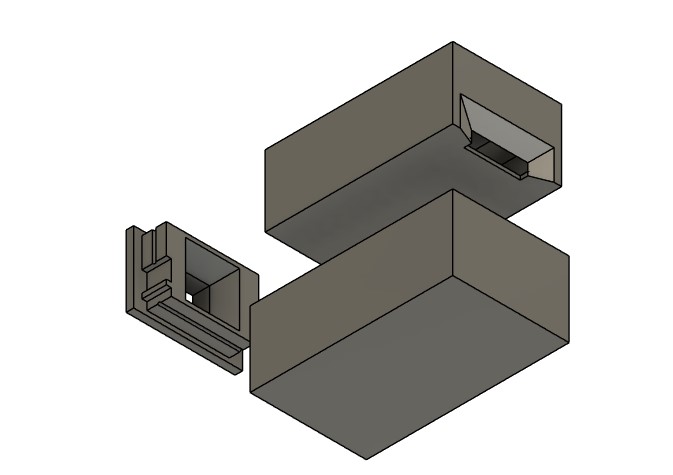
and a case for the Flipsky BT board
I will aim to upload the files soon and add them. message me otherwise. Apoligies this is coming out rather disjointed I am trying to rember back as I was to lazy to blog as I went along.
5 Likes
First of all, I have great respect for your work. Everything is very well thought out. Normally, you only find beginners who want to get on the water quickly, easily, and cheaply. Like Markus, you really put some thought into it and developed a cool solution.
I myself use dozens of DIY Vesc Express with the ESp32 and CAN module. The functionality for the price and the convenience are just awesome. There’s no need to buy a Bluetooth module for €15.
If you don’t have an infinite number of devices on the CAN bus, this might not be a bad option. This way, you can also use Bluetooth.
2 Likes
Awesome build! Do you think you could upload the print files. Does the adapter hub you made work for the new flipsky 6384 motor? Have been having trouble finding prop mounts for the new motor. Thanks so much!
It works for the short shaft 6384 old waterproof flipsky motor.6384 waterproof. I will endeavour to upload them today.
Just saw the change with the extruded part. I should be able to modify mine easy enough if needed, would just need the dimensions for the raised part and the hole locations.
I have uploaded the .STL files.
FlipSky 6384 Adapter plate for Foil Drive prop
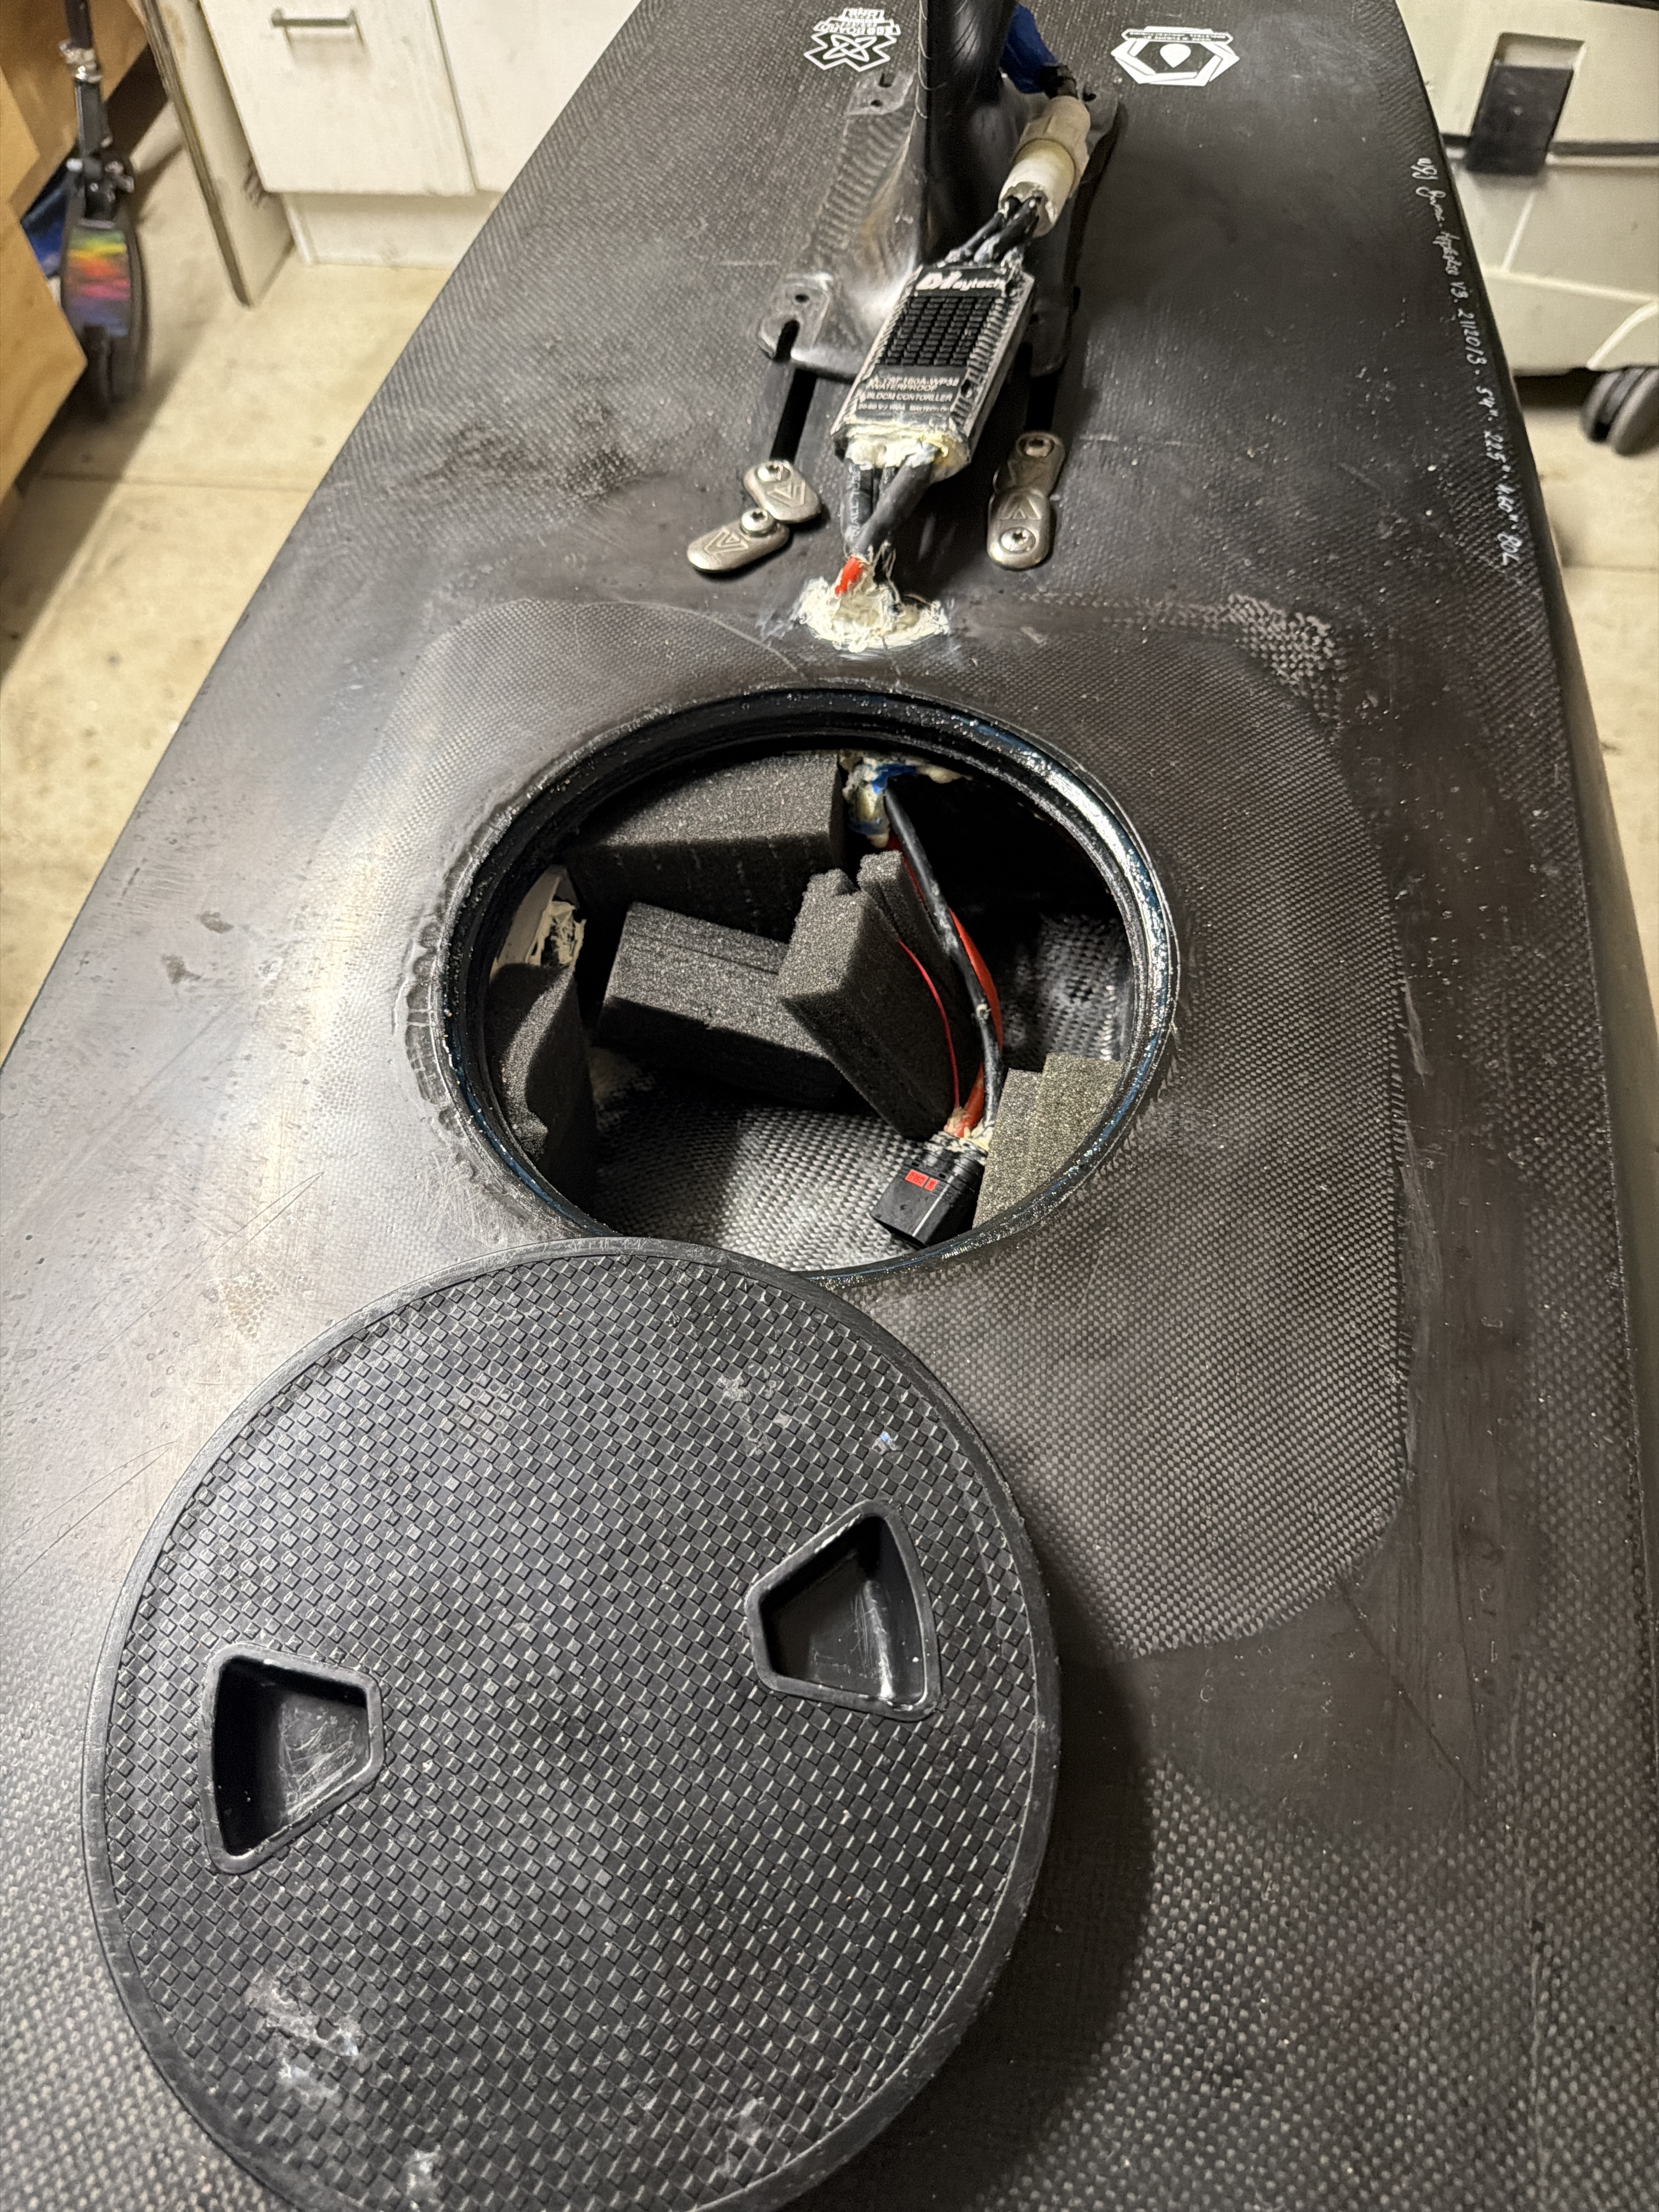
latch lock for battery box
Strap mount for battery box
Box for DIY logger ESP32, CAN, SD card for VESC
box with snap lid for FlipSky transmitter for use with remote
Fairings and cable holder for AXIS 19mm mast
If you would like to modify any please message me and I will send you a workable model.
3 Likes
Hi Phat foiler,
You’ve done a great job on your build. i’m also in Perth WA, I have built a similar setup but without vesc Im running a Maytech 160amp ESC and running Molicel P50 21700 in 12s configuration, but I’ve ran into a problem were motor cuts out when i go over half throttle. Ive worked out theres too much draw from batteries. Mine is intergrated inside my appletree board. I think I may need to change ESC to vesc for programmability but i have no idea how to program them I tried once and failed, could you help me with settings needed with vesc?
regards Astan
Hey Astan,
That sounds annoying! Hmm 12s how many p? those cells should not be having any issues with current draw maybe a bottle neck somewhere?. I can try and help with the VESC programming not an expert but seemed to get mine going ok. What size motor are you using ?
First of thanks for replying I appreciate your time mate.
It worked fine for a while but for some reason last two times it’s failing. AI says it’s the batteries I’ve used can’t handle the draw. And it says I need to use P45 cells.
Battery is molicel 12s 3p
Motor is flipsky 140kv 6384 with 2 bladed prop from flipsky.
ESC is maytech 160amp waterproof esc
Built into a 80l apple tree board works great no drag apart from esc is sitting under neath in water for cooling.
I would prefer a vesc so I could reduce amps and try and get more run time like foil drive plus I would install into board so to have zero drag and then I will drill out this Armstrong mast and install cables internally. That’s the end goal. But the vesc stumps me. Would be keen to exchange numbers to chat on msg or what’s app?
You may like this boogie design. I personally think tow boogie is the way to go , nothing on your foil and learn how to pump more run time and freedom on the waves.