That would be a XL wing? My wife is really comfortable with M wing size, which is for curve 1100cm2. Your wing is definitely too big. Maybe you can borrow some wing from local ppl and just give it some trying.
Thanks. So, I will definitely try with some other wings. I had another wing that might have been ideal (Cabrinha Carve Medium) from what you say. Unfortunately, I lost it somewhere in the SF bay last week.  But I have access to a lot of wings.
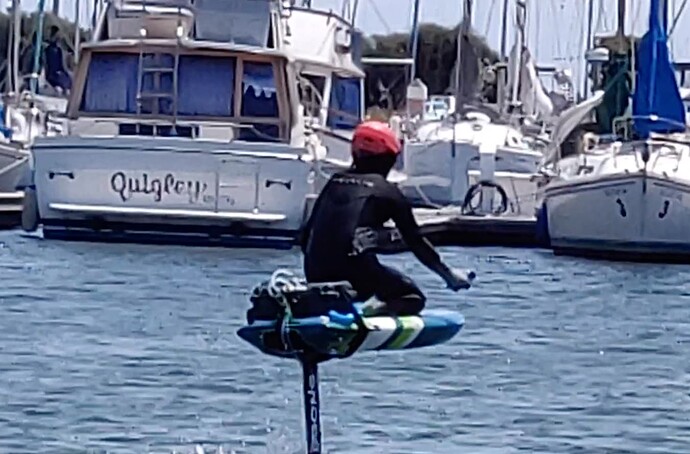
Hey Lien, great progress! It’s quite different than kite foiling but you will get it quickly. You are almost there. I had my first box on the nose, that worked well with weight balance and it allowed me to climb on the board form the back. But I think with a few more tries you can get yours to fly as is. Just keep it level at all times, lots and lots of front foot pressure, that feels very strange at first, and don’t lift off before exceeding stall speed of the wing with your total weight. Good luck! Keep us posted 
Merten
Thank you!
Would it help to install the motor a little higher? Right now it’s about 70 cm from the board.
Might help to reduce the front foot pressure on start a little but as soon as you fly you wish it would be low again. I’d keep it low and practice the start with lots of leaning to front. On some efoils I grab the nose and my head is above the water way infront of the board on startup. Awkward and something you are not used to from kite foiling yes, but you can relax, level out your position and straighten out as soon as it flys. Another quick adjustment could be adjusting the pitch on the stabilizer, less upwash, so less deg of separation to the front wing angle, will move your position back. I am sure you simulated this all with Dmitry’s cool tool  . But it also makes flight less stable.
Day 2
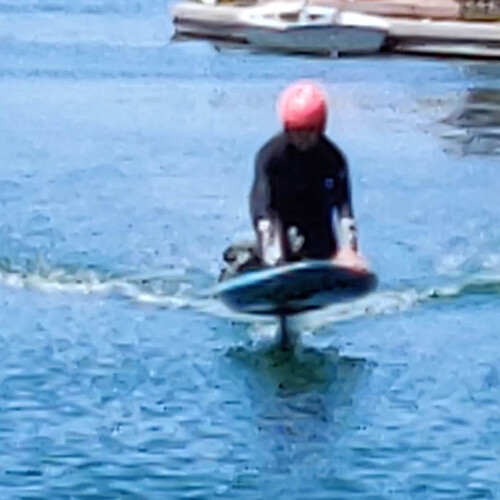
Today went much better (thank you all for the encouragement and tips!). I was able to go up and touch down in a controlled fashion a few times. I can see now that this is feasible.
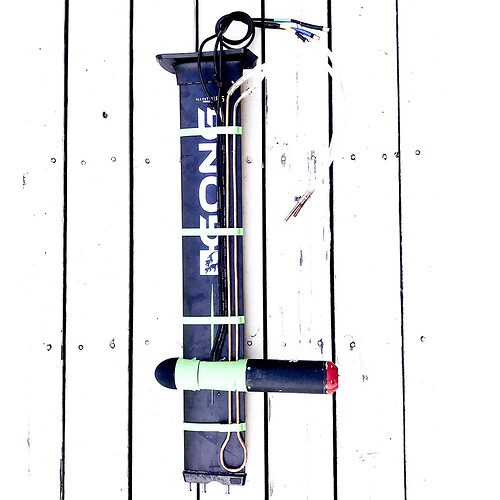
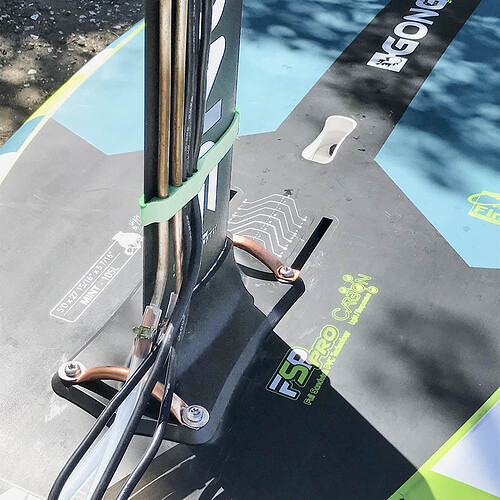
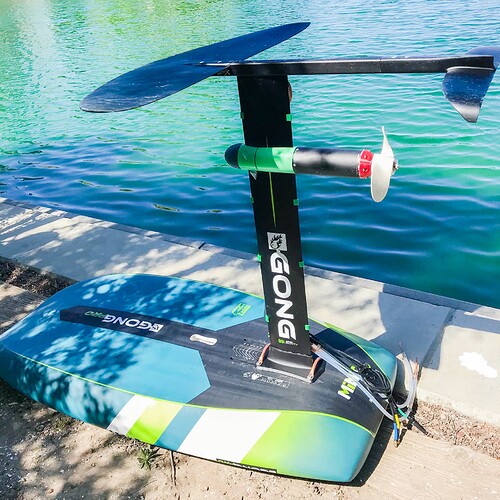
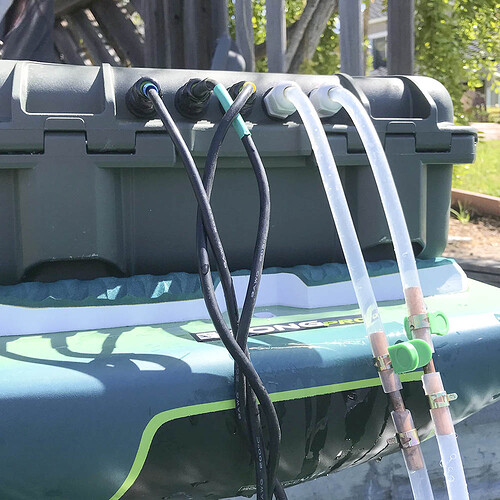
This time, I remembered to take pictures of the assembly:
- The motor wires run on the side of the mast. The copper tube is the cooling circuit for the ESC. We are using a closed circuit because the open one clogged after a few hours of test at home (This doesn’t seem to be a problem for the other builders using a water cooled ESC???)
- I mounted the mast as far back on the board as I could. The two little copper “handles” are handy to secure the suitcase straps and the motor wires, except I forgot to pass the wires through.
- The board is a cute little GONG Mint 5’ (105 l). Note how its color scheme complements the (artificial) hues of the FC lagoon…
- Connect the motor wires and the water hoses (don’t forget to put water in the water circuit). And secure the suitcase at the back of the board with straps, for now.
Question: How do I show a movie here? Link only ?
Youtube, Vimeo, … the choice is yours. 
A single cable outside the mast creates a lot of drag and makes the foil less stable.
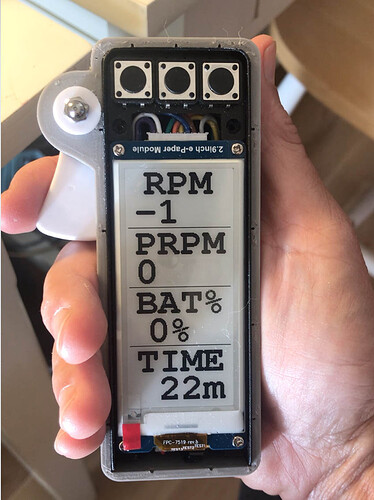
The remote
While I learn how to ride the eFoil, it’s time to fine tune the remote controller functionality.
For now, I have one trigger and three buttons, and everything is programmable. The remote is talking to the ESC. It has a large ePaper display that works like a charm even in bright sunlight.
I’m thinking the following “cruise control” scheme:
- Use the trigger to control the rpm up or down.
- Once you’re happy with the speed, press one button (the “Cuise Control - CC” button). At that point you can press the trigger all the way in, the rpm won’t change.
- Get out of CC by releasing the trigger
- Or, stay in CC and increase the cruising speed by pressing on the CC button.
Does that make sense?
What would be a reasonable/useful speed increment for the CC button? (My ambition is to eFoil small waves)
.
I’m wondering if there is any instance when you’d be cruising and want a big burst of acceleration? To catch a wave maybe? (Or run away from a shark, says my husband).
A really nice remote ! I’ve been reading your different posts since #145 and have a few questions:
1- Do you mind releasing your BOM / part list ?
2- Why have you chosen an ESP32CPU vs an Arduino Nano + NRF24 very well documented with a lot of available code and now released in handy formats like the LGT-RF-Nano https://www.aliexpress.com/item/1005003589677555.html
3- What radio band are you going to use ? The connectivity mentioned in the specs is:
Wi-Fi: 802.11 b/g/n and Bluetooth: v4.2 BR/EDR + BLE (shares the radio with Wi-Fi)
4- your receiver: a twin ESP32board configured in rec mode ?
5- from remote to ESC, do you have the possibility to send a list of given rpms in PID mode, incremented by the CC(+) button ?
6- is your home-made ESC using a VESC SW ?
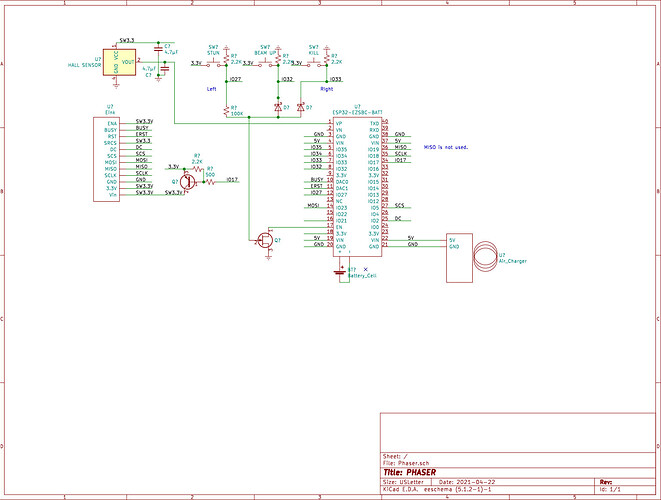
- Schematic below. This remote is customized to talk to our homemade ESC, but you can have our code, and adapt it to your own needs. Right now everything is “hand made” but my perfectionist husband Charlie is thinking of making a PC board. That might take a while though with summer vacations approaching.
(There is a little more detail if you read at #142.)
-
Control board: ESP32 Development Board with onboard LiPo State of Charge Monitor and LiPo Charger
-
Battery: AKZYTUE 3.7V 500mAh 452248 Lipo Battery - Rechargeable Lithium Polymer ion. Any 3.7 LiPo will do. This one is small and lasts about 3 hours.
-
Charger: Generic QI charger, Electronics removed from receiver, to fit into remote. Plastic removed from transmitter to get closer coupling. Qi Wireless Fast Charger Dock Charging Pad + Receiver For Samsung Android Phone | eBay
-
Pushbuttons: generic
-
Hall sensor 49E
-
Trigger with magnet to be detected by aforementioned Hall sensor - 3D printed
-
Display: E-Ink display/driver - Waveshare 2.9" e-Paper module (has driver). (Others will work. Needs B&W —color is too slow— and partial refresh feature.)
-
Our remote and ESC both use the ESP32 chip, which has a proprietary “connectionless” protocol called ESP_NOW. It is quite fast. It uses the same frequencies and will run concurrently with BT and WIFI. (Important undocumented fact: the WIFI must be on channel one.) For error control, we send with checksum and discard on error.
-
We use the EZSBC ESP32 boards in the ESC. Good quality control. The radio mode is WIFI_STA
-
ESP32 has everything. 1) A very well done (and very poorly documented) hardware BDLC motor controller. 2) Two cores, so we can have a real time one for motor control and the other for everything else. 3) Full radio: BT + WIFI + ESP_NOW. 4) Fairly good ADC.
We use the Arduino IDE though. -
The speed regulation is based on the observation of back EMF. We don’t feel like supporting the homemade ESC right now. Not that we don’t want to share, but that’s too much work.
-
Not at all. From the get go Charlie rejected it, but he doesn’t remember why… There’s probably some good reason he says… One thing I remember is tearing our hair out, trying to help a friend run a Flipsky 65161 motor with their ESC, and not being able to figure out what to do with their thousands of parameters.
So it’s all in-house “Charlie Davis” design, call it CDESC, CSESC, ChESC, or CESC, whichever is easier to pronounce…
Day 3 of learning to ride. Progress is slower than I expected, but I see that the magic carpet will fly eventually…
https://youtu.be/8L0Cy9PY_9M
Progress! It’s time for you to get back on your feet. Standing up, it is easier to control the exit to the wing than on your knees!
Day 4
We decided to test with a different propeller, just to see. Turns out I didn’t get enough speed for getting out of the water, so I decided to practice standing up on the board instead.
Is this Foster City lagoon ? I am located in San Jose CA.
Redwood City marina,101 highway 84 seaport blvd exit
hi @3rd_ave_Lien ,
Could you show me the electrical circuit diagram of the Water detection and the ESP32 to the ESC?
Thank you
Sorry, I was away the whole summer. Do you still need the information?
Gathering data - Day 1
Summer is over and we are back on the never ending project!
Summary of the previous episodes: nothing burns or leaks anymore. We reprinted the few items that fell in the bay. We learned that the leash and (more importantly) my eye glasses don’t float… I can go on the foil, but the ride is super unstable, in part due to the rider’s ability, but mainly because the propeller and wing are not matched to the application.
Our goal is to “fly” in a stable manner with the lowest power consumption possible. We have added GPS capability, and now we can start gathering useful data. We have access to:
- eFoil speed (GPS measurement)
- motor rpm
- Volts
- Amps, therefore Power (Volts x Amps)
- etc., including assorted temperature measurements
Setup: Gong Allvator XL wing + various Yamaha propellers
We cut some Yamaha propellers (D=7.25 P=6") to various diameters. Probably not the cleanest job. Today’s data is gathered in non-flying state, mostly to test that our data gathering setup is sound.
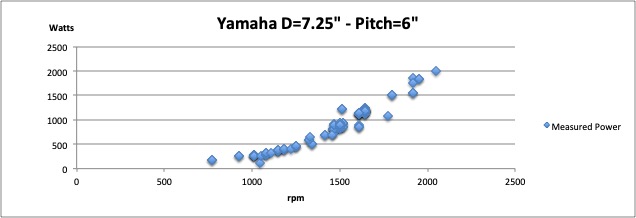
1. Power vs RPM
We plot how much power the propeller needed at different rpm. We get the familiar propeller curve, which is already satisfying…
For most vessels, the consumed power is given by: P = Cm x RPM**2.7. The higher Cm, the more power a propeller requires at a given RPM. Using points on the curve, we compute Cm ( Cm = 2.28 E-06 in this case), we plot P, and we get a very good fit between the computed P and the measured P! This sounds too good to be true…
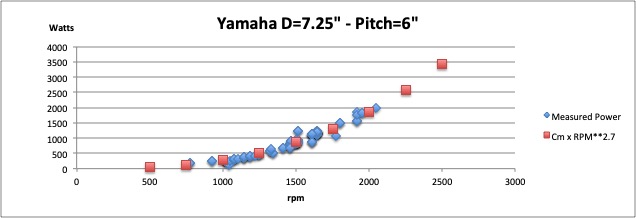
This gives us an easier and fairly reliable way to compute the power consumed at any RPM. We repeat the experiment for all the propellers we want to test.
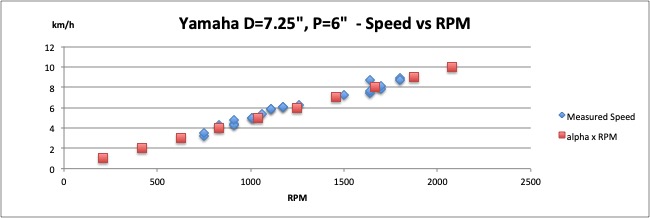
2. Speed vs RPM
The propeller’s pitch should theoretically tell us how fast we go at a given RPM, but real life is very different than theory. The GPS speed info is also not very accurate (current, position of the rider on the board, and probably manny other factors that I am not aware of yet, derail the measurements), but it’s a start.
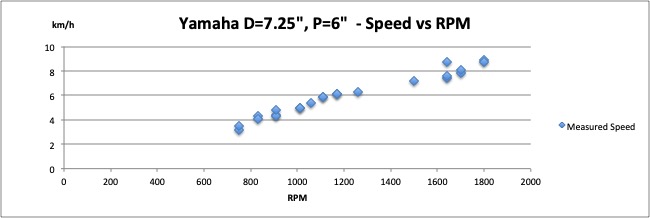
We fit a line through the plot as best as we can, this allows us to compute the propeller’s efficiency vs theoretical speed. Here, the propeller’s efficiency is 53%, which seems to be average for a boat.
3. Power vs Speed
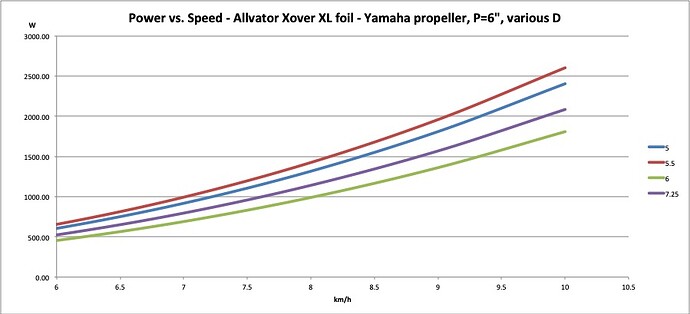
After a few hours of tedious work, we reach the grand finale, of “how much power is needed to attain a given speed”, for each of our setups. The result is this beautiful plot (we did check that this sort of matches the data we measured), which is a lot more readable than the initial raw data.
From this curve, we see that the 6" diameter propeller (green plot) is more efficient at getting us to the flying speed (around 10 km/h for this foil). Of course, what’s more important is which propeller will be more efficient at flying, but that will be another day.
