Jatem's Tow Boogie

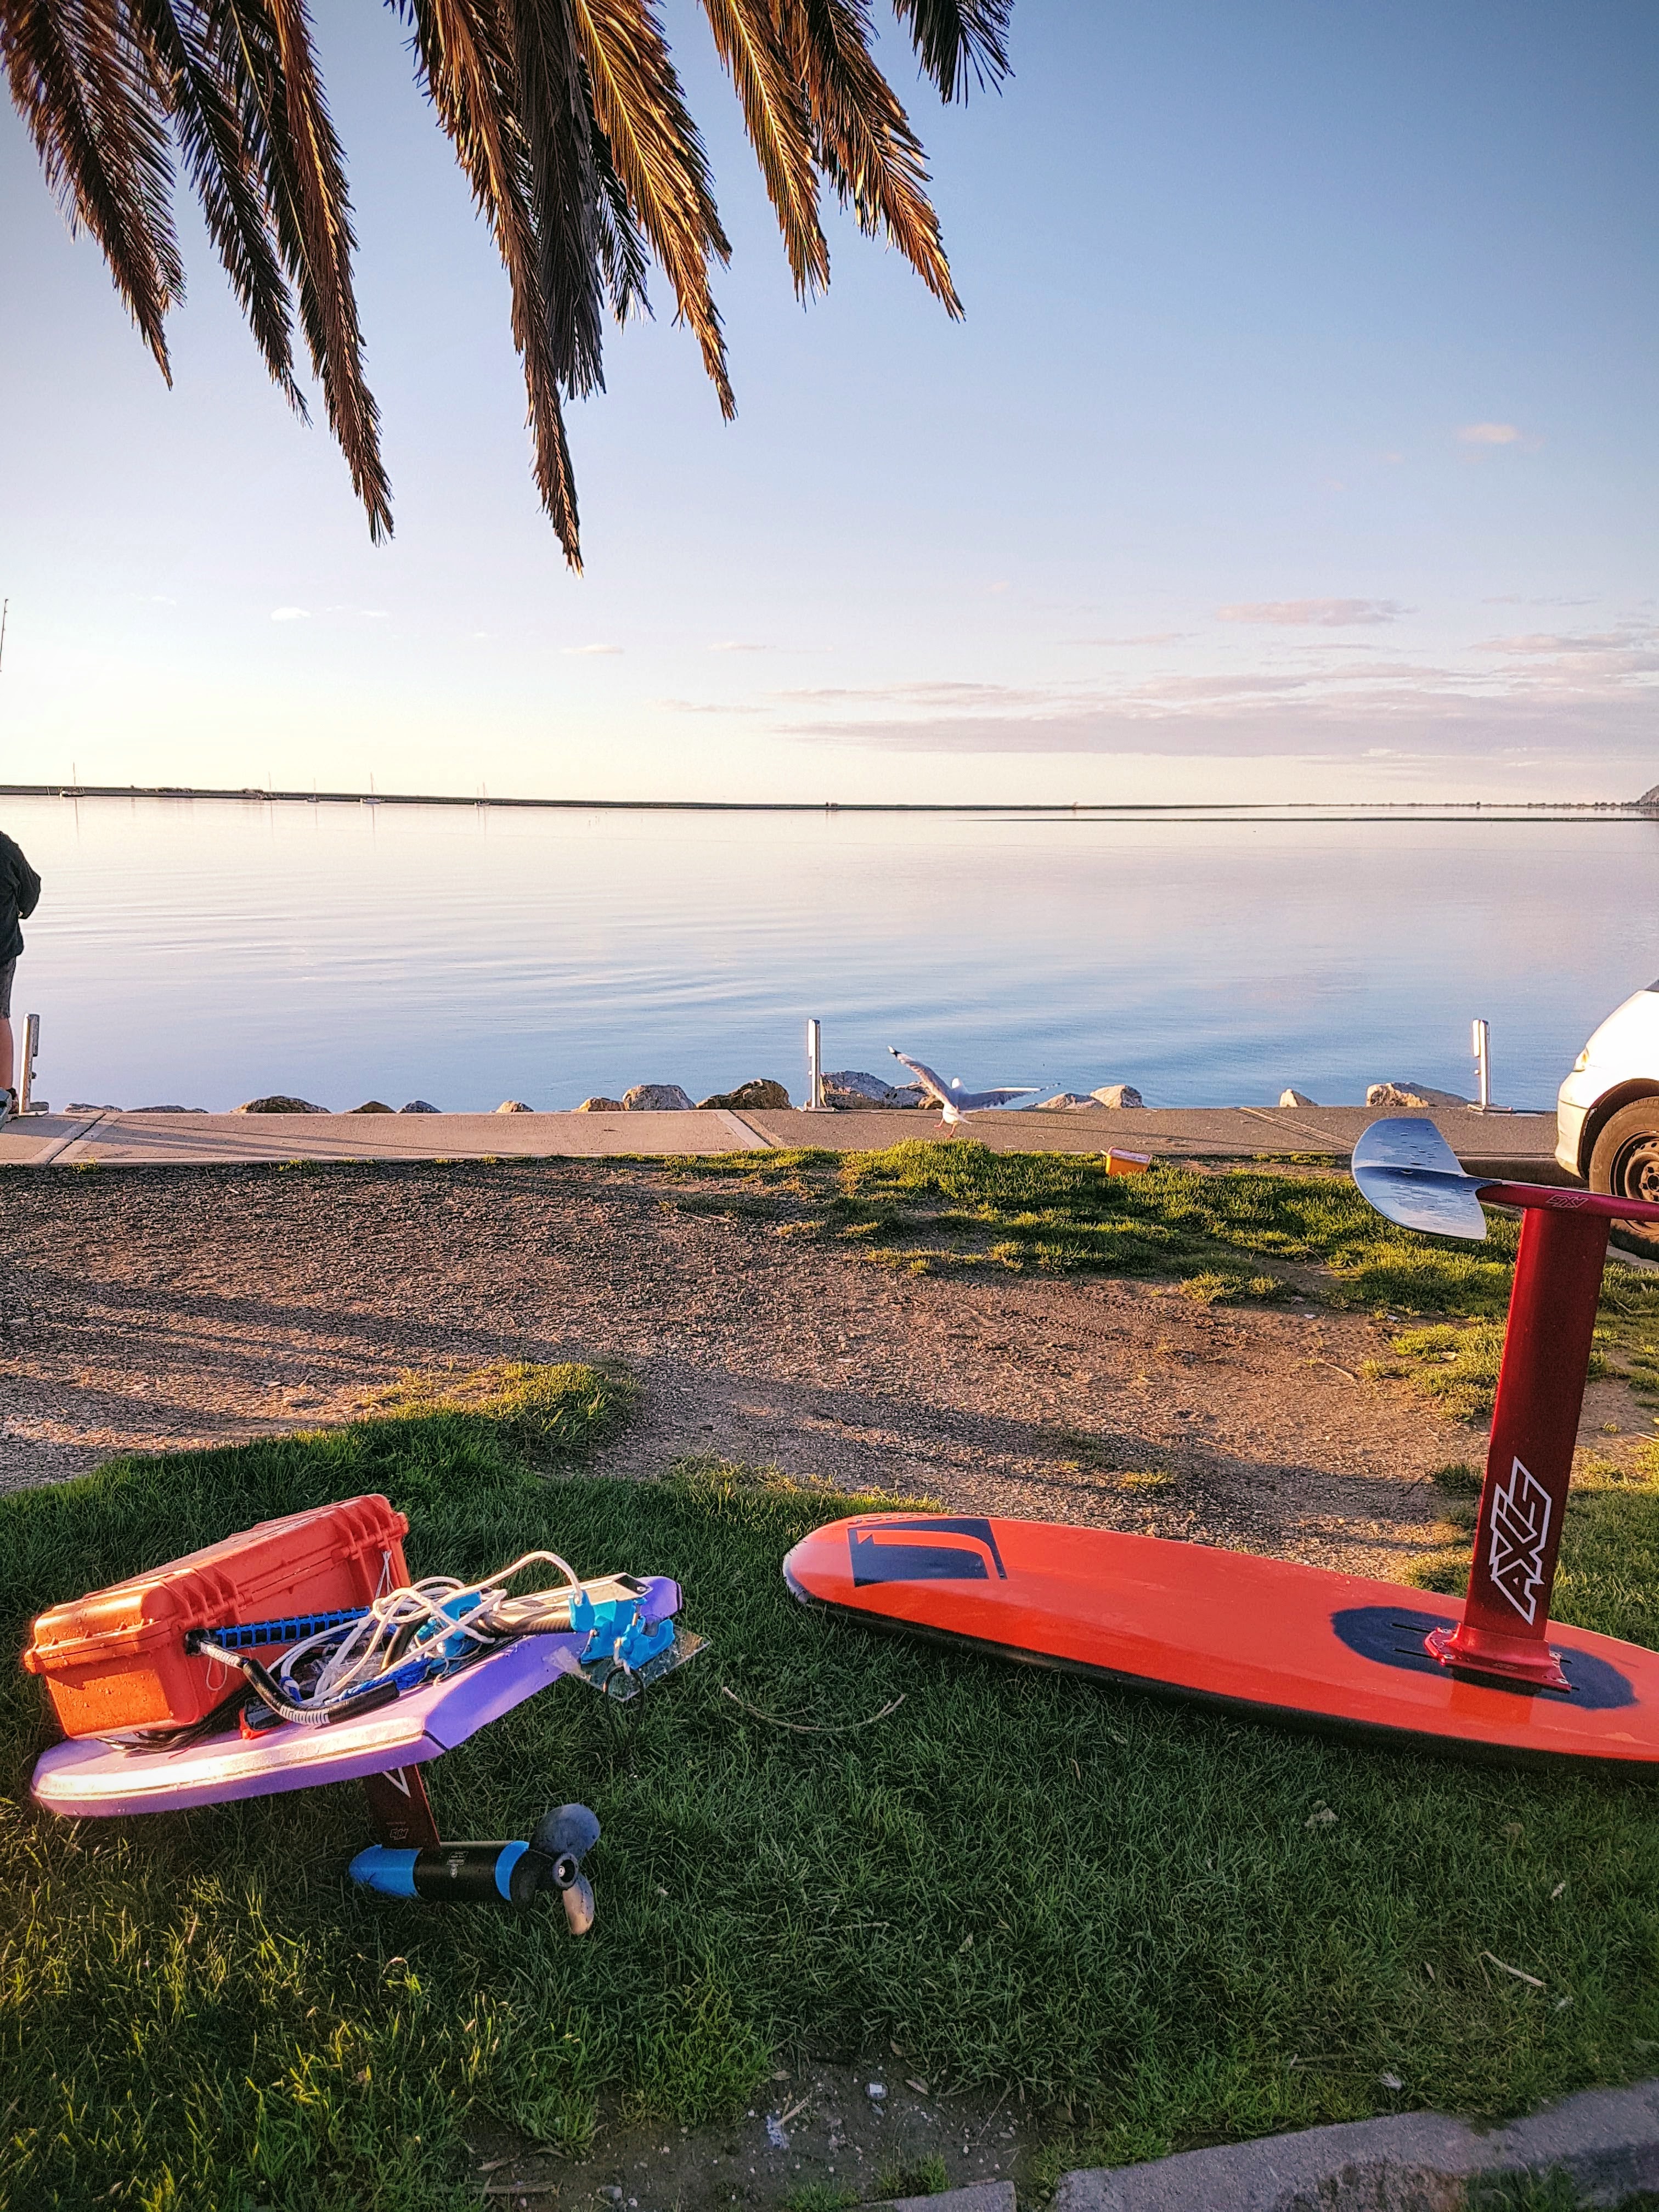
I built a tow boogie based on Valhalla’s board setup.


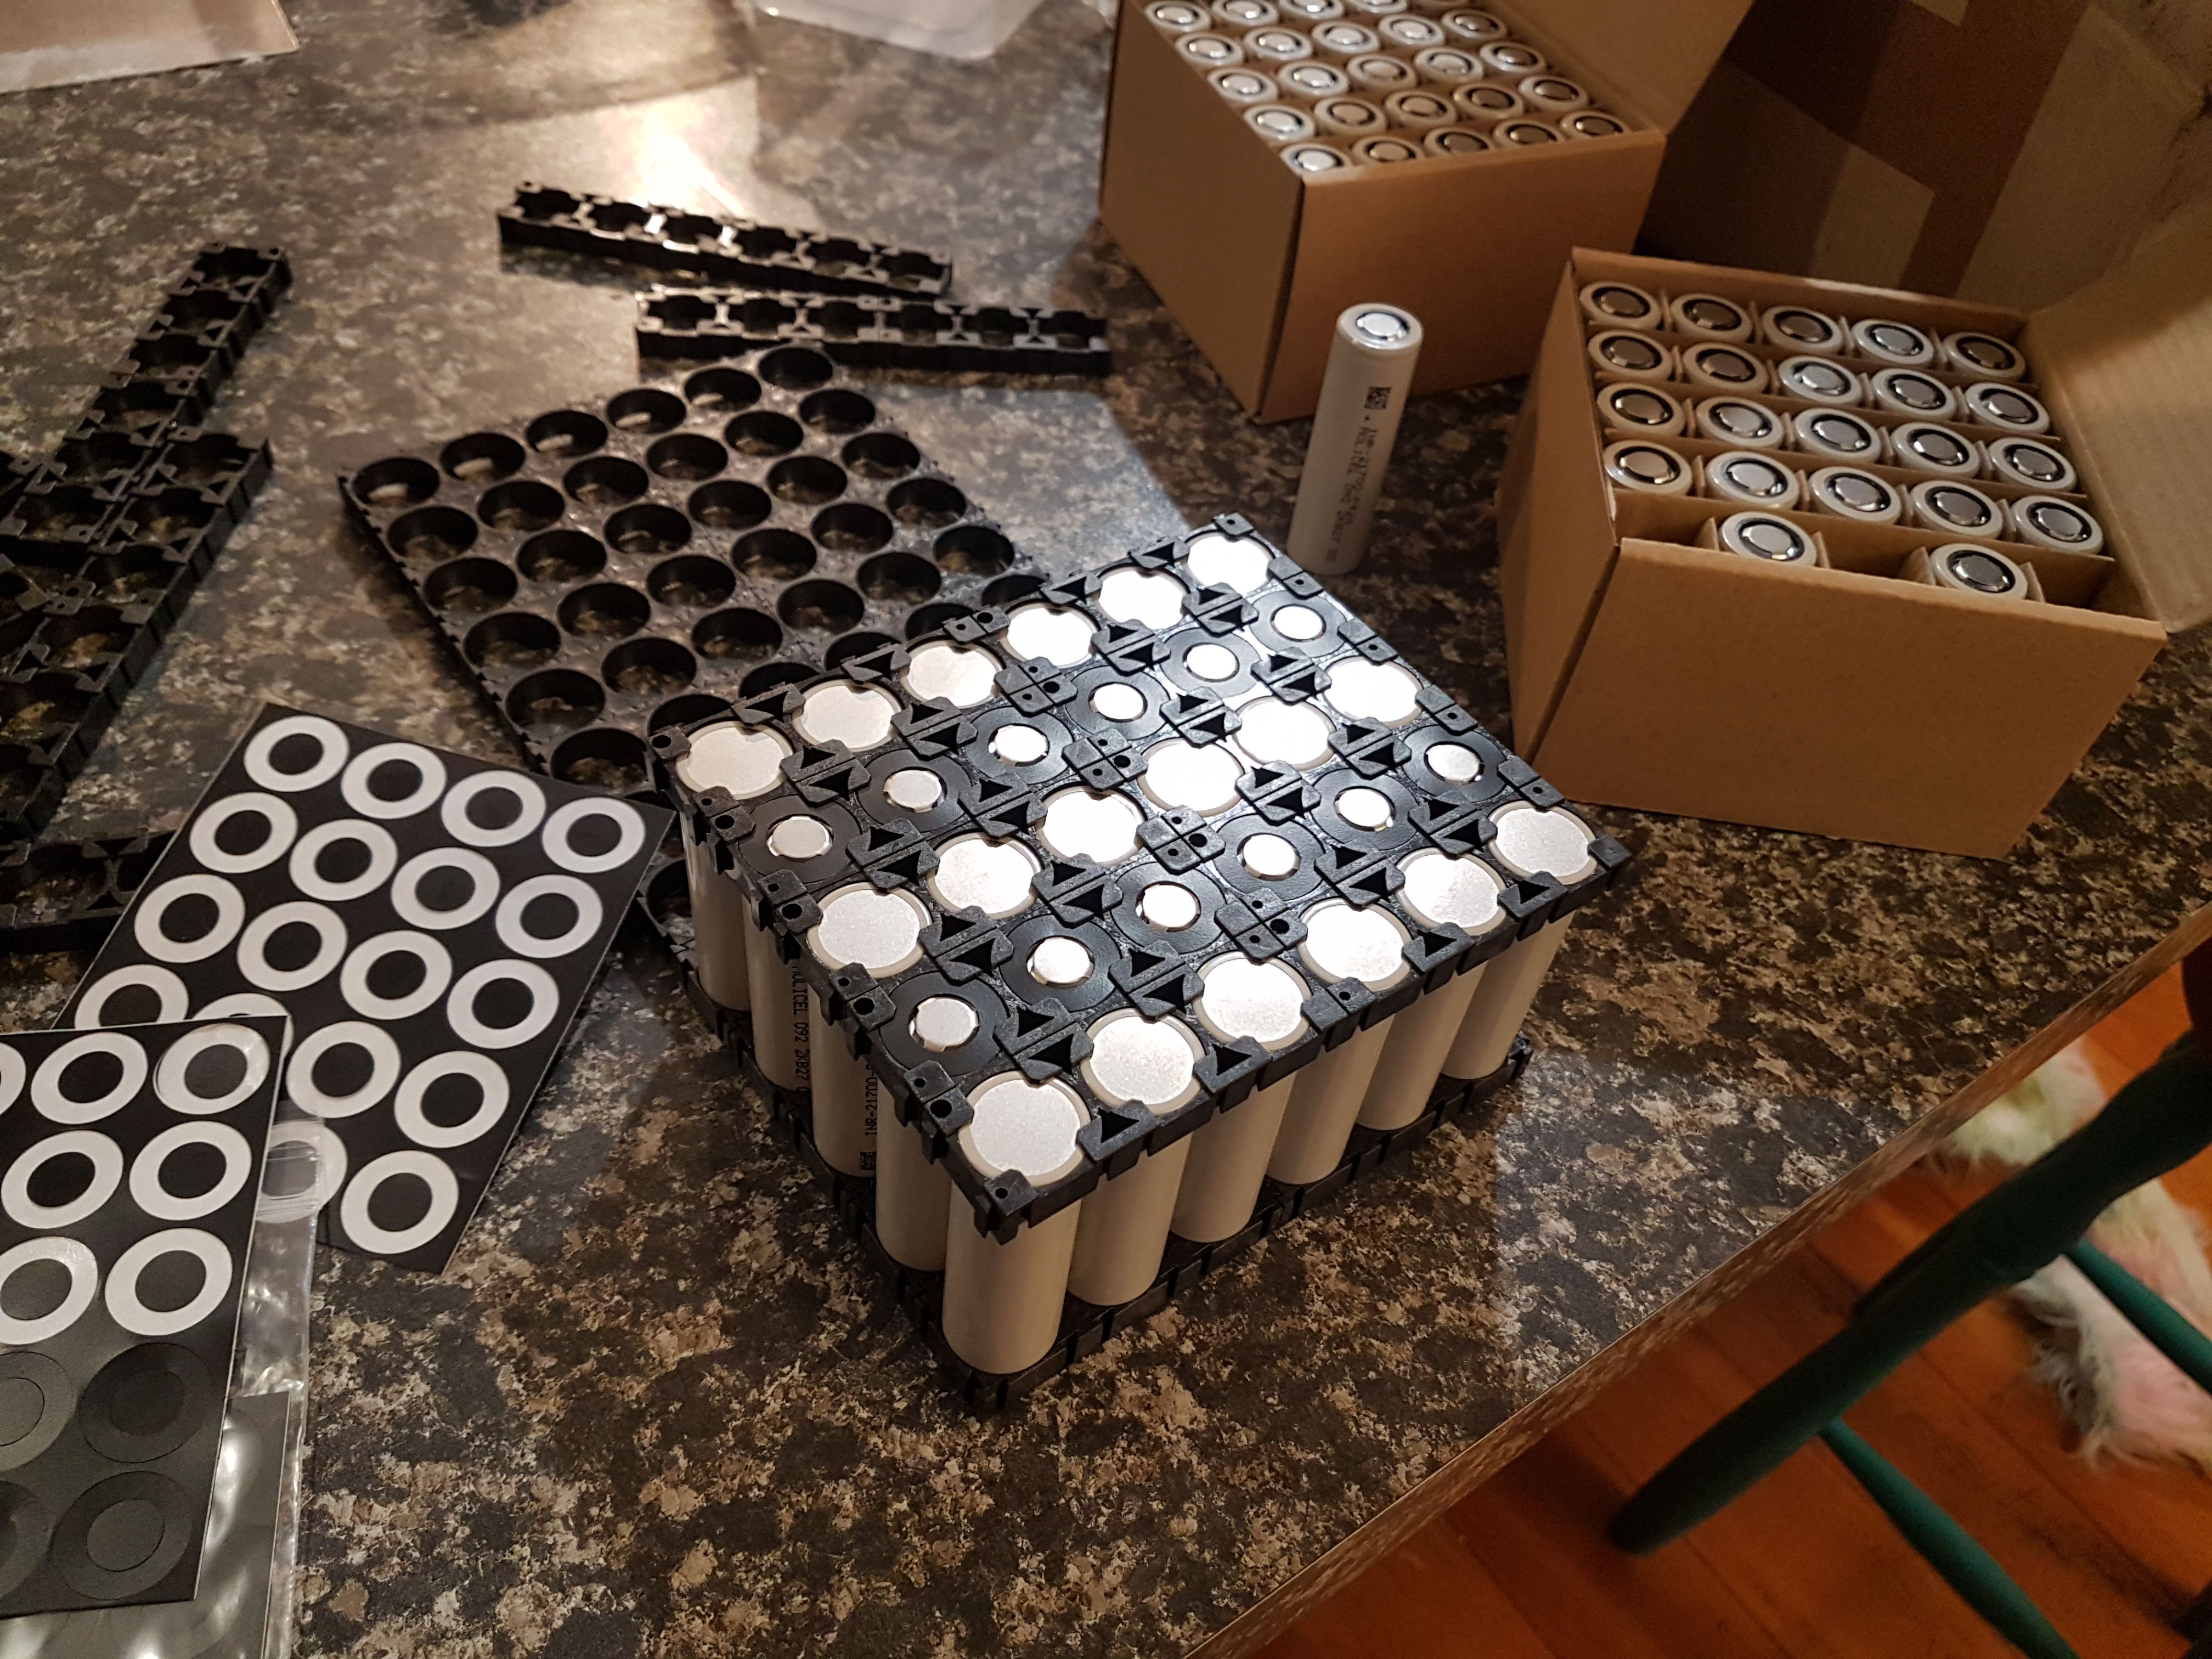
I wanted a battery with good durability (cycle life) for plenty of tow boogie sessions, so I used li-ion cells rather than lipos. The cells I’m using are Molicel P42A, bigger form factor 21700 cells, which are a high current cell with a long rated life of 500 cycles at 10A discharge to reach 80% capacity. I didn’t want to be throwing away a puffy lipo prematurely, and I’ve seen ratings for the Tattu lipos at around 150 cycles. The battery build is detailed here…

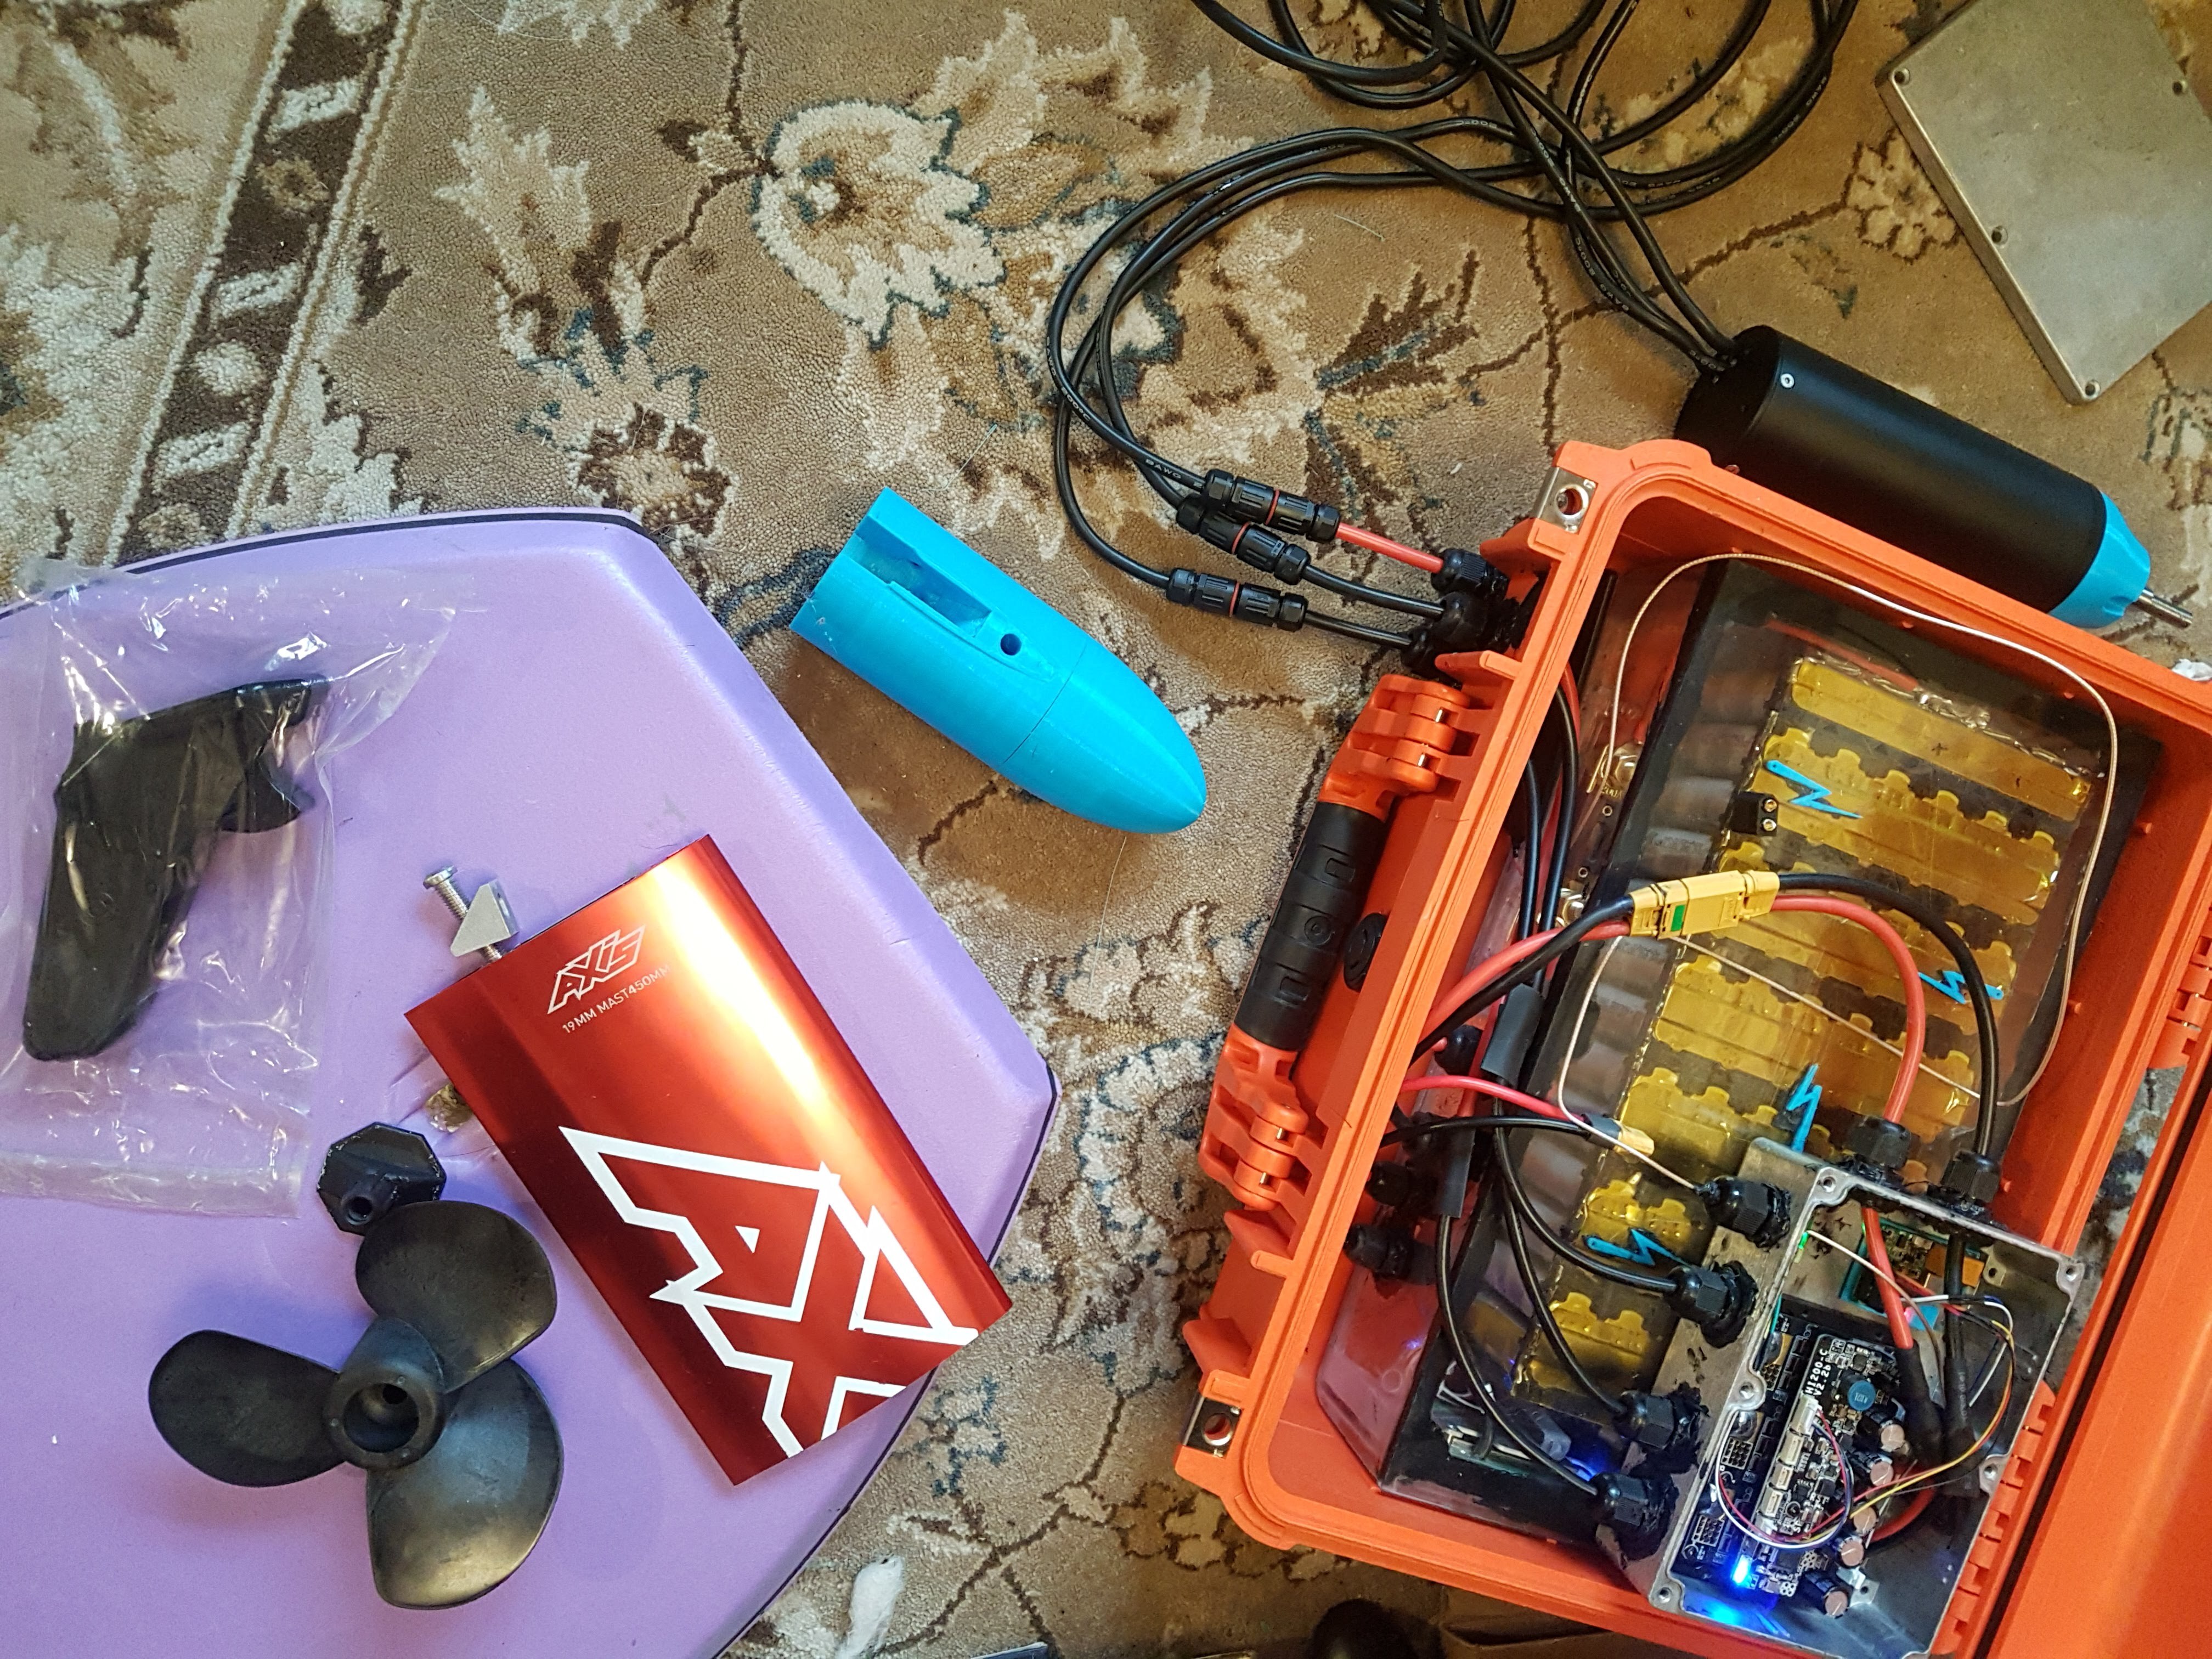
The battery pack is a 13s6p configuration, for 48V and about 25Ah (total capacity 1177 Wh). It is spot welded with a kweld at 30J, with 0.3mm pure nickel 30mm wide strip for ample current carrying capacity. The BMS is a JBD 30A from lithiumbatterypcb, wired for charging and balancing purposes. Discharge leads are 8 gauge silicone wire connected directly to the battery through a 200A fuse. BMS wiring is tidy, with no crossing wires. There are 2A pico fuses where the balance leads attach to the nickel strips.

I initially considered soldering to the cells, but the chance of overheating cells and potentially leaving a blob of stray solder that could short out the +ve end of the cell didn’t seem appealing, so I picked up a kweld spot welder.

Liion batteries must be treated with respect, and should only be built with ample care and research. I highly recommend tidy and parallel routing for balance wires, with nothing pressing/rubbing on them, because otherwise the balance wires could wear through and short out your cells, causing a fire. The same thing can happen if you use 6+ pin plugs with an RC balance charger, and they get some saltwater into the plug or if the pins short out. With the BMS wired for charge only, I use a separate xt60 plug for charging, and there’s no risk of shorting it out. There is also a 30A fuse between the xt60 charge plug and the BMS. I can use my phone via bluetooth to check that all the cells are balanced.


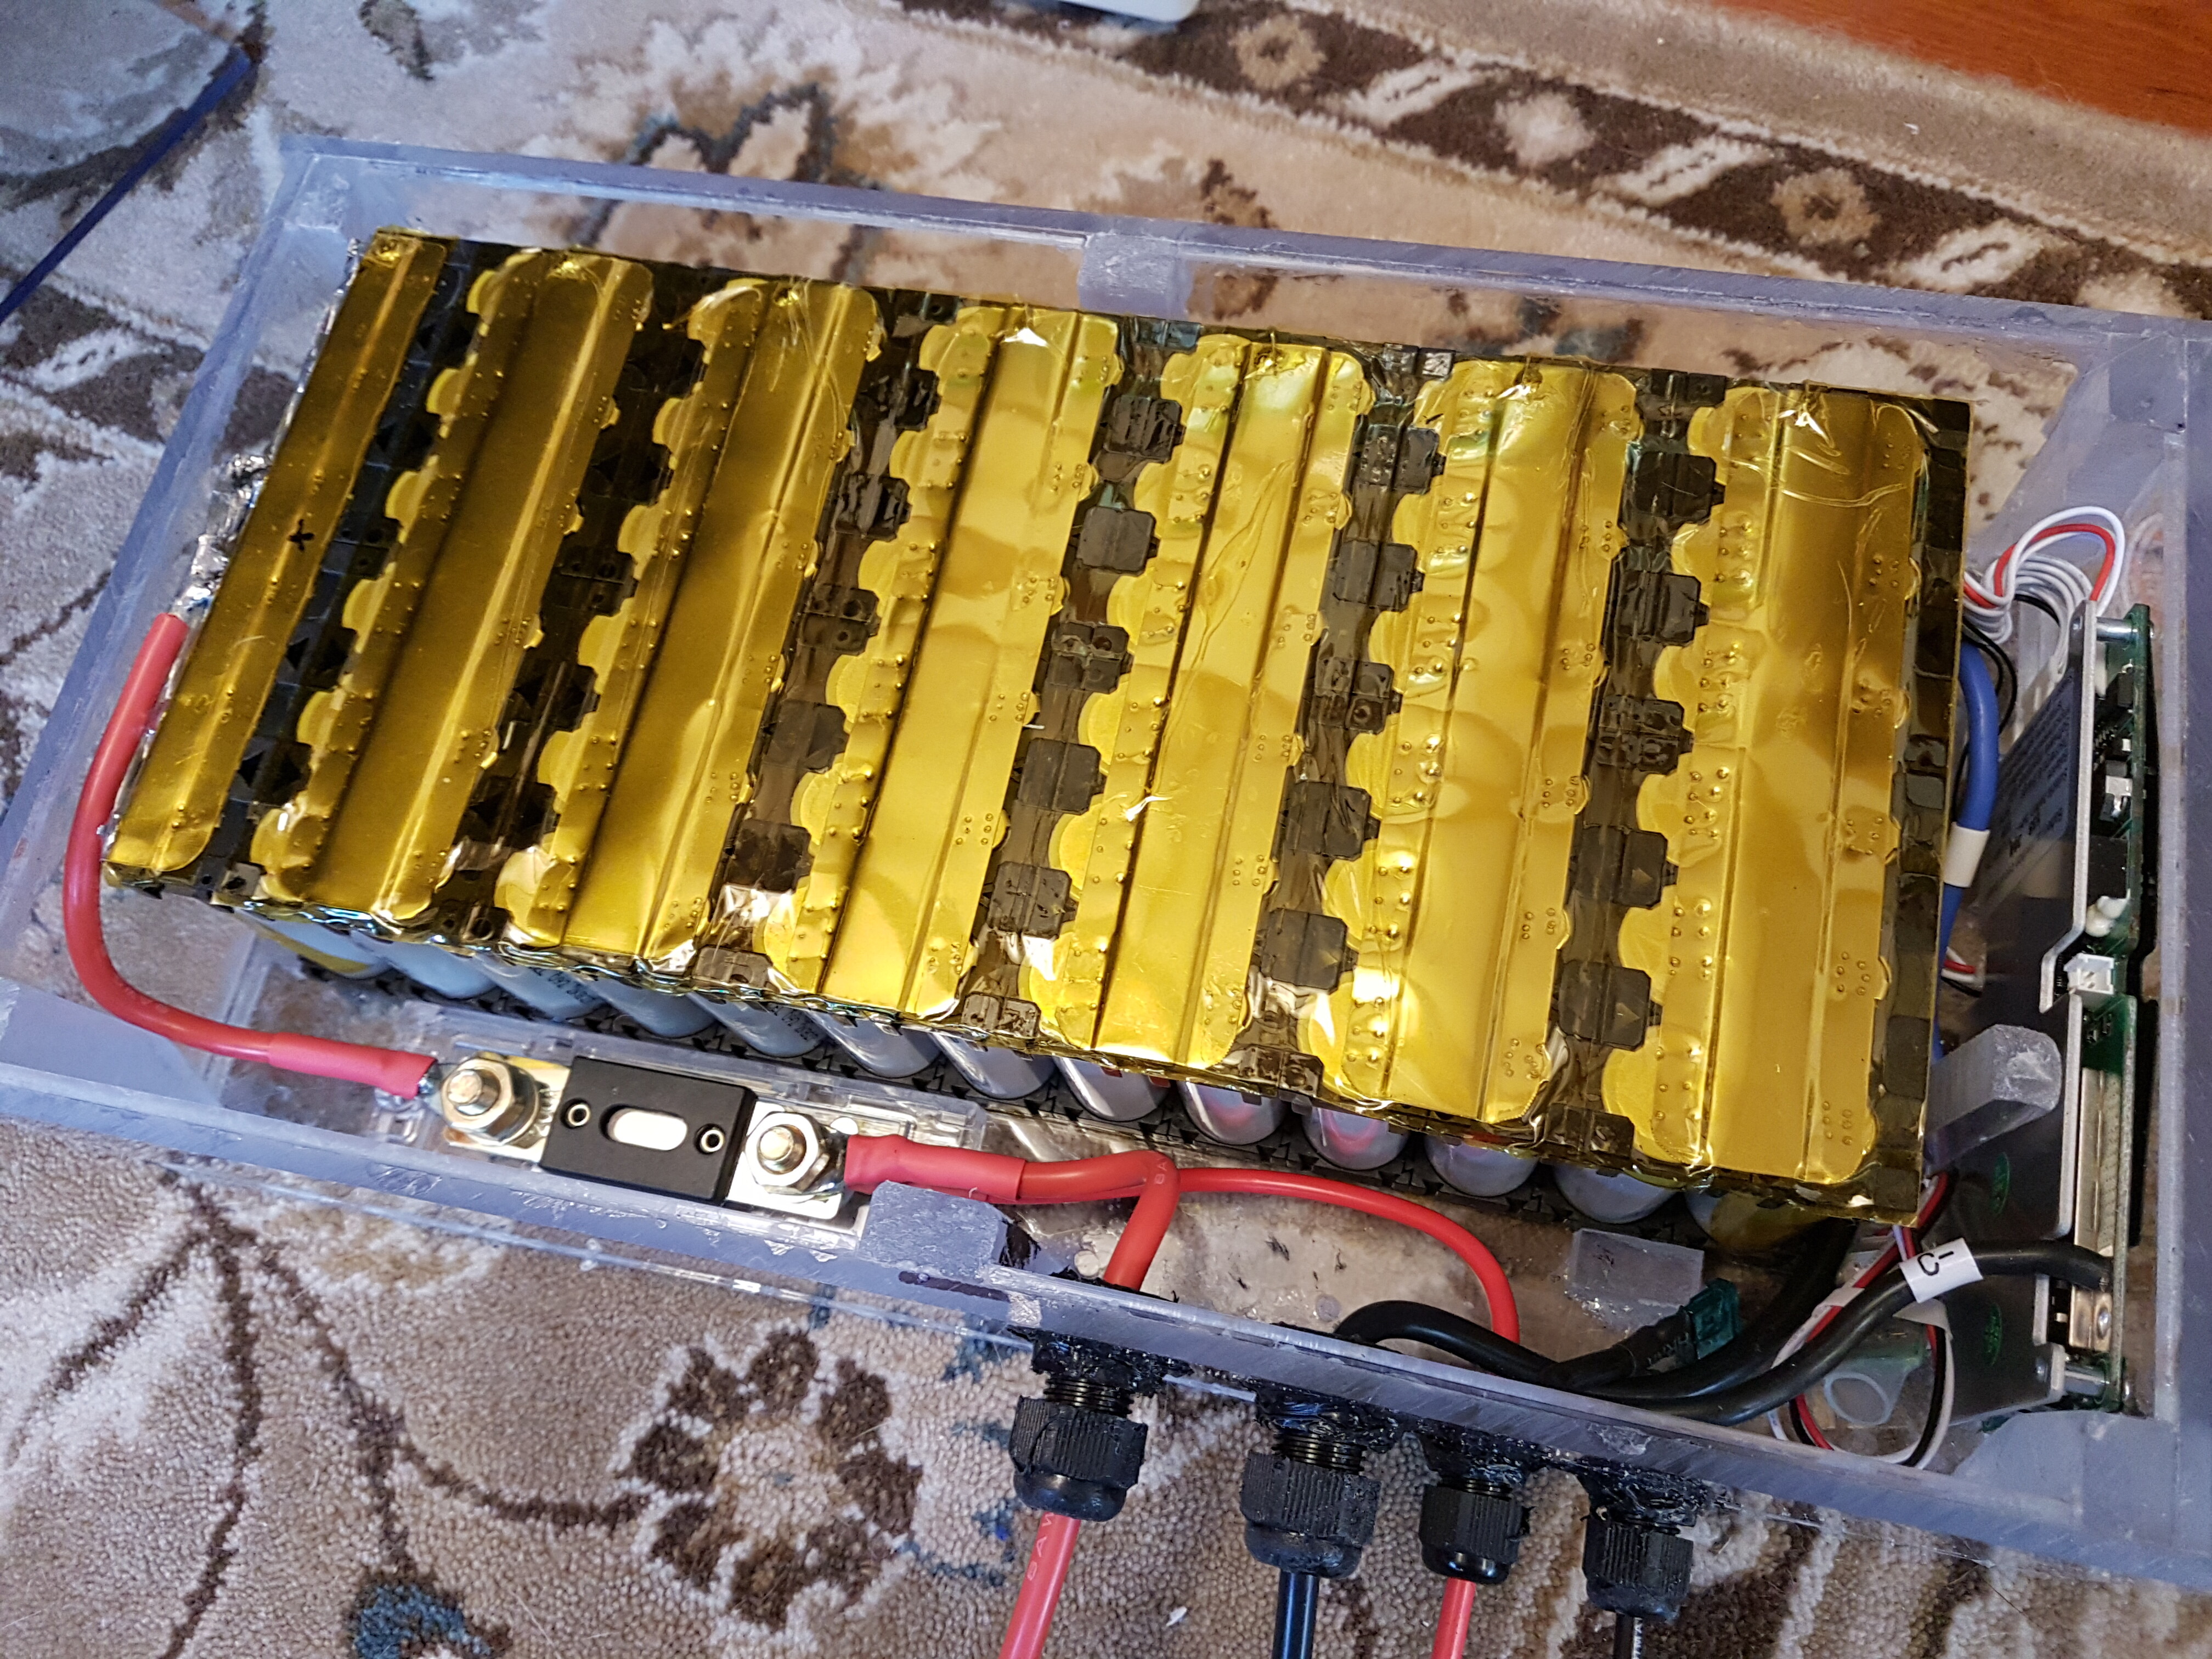
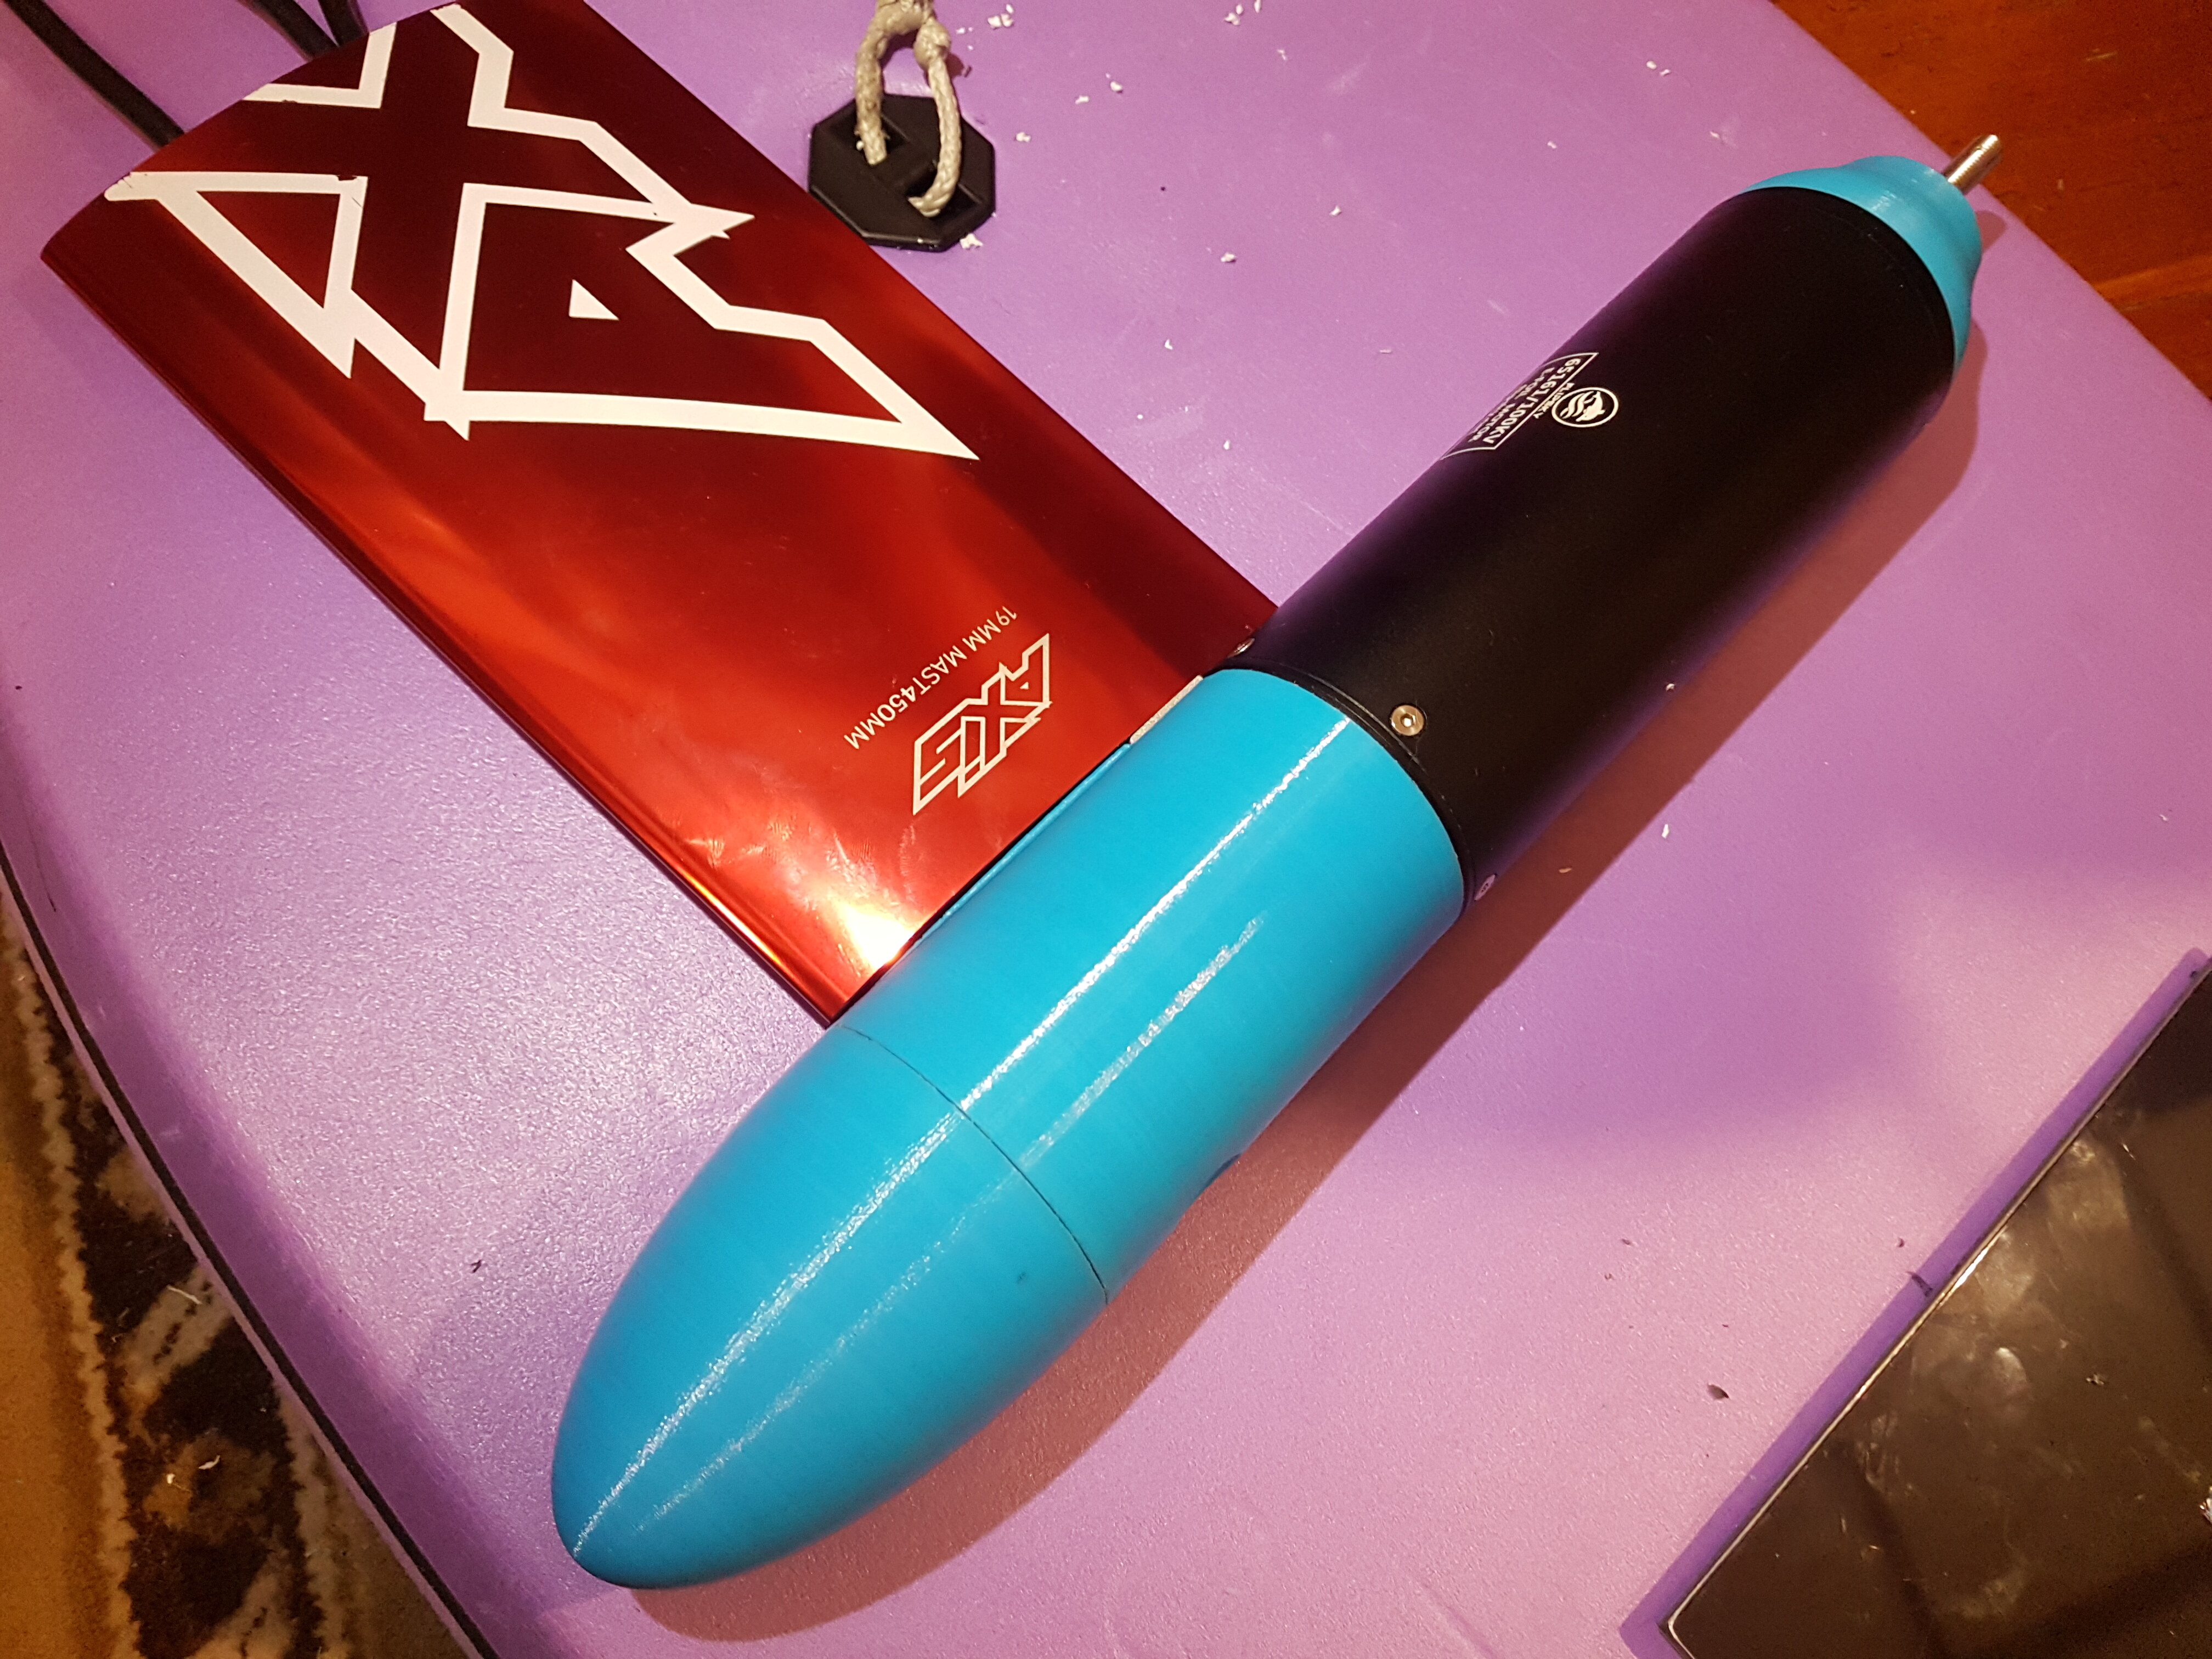
Battery is in a 4.5mm polycarbonate case, glued with proper acrylic type glue on bottom and sides, and the top is stuck on with bostik ISR 70-03 adhesive which can be removed if required.

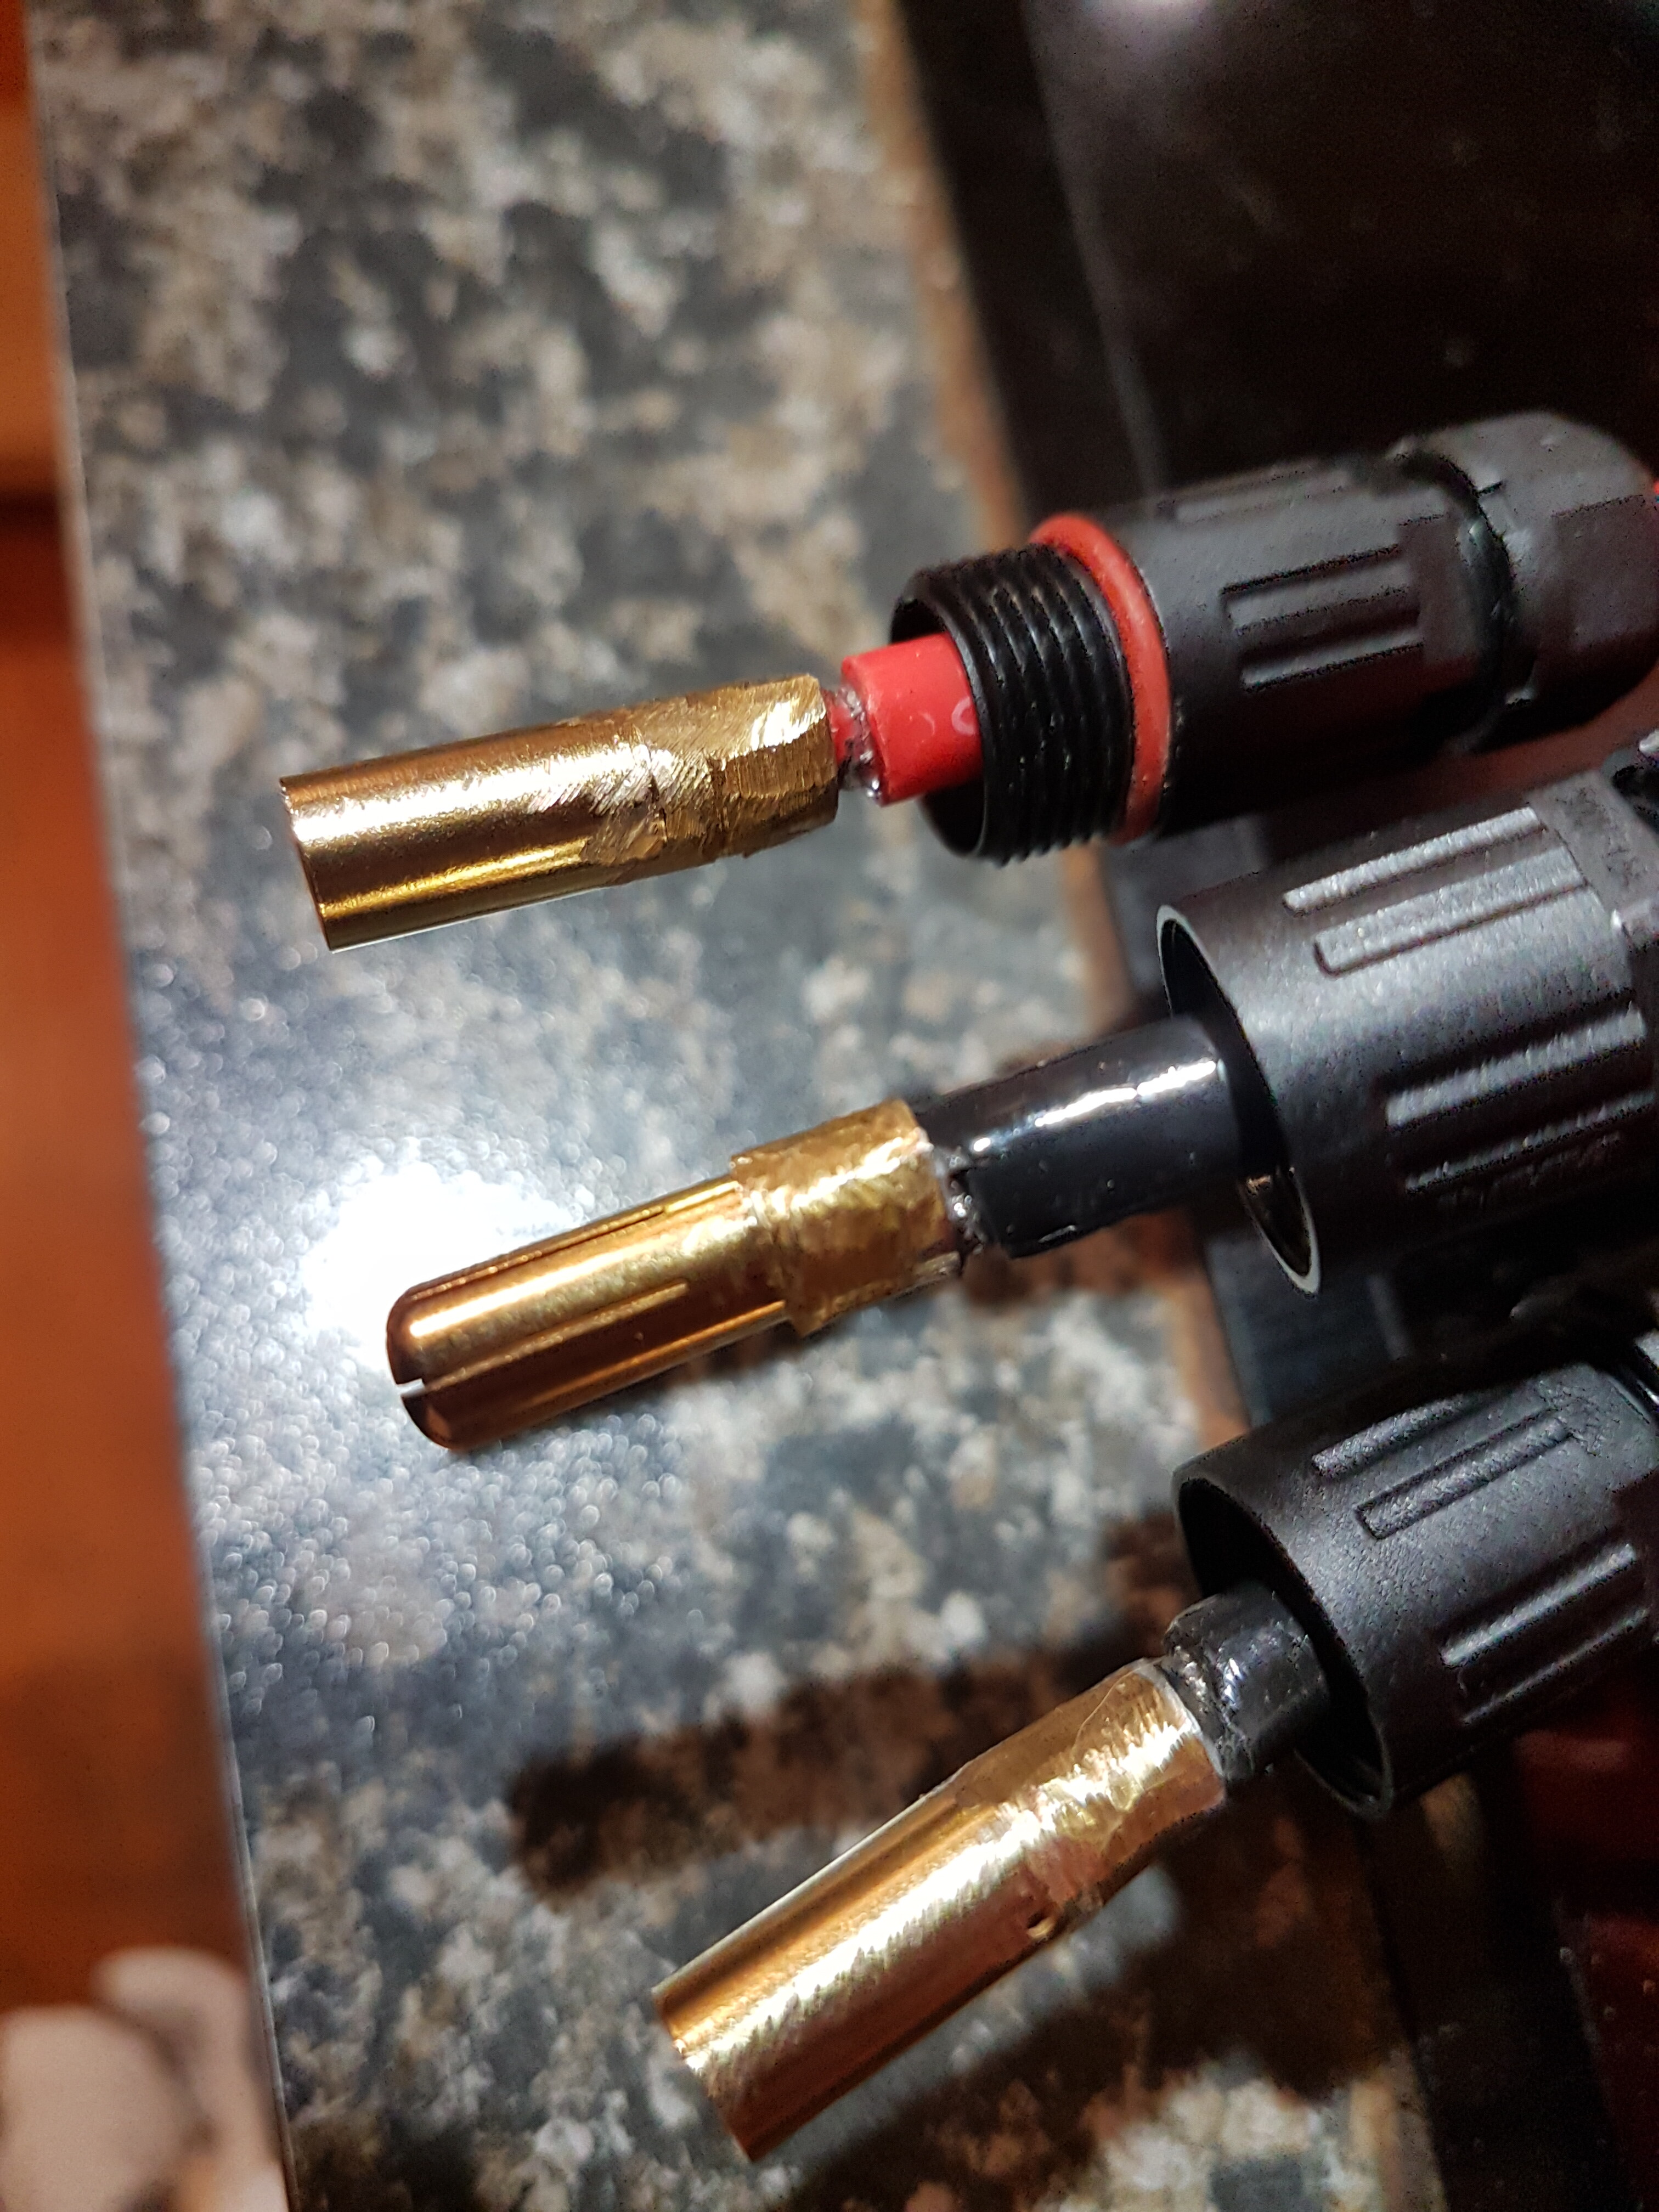
The Maker-X Hi300 (75/300) vesc works flawlessly with the flipsky 65161 motor, perfect auto tune first time with large inrunner setting in the vesc tool. It’s running FOC mode. I didn’t put any corrosion x inside the vesc enclosure, because I’ve read that it can destroy heatsink silicone pads. The aluminium VESC enclosure is passively cooled, with an adhesive thermal pad on base of the VESC, and warms up about 30 deg C from ambient after an hour at cruise speed, 45 deg C above ambient if I’m pushing it. I was surprised how quiet and smooth the motor runs. The alu enclosure is a BUD Industries AN-1306-A from Amazon, which has a much better quality seal for IP68 rating than the aliexpress enclosure I initially purchased. I’m using a 1m aerial extension purchased with the Maytech remote, otherwise there is poor reception from the alu case. I glued the thin aerial wire inside a short section of 8awg wire casing with Bostik Simson ISR 70-03 (excellent black sealant+adhesive you can see on all the PG-9 glands), and that way the PG-9 on the top left could clamp down and seal on it.
The maytech receiver is on the top right of the pic, and you’ll see a small NRF51 bluetooth module I bought from Maker-X on the top left, which I’m currently using for bluetooth to connect the android VESC tool app (the NRF51 isn’t required, and actually takes away useful UART data that the maytech remote would otherwise show - it’s just for more detailed logging data). Make sure your TX pin on the receiver (or NRF51) is connected to the RX pin of the VESC, and RX to the TX pin, if you want UART to work. I’m using PPM mode (PWM). The maker-x vesc can be programmed via usb cable and the pc VESC application.


The speed restricted modes on the esk8 remote are very useful, I have it limited to 70% throttle.
It’s a 100kV motor, which has more than enough speed for a tow boogie. I half filled the motor with corrosion x, by taking off the cover on the shaft end, to reduce the likelihood of corrosion.

An XT90s is used on the discharge leads from the battery to the vesc, as this has an antispark resistor built in. XT150 connectors are used for the three phase wires, without using the xt150 plastic covers, and I filed down the widest part of the connectors so they can be slid in and out of the mini waterproof connectors for mounting inside the mast during assembly. I only needed one set of XT150 connectors between the VESC and the motor, because I can slide the connectors through the PG9 glands and the mini waterproof connectors if required.


It’s all stays dry inside the pelican 1450, with some grease on the enclosure and pelican seals. The battery and vesc enclosures are also tested as waterproof.

Maytech esk8 MTSKR20WF V2 remote, with corrosion x inside, and silicone conformal, and then I put it inside a piece of pu kite bladder (sealed the ends with a heat gun at 280 deg C). These remotes don’t like getting wet.


It’s an Axis 19mm aluminium mast. I cut a “450mm” mast in half, but they are actually 430mm so I’m using 215mm. The cut end was threaded with a m8 tap.
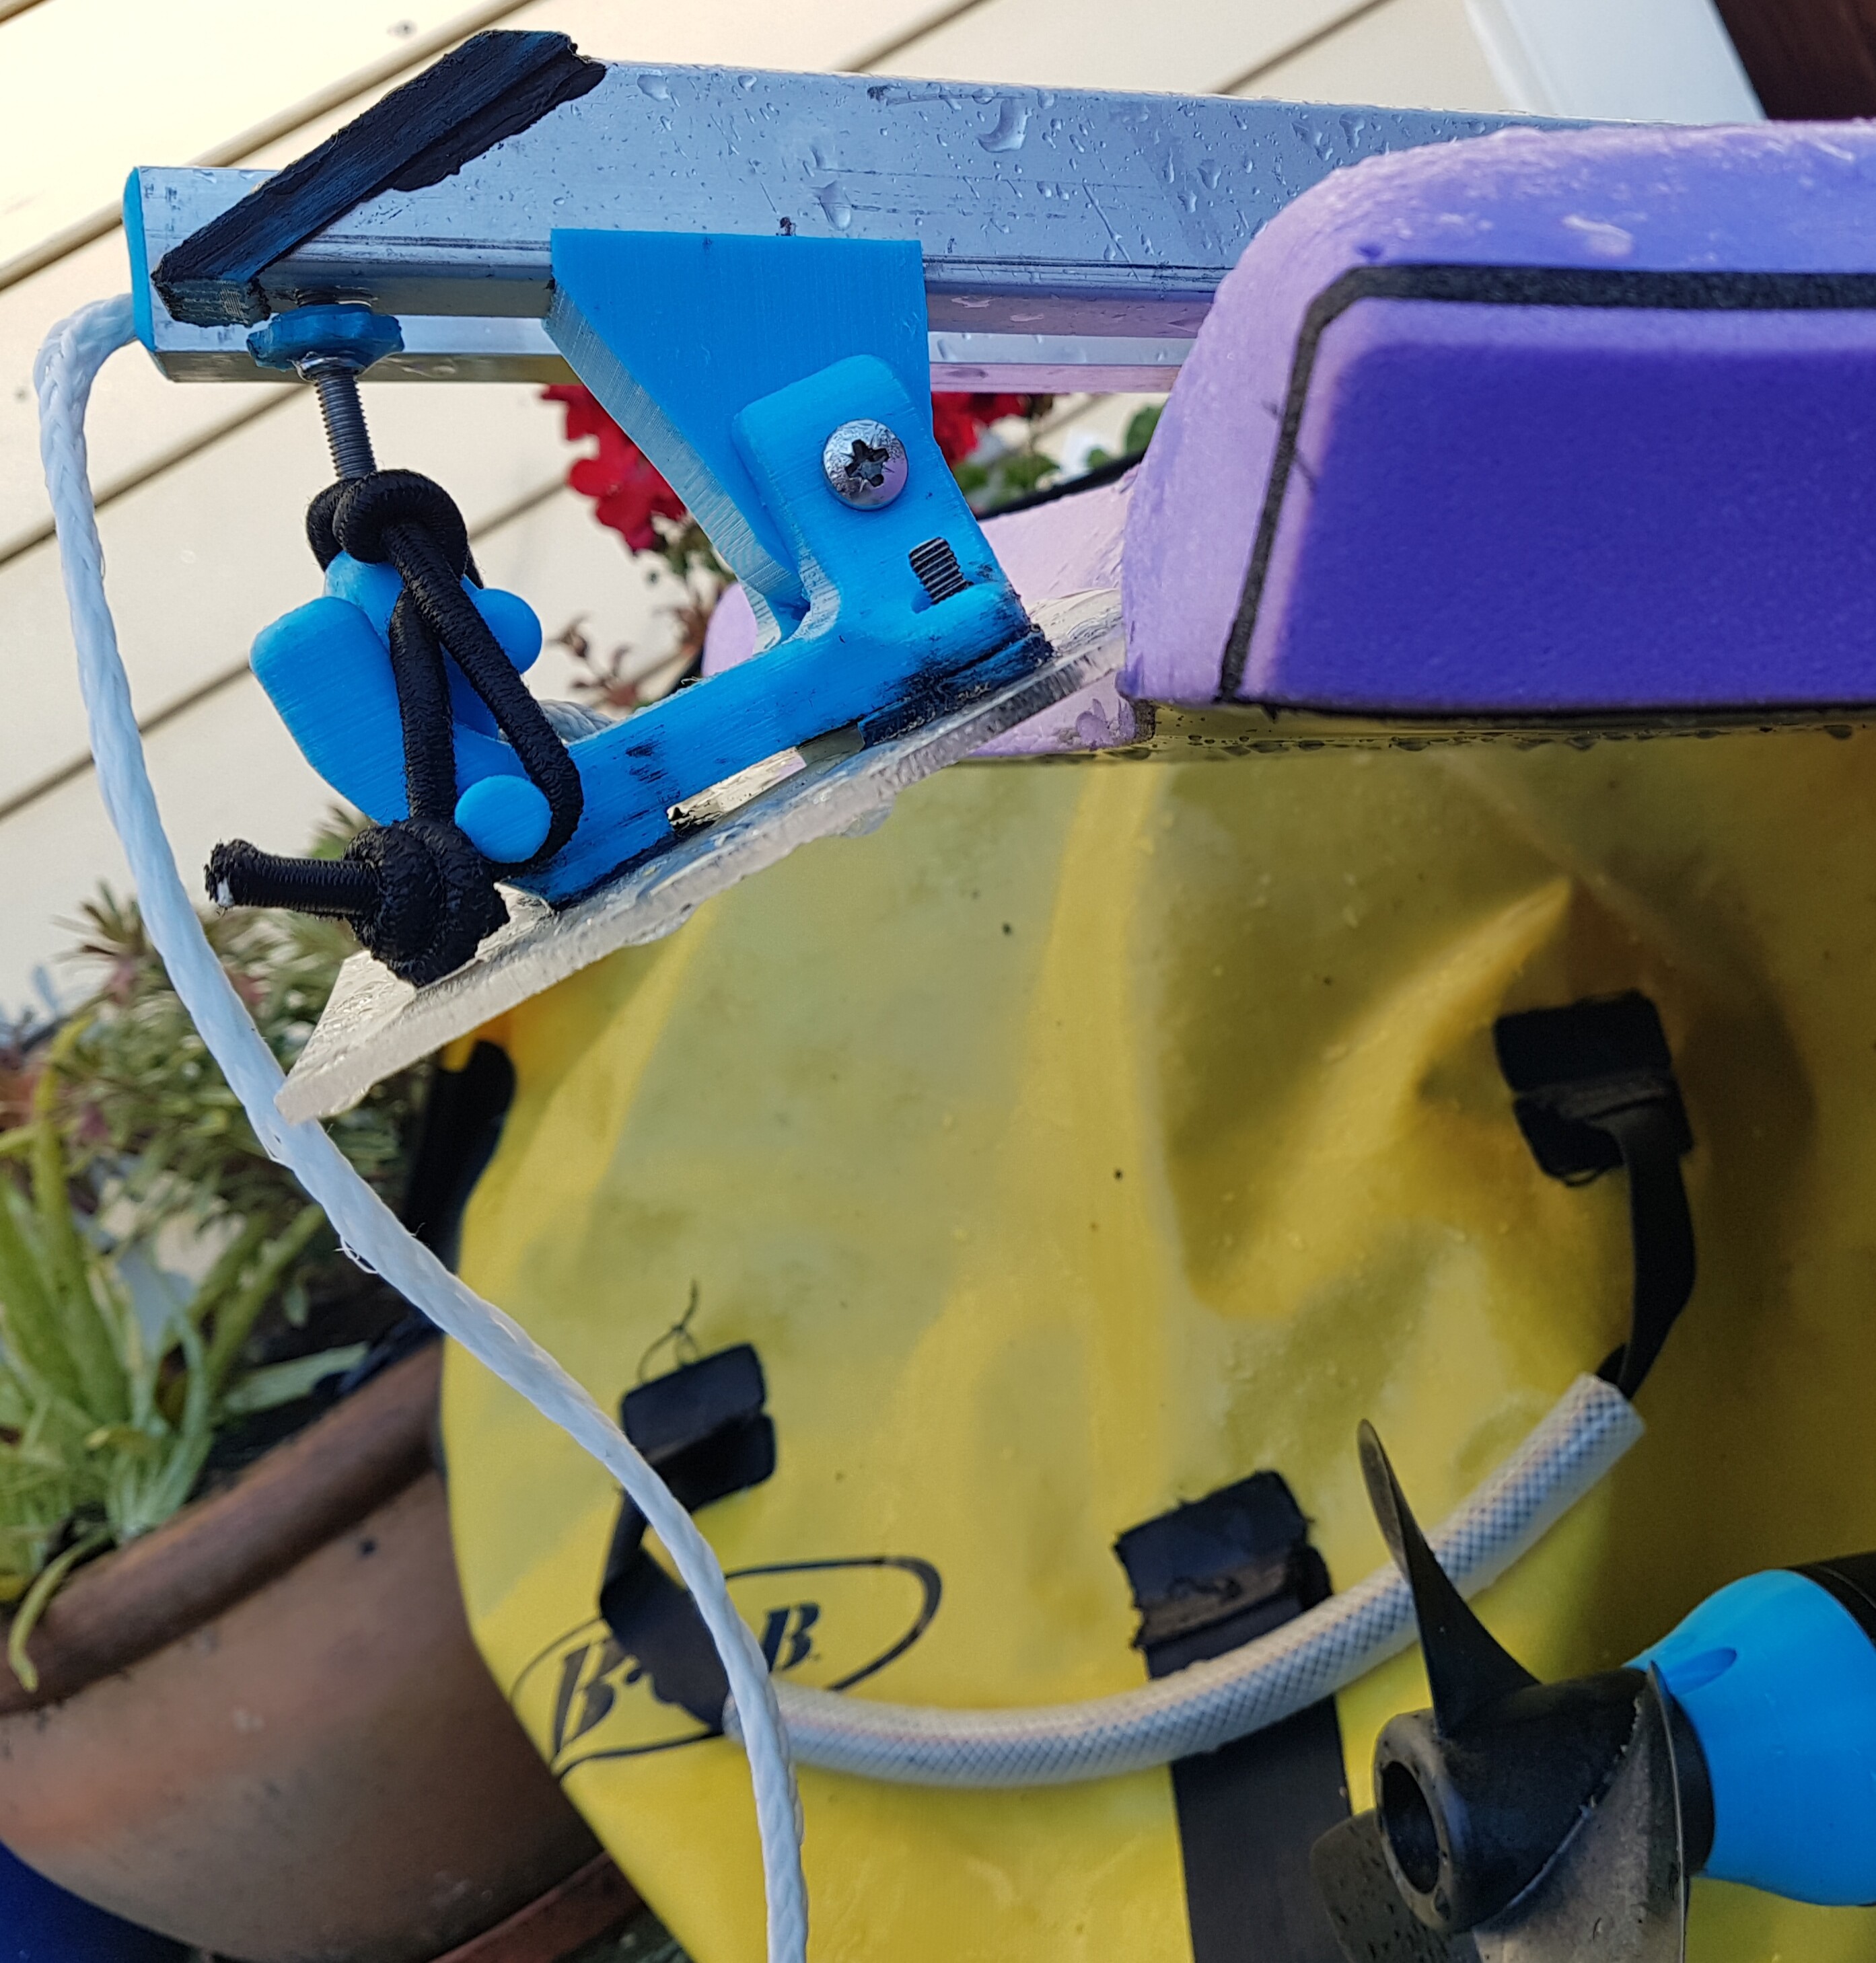
I designed a 3d printed mast plate which braces solidly against the plate on top, and also clamps onto the board with 2 small screws. I’m using ACM 4mm sheet (200*400mm) to support the mast onto the board, glued down with Bostik contact bond industrial strength adhesive (w toluene it actually sticks to the PE surface of the boogie board). ACM is a composite polypropylene sheet with very thin aluminium on each side.

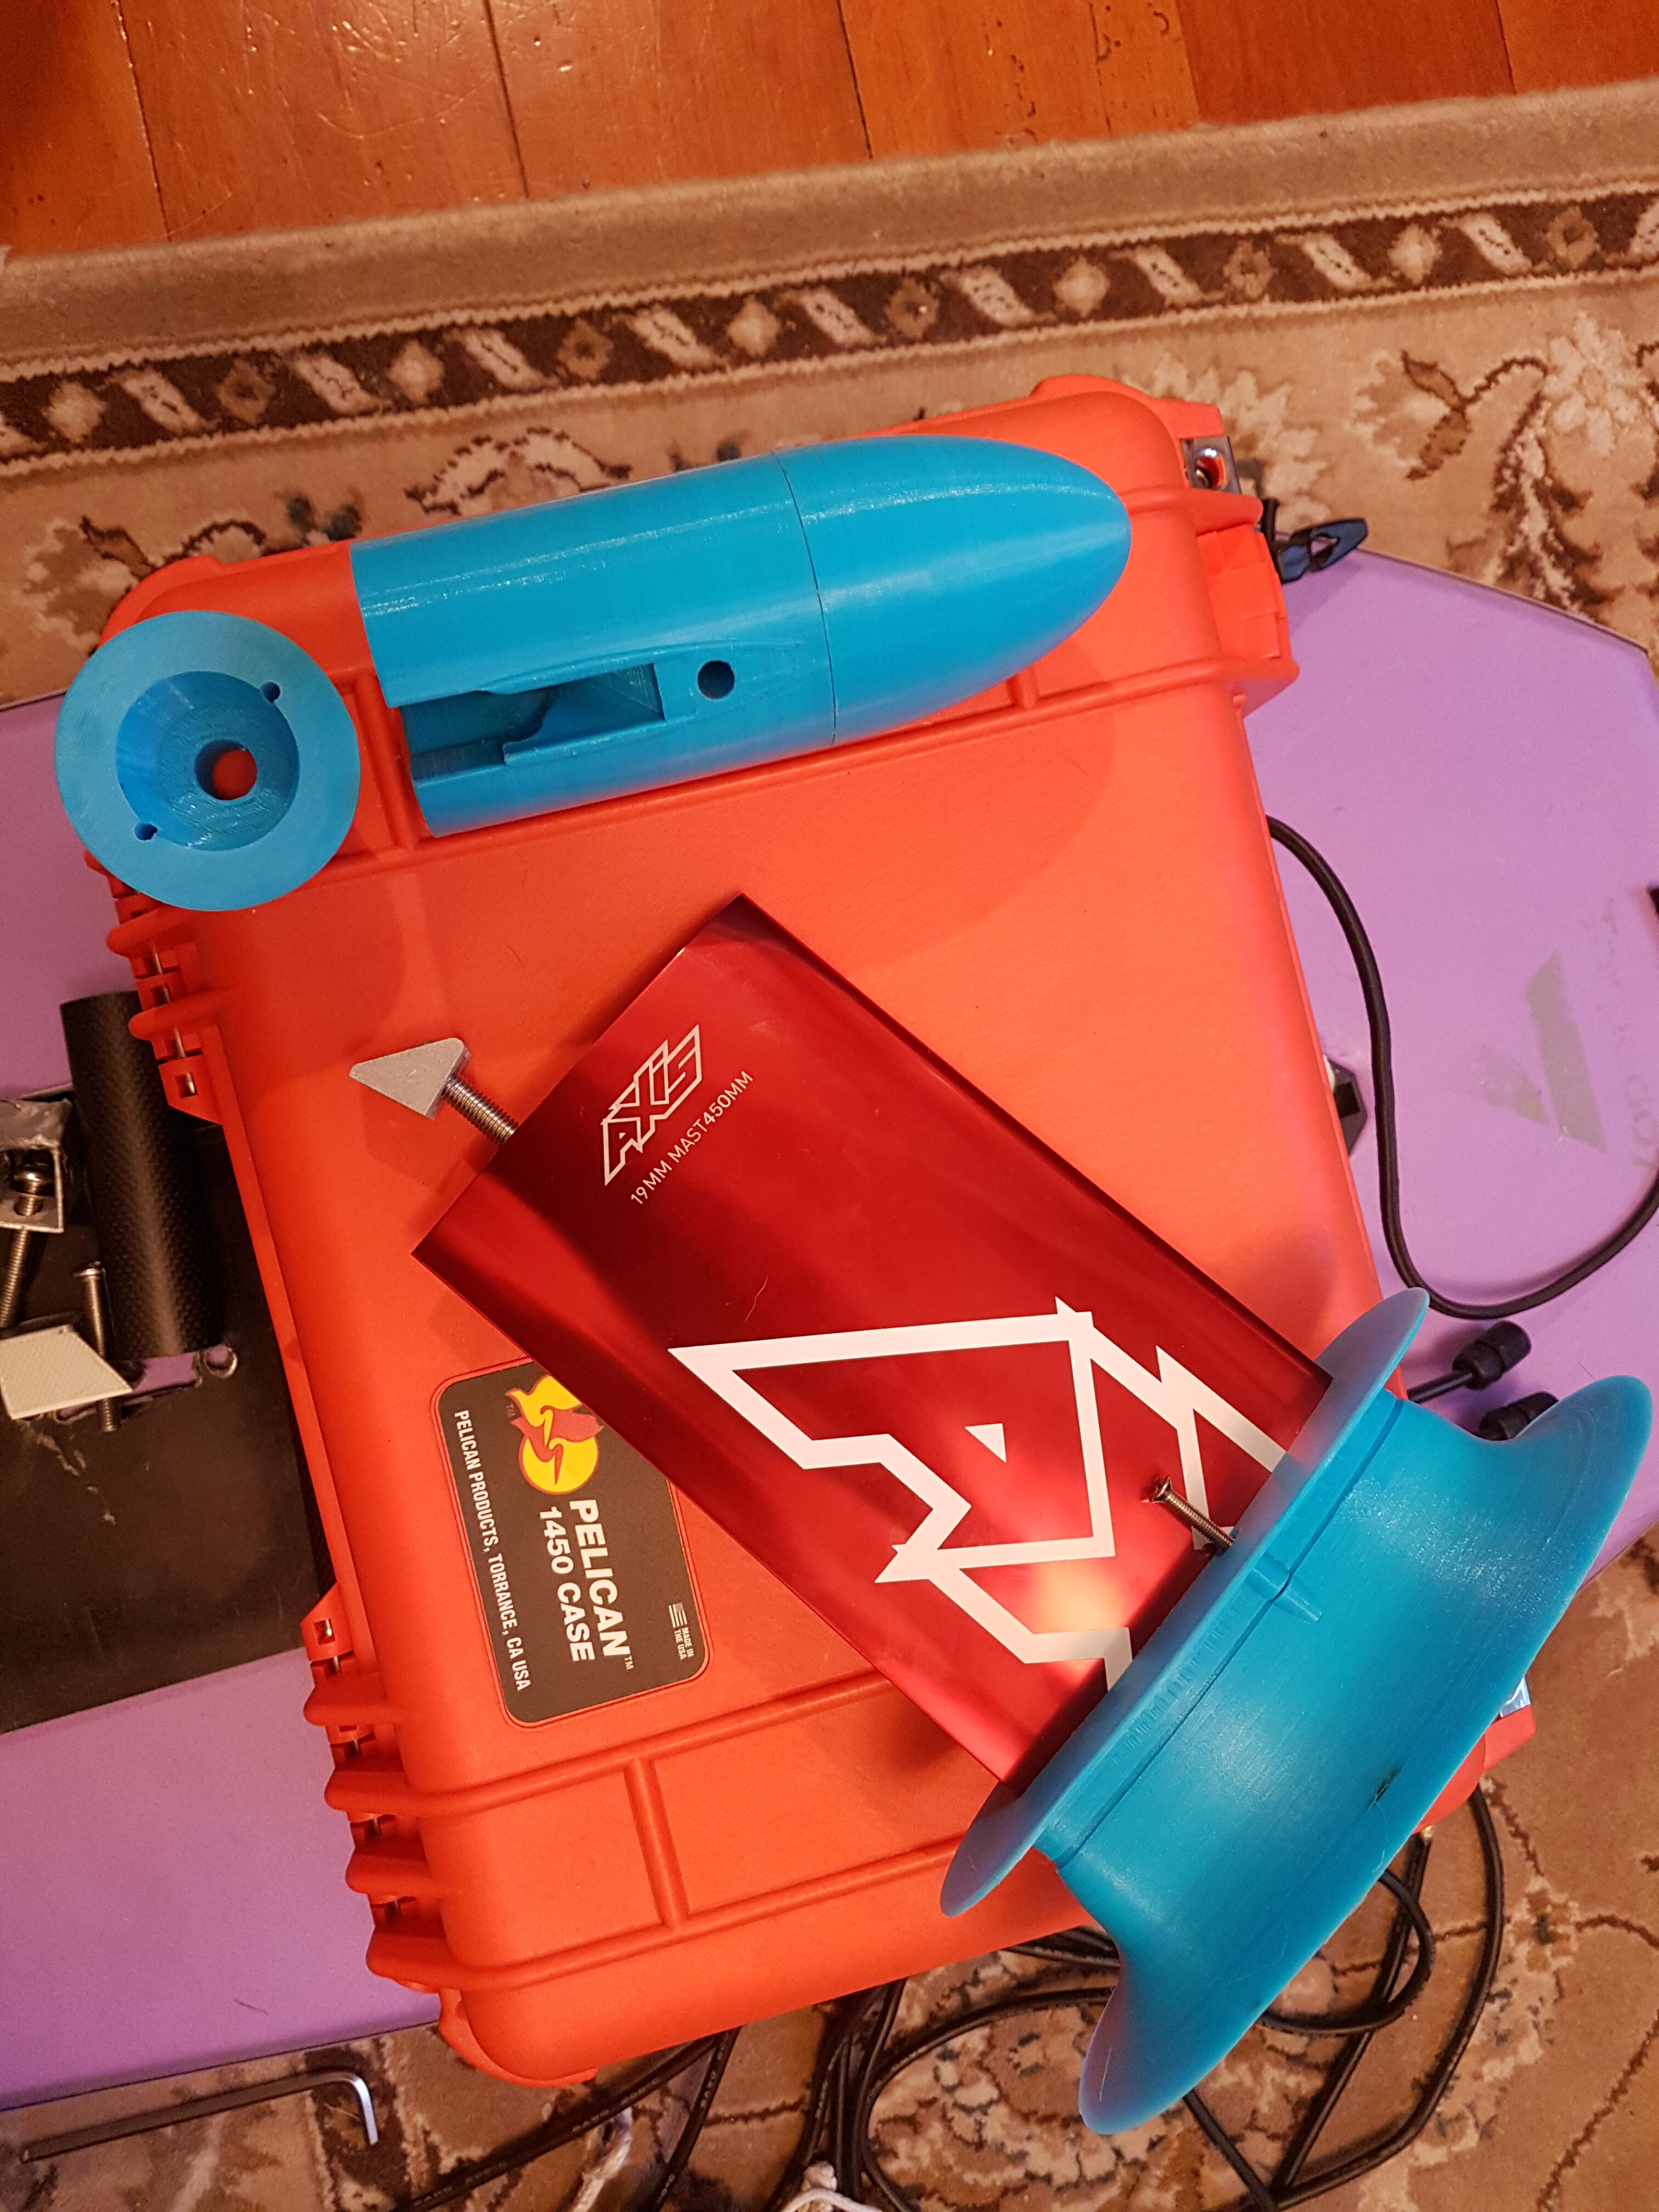
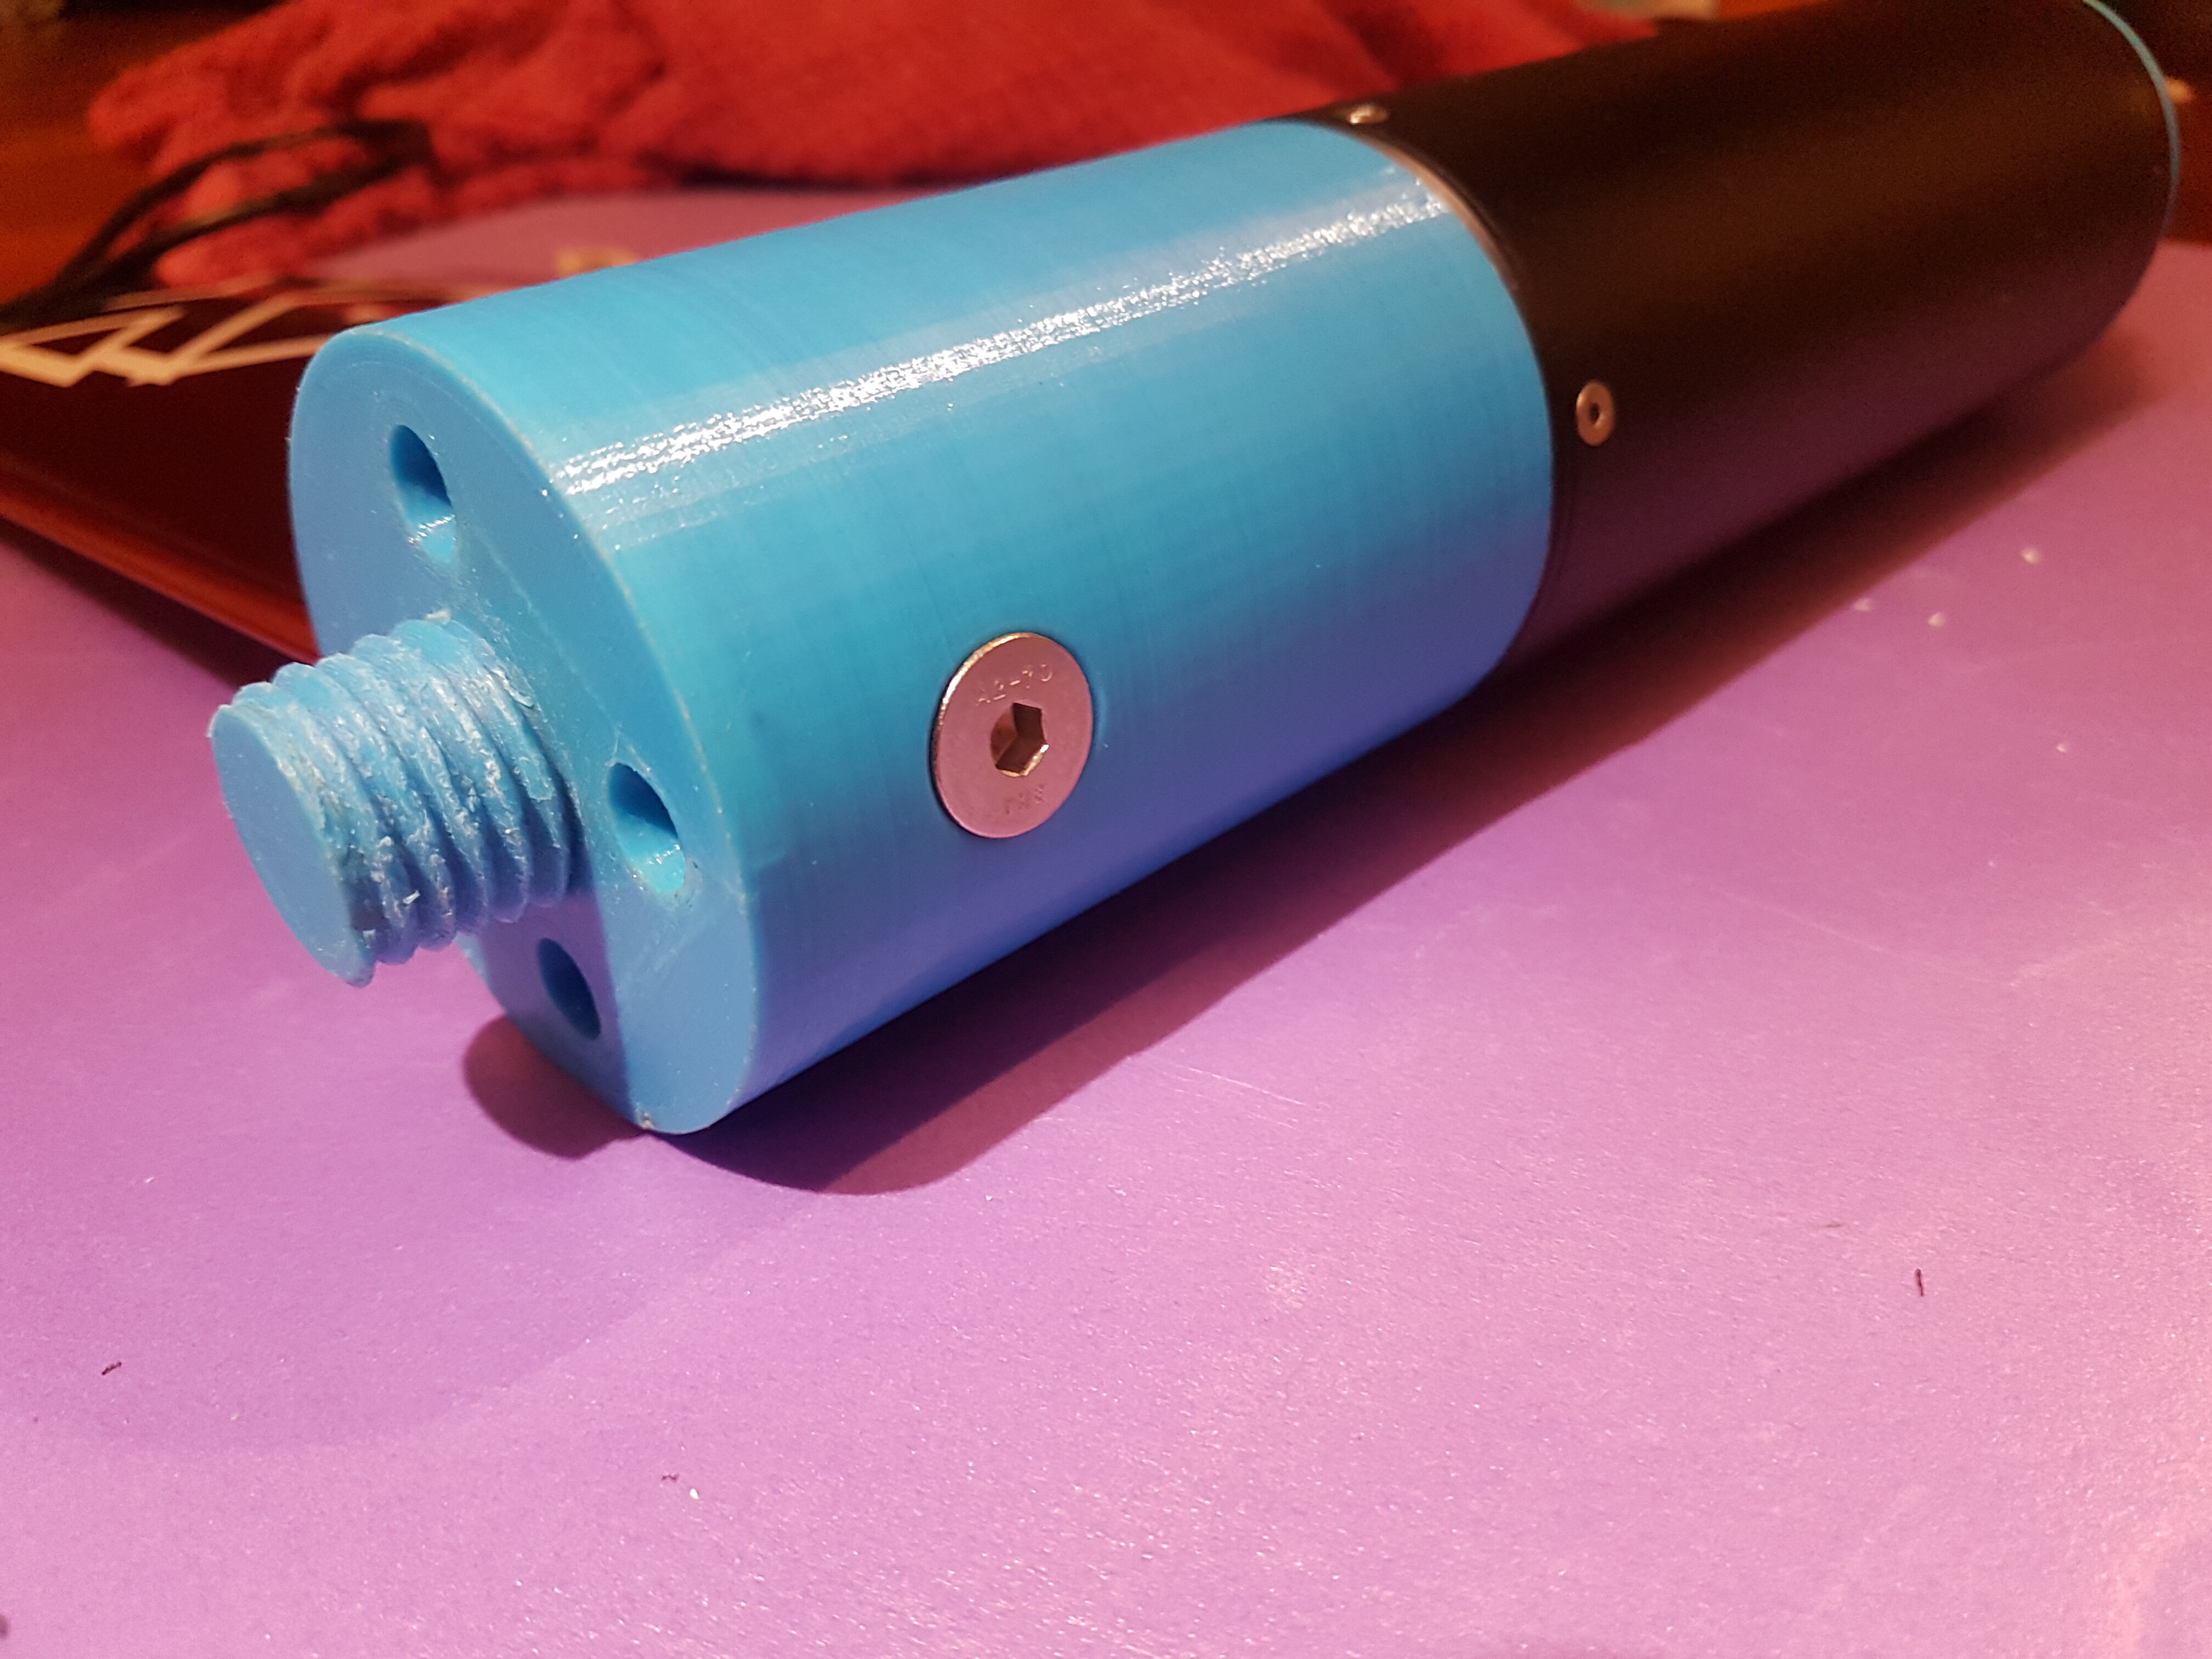
I designed a 3d printed motor mount which doesn’t required the 3d printed part to be under tension, and should hopefully be durable. An aluminium 2020 extrusion bracket holds the motor vertically to the mast, and then the 3d printed mount is controlling rotation downwards against the front mast bolt. It has a screw on nose-cone, which covers up the bolt holes for motor mounting, for smoother hydrodynamics.

The 10’ tow rope attaches to a 25mm alu square tube, providing a solid tow point attached directly to the top mast bolts, it’s very rigid.

I would recommend using a large adult (42-44") boogie board. This one is a youth size 39", and I added some closed cell foam to the front to help keep the nose up at speed (ala Naiad). I install a piece of acrylic (150mm x 150mm) for the trim tab, with an angle adjustable mount, so I can tune how much trim it needs to prevent torque twist on startup. When you’re up to speed, the high angle of your tow rope causes it to run very flat. A speed adjustable trim tab might be a good upgrade in the future.

I’m using axis 1010 foil which is an efficient wing and pumps great. The manta prop works well.
Run time is more than 1 hour of continuous foiling. I’m using 16-18A from the battery when I’m cruising at low speed.

Loving this thing. Way more sustainable than a power boat. Perfect for glassy flat days when I can’t kite foil. Whipping into unbroken swell is primo.

17 Likes

That’s a perfect setup. Well done!

Amazing idea.
Can you show the setup inside your waterproof case? And also how do you steer the bodyboard from the tow cable?
Thanks.

Here’s a pic inside the pelican case, the watertight aluminium lid for the VESC enclosure is sitting nearby in the top of the pic. I’ve added some chunks of rigid foam (polystyrene works fine) to keep the battery from moving when it gets flipped upside down, not shown in the pic.


The steering is by pivoting the boogie according to the direction you’re pulling the tow line, it takes a couple of sessions to really get the hang of it. Carve the board left with a bit of tension on the tow line, easing the throttle, and you pull the rear of the boogie towards you, then apply throttle and motor off to the right. You can sweep around the boogie with full throttle and get really pulled into the turn, or pump around the board and take off again with the motor when you’re done.

I’m pleased with the efficiency, I used 61Wh/km for a 13.8km session. The Axis 1010 is able to foil at speeds of around 12.5km/hr, and is an efficient/slippery wing.

3 Likes

Thanks for the picture and steering explanations. I was not thinking the battery would fit onside your case. I guess is much deeper than mine… for sure i will check that pelican case model.

NickO - Here’s the trim tab angle that’s working for me at the moment. I made an adjustable angle mount, with a 150x150mm piece of thin acrylic.


It makes a lot of lift when you push it over 30 km/hr, causing speed wobbles, but it’s working well to control torque twist on startup and at my normal mid range speeds.

I’m about 75kg using a 5’ 40L board, and as soon as I’m standing/crouching I pump the board up onto the foil. This seems to require about 1600w initially to get foiling, if you’re heavier or not pumping then it’s going to be more difficult with more torque twist.

I’m not sure whether towing a second person up onto the foil is possible, as I don’t I’ll be able to put down enough power from stationary without lifting the nose or twisting too much. Will have to try it soon.

The electrics, motor mount and prop are working very well. The board layout/design needs some work for bigger conditions.

It’s a fun setup for flat water and glassy long period small swell. For rough/choppy conditions, it jumps and slaps a lot due to the flat board, and it has a habit of burying the nose. I might go with a custom epoxy foam core hull design next.

Looks good! I’m definitely switching to a Maker-x controller. The flipsky one needs fixing/replacing as it starts cogging under load (resistor issue).

Hello Jatem,
I am attempting to put together a tow boogie with no experience. I’ve been following Valhalla’s build and I noticed your use of a thermal pad under your VESC as opposed to thermal paste. Are there advantages with this method over thermal paste?
Cheers and thanks for the help!

The adhesive thermal pad was a convenient way to secure the vesc to the alu enclosure, rather than creating some custom clamps/brackets with thermal paste. Either should work.

Vesc temperatures are good with passive cooling when I’m towing myself on foil at 700-800w. When I’m towing a 30kg kid on a big surfboard behind me, I’m using a continuous 1200-1500W and the vesc gets hotter. I’ll run the vesc app and do some more temp testing one day soon, when we have warmer weather. I might try adding some silicon oil to the vesc enclosure later, to see if it helps with cooling. I’m not wanting to add water cooling as the reliability will be an issue.
Good waterproofing is vital for reliability on the boogie.

1 Like

It’s interesting how much efficiency you can get from improved foils (high aspect). I picked up an Axis ART 999 wing and HA 400 tail, still on the alloy 19mm mast. I was amazed to see that my trip distance was a smidge under 18km today (a full 4km more than my usual distance of 14km with the 1010 wing). The swell was phenomenal and it was glassy as, and the battery usage worked out at only 50wh/km with plenty of water starts. That’s 10wh/km better than my usual battery usage on the axis 1010. Pretty efficient for a boogie board towing me along.

The art 999 is much harder to waterstart with the tow boogie, because it needs a few km/hr more speed and a gentler pump. With the 1010, as soon as I pop up into the board I can give it two good pumps and I’m foiling. I like to use as little power as possible to start, so I can get more waves. With the 999 I have to give it a bunch of little tap style pumps and gain more speed to get it flying. This is on my 5’ prone board (35-40L), which is a challenge for other people that have tried the boogie. The 1010 is the sweet spot for ease of use on boogie, it can cruise so slowly. The 999 is much more technical to start, but what a fantastic glide in swell, and an impressive reduction in power use. Minimum cruise speed has gone up to about 16-17km/hr - as slow as is practical to keep foiling and maximize run time. I’m very pleased with 18km from a 1.2kwh battery pack.

The two parts of my build I’m least happy with are the bouyancy I’ve added to the bow, to stop it burying the nose in wave troughs, and the maytech remote (which has terrible waterproofing). I added foam and a pool noodle to the front, which works great but it’s hard to keep it stuck to the Boogie board (polyethylene). The boogie board needs good contact adhesive, and the pool noodle needs good hot glue (from a powerful big DeWalt glue gun). I have some black closed cell foam between the pool noodle and the board, and the closed cell foam sticks to both types of glue. The boogie gets slammed when there’s a lot of wind chop, and jumping off waves, and the front partially detaches. It really needs a proper carbon hull with a v nose for the harsh conditions in using it in sometimes (but it also needs a padded nose to keep it safe).

What really helps with the digging nose is actually an old boogie board with a rocker line. A V nose would be nice but a V hull would increase the speed necessary to plane. I think a trident nose but a flat tail section would be best.

I only take it out on flat days with minimal swell anyway.

A bigger and rockered boogie would have been better, this is just a kids one I had lying around.
I only use the boogie for towing into swell, and it gets a hard time. I’ve done about 500km on it now, it’s been the perfect substitute for kite foiling in winter.

2 Likes

@Jatem
We are about to stat building a tow board.

Some questions.
(1) It looks like your “trim tab” is also attached to the towing boom. Is this, so when you are up on the board and foiling the trim tab gets lifted out of the water? (towing boom will have another angle and pull the trim tab upwards)

(2) We are thinking of using the front part of an old surfboard (softop surfboard), however we have here an old 42" boogie board too for use.
It looks like the surfboard (after cutting it) has more rocker than the 42" boogie board.
What do you think would be better to use? The surf or boogie board?

(3) Where is the CG of the board? Is it just past 1/2 way the back of the board?

I’ve uploaded my motor mount for Axis 19mm mast:

I’m using a 1" alu box section tube for the main tow connection, bolted straight onto the top of the mast for strength. I have a separate (parallel) box tube which holds my trim tab. This could be tidied up if you designed a bracket to hold the trim tab out sideways from the main tow connection point. I don’t like the drag of the trim tab at higher speeds, but it does the job. The wider and bigger the trim tab, it’s likely you’ll get better control of torque twist - which can be very significant when you crank the throttle to get up on foil (particularly for people’s first time on tow boogie). A wider boogie board is probably better than a surfboard, so that it helps prevent the boogie flipping sideways from the torque. The CG on my board is a bit far forward due to being a kids boogie, you’ll want it somewhere in the centre. I have the mast mounted so that my propellor is 13cm from the back of my board, and it works fine there.

2 Likes

@Jatem I’m working on a build which is a combo of yours and Valhalla’s. One thing that I am wondering: how well is the 3D printed Axis mast mount holding up? Wondering about using that versus the standard Axis mast plate like Valhalla. Can you post pics of the top of your tow boogie build (if not a hassle/ when you get a chance)? I’m interested to see how the 3D printed mast plate looks when looking at the top of the board and if there’s anything you put over top of it, e.g. mounting board for tow rope and you need to drill holes in the board for access to the mast bolts that go through the board and allows you to unscrew the bolts to the mast. Many thanks for uploading your 3D files on Thingiverse. I am working with someone on printing the motor mounts while I wait for delivery of the various parts I ordered (e.g. motor, VESC, batteries).

The top mast mount is working well. There isn’t the sideways load on the mast plate like when on a foilboard. I cut the curved shape of the mast mount out of the top of the boogie board, so it sits flush with the top, and then covered it with a plate of Aluminium composite panel (ACM) about 400x200mm. The tow point is a 25*25mm alu box tube, which has m8 bolts securing it to the mast with the ACM panel sandwiched on top of the printed mast plate.

I have done 700+ km on the tow, always hunting swell, and my motor clamp and top mast mount have been solid.

Securing the battery box was an early issue, and i printed some plates for under the board so that I could secure the pelican with 2mm dynema.

1 Like

Thanks for the info! If you were to do another build would you go with the same Maker-X VESC? I only see the Hi200 not 300 on their site. Did you cover it with Corrosion X or are you still going without it?
I ordered the 65161+VESC+VX3 Flipsky package but thinking about canceling that order given all of the negative reviews about the VESC. Sounds like Maker-X is a good way to go with the Flipsky 65161 motor. Trampa sounds good too but much more expensive.

The maker x vesc has been very reliable. I lowered the temp limit in vesc tool when i set it up, and it will reduce max power a bit after it warms up from 30+ mins hard use, but it still has enough grunt for towing me. I haven’t needed to add oil or corrosion x. I’m cautious that corrosion x might cause some damage to the silicon pads.

Next time, I’d get a thinner and higher heat conduction rating thermal pad, between the vesc and alu enclosure, as the one i used from jaycar is a bit thick and not rating all that highly, but it works ok.

I would consider 13s7p on the battery for a bit more runtime, but my pumping is getting better so maybe that doesn’t matter. A bigger battery would bring extra weight and would be a hassle for carrying, the current weight of 15kg is fine to carry to the water . If I had used lipos, it might have been puffy and starting to die after the 60-70 cycles I’ve done already. The molicel p42a cells are still going strong.

The waterproofing has been reliable, the pelican 1450 is high quality and totally dry.

I like being able to see the battery charge state over BT to the bms.

I would use a bigger boogie board, with the weight centred. Diving the nose was an issue in rough seas, until i added a pool noodle around the nose similar to a Naiad, but the noodle is hard to keep on. A custom shaped hull would be nice.

10 ft tow rope is fine, nimble for tight turns. Longer would be more mellow if you’re cruising.

The maytech esk8 remote is unreliable for waterproofing, and i keep it in a watertight piece of kite bladder. I would try the eray foil remote next time. I’m actually about to design a housing for a cheap $30 remote, to suit my foil assist, which would probably work for the tow boogie. The only thing useful on the expensive maytech is the battery level display, although 5 bars is very crude. I would consider adding a voltage display to the back of the tow boogie, so I could see it accurately. Another option I considered was an adjustable voltage alarm to buzz when I need to head in. I travel a long way to waves on the boogie, and watching the battery remaining is very important, a big bright and accurate voltage display would be ideal.

I like the torque of the big inrunner and manta prop, but I am unsure how long the seals and bearings will actually last. I would test an outrunner like the 63100 or similar if I could get a similar efficiency and torque, but there isn’t a ready made propellor that is tested to be as good. The outrunner would be more maintenance, but easier to work on, and 2kg lighter. Maybe I’ll try making an adaptor to fit the 63100 to the manta prop.

2 Likes

Flat water or clean unbroken swell are where the tow boogie shines.

It has a rough time in choppy water, when you are driving against the chop. Because it’s a very small planing vessel, it jumps and bangs, which is very rough on it. Wind will push the nose sideways. Going against chop slows your progress a lot, and the prop will cavitate when it is banging up and down, which makes it hard work to keep foiling. The TB is suited to low wind (less than 8 knots) conditions, when it isn’t messy and choppy.

The extra object with a propellor and a remote, combined with your foilboard, makes whitewater a bad time, and I always stay out behind the whitewater. At my local, I head out to the break via an estuary channel, so I don’t have to push through whitewater. It is a priority to keep the TB out of the whitewater, and stay beyond the impact zone, as it is a handful to recover it and also handle your foilboard when the TB is upside down and getting pushed in by whitewater.

2 Likes

I wonder if offsetting the motor to one side of the boogie would reduce torque twist.

Thanks for posting details. I like your build, seems solid. I was thinking of getting the flipsky kit, but maybe I’ll try yours instead :+1:t4: